- C语言:第11天笔记
Star在努力
c语言笔记开发语言
C语言:第11天笔记内容提要函数函数的概述函数的分类函数的定义形参和实参函数的返回值函数的调用函数的声明函数函数的概述**函数:**实现一定功能的,独立的代码模块,对于函数的使用,一定是先定义,后使用。使用函数的优势:①我们可以通过函数提供功能给别人使用。当然我们也可以使用别人提供的函数,减少代码量。②借助函数可以减少重复性的代码。③实现结构化(模块化:C语言中的模块化其实就是多文件+函数)程序设
- 京东返利软件排行榜前十名,10款最热门的京东返利APP排行榜
古楼
在网购盛行的时代,优惠券和返利成为了吸引用户的重要手段。为了让广大消费者更好地享受到购物返利的好处,本文为您推荐了2024年十大热门的京东返利APP,帮助您在享受优惠的同时,还能获得额外返利。月入十万必看!都在挣钱!推荐几个月入几千到几万的靠谱副业项目!(公众号:善士思维笔记)【高省】APP(高佣金领导者)是一个自用省钱佣金高,分享推广赚钱多的平台,2000万用户信赖的四年老平台,稳定可靠。高省A
- 2023年2月3日 五福觉察日记
琨姐坤学院智慧家庭陪伴老师
坤学院会长天性识别五福觉察日记姓名:李琨所在团队:4团颜色偏好:绿色1.我今天颜色偏好上发掘自己的优势故事(五大模式)思维模式:春文问我这次不是团长了,什么心情,什么感受,会不舒服吗?我想了想说,没有,内心很平静,因为通过前三次带团,自己已经获得非常大的成长和提升,也更加清晰这一次训练目标是静下心来,用心训练一对一陪伴儿赋能对话,支持团队长和所有小伙伴拿到想要的目标。知止而后能定,定而后能静,思维
- ANSYS 2025 R1软件下载及安装教程|附安装文件
仰望天空—永强
嵌入式硬件硬件工程智能硬件硬件架构数学建模
软件名称:ANSYS2.软件版本:2025R13.软件大小:52.2GB4.安装环境:win10/win11(64位)下载通道:夸克网盘链接:https://pan.quark.cn/s/ce34e3269bd4更多免费软件,游戏等点这里软件介绍ANSYS是一款由ANSYS,Inc.开发的工程仿真软件,广泛应用于结构、流体、电磁、热分析和多物理场耦合等领域。它支持有限元分析(FEA)、计算流体力学
- 每天学点非暴力沟通案例分享(1)
立郑言
最近在学非暴力沟通,也深深体会到“非暴力沟通”的妙处。什么是“非暴力沟通”?非暴力沟通是美国著名的马歇尔卢森堡博士在他的著作《非暴力沟通》提出的一个全新的观点。它用一种神奇而平和的沟通方式,教会人们更好地表达自己的真实想法,懂得考虑对方的感受,并准确地表达自己的需求,最终实现愉快地沟通。非暴力沟通指导我们转变谈话和聆听的方式。我们不再条件反射式地反应,而是去明了自己的观察、感受和愿望,有意识地使用
- JUC——创建线程的方法
机器滴小白
JAVA学习笔记java开发语言JUC并发编程
1.继承Thread类原理:通过继承Thread类并重写其run()方法,定义线程的执行逻辑。(Thread类实现了Runnable接口)调用start()方法启动线程(JVM会自动调用run())。特点简单直接,适合快速实现线程逻辑。局限性:Java是单继承的,继承Thread后无法再继承其他类。//1.继承Thread类classMyThreadextendsThread{@Overridep
- 【免费下载】 LabVIEW 2019 百度网盘安装教程
LabVIEW2019百度网盘安装教程【下载地址】LabVIEW2019百度网盘安装教程分享LabVIEW2019百度网盘安装教程本资源文件提供了LabVIEW2019的百度网盘安装教程,帮助用户轻松完成LabVIEW2019的安装过程项目地址:https://gitcode.com/Resource-Bundle-Collection/3164d本资源文件提供了LabVIEW2019的百度网盘安
- 与君共享
马明洋河南信阳
#与班共享[玫瑰]昨天期中复习检测已结束[玫瑰]本次试卷有点难——第一题的最后一题和试卷的最后一道解决问题,共计7分,其他题均为常规题。[玫瑰]90分以上的18人,85分以上的34人。但,60分以下的有5人,还有一位同学不交试卷。[玫瑰]从成绩上看,一年级已经出现“二级”分化,主要原因是识字量的差距——以张语蔓、邢硕城全张测试卷仅有2个字不认识;简双佑、简子茜、马梓怡全张试卷仅有3个字不太认识,而
- 小红书优惠券领取在哪里?领取方法详细介绍!
爱生活爱氧券
小红书优惠券领取在哪里?领取方法详细介绍!作为一名热衷于社交电商平台的小红书用户,你是否想知道如何领取优惠券?本文将为你详细介绍小红书优惠券的领取方法,让你轻松获取优惠,畅享购物乐趣!一、小红书优惠券领取入口1.小红书App首页:打开小红书App,你可以看到首页上有品牌活动、限时特惠等板块,参与这些活动就有机会领取优惠券。2.关注达人:关注小红书上的时尚美妆博主,他们经常会分享购物经验和优惠券信息
- 每日一题7.22
P10450[USACO03MAR]BestCowFencesG-洛谷题目描述原题来自:USACO2003Mar.Green给定一个长度为n的非负整数序列A,求一个平均数最大的,长度不小于L的子段。输入格式第一行用空格分隔的两个整数n和L;第二行为n个用空格隔开的非负整数,表示Ai。输出格式输出一个整数,表示这个平均数的1000倍。不用四舍五入,直接输出。输入输出样例输入#1复制106642103
- 摄影|松果之色
阿风的诗0109
今天又有一件挺好玩的事情——捡松果!松果四月天,熟透了的松果,便随风吹落。散落在松软的松针下,静静躺着,直到被有心人拾起。松果之俯拍我们一行人为了拾松果,手上拿着菜篮子,拿着大口袋,从小路上山去。四月的季节,到处都是绿油油的,心情都舒畅极了,在松林中穿梭和寻找着。每个人都在不同的方向低头搜索着,看到自己钟意的松果都惊喜万分,直呼这边的好大个啊!平拍松果仔细看着这个小玩意儿,真是特别极了,松果果瓣有
- 每日一题7.19
渣呵
每日一题算法
P10449费解的开关-洛谷题目描述你玩过“拉灯”游戏吗?25盏灯排成一个5×5的方形。每一个灯都有一个开关,游戏者可以改变它的状态。每一步,游戏者可以改变某一个灯的状态。游戏者改变一个灯的状态会产生连锁反应:和这个灯上下左右相邻的灯也要相应地改变其状态。我们用数字1表示一盏开着的灯,用数字0表示关着的灯。下面这种状态1011101101101111000011011在改变了最左上角的灯的状态后将
- 第二期《论语》学习打卡17
暖暖1314
2022年5月17日心得体会:1)最寒冷的时候,才知道松柏是最后才凋谢的。路遥知马力,日久见人心。唯有经历磨难,才能看到坚毅之力是如何的强大,相伴之人是如何地用心竭力。2)追求的至高境界是:做有智慧的人而不受惑于外物,做仁慈的人而不忧愁,做有勇气的人而不畏惧。智慧、仁义、勇气,值得毕生去探索和追寻。3)求学的四个阶段是:入门学习;立志于求道;守道义,以道立世、立身;能守道亦能懂得通达权变却又不逾矩
- 践行宗旨 为民造福
Mmenge
民生无小事,枝叶总关情。关注民生、重视民生、保障民生、改善民生,是党和政府一切工作的出发点和落脚点,更是我们党全心全意为人民服务根本宗旨的必然要求。自成立以来,我们党情系群众,与人民同呼吸、共命运、心连心,始终把群众的安危冷暖放在心上。党章明确规定,“党的干部是党的事业的骨干,是人民的公仆”“必须坚持党和人民的利益高于一切”。一百多年来,一代代中国共产党人正是做到了“把人民放在心中最高位置”,为人
- 这片真毒,单身狗看完已经哭晕在厕所
麻婆电影
夏天是个恋爱的好时节。今天麻婆给你们推荐一部爱情片——《最终幻想女孩》勝手にふるえてろ影片根据作家绵矢莉莎的小说改编。江藤良香,是个没有任何恋爱经验,目前还单身的会计。喜欢灭绝动物,喜欢刷维基百科,经常不小心就刷一夜,自己给自己寄快递是一个大大的蜗牛壳。她的生活里有两个男人。一个是她暗恋了10年的小一,另一个是对她百依百顺的小二。她心里喜欢的是小一,得到的是小二的心意。和小一的故事都发生在梦中的记
- 原来80%以上公司的股权设计都存在弊端,答案在这里!
自运行机制
股权激励,作为一种长效激励机制,被一些学者誉为“金手铐”并受到青睐和追捧。然而,国内企业所实行的股权激励,大多存在着种种缺陷,信手拈来,比比皆是。目前常见的股权激励的各种弊端首先,股权激励一般只覆盖到企业高管和少数技术骨干,可一个企业效益的提升,并不仅仅是极少数高管的事情,而是包括管理层、中低层管理者和一线员工的共同努力。厚此薄彼,难免打击积极性。其次,企业高管持股后,工作动力反而下降。因为对于这
- 正式开始!今年全国医保基金飞检启动,关注2个重点
evist
根据《2023年医疗保障基金飞行检查工作方案》(以下简称《方案》),国家医保局会同有关部门将于8月至12月对全国31个省(自治区、直辖市)和新疆生产建设兵团全覆盖飞检。目前已时至8月,医保全国飞检马上拉开帷幕,2个重点值得关注。倒查两年,检查内容更广泛《方案》明确,本次飞检将于8月至12月开展,涉及全国31个省(自治区、直辖市)和新疆生产建设兵团,采取“省份交叉互检”模式,通过抽签方式确定参检和被
- 有声读书主播是怎么赚钱的?有声读书主播的赚钱之道
高省APP大九
随着有声书市场的蓬勃发展,有声读书主播这一职业逐渐走进大众的视野,成为许多人实现灵活就业和增收的新途径。那么,有声读书主播是如何赚钱的呢?本文将详细探讨这一问题。【高省】APP(高佣金领导者)是一个自用省钱佣金高,分享推广赚钱多的平台,2000万用户信赖的四年老平台,稳定可靠。高省APP佣金更高,模式更好,终端用户不流失。高省是公认的返利最高的软件。蓓蓓导师高省邀请码110000,注册送2皇冠会员
- 《情商3-情商比技能更重要》2021-08-03
对牛弹什么琴
如何进行自我管理,怎样为人处世。人如果善于控制情绪和抑制冲动,善于激励自己努力,运用同理心,善于社交,情商会随之提升。个人特质:主动精神、同理心、适应能力、说服力情商不是温和儒雅,有时候需要直言不讳,情商不是放纵个性,而是管理情绪。有些人有同理心,但是不善于排解负面情绪。善于察言观色,但是不善于人际交往(感觉说的就是我啊)管理自己的情绪,克服困难,团队合作与领导能力,组建团队与应变能力,革新能力与
- 【SpringMVC】MyBatis多表操作与注解开发
abboo
一、多表操作1.一对一查询想象一下你在淘宝,在购买东西后会有个订单支付的页面,下单后用户和订单就关联起来了,同时订单有一个唯一的编号叫订单号。用户表和订单表的关系为,一个用户有多个订单,一个订单只从属于一个用户一对一查询的需求:查询一个订单,与此同时查询出该订单所属的用户即order对user是一对一的,反过来,user对order是一对多的1.1建一张order表DROPTABLEIFEXIST
- 三个人的婚姻我选择退出(江秋瑜vs林诀vs许念念)短篇言情小说&全集免费阅读
桃子爱阅读
三个人的婚姻我选择退出(江秋瑜vs林诀vs许念念)短篇言情小说&全集免费阅读主角:江秋瑜vs林诀vs许念念简介:我的三十岁生日宴上,老公林诀和女兄弟深情拥吻。我冷眼旁观,林诀当着所有人的面训斥我。“兄弟间的玩闹罢了,你是什么封建残留吗?我和念念要有事早有了,哪轮得到你!”----阅读全文小说内容请翻阅文章最底部---第一章我的三十岁生日宴上,老公林诀和女兄弟深情拥吻。我冷眼旁观,林诀当着所有人的面
- 睿是信息携手Arctera,深化服务中国市场,共筑数据管理新未来
科技云报道
安全架构
睿是信息携手Arctera,深化服务中国市场,共筑数据管理新未来2025年6月23日,为了更加深入服务中国大陆地区的广大用户,上海睿是信息科技有限公司(以下简称“睿是信息”)与全球数据管理领域的领导者Arctera,双方正式达成战略合作,自2025年7月7日起,睿是信息正式成为Arctera中国区独家总代理,全面负责Arctera在中国地区的运营、销售和技术支持服务。此次合作标志着双方将携手深化服
- 【重磅】瑞数信息蝉联IDC中国AI赋能私有云WAF市场份额Top2!
科技云报道
人工智能
近日,国际数据公司IDC正式发布《IDC中国AI赋能的Web应用防火墙硬件市场份额,2024:合规需求带动市场反弹,LLM-WAF成为未来市场新增量》和《IDC中国AI赋能的云Web应用防火墙市场份额,2024:大模型全行业渗透,LLM-WAF带来市场新增量》系列报告。报告针对2024年中国Web应用防火墙市场的规模、增长速度、主要玩家、市场与技术的发展趋势等内容进行了详细研究。报告显示,2024
- 618风控战升级,瑞数信息“动态安全+AI”利剑出鞘
科技云报道
安全人工智能
每年的618电商促销季,都是各大电商平台和商家的兵家必争之地。数以亿计的消费者涌入线上平台,期待已久的优惠券、秒杀商品如潮水般涌现,海量交易在瞬间达成,无疑是一场商业狂欢。然而,在这场狂欢背后,自动化程序以毫秒级速度疯狂扫货囤积优惠券;AI驱动的拟人化攻击绕过传统规则引擎,以每秒数十万次的恶意请求冲击服务器;恶意API调用窥探用户数据,欺诈交易如影随形,这些隐形威胁正蚕食着电商生态的安全根基。面对
- 《社会理论和社会结构》笔记2之孔德“大脑卫生原则” 2022-05-14
定投的奇迹
看到社会学家孔德的‘’大脑卫生原则”读出了自我。面对很多读书建议:拿到一本书,要看前言、目录、前序、后序、他人评价,我一直很排斥,奉行自己的读书原则:读书直奔正文。因为我不要别人以为是如何,我不要别人怎么说,我要的是我自己看完原文之后,我自己怎么想。然后再看前言、目录、前序、后序、他人评价,通过比较,看到我的视野的狭窄,我的看问题的不深刻,从而获得成长。虽然一直这样做,但没有看到所谓大咖这方面的观
- linux内核驱动第一课(基于RK3568)
学习Linux驱动需要以下基础知识:C语言编程:掌握C语言是开发Linux驱动程序的基本要求。操作系统原理:了解操作系统的基本概念和原理,如进程管理、内存管理、中断处理等。Linux内核:熟悉Linux内核的结构和工作机制,了解内核模块的编写和加载方法。硬件知识:了解目标硬件平台的基本结构和工作原理。(学习过stm32更佳)学习路径1、搭建环境(交叉编译,VIM,tftp,nfs,下载工具)2、驱
- java 结合 FreeMarker 和 Docx4j 来生成包含图片的 docx 文件
liangblog
Java生产环境全栈开发Java进阶javapython开发语言
使用FreeMarker生成HTML,然后通过Docx4j将HTML转换为.docx文件;步骤1.添加依赖确保你的项目中包含了FreeMarker和Docx4j的依赖。以下是Maven的pom.xml示例:
- D201博远班小作家读写成长营:《钓鱼趣事》
花小径
每个人都有一个五彩缤纷的童年,记忆里有趣的事情一定数不胜数。不过,那次钓鱼在我心中依旧记忆犹新,现在我就和大家分享一下吧。那是一个阳光明媚的周末,完成作业后,在我的苦苦哀求下,爸爸终于答应带我去钓鱼。准备好渔具、鱼饵,我们开心地出发了。一条清澈见底的小河,四周青山环绕,河岸有一片绿油油的草地,草地上还点缀着五颜六色的野花,这景色实在太美丽了,我和爸爸情不自禁地在草地上滚来滚去。开始准备钓鱼了,因为
- 看抖音停不下来怎么办......
读书千本
今天翻看手机的app使用时间统计,发现用在微信上的时间是以前的好几倍。而时间之所以翻了好几倍是因为最近喜欢刷视频号。没想到卸载了抖音,又掉入了微信视频号的陷阱,还真是逃都逃不掉……刷短视频太容易上瘾了。每个短视频都只有短短几十秒或几分钟,然后一个接一个的让人应接不暇,根本不给大脑停下来思考的时间。整个过程大脑都被本能和情绪劫持,理智脑根本没有启动的机会,然后不知不觉几个小时就过去了......喜欢
- 成功的标志,不是看一个人所在的高度,而是看他跌到谷底的反弹力
楚梦雨晨
这几年不管是自己,还是看到身边的人,或是看到几个创业有着一定影响力的人倒下,让我感触太多和太深。人生真的是巅峰时给你享尽人间繁华与嚣张,意气风发;失意时,给你卑微到尘埃,受尽人间的冷暖,想死的心都有。也许这就是人性吧,巅峰时,高朋满座;失意时,门前无人问津。可巴顿将军在很久之前说过:“衡量一个人成功的标志,不是看他登到顶峰的高度,而是看他跌到谷底的反弹力。”其实,没有哪个人的人生是一帆风顺的,越是
- 继之前的线程循环加到窗口中运行
3213213333332132
javathreadJFrameJPanel
之前写了有关java线程的循环执行和结束,因为想制作成exe文件,想把执行的效果加到窗口上,所以就结合了JFrame和JPanel写了这个程序,这里直接贴出代码,在窗口上运行的效果下面有附图。
package thread;
import java.awt.Graphics;
import java.text.SimpleDateFormat;
import java.util
- linux 常用命令
BlueSkator
linux命令
1.grep
相信这个命令可以说是大家最常用的命令之一了。尤其是查询生产环境的日志,这个命令绝对是必不可少的。
但之前总是习惯于使用 (grep -n 关键字 文件名 )查出关键字以及该关键字所在的行数,然后再用 (sed -n '100,200p' 文件名),去查出该关键字之后的日志内容。
但其实还有更简便的办法,就是用(grep -B n、-A n、-C n 关键
- php heredoc原文档和nowdoc语法
dcj3sjt126com
PHPheredocnowdoc
<!doctype html>
<html lang="en">
<head>
<meta charset="utf-8">
<title>Current To-Do List</title>
</head>
<body>
<?
- overflow的属性
周华华
JavaScript
<!DOCTYPE html PUBLIC "-//W3C//DTD XHTML 1.0 Transitional//EN" "http://www.w3.org/TR/xhtml1/DTD/xhtml1-transitional.dtd">
<html xmlns="http://www.w3.org/1999/xhtml&q
- 《我所了解的Java》——总体目录
g21121
java
准备用一年左右时间写一个系列的文章《我所了解的Java》,目录及内容会不断完善及调整。
在编写相关内容时难免出现笔误、代码无法执行、名词理解错误等,请大家及时指出,我会第一时间更正。
&n
- [简单]docx4j常用方法小结
53873039oycg
docx
本代码基于docx4j-3.2.0,在office word 2007上测试通过。代码如下:
import java.io.File;
import java.io.FileInputStream;
import ja
- Spring配置学习
云端月影
spring配置
首先来看一个标准的Spring配置文件 applicationContext.xml
<?xml version="1.0" encoding="UTF-8"?>
<beans xmlns="http://www.springframework.org/schema/beans"
xmlns:xsi=&q
- Java新手入门的30个基本概念三
aijuans
java新手java 入门
17.Java中的每一个类都是从Object类扩展而来的。 18.object类中的equal和toString方法。 equal用于测试一个对象是否同另一个对象相等。 toString返回一个代表该对象的字符串,几乎每一个类都会重载该方法,以便返回当前状态的正确表示.(toString 方法是一个很重要的方法) 19.通用编程:任何类类型的所有值都可以同object类性的变量来代替。
- 《2008 IBM Rational 软件开发高峰论坛会议》小记
antonyup_2006
软件测试敏捷开发项目管理IBM活动
我一直想写些总结,用于交流和备忘,然都没提笔,今以一篇参加活动的感受小记开个头,呵呵!
其实参加《2008 IBM Rational 软件开发高峰论坛会议》是9月4号,那天刚好调休.但接着项目颇为忙,所以今天在中秋佳节的假期里整理了下.
参加这次活动是一个朋友给的一个邀请书,才知道有这样的一个活动,虽然现在项目暂时没用到IBM的解决方案,但觉的参与这样一个活动可以拓宽下视野和相关知识.
- PL/SQL的过程编程,异常,声明变量,PL/SQL块
百合不是茶
PL/SQL的过程编程异常PL/SQL块声明变量
PL/SQL;
过程;
符号;
变量;
PL/SQL块;
输出;
异常;
PL/SQL 是过程语言(Procedural Language)与结构化查询语言(SQL)结合而成的编程语言PL/SQL 是对 SQL 的扩展,sql的执行时每次都要写操作
- Mockito(三)--完整功能介绍
bijian1013
持续集成mockito单元测试
mockito官网:http://code.google.com/p/mockito/,打开documentation可以看到官方最新的文档资料。
一.使用mockito验证行为
//首先要import Mockito
import static org.mockito.Mockito.*;
//mo
- 精通Oracle10编程SQL(8)使用复合数据类型
bijian1013
oracle数据库plsql
/*
*使用复合数据类型
*/
--PL/SQL记录
--定义PL/SQL记录
--自定义PL/SQL记录
DECLARE
TYPE emp_record_type IS RECORD(
name emp.ename%TYPE,
salary emp.sal%TYPE,
dno emp.deptno%TYPE
);
emp_
- 【Linux常用命令一】grep命令
bit1129
Linux常用命令
grep命令格式
grep [option] pattern [file-list]
grep命令用于在指定的文件(一个或者多个,file-list)中查找包含模式串(pattern)的行,[option]用于控制grep命令的查找方式。
pattern可以是普通字符串,也可以是正则表达式,当查找的字符串包含正则表达式字符或者特
- mybatis3入门学习笔记
白糖_
sqlibatisqqjdbc配置管理
MyBatis 的前身就是iBatis,是一个数据持久层(ORM)框架。 MyBatis 是支持普通 SQL 查询,存储过程和高级映射的优秀持久层框架。MyBatis对JDBC进行了一次很浅的封装。
以前也学过iBatis,因为MyBatis是iBatis的升级版本,最初以为改动应该不大,实际结果是MyBatis对配置文件进行了一些大的改动,使整个框架更加方便人性化。
- Linux 命令神器:lsof 入门
ronin47
lsof
lsof是系统管理/安全的尤伯工具。我大多数时候用它来从系统获得与网络连接相关的信息,但那只是这个强大而又鲜为人知的应用的第一步。将这个工具称之为lsof真实名副其实,因为它是指“列出打开文件(lists openfiles)”。而有一点要切记,在Unix中一切(包括网络套接口)都是文件。
有趣的是,lsof也是有着最多
- java实现两个大数相加,可能存在溢出。
bylijinnan
java实现
import java.math.BigInteger;
import java.util.regex.Matcher;
import java.util.regex.Pattern;
public class BigIntegerAddition {
/**
* 题目:java实现两个大数相加,可能存在溢出。
* 如123456789 + 987654321
- Kettle学习资料分享,附大神用Kettle的一套流程完成对整个数据库迁移方法
Kai_Ge
Kettle
Kettle学习资料分享
Kettle 3.2 使用说明书
目录
概述..........................................................................................................................................7
1.Kettle 资源库管
- [货币与金融]钢之炼金术士
comsci
金融
自古以来,都有一些人在从事炼金术的工作.........但是很少有成功的
那么随着人类在理论物理和工程物理上面取得的一些突破性进展......
炼金术这个古老
- Toast原来也可以多样化
dai_lm
androidtoast
Style 1: 默认
Toast def = Toast.makeText(this, "default", Toast.LENGTH_SHORT);
def.show();
Style 2: 顶部显示
Toast top = Toast.makeText(this, "top", Toast.LENGTH_SHORT);
t
- java数据计算的几种解决方法3
datamachine
javahadoopibatisr-languer
4、iBatis
简单敏捷因此强大的数据计算层。和Hibernate不同,它鼓励写SQL,所以学习成本最低。同时它用最小的代价实现了计算脚本和JAVA代码的解耦,只用20%的代价就实现了hibernate 80%的功能,没实现的20%是计算脚本和数据库的解耦。
复杂计算环境是它的弱项,比如:分布式计算、复杂计算、非数据
- 向网页中插入透明Flash的方法和技巧
dcj3sjt126com
htmlWebFlash
将
Flash 作品插入网页的时候,我们有时候会需要将它设为透明,有时候我们需要在Flash的背面插入一些漂亮的图片,搭配出漂亮的效果……下面我们介绍一些将Flash插入网页中的一些透明的设置技巧。
一、Swf透明、无坐标控制 首先教大家最简单的插入Flash的代码,透明,无坐标控制: 注意wmode="transparent"是控制Flash是否透明
- ios UICollectionView的使用
dcj3sjt126com
UICollectionView的使用有两种方法,一种是继承UICollectionViewController,这个Controller会自带一个UICollectionView;另外一种是作为一个视图放在普通的UIViewController里面。
个人更喜欢第二种。下面采用第二种方式简单介绍一下UICollectionView的使用。
1.UIViewController实现委托,代码如
- Eos平台java公共逻辑
蕃薯耀
Eos平台java公共逻辑Eos平台java公共逻辑
Eos平台java公共逻辑
>>>>>>>>>>>>>>>>>>>>>>>>>>>>>>>>>>>>>>>
蕃薯耀 2015年6月1日 17:20:4
- SpringMVC4零配置--Web上下文配置【MvcConfig】
hanqunfeng
springmvc4
与SpringSecurity的配置类似,spring同样为我们提供了一个实现类WebMvcConfigurationSupport和一个注解@EnableWebMvc以帮助我们减少bean的声明。
applicationContext-MvcConfig.xml
<!-- 启用注解,并定义组件查找规则 ,mvc层只负责扫描@Controller -->
<
- 解决ie和其他浏览器poi下载excel文件名乱码
jackyrong
Excel
使用poi,做传统的excel导出,然后想在浏览器中,让用户选择另存为,保存用户下载的xls文件,这个时候,可能的是在ie下出现乱码(ie,9,10,11),但在firefox,chrome下没乱码,
因此必须综合判断,编写一个工具类:
/**
*
* @Title: pro
- 挥洒泪水的青春
lampcy
编程生活程序员
2015年2月28日,我辞职了,离开了相处一年的触控,转过身--挥洒掉泪水,毅然来到了兄弟连,背负着许多的不解、质疑——”你一个零基础、脑子又不聪明的人,还敢跨行业,选择Unity3D?“,”真是不自量力••••••“,”真是初生牛犊不怕虎•••••“,••••••我只是淡淡一笑,拎着行李----坐上了通向挥洒泪水的青春之地——兄弟连!
这就是我青春的分割线,不后悔,只会去用泪水浇灌——已经来到
- 稳增长之中国股市两点意见-----严控做空,建立涨跌停版停牌重组机制
nannan408
对于股市,我们国家的监管还是有点拼的,但始终拼不过飞流直下的恐慌,为什么呢?
笔者首先支持股市的监管。对于股市越管越荡的现象,笔者认为首先是做空力量超过了股市自身的升力,并且对于跌停停牌重组的快速反应还没建立好,上市公司对于股价下跌没有很好的利好支撑。
我们来看美国和香港是怎么应对股灾的。美国是靠禁止重要股票做空,在
- 动态设置iframe高度(iframe高度自适应)
Rainbow702
JavaScriptiframecontentDocument高度自适应局部刷新
如果需要对画面中的部分区域作局部刷新,大家可能都会想到使用ajax。
但有些情况下,须使用在页面中嵌入一个iframe来作局部刷新。
对于使用iframe的情况,发现有一个问题,就是iframe中的页面的高度可能会很高,但是外面页面并不会被iframe内部页面给撑开,如下面的结构:
<div id="content">
<div id=&quo
- 用Rapael做图表
tntxia
rap
function drawReport(paper,attr,data){
var width = attr.width;
var height = attr.height;
var max = 0;
&nbs
- HTML5 bootstrap2网页兼容(支持IE10以下)
xiaoluode
html5bootstrap
<!DOCTYPE html>
<html>
<head lang="zh-CN">
<meta charset="UTF-8">
<meta http-equiv="X-UA-Compatible" content="IE=edge">
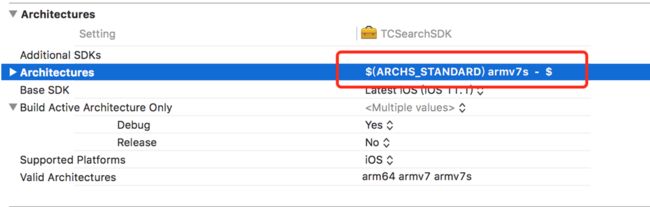


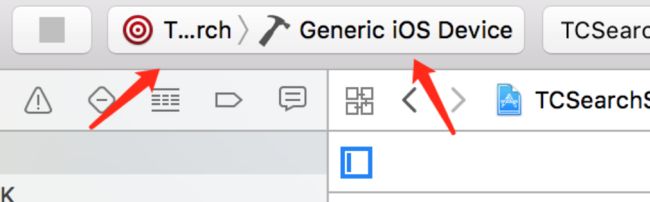

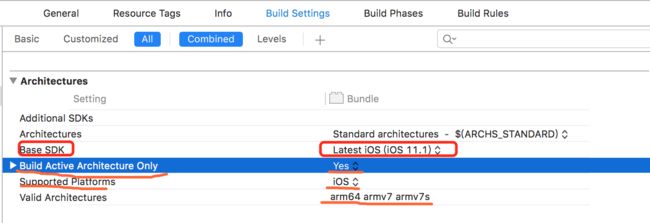
 image.png
2. 配置Bundle
image.png
2. 配置Bundle