一文搞懂 Java 线程
文章目录
- 什么是线程?
- 最简单的理解
- 线程的创建与运行
- Runnable接口的引入以及策略模式在Thread中的使用
- Runnable的职责
- Thread 与 Runnable 的联系
- start() 是如何调用 run() 方法的?
- 线程的运行状态
- 线程的命名和取得
- 线程的休眠
- 线程中断
- 线程的强制执行
- 线程的礼让
- 线程的优先级
- 线程的同步
- 如何实现线程同步呢?
- 1、利用同步代码块进行处理
- 2、利用同步方法解决
- Java 多线程(生产者与消费者)
- 程序的基本实现
- 解决生产者与消费者的同步问题
- 线程的等待与唤醒
- Thread 类如何实现多线程?
- 调用 run() 方法(不建议)
- 使用 start() 方法(推荐)
- Thread.start() 的实现
- Runnable 如何启动多线程?
- 使用 Runnable 的优点
- Callable 如何实现多线程?
- 如何优雅地停止线程?
- 具体内容
- 线程的守护
- volatile 关键字
- 具体内容
- 面试题
什么是线程?
线程(英语:thread)是操作系统能够进行运算调度的最小单位。它被包含在进程之中,是进程中的实际运作单位。一条线程指的是进程中一个单一顺序的控制流,一个进程中可以并发多个线程,每条线程并行执行不同的任务。在Unix System V及SunOS中也被称为轻量进程(lightweight processes),但轻量进程更多指内核线程(kernel thread),而把用户线程(user thread)称为线程。(来源百度百科)
最简单的理解
最简单的理解就是在Java中,当我们启动main函数时其实就启动了一个JVM进程,而main函数所在的线程就是这个进程中的一个线程,也称为主线程
线程的创建与运行
在Java中创建线程有三种方式,分别是
- 实现Runnable接口的run()方法
/**
 * @author Woo_home
 * @create by 2019/10/24
 */
public class RunnableTask implements Runnable{
    @Override
    public void run() {
        System.out.println("Thread running......");
    }

    public static void main(String[] args) throws InterruptedException{
        RunnableTask task = new RunnableTask();
        new Thread(task).start();
        new Thread(task).start();
    }
}
- 继承Thread类并重写run()方法
/**
 * @author Woo_home
 * @create by 2019/10/24
 */
public class ThreadTest extends Thread{

    @Override
    public void run() {     //继承Thread类并重写run()方法
        System.out.println("Thread running......");
    }


    public static void main(String[] args) {
        ThreadTest test = new ThreadTest();//创建线程
        test.start();//启动线程
    }
}
- 使用FutureTask方式(这里暂时不讲)
/**
 * @author Woo_home
 * @create by 2019/10/24
 */
//类似Runnable
public class CallerTask implements Callable<String> {

    @Override
    public String call() throws Exception {
        return "Thread running......";
    }

    public static void main(String[] args) {
        //创建异步任务
        FutureTask<String> futureTask = new FutureTask<String>(new CallerTask());
        //启动线程
        new Thread(futureTask).start();
        try {
            //等待任务执行完毕,并返回结果
            String result = futureTask.get();
            System.out.println(result);
        }catch (Exception e){
            e.printStackTrace();
        }
    }
}
CallerTask类实现了Callable接口的call()方法,在main函数内首先创建了一个FutureTask对象(构造函数为CallerTask的实例),然后使用创建的FutureTask对象作为任务创建了一个线程并且启动它,然后通过futureTask.get()等待任务执行完毕并返回结果
Runnable接口的引入以及策略模式在Thread中的使用
Runnable的职责
Runnable接口其实非常简单,只是定义了一个无参无返回值的抽象run()方法,具体代码如下:
public interface Runnable {
    public abstract void run();
}
在很多时候JDK中代表线程的就只有Thread这个类,而线程执行单元就是run()方法,可以用过继承Thread类然后重写run()方法来实现自己的业务逻辑,也可以实现Runnable接口实现自己的业务逻辑,如:
private Runnable target;
@Override
    public void run() {
        if (target != null) {
            target.run(); //这个run()就是Runnable接口中的run()方法
        }
    }
总结:使用继承的方式的好处是方便传参,你可以在子类里面添加成员变量,通过set方法设置参数或者通过构造是函数进行传递,而如果使用Runnable方式,则只能使用主线程里面被声明为final的变量。不好的地方是Java并不支持多继承,如果继承了Thread类,那么子类不能再继承其他类,而Runnable则没有这个限制。继承Thread和实现Runnable都没办法拿到任务的返回结果,但是FutureTask方式可以
Thread 与 Runnable 的联系
如果从代码结构的本身来讲肯定是使用 Runnable 是最方便的,因为其可以避免单继承的局限,同时也可以更好的进行功能的扩展
但是从结构上也需要观察 Thread 与 Runnable 的联系
public class Thread extends Object implements Runnable {}
从代码中可以发现在 Thread 类也是 Runnable 接口的子类,那么在之前继承 Thread 类的时候实际上重写的还是 Runnable 接口的 run() 方法

在多线程的设计之中,使用了代理设计模式的结构,用户自定义的线程主体只是负责项目核心功能的实现,而所有的辅助实现全部交由 Thread 类来处理,关于代理设计模式可以看这里 代理设计模式
start() 是如何调用 run() 方法的?
在进行 Thread 启动多线程的时候调用的是 start() 方法,而后找到的是 run() 方法,那么 start() 是如何调用 run() 方法的呢?
public Thread(Runnable target) {
    init(null, target, "Thread-" + nextThreadNum(), 0);
}
当我们通过 Thread 类的构造方法传递了一个 Runnable 的接口对象的时候,那么该接口对象将被 Thread 类中的 target 属性所保存,在 start() 方法执行的时候会调用 Thread 类中的 run() 方法,而这个 run() 方法会去调用 Runnable 接口子类被重写过的 run() 方法

多线程开发的本质实际上是在于多个线程可以进行同一个资源的抢占,那么 Thread 主要描述的是线程,而资源的描述是通过 Runnable 来完成的

举例:(模仿一个商品抢购的例子)
package com.java.springtest.test;

/**
 * @author Woo_home
 * @create by 2020/1/20
 */

class ProductThread implements Runnable {

    private int product = 10; // 商品数量

    @Override
    public void run() {
        for (int i = 0; i < 100; i++) {
            if (this.product > 0) {
                System.out.println("抢购,product = " + this.product--);
            }
        }
    }
}

public class Demo {
    public static void main(String[] args) {
        ProductThread product = new ProductThread();
        new Thread(product).start(); // 第一个线程启动
        new Thread(product).start(); // 第二个线程启动
        new Thread(product).start(); // 第三个线程启动
    }
}
输出:
抢购,product = 10
抢购,product = 8
抢购,product = 9
抢购,product = 6
抢购,product = 5
抢购,product = 4
抢购,product = 3
抢购,product = 2
抢购,product = 1
抢购,product = 7
可以到一个线程对象代表着一个用户,三个线程对象(用户)抢购 10 个商品

线程的运行状态
对于多线程的开发而言,编写程序的过程之中总是按照:定义的线程主体类,而后通过 Thread 类进行线程的启动,但是并不意味着你调用了 start() 方法,线程就已经开始运行了,因为整体的线程处理有自己的一套运行的状态

- 1、任何一个线程的对象都应该使用 Thread 类进行封装,所以线程的启动使用的是 start(),但是启动的时候若干个线程都将进入到一种叫就绪状态,现在并没有执行
- 2、进入到就绪状态之后就需要等待进行资源的调度,当某个线程调度成功之后则进入到运行状态(run()),但是所有的线程不可能一直持续执行下去,中间需要产生一些暂停的状态,例如:某个线程执行一段时间之后就需要让出资源,而后这个线程就将进入到阻塞状态,随后重新回归到就绪状态
- 3、当 run() 方法执行完毕之后,实际上该线程的主要任务也就结束了,那么此时就可以直接进入到停止状态
- 4、start() 只是准备执行,并不是执行,具体执行得等到操作系统的确认
多线程的主要操作方法都在 Thread 类中定义了
线程的命名和取得
多线程的运行状态是不确定的,那么在程序的开发之中为了可以获取到一些需要使用到线程只能依靠线程的名字来进行操作。所以线程的名字是一个至关重要的概念,这样在 Thread 类之中就提供有线程名称的处理
- 构造方法:public Thread(Runnable target, String name)
- 设置名字:public final void setName(String name)
- 取得名字:public final String getName()
对于线程对象的获得是不可能只是依靠一个 this 来完成的,因为线程的状态是不可控的,但是有一点可以明确的是,所有的线程对象一定要执行 run() 方法,那么这个时候可以考虑获取当前线程,在 Thread 类里面提供了获取当前线程的方法
- 获取当前线程: public static Thread currentThread()
举例:(观察线程的命名操作)
package com.java.springtest.test;

/**
 * @author Woo_home
 * @create by 2020/1/20
 */
class MyThread implements Runnable {
    @Override
    public void run() {
        System.out.println(Thread.currentThread().getName());
    }
}

public class Demo1 {
    public static void main(String[] args) {
        MyThread thread = new MyThread();
        new Thread(thread,"线程 A").start();      // 设置线程的名字
        new Thread(thread).start();               // 未设置线程的名字
        new Thread(thread,"线程 B").start();      // 设置线程的名字
    }
}
输出:

从输出可以发现当开发者为线程设置名字的时候就使用设置的名字,如果没有设置名字,则会自动生成一个不重复的名字,比如我们在上述的代码中再加几个线程
public class Demo1 {
    public static void main(String[] args) {
        MyThread thread = new MyThread();
        new Thread(thread,"线程 A").start(); // 设置线程的名字
        new Thread(thread).start();               // 未设置线程的名字
        new Thread(thread).start();
        new Thread(thread).start();
        new Thread(thread,"线程 B").start(); // 设置线程的名字
    }
}

可以发现,如果没有命名的线程会自动产生一个编号来代替线程的名字,来保证不重复,那么这种编号是如何产生的呢?其实这种属性命名主要是依靠了 static 属性来完成的,在 Thread 类里面定义有如下操作:
public Thread(Runnable target) {
    init(null, target, "Thread-" + nextThreadNum(), 0);
}
从代码中可以发现,如果是没有命名的线程会执行这个构造方法,这个构造方法的特点就是 nextThreadNum(),我们来看下 nextThreadNum() 这个方法,发现这是一个静态的方法,所以这也就是为什么会产生不重复的编号了
private static int threadInitNumber;
private static synchronized int nextThreadNum() {
    return threadInitNumber++;
}
我们再来举个例子
package com.java.springtest.test;

/**
 * @author Woo_home
 * @create by 2020/1/20
 */
class MyThread implements Runnable {
    @Override
    public void run() {
        System.out.println(Thread.currentThread().getName());
    }
}

public class Demo1 {
    public static void main(String[] args) {
        MyThread thread = new MyThread();
        new Thread(thread,"线程对象").start(); // 设置线程的名字
        thread.run(); 						  // 对象直接调用 run() 方法
    }
}

通过此时的代码可以发现当使用了 “thread.run()” 直接在主方法之中调用线程类对象中的 run() 方法所获得的线程对象的名字为 “main” ,所以可以得出一个结论:主方法也是一个线程。那么现在的问题来了,所有的线程都是在进程上的一个划分,那么进程在哪里?每当使用 Java 命令执行程序的时候就表示启动了一个 JVM 的进程,一台电脑上可以同时启动若干个 JVM 进程,所以 JVM 进程都会有各自的线程
![]()
在任何的开发之中,主线程可以创建若干个子线程。然而创建子线程的目的就是可以将一些复杂逻辑或者比较耗时的逻辑交由子线程去处理
举例: (子线程处理)
package com.java.springtest.test;

/**
 * @author Woo_home
 * @create by 2020/1/20
 */
public class Demo1 {
    public static void main(String[] args) {
        System.out.println("1、执行操作任务一");
        new Thread(() -> { // 交由子线程去计算
            int temp = 0;
            for (int i = 0; i < Integer.MAX_VALUE; i++) {
                temp += i;
            }
        }).start();
        System.out.println("2、执行操作任务二");
        System.out.println("n、执行操作任务N");
    }
}
线程的休眠
如果说现在希望某一个线程可以暂缓执行,那么就可以使用休眠处理,在 Thread 类中定义的休眠方法如下:
- 休眠:public static void sleep(long millis) throws InterruptedException
- 休眠:public static void sleep(long millis, int nanos) throws InterruptedException
在进行休眠的时候有可能会产生中断异常 “InterruptedException”,中断异常属于 Exception 的子类,所以证明该异常必须进行处理
举例:(观察线程休眠处理)
package com.java.springtest.test;

/**
 * @author Woo_home
 * @create by 2020/1/20
 */
public class Demo1 {
    public static void main(String[] args) {
        new Thread(() -> {
            for (int i = 0; i < 10; i++) {
                System.out.println(Thread.currentThread().getName() + ".i = " + i);
                try {
                    Thread.sleep(1000); // 暂缓执行
                } catch (InterruptedException e) {
                    e.printStackTrace();
                }
            }
        },"Thread1").start();
    }
}
输出:

休眠的主要特点就是可以自动实现线程的唤醒,以继续进行后续的处理。但是需要注意的是,如果现在你有多个线程对象,那么休眠也是有先后顺序的
举例:(产生多个线程对象进行休眠处理)
package com.java.springtest.test;

/**
 * @author Woo_home
 * @create by 2020/1/20
 */
public class Demo1 {
    public static void main(String[] args) {
        for (int num = 0; num < 5; num++) {
            new Thread(() -> {
                for (int i = 0; i < 10; i++) {
                    System.out.println(Thread.currentThread().getName() + ".i = " + i);
                    try {
                        Thread.sleep(1000); // 暂缓执行
                    } catch (InterruptedException e) {
                        e.printStackTrace();
                    }
                }
            },"Thread1 - " + num).start();
        }
    }
}
此时产生五个线程对象,并且这五个线程对象执行的方法体是相同的。但是此时从程序执行的感觉上来讲好像是若干个线程一起进行了休眠,而后一起进行了自动唤醒

线程中断
在上面我们讲过线程的休眠里面提供有一个中断异常,实际上就证明线程的休眠是可以被打断的,而这种打断肯定是由其它线程完成的。在 Thread 类里面提供有这种中断执行的方法
- 判断线程是否被中断:public boolean isInterrupted()
- 中断线程执行:public void interrupt()
举例:(观察线程的中断处理操作)
package com.java.springtest.test;

/**
 * @author Woo_home
 * @create by 2020/1/20
 */
public class Demo1 {
    public static void main(String[] args) throws InterruptedException {
        Thread thread = new Thread(() -> {
            System.out.println("线程的启动");
            try {
                Thread.sleep(10000); // 休眠 10 s
                System.out.println("线程的关闭");
            } catch (InterruptedException e) {
                System.out.println("O_O");
            }
        });
        thread.start(); // 开始执行
        Thread.sleep(1000);
        if (!thread.isInterrupted()) { // 判断该线程中断了没
            System.out.println("线程中断了");
            thread.interrupt();        // 线程中断
        }
    }
}
输出:

所有正在执行的线程都是可以被中断的,中断线程必须进行异常的处理
线程的强制执行
所谓的线程强制执行指的是当满足于某些条件之后,某一个线程对象将可以一直独占资源,一直到该线程的程序执行结束
举例:(先来观察一下没有强制执行的程序)
package com.java.springtest.test;

/**
 * @author Woo_home
 * @create by 2020/1/20
 */
public class Demo1 {
    public static void main(String[] args) throws InterruptedException {
        Thread thread = new Thread(() -> {
            for (int i = 0; i < 100; i++) {
                try {
                    Thread.sleep(100);
                } catch (InterruptedException e) {
                    e.printStackTrace();
                }
                System.out.println(Thread.currentThread().getName() + "执行.i = " + i);
            }
        },"正常的线程执行操作");
        thread.start();
        for (int i = 0; i < 100; i++) {
            Thread.sleep(100);
            System.out.println("main number = " + i);
        }
    }
}
部分运行截图

这个时候可以发现主线程和子线程都在交替执行者,但是如果说现在你希望主线程独占执行。那么就可以利用 Thread 类中的方法
- 强制执行:public final void join() throws InterruptedException
package com.java.springtest.test;

/**
 * @author Woo_home
 * @create by 2020/1/20
 */
public class Demo1 {
    public static void main(String[] args) throws InterruptedException {
        Thread mainThread = Thread.currentThread(); // 主线程
        Thread thread = new Thread(() -> {
            for (int i = 0; i < 100; i++) {
                if (i == 3) {
                    try {
                        mainThread.join();  // main 线程要先执行
                    } catch (InterruptedException e) {
                        e.printStackTrace();
                    }
                }
                try {
                    Thread.sleep(100);
                } catch (InterruptedException e) {
                    e.printStackTrace();
                }
                System.out.println(Thread.currentThread().getName() + "执行.i = " + i);
            }
        },"正常的线程执行操作");
        thread.start();
        for (int i = 0; i < 100; i++) {
            Thread.sleep(100);
            System.out.println("main线程 number = " + i);
        }
    }
}
部分运行截图

在进行线程强制执行的时候一定要获取强制执行线程对象之后才可以执行 join() 调用
线程的礼让
线程的礼让就是指先将资源让出去让别的线程先执行。线程的礼让可以使用 Thread 中提供的方法:
- 礼让:public static void yield()
举例:(使用线程礼让操作)
为了方便,我们直接把上面的代码拿过来修改吧,如下:
package com.java.springtest.test;

/**
 * @author Woo_home
 * @create by 2020/1/20
 */
public class Demo1 {
    public static void main(String[] args) throws InterruptedException {
        Thread thread = new Thread(() -> {
            for (int i = 0; i < 100; i++) {
                if (i % 3 == 0) {
                    Thread.yield(); // 线程礼让
                    System.out.println("线程礼让执行");
                }
                try {
                    Thread.sleep(100);
                } catch (InterruptedException e) {
                    e.printStackTrace();
                }
                System.out.println(Thread.currentThread().getName() + "执行.i = " + i);
            }
        },"正常的线程执行操作");
        thread.start();
        for (int i = 0; i < 100; i++) {
            Thread.sleep(100);
            System.out.println("main线程 number = " + i);
        }
    }
}
礼让执行的时候每一次调用 yield() 方法都只会礼让一次当前的资源
线程的优先级
从理论上来讲线程的优先级越高越有可能先执行(越有可能先抢占到资源)。在 Thread 类里面针对于优先级提供了两个处理方法
- 设置优先级:public final void setPriority(int newPriority)
- 获取优先级:public final int getPriority()
在进行优先级定义的时候都是通过 int 类型的数字来完成的,而对于此数字的选择在 Thread 类里面定义了三个常量
- 最高优先级:MAX_PRIORITY 默认值为 10
- 中等优先级:NORM_PRIORITY 默认值为 5
- 最低优先级:MIN_PRIORITY 默认值为 1
举例:(观察优先级)
package com.java.springtest.test;

/**
 * @author Woo_home
 * @create by 2020/1/20
 */
public class Demo1 {
    public static void main(String[] args) throws InterruptedException {
        Runnable runnable = () -> {
            for (int i = 0; i < 10; i++) {
                try {
                    Thread.sleep(1000);
                } catch (InterruptedException e) {
                    e.printStackTrace();
                }
                System.out.println(Thread.currentThread().getName() + "执行. " + i);
            }
        };
        Thread threadA = new Thread(runnable,"线程对象A");
        Thread threadB = new Thread(runnable,"线程对象B");
        Thread threadC = new Thread(runnable,"线程对象C");
        threadA.setPriority(Thread.MIN_PRIORITY);   // 将 threadA 设置为最低优先级
        threadB.setPriority(Thread.MIN_PRIORITY);   // 将 threadB 设置为最低优先级
        threadC.setPriority(Thread.MAX_PRIORITY);   // 将 threadC 设置为最高优先级
        threadA.start();
        threadB.start();
        threadC.start();
    }
}
输出:
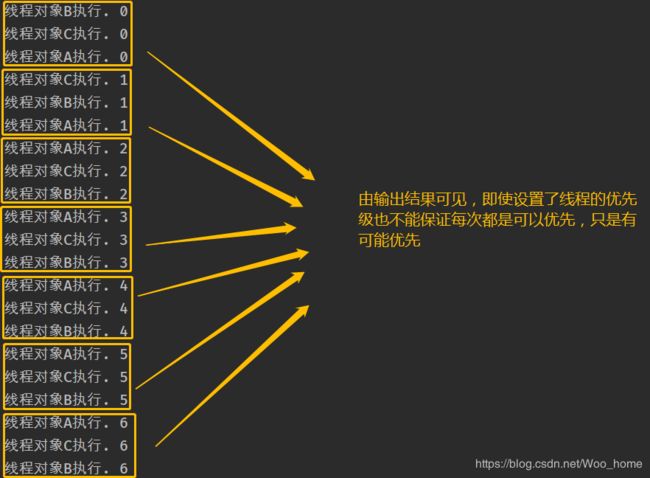
前面我们说过主方法也是一个线程也叫主线程,那么主线程的优先级呢?
package com.java.springtest.test;

/**
 * @author Woo_home
 * @create by 2020/1/20
 */
public class Demo1 {
    public static void main(String[] args) {
        // 默认的线程
        System.out.println(new Thread().getPriority());
        // 主方法线程
        System.out.println(Thread.currentThread().getPriority());
    }
}
输出结果为 5,前面我们说过中等优先级的默认值也是 5,那么也就是说主线程属于中等优先级,而默认创建的线程也是中等优先级

总结一下:只是优先级高的有可能先执行
线程的同步
在多线程的处理当中,可以利用 Runnable 描述多个线程操作的资源,而 Thread 描述的是每一个线程对象,于是当多个线程访问统一资源的时候如果处理不当就会产生数据的错误操作
- 同步问题的引出
下面编写一个简单的商品抢购程序,将创建若干个线程对象实现抢购的处理操作
举例:(实现商品抢购)
package com.java.springtest.test;

/**
 * @author Woo_home
 * @create by 2020/1/20
 */

class ProductThreadDemo implements Runnable {

    private int products = 10;  // 总商品数为 10

    @Override
    public void run() {
        while (true) {
            if (this.products > 0) {
                System.out.println(Thread.currentThread().getName() + "抢购.product" + this.products--);
            } else {
                System.out.println("------ 商品已经抢购完咯 ------");
                break;
            }
        }
    }
}

public class Demo1 {
    public static void main(String[] args) {
        ProductThreadDemo demo = new ProductThreadDemo();
        new Thread(demo,"用户 A").start();
        new Thread(demo,"用户 B").start();
        new Thread(demo,"用户 C").start();
    }
}
此时的线程将创建三个线程对象,并且这三个线程对象将进行 10 个商品的抢购,从输出可以看到没什么问题
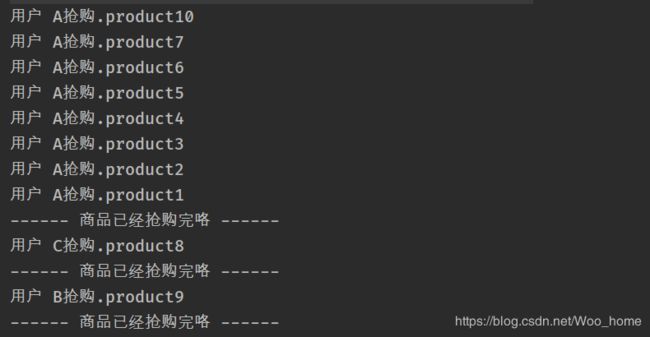
此时的程序在进行抢购的处理的时候并没有任何的问题(假象),下面可以模拟一下抢购中的延迟操作,就是加个 Thread.sleep(100)
package com.java.springtest.test;

/**
 * @author Woo_home
 * @create by 2020/1/20
 */

class ProductThreadDemo implements Runnable {

    private int products = 10;  // 总商品数为 10

    @Override
    public void run() {
        while (true) {
            if (this.products > 0) {
                try {
                    Thread.sleep(100);      // 模拟网络延迟
                } catch (InterruptedException e) {
                    e.printStackTrace();
                }
                System.out.println(Thread.currentThread().getName() + "抢购.product" + this.products--);
            } else {
                System.out.println("------ 商品已经抢购完咯 ------");
                break;
            }
        }
    }
}

public class Demo1 {
    public static void main(String[] args) {
        ProductThreadDemo demo = new ProductThreadDemo();
        new Thread(demo,"用户 A").start();
        new Thread(demo,"用户 B").start();
        new Thread(demo,"用户 C").start();
    }
}
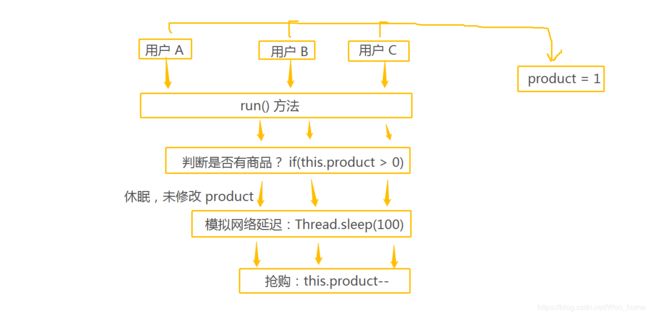
现在出现了一个用户抢到商品 0 和 -1 的情况,也就是说商品明明已经被用户们抢购完了,你现在还来个用户抢够到商品,上哪去找商品发给用户呢?

这个时候追加了延迟问题就暴露出来了,而实际上这个问题一直都在(自己画的图,不好看勿喷)
如何实现线程同步呢?
经过上述的分析之后已经可以确认同步问题所产生的主要原因了,那么下面就需要进行同步问题的解决,但是解决同步问题的关键是锁,那么什么是锁呢?指的是当某一个线程执行操作的时候,其它线程外面等待;

如果想要在程序当中实现这把锁的功能,就可以使用 synchronized 关键字来实现,利用此关键字可以定义同步方法或同步代码块,在同步代码块的操作里面的代码只允许一个线程执行
1、利用同步代码块进行处理
// 用法
synchronized(同步对象) {
	同步代码块操作
}
一般要进行同步对象处理的时候可以采用当前对象 this 进行同步
举例:(利用同步代码块解决数据同步访问问题)
package com.java.springtest.test;

/**
 * @author Woo_home
 * @create by 2020/1/20
 */

class ProductThreadDemo implements Runnable {

    private int products = 10;  // 总商品数为 10

    @Override
    public void run() {
        while (true) {
            synchronized (this) {                   // 每次只允许一个线程访问
                if (this.products > 0) {
                    try {
                        Thread.sleep(100);      // 模拟网络延迟
                    } catch (InterruptedException e) {
                        e.printStackTrace();
                    }
                    System.out.println(Thread.currentThread().getName() + "抢购.product" + this.products--);
                } else {
                    System.out.println("------ 商品已经抢购完咯 ------");
                    break;
                }
            }
        }
    }
}

public class Demo1 {
    public static void main(String[] args) {
        ProductThreadDemo demo = new ProductThreadDemo();
        new Thread(demo,"用户 A").start();
        new Thread(demo,"用户 B").start();
        new Thread(demo,"用户 C").start();
    }
}
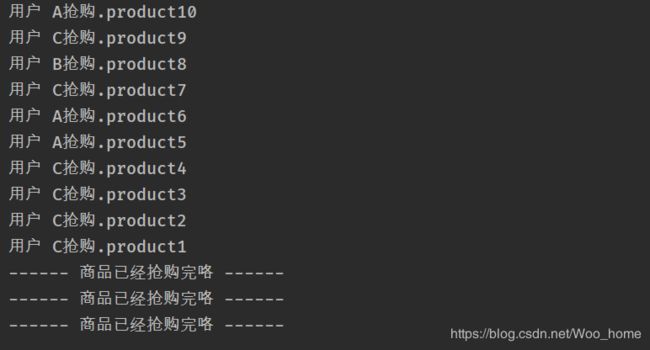
此时就不会出现商品抢购为负数的问题了,但是加入同步处理之后,程序的整体性能下降了。同步实际上会造成性能的降低
2、利用同步方法解决
那么如何实现同步方法呢?只需要在方法定义上使用 synchronized 关键字即可
package com.java.springtest.test;

/**
 * @author Woo_home
 * @create by 2020/1/20
 */

class ProductThreadDemo implements Runnable {

    private int products = 10;  // 总商品数为 10

    public synchronized boolean sale() {
        if (this.products > 0) {
            try {
                Thread.sleep(100);      // 模拟网络延迟
            } catch (InterruptedException e) {
                e.printStackTrace();
            }
            System.out.println(Thread.currentThread().getName() + "抢购.product" + this.products--);
            return true;
        } else {
            System.out.println("------ 商品已经抢购完咯 ------");
            return false;
        }
    }

    @Override
    public void run() {
        while (this.sale()) {
            ;
        }
    }
}

public class Demo1 {
    public static void main(String[] args) {
        ProductThreadDemo demo = new ProductThreadDemo();
        new Thread(demo,"用户 A").start();
        new Thread(demo,"用户 B").start();
        new Thread(demo,"用户 C").start();
    }
}
Java 多线程(生产者与消费者)
在多线程的开发过程之中最为著名的案例就是生产者与消费者操作,该操作的主要流程如下:
- 生产者负责信息内容的生产
- 每当生产者生产完成一项完整的信息之后消费者要从这里面取走信息
- 如果生产者没有生产完则消费者需要等待它生产完成,反之如果消费者还没有对信息进行消费, 则生产者应该等待消费处理完成后在继续生产
程序的基本实现
可以将生产者与消费者定义为两个独立的线程类对象,但是对于现在生产的数据,可以使用如下的组成:
- 数据一:title:Java 、content:生产者与消费者
- 数据二:title:Python、content:数据分析
既然生产者与消费者是两个独立的线程,那么这两个独立的线程之间就需要有一个数据的保存的集中点,那么可以定义一个单独的 Message 类实现数据的保存

举例:(生产者与消费者的实现)
package com.java.springtest.test;

/**
 * @author Woo_home
 * @create by 2020/1/20
 */

// 消息中心
class Message {
    private String title;
    private String content;

    public String getTitle() {
        return title;
    }

    public void setTitle(String title) {
        this.title = title;
    }

    public String getContent() {
        return content;
    }

    public void setContent(String content) {
        this.content = content;
    }
}

// 生产者
class Producer implements Runnable{

    private Message message;

    public Producer(Message message) {
        this.message = message;
    }

    @Override
    public void run() {
        for (int i = 0; i < 100; i++) {
            if (i % 2 == 0) {
                this.message.setTitle("Java");
                try {
                    Thread.sleep(10);
                } catch (InterruptedException e) {
                    e.printStackTrace();
                }
                this.message.setContent("生产者与消费者");
            } else {
                this.message.setTitle("Python");
                try {
                    Thread.sleep(10);
                } catch (InterruptedException e) {
                    e.printStackTrace();
                }
                this.message.setContent("数据分析");
            }
        }
    }
}

// 消费者
class Consumer implements Runnable {

    private Message message;

    public Consumer(Message message) {
        this.message = message;
    }

    @Override
    public void run() {
        for (int i = 0; i < 100; i++) {
            try {
                Thread.sleep(10);
            } catch (InterruptedException e) {
                e.printStackTrace();
            }
            System.out.println(this.message.getTitle() + " - " + this.message.getContent());
        }
    }
}
public class Demo1 {
    public static void main(String[] args) {
        Message message = new Message();
        new Thread(new Producer(message)).start(); // 启动生产者线程
        new Thread(new Consumer(message)).start(); // 启动消费者线程
    }
}
- 问题一:数据不同步
- 问题二:生产一个取走一个,但是发现有了重复生产和重复取出的问题
解决生产者与消费者的同步问题
如果要解决问题的话,首先要解决的就是数据同步处理的问题了,如果要想解决数据同步最简单的做法就是使用 synchronized 关键字定义同步代码块或同步方法,于是这个时候对于同步的处理就可以直接在 Message 类中完成
举例:(解决同步操作)
package com.java.springtest.test;

/**
 * @author Woo_home
 * @create by 2020/1/20
 */

class Message {
    private String title;
    private String content;

    public synchronized void set(String title, String content) {
        this.title = title;
        try {
            Thread.sleep(10);
        } catch (InterruptedException e) {
            e.printStackTrace();
        }
        this.content = content;
    }

    public synchronized String get() {
        try {
            Thread.sleep(10);
        } catch (InterruptedException e) {
            e.printStackTrace();
        }
        return this.title + " -- " + this.content;
    }
}

class Producer implements Runnable{

    private Message message;

    public Producer(Message message) {
        this.message = message;
    }

    @Override
    public void run() {
        for (int i = 0; i < 100; i++) {
            if (i % 2 == 0) {
                this.message.set("Java","生产者与消费者");
            } else {
                this.message.set("Python","数据分析");
            }
        }
    }
}

class Consumer implements Runnable {

    private Message message;

    public Consumer(Message message) {
        this.message = message;
    }

    @Override
    public void run() {
        for (int i = 0; i < 100; i++) {
            System.out.println(this.message.get());
        }
    }
}
public class Demo1 {
    public static void main(String[] args) {
        Message message = new Message();
        new Thread(new Producer(message)).start(); // 启动生产者线程
        new Thread(new Consumer(message)).start(); // 启动消费者线程
    }
}
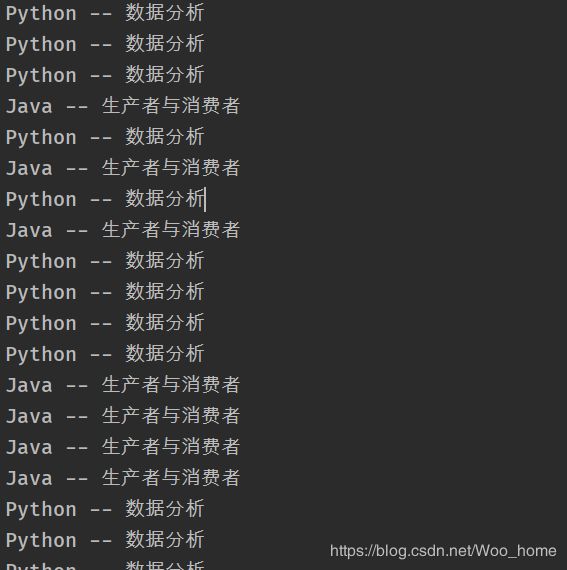
在进行同步处理的时候肯定需要有一个同步的处理对象,那么此时肯定要将同步操作交由 Message 类处理是最合适的。这个时候返现数据已经可以正常的保持一致了,但是对于重复操作的问题依然存在
线程的等待与唤醒
如果说现在想要解决生产者与消费者的问题,那么最好的解决方案就是使用等待与唤醒机制。而对于等待与唤醒机制的操作主要依靠的是 Object 类中提供的方法处理的:
- wait() 等待机制:
- 固定等:public final void wait() throws InterruptedException
- 设置等待时间:public final void wait(long timeout,int nanos) throws InterruptedException
- 设置等待时间:public final void wait(long timeout) throws InterruptedException
- 唤醒第一个等待线程:public final void notify()
- 唤醒全部等待线程:public final void notifyAll()
如果此时有若干个等待线程的话,那么 notify() 表示的是唤醒第一个等待的,而其它的线程继续等待;而 notifyAll() 表示唤醒所以的线程,哪个线程的优先级高就有可能先执行
对于当前的问题主要的解决方法应该是通过 Message 类完成处理
举例:(修改 Message 类)
package com.java.springtest.test;

/**
 * @author Woo_home
 * @create by 2020/1/20
 */

class Message {
    private String title;
    private String content;

    /**
     * 表示生产或者消费的形式
     * 如果 flag = true 表示允许生产,但是不允许消费
     * 如果 flag = false 表示允许消费,不允许生产
     */
    private boolean flag;

    public synchronized void set(String title, String content) {
        if (!this.flag) { // 无法进行生产,应该等待被消费
            try {
                super.wait(); // 等待
            }catch (InterruptedException e) {
                e.printStackTrace();
            }
        }
        this.title = title;
        try {
            Thread.sleep(100);
        } catch (InterruptedException e) {
            e.printStackTrace();
        }
        this.content = content;
        this.flag = false;   // 已经生产过了
        super.notify();      // 唤醒等待的线程
    }

    public synchronized String get() {
        if (this.flag) { // 还未生产,需要等待
            try {
                super.wait();
            }catch (InterruptedException e) {
                e.printStackTrace();
            }
        }
        try {
            Thread.sleep(100);
        } catch (InterruptedException e) {
            e.printStackTrace();
        }
        try {
            return this.title + " -- " + this.content;
        } finally { // 不管如何都要执行
            this.flag = true; // 继续生产
            super.notify();   // 唤醒等待线程
        }
    }
}

class Producer implements Runnable{

    private Message message;

    public Producer(Message message) {
        this.message = message;
    }

    @Override
    public void run() {
        for (int i = 0; i < 100; i++) {
            if (i % 2 == 0) {
                this.message.set("Java","生产者与消费者");
            } else {
                this.message.set("Python","数据分析");
            }
        }
    }
}

class Consumer implements Runnable {

    private Message message;

    public Consumer(Message message) {
        this.message = message;
    }

    @Override
    public void run() {
        for (int i = 0; i < 100; i++) {
            System.out.println(this.message.get());
        }
    }
}
public class Demo1 {
    public static void main(String[] args) {
        Message message = new Message();
        new Thread(new Producer(message)).start(); // 启动生产者线程
        new Thread(new Consumer(message)).start(); // 启动消费者线程
    }
}

这种处理形式就是在进行多线程开发过程之中最原始的处理方案,整个的等待、同步、唤醒机制都是由开发者自行通过原生代码实现控制
我们知道虽然可以通过继承 Thread 类来实现多线程的定义,但是在 Java 程序里面对于继承永远都是存在有单继承局限的,所以在 Java 里面又提供了有第二种多线程的主体定义结构形式:实现 java.lang.Runnable 接口,此接口定义如下:
// 从 JDK 1.8 引入 Lambda 表达式之后就变为了函数式的接口
@FunctionalInterface
public interface Runnable {
    public abstract void run();
}
举例:通过 Runnable 实现多线程主体类
class ThreadDemoTest implements Runnable { // 线程的主体类

    private String title;

    public ThreadDemoTest(String title) {
        this.title = title;
    }

    @Override
    public void run() { // 线程的主体方法
        for (int i = 0; i < 10; i++) {
            System.out.println(this.title + "运行,x = " + i);
        }
    }
}
由于不再是继承 Thread 父类了,那么对于此时的 ThreadDemoTest 类中也不再支持有 start() 这个继承方法。可以如果不使用 Thread.start() 方法是无法进行多线程的启动的,那么这个时候就需要去观察一下 Thread 类所提供的构造方法了
public Thread() {
    init(null, null, "Thread-" + nextThreadNum(), 0);
}

public Thread(Runnable target) {
    init(null, target, "Thread-" + nextThreadNum(), 0);
}

Thread(Runnable target, AccessControlContext acc) {
    init(null, target, "Thread-" + nextThreadNum(), 0, acc, false);
}

public Thread(ThreadGroup group, Runnable target) {
    init(group, target, "Thread-" + nextThreadNum(), 0);
}

public Thread(String name) {
    init(null, null, name, 0);
}

public Thread(ThreadGroup group, String name) {
    init(group, null, name, 0);
}

public Thread(Runnable target, String name) {
    init(null, target, name, 0);
}

public Thread(ThreadGroup group, Runnable target, String name) {
    init(group, target, name, 0);
}

public Thread(ThreadGroup group, Runnable target, String name,
           long stackSize) {
    init(group, target, name, stackSize);
}
虽然 Thread 的构造有很多,但是这里我们只需要看下第二个构造方法就够了
public Thread(Runnable target) {
    init(null, target, "Thread-" + nextThreadNum(), 0);
}
Thread 类如何实现多线程?
Java 里面提供有一个 java.lang.Thread 的程序类,那么一个类只要继承了此类就表示这个类可以直接实现多线程处理了
class ThreadDemoTest extends Thread { // 线程的主体类

    private String title;

    public ThreadDemoTest(String title) {
        this.title = title;
    }

    @Override
    public void run() { // 线程的主体方法
        for (int i = 0; i < 10; i++) {
            System.out.println(this.title + "运行,i = " + i);
        }
    }
}
多线程要执行的功能都应该在 run() 方法中进行定义。需要说明的是:在正常的情况下如何产生实例化对象,而后去调用类中提供的方法,但是 run() 方法是不能够被直接调用的,因为这里面牵扯到一个操作系统的资源调度问题
举个例子:
调用 run() 方法(不建议)
package com.java.springtest.test;

/**
 * @author Woo_home
 * @create by 2020/1/20
 */

class ThreadDemoTest extends Thread { // 线程的主体类

    private String title;

    public ThreadDemoTest(String title) {
        this.title = title;
    }

    @Override
    public void run() { // 线程的主体方法
        for (int i = 0; i < 10; i++) {
            System.out.println(this.title + "运行,x = " + i);
        }
    }
}

public class Test {
    public static void main(String[] args) {
        new ThreadDemoTest("线程 A").run();
        new ThreadDemoTest("线程 B").run();
        new ThreadDemoTest("线程 C").run();
    }
}
运行这个程序我们可以发现线程对象都是顺序执行的,并没有起到多线程的作用,我们想要的交替执行
线程 A运行,x = 0
线程 A运行,x = 1
线程 A运行,x = 2
线程 A运行,x = 3
线程 A运行,x = 4
线程 A运行,x = 5
线程 A运行,x = 6
线程 A运行,x = 7
线程 A运行,x = 8
线程 A运行,x = 9
线程 B运行,x = 0
线程 B运行,x = 1
线程 B运行,x = 2
线程 B运行,x = 3
线程 B运行,x = 4
线程 B运行,x = 5
线程 B运行,x = 6
线程 B运行,x = 7
线程 B运行,x = 8
线程 B运行,x = 9
线程 C运行,x = 0
线程 C运行,x = 1
线程 C运行,x = 2
线程 C运行,x = 3
线程 C运行,x = 4
线程 C运行,x = 5
线程 C运行,x = 6
线程 C运行,x = 7
线程 C运行,x = 8
线程 C运行,x = 9

Process finished with exit code 0
使用 start() 方法(推荐)
所以要想启动多线程必须使用 start() 方法完成,也就是 public void start()
package com.java.springtest.test;

/**
 * @author Woo_home
 * @create by 2020/1/20
 */

class ThreadDemoTest extends Thread { // 线程的主体类

    private String title;

    public ThreadDemoTest(String title) {
        this.title = title;
    }

    @Override
    public void run() { // 线程的主体方法
        for (int i = 0; i < 10; i++) {
            System.out.println(this.title + "运行,x = " + i);
        }
    }
}

public class Test {
    public static void main(String[] args) {
        new ThreadDemoTest("线程 A").start();
        new ThreadDemoTest("线程 B").start();
        new ThreadDemoTest("线程 C").start();
    }
}
通过此时的调用,可以发现虽然调用了 start() 方法,但是最终执行的是 run() 方法,并且所有的线程对象都是交替执行的
线程 A运行,x = 0
线程 A运行,x = 1
线程 A运行,x = 2
线程 A运行,x = 3
线程 A运行,x = 4
线程 A运行,x = 5
线程 A运行,x = 6
线程 A运行,x = 7
线程 A运行,x = 8
线程 A运行,x = 9
线程 B运行,x = 0
线程 B运行,x = 1
线程 B运行,x = 2
线程 B运行,x = 3
线程 B运行,x = 4
线程 B运行,x = 5
线程 B运行,x = 6
线程 B运行,x = 7
线程 B运行,x = 8
线程 C运行,x = 0
线程 C运行,x = 1
线程 C运行,x = 2
线程 C运行,x = 3
线程 C运行,x = 4
线程 C运行,x = 5
线程 C运行,x = 6
线程 C运行,x = 7
线程 C运行,x = 8
线程 C运行,x = 9
线程 B运行,x = 9
Thread.start() 的实现
为什么多线程的启动不是直接使用 run() 方法?而是必须使用 Thread 类中的 start() 方法呢?
如果想搞清楚这个问题,最好的做法就是看下 start() 方法是如何实现的
可以看到 Thread 从 1.0 就开始有了
下面这块就是 Thread 的 start() 方法的源码:
public synchronized void start() {
    // 判断线程的状态
    if (threadStatus != 0)
    	// 抛出一个异常
        throw new IllegalThreadStateException();


    group.add(this);

    boolean started = false;
    try {
        start0(); // 在 start() 方法里面调用了一个 start0() 方法
        started = true;
    } finally {
        try {
            if (!started) {
                group.threadStartFailed(this);
            }
        } catch (Throwable ignore) {

        }
    }
}

// start0() 只定义了方法名称,但是没有实现
private native void start0();
- IllegalThreadStateException():通过代码我们可以发现在 start() 方法里面会抛出一个 “IllegalThreadStateException” 的异常类对象,但是整个的程序并没有使用 throws 或者是明确的 try catch 处理(为什么呢?),因为该异常一定是 RuntimeException 的子类;每一个线程类的对象只允许启动一次,如果重复启动则就抛出此异常。
例如下面的代码执行就会抛出异常
package com.java.springtest.test;

/**
 * @author Woo_home
 * @create by 2020/1/20
 */

class ThreadDemoTest extends Thread { // 线程的主体类

    private String title;

    public ThreadDemoTest(String title) {
        this.title = title;
    }

    @Override
    public void run() { // 线程的主体方法
        for (int i = 0; i < 10; i++) {
            System.out.println(this.title + "运行,x = " + i);
        }
    }
}

public class Test {
    public static void main(String[] args) {
        ThreadDemoTest test = new ThreadDemoTest("启动线程");
        test.start();
        test.start(); // 重复启动线程
    }
}
- private native void start0():在 Java 程序执行的过程之中考虑到对于不同层次开发者的需求,所以只支持有本地的操作系统函数调用,而这项技术就被称为 JNI (Java Native Interface ,Java本地接口)技术,但是在 Java 开发过程之中并不推荐这样使用,利用这项技术我们可以使用一些操作系统提供的底层函数进行一些特殊的处理,而在 Thread 类中提供的 start0() 就表示需要此方法依赖于不同的操作系统实现

从图中可以知道 JNI 的用处了,就是用来匹配不同的操作系统
任何情况下,只要定义了多线程,多线程的启动永远只有一种方案:Thread 类中的 start()方法
Runnable 如何启动多线程?
举例:
package com.java.springtest.test;

/**
 * @author Woo_home
 * @create by 2020/1/20
 */

class ThreadDemoTest implements Runnable { // 线程的主体类

    private String title;

    public ThreadDemoTest(String title) {
        this.title = title;
    }

    @Override
    public void run() { // 线程的主体方法
        for (int i = 0; i < 10; i++) {
            System.out.println(this.title + "运行,x = " + i);
        }
    }
}

public class Test {
    public static void main(String[] args) {
        Thread threadA = new Thread(new ThreadDemoTest("线程 A 启动"));
        Thread threadB = new Thread(new ThreadDemoTest("线程 B 启动"));
        Thread threadC = new Thread(new ThreadDemoTest("线程 C 启动"));
        threadA.start(); // 启动多线程
        threadB.start(); // 启动多线程
        threadC.start(); // 启动多线程
    }
}
输出:
线程 A 启动运行,x = 0
线程 A 启动运行,x = 1
线程 A 启动运行,x = 2
线程 A 启动运行,x = 3
线程 A 启动运行,x = 4
线程 A 启动运行,x = 5
线程 A 启动运行,x = 6
线程 A 启动运行,x = 7
线程 A 启动运行,x = 8
线程 A 启动运行,x = 9
线程 C 启动运行,x = 0
线程 C 启动运行,x = 1
线程 C 启动运行,x = 2
线程 C 启动运行,x = 3
线程 C 启动运行,x = 4
线程 C 启动运行,x = 5
线程 C 启动运行,x = 6
线程 C 启动运行,x = 7
线程 C 启动运行,x = 8
线程 C 启动运行,x = 9
线程 B 启动运行,x = 0
线程 B 启动运行,x = 1
线程 B 启动运行,x = 2
线程 B 启动运行,x = 3
线程 B 启动运行,x = 4
线程 B 启动运行,x = 5
线程 B 启动运行,x = 6
线程 B 启动运行,x = 7
线程 B 启动运行,x = 8
线程 B 启动运行,x = 9
使用 Runnable 的优点
这个时候的多线程实现里面可以发现,由于只是实现了 Runnable 接口对象,所以此时线程主体类上就不再有单继承局限了,那么这样的设计才是一个标准性的设计
可以发现从 JDK 1.8 开始,Runnable 接口使用了函数式接口的定义,所以也可以直接利用 Lambda 表达式进行线程类的实现定义
举例:(使用 Lambda 实现多线程定义)
public class Test {
    public static void main(String[] args) {
        for (int i = 0; i < 3; i++) {
            String title = "线程对象 - " + i;
            Runnable runnable = () -> {
                for (int j = 0; j < 10; j++) {
                    System.out.println(title + "运行,j = " + j);
                }
            } ;
            new Thread(runnable).start();
        }
    }
}
输出:
线程对象 - 1运行,j = 0
线程对象 - 1运行,j = 1
线程对象 - 1运行,j = 2
线程对象 - 1运行,j = 3
线程对象 - 1运行,j = 4
线程对象 - 1运行,j = 5
线程对象 - 1运行,j = 6
线程对象 - 1运行,j = 7
线程对象 - 1运行,j = 8
线程对象 - 1运行,j = 9
线程对象 - 0运行,j = 0
线程对象 - 0运行,j = 1
线程对象 - 0运行,j = 2
线程对象 - 0运行,j = 3
线程对象 - 0运行,j = 4
线程对象 - 0运行,j = 5
线程对象 - 2运行,j = 0
线程对象 - 0运行,j = 6
线程对象 - 2运行,j = 1
线程对象 - 0运行,j = 7
线程对象 - 2运行,j = 2
线程对象 - 0运行,j = 8
线程对象 - 2运行,j = 3
线程对象 - 0运行,j = 9
线程对象 - 2运行,j = 4
线程对象 - 2运行,j = 5
线程对象 - 2运行,j = 6
线程对象 - 2运行,j = 7
线程对象 - 2运行,j = 8
线程对象 - 2运行,j = 9
将代码再精简一点就是:
public class Test {
    public static void main(String[] args) {
        for (int i = 0; i < 3; i++) {
            String title = "线程对象 - " + i;
            new Thread(() -> {
                for (int j = 0; j < 10; j++) {
                    System.out.println(title + "运行,j = " + j);
                }
            }).start();
        }
    }
}
输出:
线程对象 - 0运行,j = 0
线程对象 - 2运行,j = 0
线程对象 - 1运行,j = 0
线程对象 - 1运行,j = 1
线程对象 - 1运行,j = 2
线程对象 - 1运行,j = 3
线程对象 - 1运行,j = 4
线程对象 - 2运行,j = 1
线程对象 - 0运行,j = 1
线程对象 - 2运行,j = 2
线程对象 - 1运行,j = 5
线程对象 - 1运行,j = 6
线程对象 - 1运行,j = 7
线程对象 - 1运行,j = 8
线程对象 - 1运行,j = 9
线程对象 - 2运行,j = 3
线程对象 - 0运行,j = 2
线程对象 - 2运行,j = 4
线程对象 - 0运行,j = 3
线程对象 - 0运行,j = 4
线程对象 - 0运行,j = 5
线程对象 - 0运行,j = 6
线程对象 - 0运行,j = 7
线程对象 - 0运行,j = 8
线程对象 - 0运行,j = 9
线程对象 - 2运行,j = 5
线程对象 - 2运行,j = 6
线程对象 - 2运行,j = 7
线程对象 - 2运行,j = 8
线程对象 - 2运行,j = 9
所以说在开发中对于多线程的实现,优先考虑的就是 Runnable 接口的实现,并且永恒都是通过 Thread 类对象启动多线程
Callable 如何实现多线程?
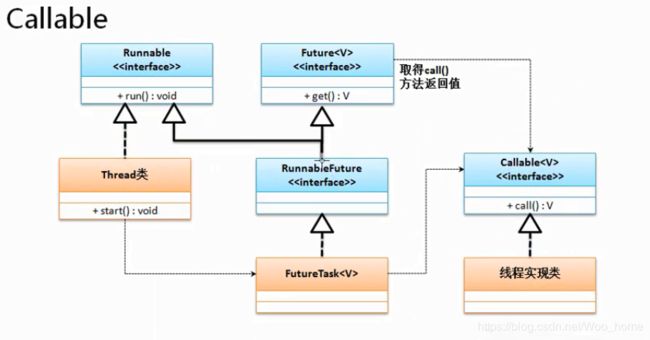
从最传统的开发来讲如果要进行多线程的实现肯定依靠的就是 Runnable,但是 Runnable 接口有一个缺点:当线程执行之后无法获取一个返回值,所以从 JDK1.5之后就提出了一个新的线程实现接口:java.util.concurrent.Callable 接口
首先来观察一下这个接口的定义:
@FunctionalInterface
public interface Callable<V> {
    V call() throws Exception;
}
可以发现 Callable 定义的时候可以设置一个泛型,该泛型的类型就是返回的数据类型,这样的好处就是可以避免向下转型所带来的安全隐患
来看下 Callable 的结构图
举例:(使用 Callable 实现多线程处理)
package com.java.springtest.test;

import org.omg.PortableServer.THREAD_POLICY_ID;

import java.util.concurrent.Callable;
import java.util.concurrent.FutureTask;

/**
 * @author Woo_home
 * @create by 2020/1/20
 */

class ProductThread implements Callable<String> {


    @Override
    public String call() throws Exception {
        for (int i = 0; i < 10; i++) {
            System.out.println("线程执行.i = " + i);
        }
        return "线程执行完毕";
    }
}

public class Demo {
    public static void main(String[] args) throws Exception{
        FutureTask<String> task = new FutureTask<>(new ProductThread());
        new Thread(task).start();
        System.out.println("【线程返回数据】" + task.get());
    }
}
输出:

面试题:Runnable 与 Callable 的区别是什么?
- Runnable 是在 JDK1.0 的时候提出的多线程的实现接口,而 Callable 是在 JDK1.5 之后提出来的
- java.lang.Runnable 接口之中只提供有一个 run() 方法,并且没有返回值
- java.util.concurrent.Callable 接口提供有 call() 方法,可以有返回值
如何优雅地停止线程?
具体内容
在多线程操作之中如果要启动多线程肯定使用的是 Thread 类中的 start() 方法,而如果对于多线程需要进行停止处理,Thread 类原本提供有 stop() 方法,但是对于这个方法从 JDK1.2 版本开始就已经被弃用了,而且一直到现在也不建议出现在你的代码之中,而且除了 stop() 方法之外还有几个方法也被弃用了:
- 停止多线程:public final void stop()
- 销毁多线程:public void destroy()
- 挂起线程: public final void suspend()、暂停执行
- 恢复挂起的线程执行:public final void resume()
之所以弃用这些方法是因为这些方法有可能导致线程的死锁,所以从 JDK1.2 开始就都不建议使用了,如果这个时候要想实现线程的停止需要通过一种柔和的方式进行
举例:(实现线程柔和的停止)
package com.java.springtest.test;

/**
 * @author Woo_home
 * @create by 2020/1/22
 */
public class ThreadTest {

    public static boolean flag = true;

    public static void main(String[] args) throws InterruptedException {
        new Thread(() -> {
            long num = 0;
            while (flag) {
                try {
                    Thread.sleep(50);
                } catch (InterruptedException e) {
                    e.printStackTrace();
                }
                System.out.println(Thread.currentThread().getName() + "正在运行.num = " + num++);
            }
        },"执行线程").start();
        Thread.sleep(200); // 休眠 200 ms
        flag = false;      // 停止线程
    }
}
输出:

万一现在有其它线程去控制这个 flag 的内容,那么这个时候对于线程的停止也不是说停就停止的,而是会在执行中会判断 flag 的内容来完成的
线程的守护
在多线程里面可以进行守护线程的定义,也就是说如果线程主线程的程序或者其它的线程还在执行的时候守护线程将一直存在,并且运行在后台状态
在 Thread 类里面提供有如下守护线程的操作方法:
- 设置为守护线程:public final void setDaemon(boolean on)
- 判断是否为守护线程:public final boolean isDaemon()
举例:(线程守护的例子)
package com.java.springtest.test;

/**
 * @author Woo_home
 * @create by 2020/1/22
 */
public class ThreadTest {
    public static void main(String[] args) {
        Thread userThread = new Thread(() -> {
            for (int num = 0; num < 100; num++) {
                try {
                    Thread.sleep(100);
                } catch (InterruptedException e) {
                    e.printStackTrace();
                }
                System.out.println(Thread.currentThread().getName() + "正在运行.num = " + num++);
            }
        },"用户线程");      // 完成核心的业务
        Thread daemonThread = new Thread(() -> {
            for (int num = 0; num < Integer.MAX_VALUE; num++) {
                try {
                    Thread.sleep(100);
                } catch (InterruptedException e) {
                    e.printStackTrace();
                }
                System.out.println(Thread.currentThread().getName() + "正在运行.num = " + num++);
            }
        },"守护线程");      // 完成核心的业务
        daemonThread.setDaemon(true); // 设置为守护线程
        userThread.start();
        daemonThread.start();
    }
}
部分运行截图:
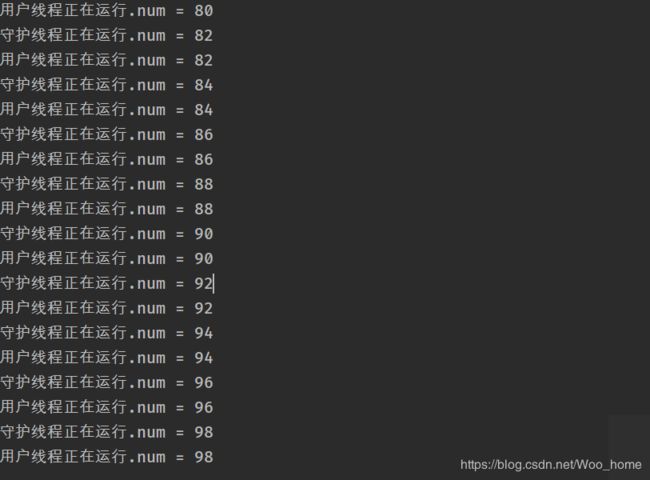
可以发现所有的守护线程都是围绕在用户线程的周围,如果程序执行完毕了,守护线程也就消失了,在整个的 JVM 里面最大的守护线程就是 GC 线程
程序执行中 GC 线程会一直存在,如果程序执行完毕,GC 线程也将消失(最大的守护线程)
volatile 关键字
具体内容
在多线程的定义之中,volatile 关键字主要是在属性定义上使用的,表示此属性为直接数据操作,而不进行副本的拷贝处理。这样的话在一些书上就将其错误的理解为同步属性了

在正常进行变量处理的时候往往会经历如下几个步骤:
- 获取变量原有的数据内容
- 为变量进行数学计算
- 将计算后的变量,保存到原始空间中
如果一个属性上追加了 volatile 关键字,表示的就是不使用副本,而是直接操作原始变量,相当于节约了:拷贝副本、重新保存的步骤
举例:(使用 volatile 关键字)
package com.java.springtest.test;

/**
 * @author Woo_home
 * @create by 2020/1/22
 */

class Product implements Runnable {

    private volatile int product = 10;   // 直接内存操作

    @Override
    public void run() {
        while (this.product > 0) {
            try {
                Thread.sleep(100);
            } catch (InterruptedException e) {
                e.printStackTrace();
            }
            System.out.println(Thread.currentThread().getName() + "抢购.product = " + this.product--);
        }
    }
}

public class Demo2 {
    public static void main(String[] args) {
        Product product = new Product();
        new Thread(product,"用户 A").start();
        new Thread(product,"用户 B").start();
        new Thread(product,"用户 C").start();
    }
}
输出:

从输出可以看到 volatile 并不解决同步的问题,只是解决了拷贝副本、重新保存的步骤
为此我们还需修改一下程序,如下:
package com.java.springtest.test;

/**
 * @author Woo_home
 * @create by 2020/1/22
 */

class Product implements Runnable {

    private volatile int product = 10; // 直接内存操作

    @Override
    public void run() {
        synchronized (this) {
            while (this.product > 0) {
                try {
                    Thread.sleep(100);
                } catch (InterruptedException e) {
                    e.printStackTrace();
                }
                System.out.println(Thread.currentThread().getName() + "抢购.product = " + this.product--);
            }
        }
    }
}

public class Demo2 {
    public static void main(String[] args) {
        Product product = new Product();
        new Thread(product,"用户 A ").start();
        new Thread(product,"用户 B ").start();
        new Thread(product,"用户 C ").start();
    }
}
输出:

更多关于 volatile 与 synchronized 关键字的介绍请看这里 volatile 与 synchronized 详解
面试题
请解释 volatile 与 synchronized 的区别?
- volatile 主要在属性上使用,而 synchronized 是在代码块与方法上使用的
- volatile 无法描述同步的处理,它只是一种直接内存的处理,避免了副本的操作,而 synchronized 是实现同步的


