javaWeb-2 JSP

JSP

  • JSP的概述

JSP(全称JavaServer Pages)是由Sun Microsystems公司主导创建的一种动态网页技术标准。JSP部署于网络服务器上,可以响应客户端发送的请求,并根据请求内容动态地生成HTML、XML或其他格式文档的Web网页,然后返回给请求者。JSP技术以Java语言作为脚本语言,为用户的HTTP请求提供服务,并能与服务器上的其它Java程序共同处理复杂的业务需求。

JSP将Java代码和特定变动内容嵌入到静态的页面中,实现以静态页面为模板,动态生成其中的部分内容。JSP引入了被称为“JSP动作”的XML标签,用来调用内建功能。另外,可以创建JSP标签库,然后像使用标准HTML或XML标签一样使用它们。标签库能增强功能和服务器性能,而且不受跨平台问题的限制。

JSP:Java Server Pages (Java服务器端页面),其实就在HTML中嵌入Java代码。

  • 为什么学习JSP

SUN公司提供了动态网页开发技术:Servlet。Servlet自身有一些缺点,SUN公司发现了这些问题,推出了一个新的动态网页开发技术JSP。

Servlet的缺点:

  1. Servlet需要进行配置,不方便维护
  2. Servlet很难向网页中输出HTML页面内容
  • 创建一个JSP页面

javaWeb-2 JSP_第1张图片

  • 运行JSP

JSP需要发布到服务器中才可以运行的。

  1. 发布项目到Tomcat中
  2. 访问JSP页面

javaWeb-2 JSP_第2张图片

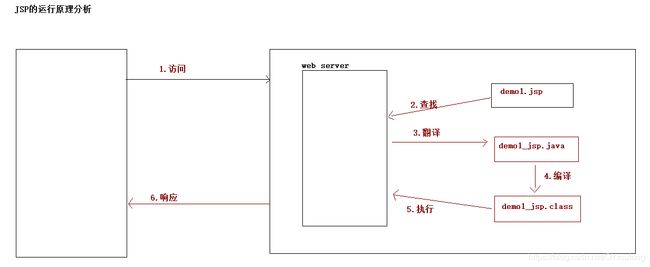
  • JSP的运行原理

javaWeb-2 JSP_第3张图片

JSP文件翻译成Java文件,将这个Java文件编译生成class文件,运行class文件。

这个java类继承了tomcat的 org.apache.jasper.runtime.HttpJspBase 类,  HttpJspBase 类继承了 HttpServlet 类,所以jsp底层还是Servlet来执行的

public final class demo1_jsp extends org.apache.jasper.runtime.HttpJspBase
  • JSP的脚本元素

什么是JSP的脚本元素

JSP = HTML + Java代码 + JSP自身东西

JSP的脚本元素: 就是在JSP中嵌入Java代码。

  • JSP的脚本元素的分类

声明标签

  1. 语法:
    1. <%! 变量或方法声明 %>
    2. 写在这个脚本中的代码,翻译成Servlet内部的成员变量或成员方法。
  2. 用法:

Hello Jsp

<%! String name = "李茂贞"; public void test(){ System.out.println("jsp test method"); }%>
public final class jspIndex_jsp extends org.apache.jasper.runtime.HttpJspBase
    implements org.apache.jasper.runtime.JspSourceDependent,
                 org.apache.jasper.runtime.JspSourceImports {

 String name = "李茂贞";
    public void test(){
        System.out.println("jsp test method");
    }
...

表达式标签

  1. 语法:
    1. <%= 表达式 %>
    2. 写在这个脚本中的代码,翻译成方法内部的out.print();当中的内容。
  2. 用法:

Hello Jsp

<%! String name = "李茂贞"; %> <%= name %>
public final class jspIndex_jsp extends org.apache.jasper.runtime.HttpJspBase
...
      out.write("\r\n");
      out.write("\r\n");
      out.write("\r\n");
      out.print( name );
      out.write("\r\n");
      out.write("\r\n");
      out.write("\r\n");
...


javaWeb-2 JSP_第4张图片

程序代码标签

  1. 语法:
    1. <% 程序代码 %>
    2. 写在这个脚本中的代码,翻译成方法内部的局部变量或方法内部代码片段。
  2. 用法:

Hello Jsp

<%! String name = "李茂贞"; %> <%= name %> <% int age = 25; %>
public final class jspIndex_jsp extends org.apache.jasper.runtime.HttpJspBase
    implements org.apache.jasper.runtime.JspSourceDependent,
                 org.apache.jasper.runtime.JspSourceImports {
...
      out.write("\r\n");
      out.write("\r\n");
      out.write("\r\n");
      out.print( name );
      out.write("\r\n");
      out.write("\r\n");
      out.write("\r\n");
 int age = 25; 
      out.write("\r\n");
      out.write("\r\n");
      out.write("\r\n");
      out.write("");
...

注意:一般不采用 声明标签 <%! 变量或方法声明 %> 来定义为成员变变量,因为servlet是线程不安全的,定义为成员变量会有线程安全问题,所以一般采用 程序代码标签  <% 程序代码 %> 来定义为局部变量或方法内部代码片段

  • JSP的开发模式

  1. servlet
  2. jsp
  3. jsp + JavaBean
  4. Jsp + Servlet + JavaBean   (MVC模式)

主要强调是MVC模式的思想

javaWeb-2 JSP_第5张图片

  • 开发中的路径问题

什么时候会遇到路径问题:

提供一些页面,在页面中会提供链接或者表单,当点击链接或者表单的时候需要进行提交,提交到Servlet中。从页面向Servlet发送请求的地址(路径)应该如何编写。

javaWeb-2 JSP_第6张图片

  • 相对路径(开发中不常用)
  1. 相对路径的写法:
    1. 相对路径不是以 / 开头的。
  2. 相对路径的使用:
    1. 在跟路径下的页面访问Servlet

demo2.jsp的访问路径:

http://localhost:8080/web02/demo2.jsp

ServletDemo1的访问路径:

http://localhost:8080/web02/ServletDemo1


    1. 在某个目录下的页面访问Servlet

demo2.jsp的访问路径:

         http://localhost:8080/web02/demo2/demo2.jsp

ServletDemo1的访问路径:

http://localhost:8080/web02/ServletDemo1

  • 绝对路径(开发中常用)
  1. 绝对路径的写法:
    1. 通常以 / 开始的路径

使用绝对路径,不需要关心当前文件和要请求的文件的相对位置的关系!!!

  1. 注意:
    1. 绝对路径分成服务器端路径和客户端路径
    2. 客户端路径  需要带工程名
    3. 服务器端路径 不需要带工程名

  • Request作为域对象存取数据

  1. 向Request域中保存数据

  1. 从Request域中获取数据

  1. 从Request域中移除数据

  • Request作为域对象作用范围

Request对象其实就是从客户端浏览器向服务器发送的一次请求信息的封装。那么实质上向Request中所保存的数据有效期也是一次请求范围。

一次请求范围:从客户端浏览器向服务器发送一次请求,服务器针对这次请求对浏览器作出响应。当服务器作出响应之后,请求对象就销毁了,保存在其中的数据就无效了。

  • 请求转发和重定向

  • 请求转发

通过ServletRequest对象获得RequestDispatcher对象。

再根据RequestDispatcher中的方法进行请求转发。


<%@ page language="java" contentType="text/html; charset=UTF-8"
    pageEncoding="UTF-8"%>


Insert title here


跳转后的页面

<%= request.getAttribute("name") %>
/**
 * 请求转发
 */
public class SkipDemo extends HttpServlet {

	protected void doGet(HttpServletRequest request, HttpServletResponse response) throws ServletException, IOException {
                //向request域中存入数据
		request.setAttribute("name", "海乃百川,有容乃大,壁立千仞,无欲则刚");
		//请求转发
		//获得RequestDispatcher对象
//		RequestDispatcher dispatcher = request.getRequestDispatcher("/index.jsp");
//		dispatcher.forward(request, response);
		request.getRequestDispatcher("/index.jsp").forward(request, response);
	}

	protected void doPost(HttpServletRequest request, HttpServletResponse response) throws ServletException, IOException {
		// TODO Auto-generated method stub
		doGet(request, response);
	}
}

请求地址: http://localhost:8080/JspDemo/SkipDemo

javaWeb-2 JSP_第7张图片

  • 重定向

通过HttpServletResponse对象中的以下方法实现重定向

/**
 * 重定向
 */
public class SkipDemo extends HttpServlet {

	protected void doGet(HttpServletRequest request, HttpServletResponse response) throws ServletException, IOException {
                //向request域中存入数据
		request.setAttribute("name", "海乃百川,有容乃大,壁立千仞,无欲则刚");
		//重定向
		response.sendRedirect("/JspDemo/index.jsp");
	}

	protected void doPost(HttpServletRequest request, HttpServletResponse response) throws ServletException, IOException {
		// TODO Auto-generated method stub
		doGet(request, response);
	}
}

 请求地址: http://localhost:8080/JspDemo/SkipDemo

javaWeb-2 JSP_第8张图片

  1. 注意:
    1. 绝对路径分成服务器端路径和客户端路径
    2. 客户端路径  需要带工程名
    3. 服务器端路径 不需要带工程名

请求转发是服务器端路径不需要带工程名,重定向是客户端路径需要带工程名,所以请求转发的时候路径是 /index.jsp,重定向的路径是 /JspDemo/index.jsp

  • 请求转发和重定向区别

  • 请求转发和重定向原理

javaWeb-2 JSP_第9张图片

  • 区别
  1. 请求转发是一次请求一次响应,而重定向是两次请求两次响应。
  2. 请求转发地址栏不会变化的,重定向地址栏发生变化。
  3. 请求转发路径不带工程名,重定向需要带工程名路径。
  4. 请求转发只能在本网站内部,重定向可以定向到任何网站。
  5. 请求转发后可以使用request域中的数据,重定向之后不能使用之前request域中的数据(重定向是两次请求,两个request,数据不一样)
  • 用户登录案例


控制层

/**
 * 用户登录
 */
public class LoginServlet extends HttpServlet {
	
	/*
	 * 统计登录人数 
	 */
	public void init(){
		int count = 0;
		// 将这个值存入到ServletContext域中。
		ServletContext scontext = this.getServletContext();
		scontext.setAttribute("count", count);
		System.out.println("count被初始化为0");
	}

	protected void doGet(HttpServletRequest request, HttpServletResponse response) throws ServletException, IOException {
		try {
			//处理中文乱码
			request.setCharacterEncoding("UTf-8");
			//接收数据
			String name = request.getParameter("username");
			String password = request.getParameter("password");
			System.out.println("username" + name + ", password:" + password);
			//数据封装
			User user = new User();
			user.setUserName(name);
			user.setPassword(password);
			//处理数据
			UserModel userModel = new UserModel();
			User dataUser = userModel.login(user);
			if (dataUser == null) {
				//登录失败
				//向request域中保存错误信息
				request.setAttribute("loginMessage", "用户或密码错误!");
				//使用请求转发跳转回登录页面,反馈错误信息
				request.getRequestDispatcher("/login.jsp").forward(request, response);
			}else {
				//登录人数加一
				ServletContext scontext = this.getServletContext();
				int count = (int)scontext.getAttribute("count") + 1;
				scontext.setAttribute("count", count);
				//登陆成功
				response.sendRedirect("/WebLogin/success.jsp");
			}
		} catch (SQLException e) {
			// TODO Auto-generated catch block
			e.printStackTrace();
		}
	}


	protected void doPost(HttpServletRequest request, HttpServletResponse response) throws ServletException, IOException {
		// TODO Auto-generated method stub
		doGet(request, response);
	}

}

模型层

/*
 * 处理数据 
 */
public class UserModel {

	/*
	 *用户登录 
	 */
	public User login(User user) throws SQLException {
		//连接数据库:通过传入的用户名和密码去数据库中进行查询
		QueryRunner queryRunner = new QueryRunner(JDBCUtils.getDataSource());
		System.out.println("查询数据库");
		User existUser = queryRunner.query("select * from user where username =? and password =? ",
				new BeanHandler(User.class), user.getUserName(), user.getPassword());
		return existUser;
	}
}

视图层

<%@ page language="java" contentType="text/html; charset=UTF-8"
    pageEncoding="UTF-8"%>


用户登录


用户登录

<% /** * 判断request域中是否有错误信息:(第一次进入登录页面的时候,没有错误信息) * * 如果有错误信息:显示错误信息 */ String msg = ""; if(request.getAttribute("loginMessage") != null){ // 有错误信息:显示错误信息: msg = (String)request.getAttribute("loginMessage"); } %>

<%= msg %>

用户名
密码
<%@ page language="java" contentType="text/html; charset=UTF-8"
    pageEncoding="UTF-8"%>


Insert title here


登录成功的页面!

<% Integer count = 0; // 判断,如果ServletContext中有值,获取并显示: if(this.getServletContext().getAttribute("count")!=null){ count = (Integer)this.getServletContext().getAttribute("count"); } %>

登录成功的总人数:<%= count %>

配置初始化统计登录人数参数


    LoginServlet
    LoginServlet
    com.toroidals.controller.LoginServlet
    
    2
  
	/*
	 * 统计登录人数 
	 */
	public void init(){
		int count = 0;
		// 将这个值存入到ServletContext域中。
		ServletContext scontext = this.getServletContext();
		scontext.setAttribute("count", count);
		System.out.println("count被初始化为0");
	}

...
				//登录人数加一
				ServletContext scontext = this.getServletContext();
				int count = (int)scontext.getAttribute("count") + 1;
				scontext.setAttribute("count", count);
				//登陆成功
				response.sendRedirect("/WebLogin/success.jsp");
...

javaWeb-2 JSP_第10张图片

javaWeb-2 JSP_第11张图片

javaWeb-2 JSP_第12张图片

javaWeb-2 JSP_第13张图片

  • 会话

在计算机术语中,会话是指一个终端用户与交互系统进行通讯的过程,比如从输入账户密码进入操作系统到退出操作系统就是一个会话过程。会话较多用于网络上,TCP的三次握手就创建了一个会话,TCP关闭连接就是关闭会话。

Cookie 并不是它的原意“甜饼”的意思, 而是一个保存在客户机中的简单的文本文件, 这个文件与特定的 Web 文档关联在一起, 保存了该客户机访问这个Web 文档时的信息, 当客户机再次访问这个 Web 文档时这些信息可供该文档使用。

  • cookie记录用户上次访问时间

javaWeb-2 JSP_第14张图片

获得从浏览器带过来的Cookie,通过HttpServletRequest对象中的方法:

 Cookie[] getCookies()
         返回包含客户端随此请求一起发送的所有 Cookie 对象的数组。如果没有发送任何 cookie,则此方法返回 null。

向浏览器回写Cookie,通过HttpServletResponse对象中的方法:

 void addCookie(Cookie cookie)
         将指定 cookie 添加到响应。可多次调用此方法设置一个以上的 cookie。

Cookie的构造,cookie的构造方法:

Cookie(String name, String value)
          Constructs a cookie with a specified name and value.

名称必须遵守 RFC 2109。这意味着它只能包含 ASCII 字母数字字符,不能包含逗号、分号或空格,也不能以 $ 字符开头。cookie 的名称在创建之后不得更改。 

  1. 获得Cookie的名称的方法

  1. 获得Cookie的值的方法

  1. 设置Cookie的有效域名

  1. 设置Cookie的有效路径

  1. 设置Cookie的有效时长

public class CookieUtils {
	
	public static Cookie findCookie(Cookie[] cookies, String name) {
		if (cookies == null) {
			return null;
		}else {
			for(Cookie cookie: cookies) {
				if (cookie.getName().equals(name)) {
					return cookie;
				}
			}
			return null;
		}
	}
}
public class FirstTime extends HttpServlet {
	
	protected void doGet(HttpServletRequest request, HttpServletResponse response) throws ServletException, IOException {
		/**
		 * 用户访问Servlet
		 * 	* 如果是第一次访问
		 * 		* 显示 您好,欢迎来到本网站
		 * 		* 记录当前访问时间,存入到Cookie,回写到浏览器
		 *  * 如果不是第一次访问
		 *  	* 从cookie中获得上次时间,显示到页面
		 *  	* 记录当前访问时间,存入到Cookie,回写到浏览器
		 */
		// 判断是否是第一次访问:从指定的Cookie的数组中获取指定名称的Cookie。
		// 获得从浏览器带过来的所有的Cookie:
		Cookie[] cookies = request.getCookies();
		// 从数组中找到指定名称的Cookie:
		Cookie cookie = CookieUtils.findCookie(cookies, "visitTime");
		if (cookie == null) {
			//第一次访问
			response.setContentType("text/html;charset=UTF-8");
			response.getWriter().println("

您好,欢迎来到本网站!

"); }else { // 获得cookie中的上次访问时间,显示到页面 String date = cookie.getValue(); response.setContentType("text/html;charset=UTF-8"); response.getWriter().println("

您好,您的上次访问时间为:"+date+"

"); } // 记录当前系统时间存入到Cookie,回写到浏览器 Date date = new Date(); // 存入到Cookie Cookie co = new Cookie("visitTime", date.toString()); // 给Cookie设置有效路径 co.setPath("/JavaWeb"); // 给Cookie设置有效时长 co.setMaxAge(60 * 60); // 设置有效时长为1小时 // 回写到浏览器: response.addCookie(co); } protected void doPost(HttpServletRequest request, HttpServletResponse response) throws ServletException, IOException { doGet(request, response); } }


javaWeb-2 JSP_第15张图片

  • Cookie的分类
  1. 默认级别的Cookie

         指的是没有设置有效时间的Cookie,默认的情况下只要关闭了浏览器,Cookie也会被销毁。(Cookie存在于浏览器的内存中,当关闭了浏览器Cookie就销毁了)。

  1. 持久级别的Cookie

       指的是有有效时间的Cookie,这种Cookie的内容不是保存在浏览器的内存中,将Cookie的内容保存(持久化)到硬盘上。这个时候,关闭浏览器,再次打开浏览器会加载硬盘上的文件,从而Cookie中的数据就不会丢失。

  • Cookie的使用细节总结
  1. 一个Cookie只用标识一种信息,至少含有一个标识该信息的名称和值。
  2. 一个web站点可以给一个浏览器发送多个Cookie。一个web浏览器可以存储多个web站点的Cookie。
  3. 浏览器一般只允许存放300个Cookie,每个站点最多可以存放20个Cookie,每个Cookie的大小限制为4KB(老版本浏览器)。-----浏览器存放的Cookie的大小和个数是有限制的。
  4. 如果创建了一个Cookie,并发送到浏览器,默认情况下它是一个会话级别的Cookie。用户退出浏览器就被删除。如果希望将这个Cookie存到磁盘上,需要设置有效时长调用setMaxAge(int maxAge)方法,以秒为单位的。
  5. 需要手动删除持久性Cookie,可以将Cookie的有效时长设置为0.必须注意:删除Cookie时候,path必须一致,否则无法删除。
  • Session

Session:在计算机中,尤其是在网络应用中,称为“会话控制”。Session对象存储特定用户会话所需的属性及配置信息。这样,当用户在应用程序的Web页之间跳转时,存储在Session对象中的变量将不会丢失,而是在整个用户会话中一直存在下去。当用户请求来自应用程序的 Web页时,如果该用户还没有会话,则Web服务器将自动创建一个 Session对象。当会话过期或被放弃后,服务器将终止该会话。

  • 什么是Session

Session称为是一次会话,Cookie将用户产生的私有的数据保存到浏览器端,Session将用户产生的私有的数据保存到服务器端。注意:一个浏览器独占一个session对象。因此,在需要保存用户数据时候,服务器程序可以将用户数据写到session对象中,当用户使用浏览器访问其他程序时,其他程序可以从用户的session中取出该用户的数据,为用户服务。

  • 为什么有Cookie还要有Session
  1. Cookie局限性:
    1. Cookie保存的数据是有个数和大小的限制的。
    2. 数据是保存客户端浏览器上(相对不是很安全)。
  2. Session
    1. Session没有个数和大小限制。
    2. 数据是保存在服务器上(相对比较安全)。

Session对象由服务器创建,开发人员可以调用request对象的getSession方法得到Session对象。

  1. 服务器是如何实现一个session为一个用户浏览器服务的?

javaWeb-2 JSP_第16张图片


Session的实现原理:

  1. 基于Cookie,基于Cookie回写了一个Session的ID。
  • Session作为域对象
  1. 向session中存入数据

  1. 从session域中获取数据

  1. 从session域中移除数据

  • Session作为域对象的作用范围

Session作为域对象,作用范围就是一次会话的范围。一次会话,指的是用户打开浏览器点击多个超链接,访问服务器资源,到最后关闭浏览器的过程。

  • Servlet的域对象的总结

  • 请求范围(ServletRequest)
  1. 何时创建和销毁的
    1. 创建:当用户向服务器发送一次请求,服务器创建一个request对象。
    2. 销毁:当服务器对这次请求作出了响应,服务器就会销毁这个request对象。
  2. 如何存取数据
    1. 存数据:
      1. void setAttribute(String name,Object value);
    2. 取数据
      1. Object getAttribute(String name);
  3. 作用范围
    1. 作用范围:一次请求。(转发就是一次请求)。
  • 会话范围(HttpSession)
  1. 何时创建和销毁的
    1. 创建:服务器端第一次调用getSession()方法的时候。
    2. 销毁:三种情况。
      1. Session过期,默认的过期时间30分钟(web.xml中配置)。
      2. 非正常关闭服务器。(正常关闭服务器—session会被序列化)。
      3. 手动调用session.invalidate();
  2. 如何存取数据
    1. 存数据:
      1. void setAttribute(String name,Object value);
    2. 取数据
      1. Object getAttribute(String name);
  3. 作用范围
    1. 作用范围:一次会话(多次请求)
  • 应用范围(ServletContext)
  1. 何时创建和销毁的
    1. 创建:服务器启动的时候创建,为每个web项目创建一个单独ServletContext对象。
    2. 销毁:服务器关闭的时候,或者项目从服务器中移除的时候。
  2. 如何存取数据
    1. 存数据:
      1. void setAttribute(String name,Object value);
    2. 取数据
      1. Object getAttribute(String name);
  3. 作用范围
    1. 作用范围:整个应用
  • 案例测试

javaWeb-2 JSP_第17张图片

  • 一次性验证码作用

一次性验证码作用:防止恶意灌水。而且一次性验证码只能够使用一次,不管成功或者失败,验证码都将失效。

一次性验证码作用:防止恶意灌水。而且一次性验证码只能够使用一次,不管成功或者失败,验证码都将失效。

javaWeb-2 JSP_第18张图片

  • jsp页面
<%@ page language="java" contentType="text/html; charset=UTF-8"
    pageEncoding="UTF-8"%>


Insert title here


<%
	String msg = "";
	// 判断是否已经存在错误信息:
	if(request.getAttribute("msg") != null){
		msg = (String)request.getAttribute("msg");
	}
%>

登录页面

<%= msg %>

用户名
密码
验证码 看不清,换一张
记住用户名
<%@page import="com.toroidals.domain.User"%>
<%@ page language="java" contentType="text/html; charset=UTF-8"
    pageEncoding="UTF-8"%>


Insert title here


<%
	if(request.getSession().getAttribute("existUser") == null){
%>		
	

您还没有登录!请先去登录

<% }else{ %>

用户登录成功!

<% User existUser = (User)request.getSession().getAttribute("existUser"); %>

您好:<%= existUser.getNickName() %> 退出

<% } %>
  • 控制层
  • 生成验证码图片

package com.toroidals.controller;

import java.awt.Color;
import java.awt.Font;
import java.awt.Graphics;
import java.awt.Graphics2D;
import java.awt.image.BufferedImage;
import java.io.IOException;
import java.util.Random;

import javax.imageio.ImageIO;
import javax.servlet.ServletException;
import javax.servlet.http.HttpServlet;
import javax.servlet.http.HttpServletRequest;
import javax.servlet.http.HttpServletResponse;
import javax.servlet.http.HttpSession;

/**
 * 生成验证码图片
 * 
 * 
 */
public class CheckImgServlet extends HttpServlet {

	public void doGet(HttpServletRequest request, HttpServletResponse response)
			throws ServletException, IOException {
		// 禁止缓存
		// response.setHeader("Cache-Control", "no-cache");
		// response.setHeader("Pragma", "no-cache");
		// response.setDateHeader("Expires", -1);

		int width = 120;
		int height = 30;

		// 步骤一 绘制一张内存中图片
		BufferedImage bufferedImage = new BufferedImage(width, height,
				BufferedImage.TYPE_INT_RGB);

		// 步骤二 图片绘制背景颜色 ---通过绘图对象
		Graphics graphics = bufferedImage.getGraphics();// 得到画图对象 --- 画笔
		// 绘制任何图形之前 都必须指定一个颜色
		graphics.setColor(getRandColor(200, 250));
		graphics.fillRect(0, 0, width, height);

		// 步骤三 绘制边框
		graphics.setColor(Color.WHITE);
		graphics.drawRect(0, 0, width - 1, height - 1);

		// 步骤四 四个随机数字
		Graphics2D graphics2d = (Graphics2D) graphics;
		// 设置输出字体
		graphics2d.setFont(new Font("宋体", Font.BOLD, 18));

		String words =
		"ABCDEFGHIJKLMNOPQRSTUVWXYZabcdefghijklmnopqrstuvwxyz1234567890";
		//String words = "\u7684\u4e00\u4e86\u662f\u6211\u4e0d\u5728\u4eba\u4eec\u6709\u6765\u4ed6\u8fd9\u4e0a\u7740\u4e2a\u5730\u5230\u5927\u91cc\u8bf4\u5c31\u53bb\u5b50\u5f97\u4e5f\u548c\u90a3\u8981\u4e0b\u770b\u5929\u65f6\u8fc7\u51fa\u5c0f\u4e48\u8d77\u4f60\u90fd\u628a\u597d\u8fd8\u591a\u6ca1\u4e3a\u53c8\u53ef\u5bb6\u5b66\u53ea\u4ee5\u4e3b\u4f1a\u6837\u5e74\u60f3\u751f\u540c\u8001\u4e2d\u5341\u4ece\u81ea\u9762\u524d\u5934\u9053\u5b83\u540e\u7136\u8d70\u5f88\u50cf\u89c1\u4e24\u7528\u5979\u56fd\u52a8\u8fdb\u6210\u56de\u4ec0\u8fb9\u4f5c\u5bf9\u5f00\u800c\u5df1\u4e9b\u73b0\u5c71\u6c11\u5019\u7ecf\u53d1\u5de5\u5411\u4e8b\u547d\u7ed9\u957f\u6c34\u51e0\u4e49\u4e09\u58f0\u4e8e\u9ad8\u624b\u77e5\u7406\u773c\u5fd7\u70b9\u5fc3\u6218\u4e8c\u95ee\u4f46\u8eab\u65b9\u5b9e\u5403\u505a\u53eb\u5f53\u4f4f\u542c\u9769\u6253\u5462\u771f\u5168\u624d\u56db\u5df2\u6240\u654c\u4e4b\u6700\u5149\u4ea7\u60c5\u8def\u5206\u603b\u6761\u767d\u8bdd\u4e1c\u5e2d\u6b21\u4eb2\u5982\u88ab\u82b1\u53e3\u653e\u513f\u5e38\u6c14\u4e94\u7b2c\u4f7f\u5199\u519b\u5427\u6587\u8fd0\u518d\u679c\u600e\u5b9a\u8bb8\u5feb\u660e\u884c\u56e0\u522b\u98de\u5916\u6811\u7269\u6d3b\u90e8\u95e8\u65e0\u5f80\u8239\u671b\u65b0\u5e26\u961f\u5148\u529b\u5b8c\u5374\u7ad9\u4ee3\u5458\u673a\u66f4\u4e5d\u60a8\u6bcf\u98ce\u7ea7\u8ddf\u7b11\u554a\u5b69\u4e07\u5c11\u76f4\u610f\u591c\u6bd4\u9636\u8fde\u8f66\u91cd\u4fbf\u6597\u9a6c\u54ea\u5316\u592a\u6307\u53d8\u793e\u4f3c\u58eb\u8005\u5e72\u77f3\u6ee1\u65e5\u51b3\u767e\u539f\u62ff\u7fa4\u7a76\u5404\u516d\u672c\u601d\u89e3\u7acb\u6cb3\u6751\u516b\u96be\u65e9\u8bba\u5417\u6839\u5171\u8ba9\u76f8\u7814\u4eca\u5176\u4e66\u5750\u63a5\u5e94\u5173\u4fe1\u89c9\u6b65\u53cd\u5904\u8bb0\u5c06\u5343\u627e\u4e89\u9886\u6216\u5e08\u7ed3\u5757\u8dd1\u8c01\u8349\u8d8a\u5b57\u52a0\u811a\u7d27\u7231\u7b49\u4e60\u9635\u6015\u6708\u9752\u534a\u706b\u6cd5\u9898\u5efa\u8d76\u4f4d\u5531\u6d77\u4e03\u5973\u4efb\u4ef6\u611f\u51c6\u5f20\u56e2\u5c4b\u79bb\u8272\u8138\u7247\u79d1\u5012\u775b\u5229\u4e16\u521a\u4e14\u7531\u9001\u5207\u661f\u5bfc\u665a\u8868\u591f\u6574\u8ba4\u54cd\u96ea\u6d41\u672a\u573a\u8be5\u5e76\u5e95\u6df1\u523b\u5e73\u4f1f\u5fd9\u63d0\u786e\u8fd1\u4eae\u8f7b\u8bb2\u519c\u53e4\u9ed1\u544a\u754c\u62c9\u540d\u5440\u571f\u6e05\u9633\u7167\u529e\u53f2\u6539\u5386\u8f6c\u753b\u9020\u5634\u6b64\u6cbb\u5317\u5fc5\u670d\u96e8\u7a7f\u5185\u8bc6\u9a8c\u4f20\u4e1a\u83dc\u722c\u7761\u5174\u5f62\u91cf\u54b1\u89c2\u82e6\u4f53\u4f17\u901a\u51b2\u5408\u7834\u53cb\u5ea6\u672f\u996d\u516c\u65c1\u623f\u6781\u5357\u67aa\u8bfb\u6c99\u5c81\u7ebf\u91ce\u575a\u7a7a\u6536\u7b97\u81f3\u653f\u57ce\u52b3\u843d\u94b1\u7279\u56f4\u5f1f\u80dc\u6559\u70ed\u5c55\u5305\u6b4c\u7c7b\u6e10\u5f3a\u6570\u4e61\u547c\u6027\u97f3\u7b54\u54e5\u9645\u65e7\u795e\u5ea7\u7ae0\u5e2e\u5566\u53d7\u7cfb\u4ee4\u8df3\u975e\u4f55\u725b\u53d6\u5165\u5cb8\u6562\u6389\u5ffd\u79cd\u88c5\u9876\u6025\u6797\u505c\u606f\u53e5\u533a\u8863\u822c\u62a5\u53f6\u538b\u6162\u53d4\u80cc\u7ec6";
		Random random = new Random();// 生成随机数

		// 定义一个StringBuffer
	    StringBuffer check_code = new StringBuffer();
		// 定义x坐标
		int x = 10;
		for (int i = 0; i < 4; i++) {
			// 随机颜色
			graphics2d.setColor(new Color(20 + random.nextInt(110), 20 + random
					.nextInt(110), 20 + random.nextInt(110)));
			// 旋转 -30 --- 30度
			int jiaodu = random.nextInt(60) - 30;
			// 换算弧度
			double theta = jiaodu * Math.PI / 180;

			// 生成一个随机数字
			int index = random.nextInt(words.length()); // 生成随机数 0 到 length - 1
			// 获得字母数字
			char c = words.charAt(index);
			
			// 将随机产生的字符存入到字符串中:
			check_code.append(c);
			
			// 将c 输出到图片
			graphics2d.rotate(theta, x, 20);
			graphics2d.drawString(String.valueOf(c), x, 20);
			graphics2d.rotate(-theta, x, 20);
			x += 30;
		}
		
		// 将buffer转成字符串对象:
		String str_check_code = check_code.toString();

		// 将其存入到session中
		HttpSession session = request.getSession();
		session.setAttribute("checkcode", str_check_code);
		// 步骤五 绘制干扰线
		graphics.setColor(getRandColor(160, 200));
		int x1;
		int x2;
		int y1;
		int y2;
		for (int i = 0; i < 30; i++) {
			x1 = random.nextInt(width);
			x2 = random.nextInt(12);
			y1 = random.nextInt(height);
			y2 = random.nextInt(12);
			graphics.drawLine(x1, y1, x1 + x2, x2 + y2);
		}

		// 将上面图片输出到浏览器 ImageIO
		graphics.dispose();// 释放资源
		ImageIO.write(bufferedImage, "jpg", response.getOutputStream());

	}


	public void doPost(HttpServletRequest request, HttpServletResponse response)
			throws ServletException, IOException {
		doGet(request, response);
	}

	/**
	 * 取其某一范围的color
	 * 
	 * @param fc
	 *            int 范围参数1
	 * @param bc
	 *            int 范围参数2
	 * @return Color
	 */
	private Color getRandColor(int fc, int bc) {
		// 取其随机颜色
		Random random = new Random();
		if (fc > 255) {
			fc = 255;
		}
		if (bc > 255) {
			bc = 255;
		}
		int r = fc + random.nextInt(bc - fc);
		int g = fc + random.nextInt(bc - fc);
		int b = fc + random.nextInt(bc - fc);
		return new Color(r, g, b);
	}

}
  • 登录控制 LoginServlet
package com.toroidals.controller;

import java.io.IOException;
import java.sql.SQLException;

import javax.servlet.RequestDispatcher;
import javax.servlet.ServletContext;
import javax.servlet.ServletException;
import javax.servlet.http.Cookie;
import javax.servlet.http.HttpServlet;
import javax.servlet.http.HttpServletRequest;
import javax.servlet.http.HttpServletResponse;
import javax.servlet.http.HttpSession;

import com.toroidals.domain.User;
import com.toroidals.model.UserModel;

/**
 * 用户登录
 */
public class LoginServlet extends HttpServlet {
	
	/*
	 * 统计登录人数 
	 */
	public void init(){
		int count = 0;
		// 将这个值存入到ServletContext域中。
		ServletContext scontext = this.getServletContext();
		scontext.setAttribute("count", count);
		System.out.println("count被初始化为0");
	}

	protected void doGet(HttpServletRequest request, HttpServletResponse response) throws ServletException, IOException {
		try {
			//处理中文乱码
			request.setCharacterEncoding("UTf-8");
			
			// 一次性验证码的校验
			// 接收验证码
			String userCode = request.getParameter("checkcode");
			
			//获取session
			HttpSession session = request.getSession();
			// 从session中获取一次性验证码的值:
			String sessionCode = (String) session.getAttribute("checkcode");
			
			// 为了保证验证码使用一次:应该将session中的验证码值清空
			session.removeAttribute("checkcode");

			// 校验一次性验证码:
			if(!userCode.equalsIgnoreCase(sessionCode)){
				request.setAttribute("msg", "验证码输入错误!");
//				RequestDispatcher rd = request.getRequestDispatcher("/login.jsp");
//				rd.forward(request, response);
				request.getRequestDispatcher("/login.jsp").forward(request, response);
				return;
			}
			
			//接收数据
			String name = request.getParameter("username");
			String password = request.getParameter("password");
			System.out.println("username" + name + ", password:" + password);
			//数据封装
			User user = new User();
			user.setUserName(name);
			user.setPassword(password);
			//处理数据
			UserModel userModel = new UserModel();
			User dataUser = userModel.login(user);
			if (dataUser == null) {
				//登录失败
				//向request域中保存错误信息
				request.setAttribute("msg", "用户或密码错误!");
				//使用请求转发跳转回登录页面,反馈错误信息
				request.getRequestDispatcher("/login.jsp").forward(request, response);
			}else {
				//登陆成功
				//登录人数加一
				ServletContext scontext = this.getServletContext();
				int count = (int)scontext.getAttribute("count") + 1;
				scontext.setAttribute("count", count);
				
				// 保存用户的信息:保存到会话当中。
				// 保存数据:
				session.setAttribute("existUser", dataUser);
				
				// 记住用户名:
				// 判断复选框是否已经勾选了:
				String remember = request.getParameter("remember");
				if("true".equals(remember)){
					// 已经勾选了:
					Cookie cookie = new Cookie("remember",dataUser.getUserName());
					// 设置有效路径:
					cookie.setPath("/WebLogin");
					// 设置有效时长:
					cookie.setMaxAge(60*60*24);
					// 将Cookie回写到浏览器
					response.addCookie(cookie);
				
				//重定向到登陆成功页面
				response.sendRedirect("/WebLogin/success.jsp");
				}
			}
		} catch (SQLException e) {
			// TODO Auto-generated catch block
			e.printStackTrace();
		}
	}


	protected void doPost(HttpServletRequest request, HttpServletResponse response) throws ServletException, IOException {
		// TODO Auto-generated method stub
		doGet(request, response);
	}

}


javaWeb-2 JSP_第19张图片

javaWeb-2 JSP_第20张图片

javaWeb-2 JSP_第21张图片

javaWeb-2 JSP_第22张图片

  • JSP的回顾

  • 什么是JSP

JSP:Java Server Pages Java服务器端页面。

JSP 就是 HTML + Java代码 + JSP自身东西。

  • JSP由来

Servlet技术生成动态网页的时候很麻烦,需要通过response获得输出流,调用print方法进行打印的。这种编程方式很麻烦,而且美工也不容易处理。SUN公司为了简化动态网页开发,推出JSP。

  • JSP的运行原理

JSP在执行时,会被服务器翻译为Servlet编译执行,JSP就是一个Servlet。

  • JSP脚本元素

<%!    %>    :JSP声明 翻译成 Servlet成员部分的内容。声明变量,方法,内部类。
<%= %>    :翻译out.print(),在service方法内部。用于生成HTML页面源码。
<%    %>    :嵌入Java代码 翻译成service方法内部的代码块。声明变量,内部类。

  • JSP的模板修改

  • 修改JSP的字符集编码

javaWeb-2 JSP_第23张图片

  • JSP的注释

  • HTML的注释
  1. 写法:
  2. 存在时机
    1. 存在JSP的源码中,翻译成Servlet后这个注释也存在,在生成HTML响应到页面的时候这个注释也会存在。
  • java代码的注释
  1. 写法:
    1. <% // 单行注释
    2. /* 多行注释 */
    3. /**文档注释*/
    4.  %>
  2. 存在时机
    1. 存在JSP的源码中,翻译成Servlet后Java代码的注释也会存在,但是生成HTML响应到页面后,这种注释就消失了。
  • jsp的注释
  1. 写法:
    1. <%-- JSP的注释 --%>
  2. 存在时机:
    1. 存在JSP的源码中,翻译Servlet后注释就没有了。

注意:Java代码注释的话不要使用HTML的注释!!!

  • JSP的指令元素的概述

  • JSP指令元素作用
  1. 用于指示JSP执行的某些步骤
  2. 用于指示JSP变现特定行为
  • JSP指令元素的语法
  1. 语法:
    1. <%@ 指令名称 属性名称=属性的值 属性名称=属性的值 %>
  • JSP指令元素的分类
  1. page指令:指示JSP的页面设置属性和行为
  2. include指令:指示JSP包含哪些其他页面
  3. taglib指令:指示JSP页面包含哪些标签库
  • JSP的指令-page

  • Page指令简介
  1. 写法:
    1. <%@ page 属性名=属性值 %>
  2. Page指令用来定义JSP文件的全局属性。
  3. 这些属性可以单独使用,也可以几个或多个同时使用。
  4. 在JSP页面中,只有import属性可以出现多次,其他属性都只能出现一次。
  • Page指令属性
  1. language属性:       声明使用脚本的语言。只能是java。
  2. extends属性:         标明JSP编译成Servlet的时候继承的类。默认值:HttpJspBase。
  3. session属性:           标明JSP中是否可以直接使用session对象。默认值是true。
  4. buffer属性:            标明JSP对客户端输出缓冲区大小。默认值8kb。
  5. autoFlush属性:      如果缓冲区大小溢出,是否自动刷出。默认true。
  6. import属性:         用于导入Java包或类。
  7. contentType属性:标明JSP被浏览器解析和打开的时候采用的默认的字符集。
  8. pageEncoding属性:JSP文件及JSP翻译后的Servlet保存到硬盘上采用字符集。
  9. isErrorPage属性:  处理JSP页面异常。
  10. errorPage属性:     处理JSP页面异常。
  11. isELIgnored属性:  通知JSP是否忽略EL表达式。
  • Include指令

  1. 写法:
    1. <%@ include 属性名=属性值%>
  2. 作用:
    1. 在JSP页面中静态包含一个文件,同时由该JSP解析包含的文件内容。
  • Include指令属性
  1. file属性:         指示JSP页面包含页面路径。
  • Include指令原理(静态包含原理)

javaWeb-2 JSP_第24张图片

思想: 将公共部分抽取出来,提供给其它jsp页面使用


<%@ page language="java" contentType="text/html; charset=UTF-8"
    pageEncoding="UTF-8"%>

这是head

<%@ page language="java" contentType="text/html; charset=UTF-8" pageEncoding="UTF-8"%>

这是menu

<%@ page language="java" contentType="text/html; charset=UTF-8" pageEncoding="UTF-8"%>

这是FOOT

<%@ page language="java" contentType="text/html; charset=UTF-8" pageEncoding="UTF-8"%> Insert title here <%@ include file="head.jsp" %> <%@ include file="menu.jsp" %> 失控的欲望,终会引发祸端
在你口嗨的时候,别人已经开始行动了 <%@ include file="foot.jsp" %>


javaWeb-2 JSP_第25张图片


  1. 注意地方:
    1. 应该将被包含的页面的结构去掉。
    2. 在被包含的页面中定义变量,在包含的页面中还可以使用。
  • Taglib指令

  1. 写法
    1. <%@ taglib 属性名=属性值%>
  2. 作用:
    1. 用于在JSP页面中引入标签库。
  • Taglib指令属性
  1. uri属性:         引入的标签库的路径
  2. prefix属性:    引入标签库的别名
  • JSP的内置对象

JSP的内置对象:指的是可以直接在JSP页面中使用的对象。

  • JSP中9大内置对象(很重要)

request

HttpServletRequest

从客户端向服务器发送的请求对象

response

HttpServletResponse

从服务器端向客户端作出响应对象

session

HttpSession

服务器为客户端创建会话对象

application

ServletContext

代表应用。获得的ServletContext对象。

out

JspWriter

向输出流写入内容的对象。

page

Object

当前的JSP翻译成Servlet后的对象的引用。

pageContext

PageContext

本JSP的页面的上下文对象。

config

ServletConfig

本JSP的ServletConfig对象。

exception

Throwable(所有异常的父类)

表示JSP页面运行时产生的异常对象。

  • pageContext对象(很重要)

pageContext对象直接翻译为“页面上下文”对象,代表的是当前页面运行的一些属性。它是javax.servlet.jsp.PageContext类的实例对象。

findAttribute方法:查找属性方法:先根据小范围的名称进行查找,如果找到了就返回,如果没有找到就会去比其大一个域的范围进行查找。

findAttribute方法

<%= pageContext.findAttribute("name") %>
  • pageContext对象作用
  1. 提供了page范围的数据存取的方法:
    1. 向page范围中存入数据:

    1. 从page范围获取数据


从page范围移除数据


查找属性的方法:

  1. 通过这个对象获得其他的8个内置对象:
    1. 获得其他8个内置对象的方法


javaWeb-2 JSP_第26张图片

  • JSP的四个作用范围

  1. PageScope                   :页面范围。
    1. 页面范围指的是在当前的页面内有效,出了这个页面,用pageContext保存的数据就无效了。
  2. RequestScope             :请求范围。
    1. 从客户端向服务器发送一次请求,服务器对这次请求作出了响应之后,用request保存的数据就无效了。
  3. SessionScope              :会话范围。
    1. 每个浏览器向服务器发送请求(多次请求)。将该会话结束。
  4. ApplicationScope       :应用范围。

                在整个应用中任意的地方都可以获取


<%@ page language="java" contentType="text/html; charset=UTF-8"
    pageEncoding="UTF-8"%>


Insert title here


JSP的四个作用范围

<% //page范围(pageContext) pageContext.setAttribute("name", "page范围"); //request范围 request.setAttribute("name", "request范围"); //session范围 session.setAttribute("name", "session范围"); // application范围 application.setAttribute("name", "application范围"); %>

当前页面获取值

<%= pageContext.getAttribute("name")%>
<%= request.getAttribute("name")%>
<%= session.getAttribute("name")%>
<%= application.getAttribute("name")%>

转发页面获取值

<%= "转发到scopForward.jsp"%> <% //转发到demo2.jsp request.getRequestDispatcher("/jsp/scopForward.jsp").forward(request, response); %>

重定向页面获取值

重定向 <%@ page language="java" contentType="text/html; charset=UTF-8" pageEncoding="UTF-8"%> Insert title here

转发页面获取值

<%= pageContext.getAttribute("name")%>
<%= request.getAttribute("name")%>
<%= session.getAttribute("name")%>
<%= application.getAttribute("name")%>
<%@ page language="java" contentType="text/html; charset=UTF-8" pageEncoding="UTF-8"%> Insert title here

重定向页面获取值

<%= pageContext.getAttribute("name")%>
<%= request.getAttribute("name")%>
<%= session.getAttribute("name")%>
<%= application.getAttribute("name")%>


javaWeb-2 JSP_第27张图片

  •  转发后,page范围失效


javaWeb-2 JSP_第28张图片

  •  重定向后,page范围失效 ,request范围失效

javaWeb-2 JSP_第29张图片

  • 跨浏览器或者浏览器关闭再打开后, page范围失效 ,request范围失效,session范围失效

javaWeb-2 JSP_第30张图片

  • JSP的动作标签

JSP的动作标签用于在JSP页面中提供业务逻辑功能,避免在JSP页面中直接编写Java代码,造成jsp页面难以维护。

  • 常用的动作标签

  1. :请求转发。
  2. :包含(动态包含)。
  3. :传递参数。
  • 静态包含和动态包含区别

javaWeb-2 JSP_第31张图片


  • EL表达式

 EL(Expression Language) 是为了使JSP写起来更加简单。表达式语言的灵感来自于 ECMAScript 和 XPath 表达式语言,它提供了在 JSP 中简化表达式的方法,让Jsp的代码更加简化。

  • EL作用: EL和JSTL一起使用取代JSP页面中嵌入Java代码写法。
  • EL功能
  1. EL获取数据
  2. EL执行运算
  3. EL获取web开发常用的对象
  4. EL调用Java方法
  • EL语法
  1. 语法:  ${ EL表达式 }
  • EL如何获取数据

EL表达式语句在执行的时候,会调用pageContext.findAttribute()方法。分别从page、request、session、application范围查找相应对象,找到就会返回相应对象,找不到返回””(不是null,是空的字符串)。EL所获取的数据需要在四个作用范围中。

<%@ page language="java" contentType="text/html; charset=UTF-8"
    pageEncoding="UTF-8"%>


Insert title here


EL获取数据

<% //pageContext.setAttribute("name", "pageContext"); request.setAttribute("name", "request"); session.setAttribute("name", "session"); application.setAttribute("name", "application"); %> <%= pageContext.getAttribute("name") %> -- ${pageScope.name}
<%= request.getAttribute("name") %> -- ${requestScope.name}
<%= session.getAttribute("name") %> -- ${sessionScope.name}
<%= application.getAttribute("name") %> -- ${applicationScope.name}

EL的简写

${name}

javaWeb-2 JSP_第32张图片

  • EL获取数组的数据
  • 获取List集合的数据
  • 获取Map集合的数据
  1. 注意:
    1. 如果map的key中包含了特殊字符,不能使用.必须使用[]。
      1. .用来获取对象的属性的。
      2. []用来获得下标。
<%@page import="java.util.*"%>
<%@ page language="java" contentType="text/html; charset=UTF-8"
    pageEncoding="UTF-8"%>


Insert title here


EL获取数据

获取数组的数据

<% String[] arrs = {"aa","bb","cc"}; pageContext.setAttribute("arrs", arrs); %> ${ arrs[0] } ${ arrs[1] } ${ arrs[2] }

获取List集合的数据

<% List list = new ArrayList(); list.add("11"); list.add("22"); list.add("33"); pageContext.setAttribute("list", list); %> ${ list[0] } ${ list[1] } ${ list[2] }

获取Map中的数据

<% Map map = new HashMap(); map.put("aaa", 111); map.put("bbb", 222); map.put("ccc.ddd", 333); pageContext.setAttribute("map", map); %> ${ map.aaa } ${ map.bbb } ${ map["ccc.ddd"] }

javaWeb-2 JSP_第33张图片


  • EL执行运算

  1. 执行算数运算
  2. 执行关系运算
  3. 执行逻辑运算
  4. 执行三元运算
  5. empty运算符
<%@ page language="java" contentType="text/html; charset=UTF-8"
    pageEncoding="UTF-8"%>


Insert title here


EL执行运算

执行算数运算

<% pageContext.setAttribute("n1", "10"); pageContext.setAttribute("n2", "20"); %> ${ n1+n2 }

执行关系运算

${ n1 < n2 } -- ${ n1 lt n2 }
${ n1 > n2 } -- ${ n1 gt n2 }
${ n1 == n2 } -- ${ n1 eq n2 }
${ n1 >= n2 } -- ${ n1 ge n2 }
${ n1 <= n2 } -- ${ n1 le n2 }
${ n1 != n2 } -- ${ n1 ne n2 }

执行逻辑运算

<% pageContext.setAttribute("n3", "30"); pageContext.setAttribute("n4", "40"); %> ${ (n1 < n2) && (n3 < n4)} -- ${ (n1 < n2) and (n3 < n4)}
${ (n1 < n2) || (n3 < n4)} -- ${ (n1 < n2) or (n3 < n4)}
${ !(n1 < n2) } -- ${ not (n1 < n2)}

执行三元运算

${ n1 < n2 ? "n1小于n2" : "n1不小于n2" }

空运算符

${ empty user }

javaWeb-2 JSP_第34张图片

  • EL获取web开发常用对象

EL表达式定义了11个web开发常用对象。使用这些对象可以很方便获取web开发冲的一些常见对象,并可以读取这些对象中的数据。

  1. pageContext               :相当于JSP内置对象中pageContext
  2. pageScope                   :获取指定域下的名称的数据
  3. requestScope             :获取指定域下的名称的数据
  4. sessionScope               :获取指定域下的名称的数据
  5. applicationScope       :获取指定域下的名称的数据
  6. param                          :在页面中接收请求参数(接收一个名称对应一个值参数)。
  7. paramValues              :在页面中接收请求参数(接收一个名称对应多个值参数)。
  8. header                         :在页面上获取请求头(获取一个key对应一个value 头)
  9. headerValues             :在页面上获取请求头(获取一个key对应多个value 头)
  10. cookie                           :访问cookie的名称和值(${cookie.key.name} ${cookie.key.value})
  11. initParam                    :获取全局初始化参数的值
http://127.0.0.1:8080/JspDemo/el/index4.jsp?name="limaozhen"&hobby=pingpang&hobby=basketball


  JspDemo
  
    index.html
    index.htm
    index.jsp
    default.html
    default.htm
    default.jsp
  
  
  	username
  	root


    SkipDemo
    SkipDemo
    com.toroidals.request.SkipDemo
  
  
    SkipDemo
    /SkipDemo
  
<%@ page language="java" contentType="text/html; charset=UTF-8"
    pageEncoding="UTF-8"%>


Insert title here


EL获取web开发常用对象

${ param.name }
${ paramValues.hobby[0] }${ paramValues.hobby[1] }
${ header["User-Agent"] }
${ initParam.username }
${ pageContext.request.contextPath }
${ pageContext.request.remoteAddr }

javaWeb-2 JSP_第35张图片


  • JSTL

JSTL(Java server pages standarded tag library,即JSP标准标签库)是由JCP(Java community Proces)所制定的标准规范,它主要提供给Java Web开发人员一个标准通用的标签库,并由Apache的Jakarta小组来维护。开发人员可以利用这些标签取代JSP页面上的Java代码,从而提高程序的可读性,降低程序的维护难度。

JSTL:JSP的标准标签库。

  • JSTL作用

主要和EL来取代传统页面上直接嵌入Java代码写法。提升程序可读性、维护性和方便性。

  • JSTL的版本
  •  

JSTL1.0、JSTL1.1和JSTL1.2版本

  1. 1.0版本不支持EL表达式。
  2. 1.11.2支持了EL表达式。
  • JSTL的标签库
  1. c标签(core标签库)
  2. fmt标签(国际化标签库)
  3. xml标签
  4. sql标签
  5. jstl函数库(EL函数)
  • 引入JSTL的jar包

  • 引入标签库

<%@ page language="java" contentType="text/html; charset=UTF-8"
    pageEncoding="UTF-8"%>
<%@ taglib uri="http://java.sun.com/jsp/jstl/core" prefix="c" %>


Insert title here


<% pageContext.setAttribute("name", "李茂贞"); %>

${ name }

${ pageScope.name }


  • JSTL的if标签

  • if标签的属性
  1. test属性  :条件
  2. var属性    :将test中的条件的值赋给一个变量,在var中定义变量
  3. scope属性:作用范围


  • if的标签使用
<%@ page language="java" contentType="text/html; charset=UTF-8"
    pageEncoding="UTF-8"%>
<%@ taglib uri="http://java.sun.com/jsp/jstl/core" prefix="c"%>


Insert title here


JSTL的if标签的使用

i大于等于10 i小于10 flag为true


javaWeb-2 JSP_第36张图片

  • JSTL的foreach标签

标签的属性

属性名

是否支持EL

属性类型

属 性 描 述

var

false

String

指定将当前迭代到的元素保存到page这个Web域中的属性名称

items

true

任何支持的类型

将要迭代的集合对象

varStatus

false

String

指定将代表当前迭代状态信息的对象保存到page这个Web域中的属性名称

begin

true

int

如果指定items属性,就从集合中的第begin个元素开始进行迭代,begin的索引值从0开始编号;如果没有指定items属性,就从begin指定的值开始迭代,直到end值时结束迭代

end

true

int

参看begin属性的描述

step

true

int

指定迭代的步长,即迭代因子的迭代增量

foreach标签的使用

<%@page import="java.util.*"%>
<%@ page language="java" contentType="text/html; charset=UTF-8"
    pageEncoding="UTF-8"%>
<%@ taglib uri="http://java.sun.com/jsp/jstl/core" prefix="c"%>


Insert title here


JSTL的foreach标签的使用

遍历数组

<% String[] arrs = {"qwe","asd","zxc"}; pageContext.setAttribute("arrs", arrs); %> ${ a }

遍历List集合

<% List list = new ArrayList(); list.add("李茂贞"); list.add("袁天罡"); list.add("李淳风"); pageContext.setAttribute("list", list); %> ${ s }

遍历Map集合

<% Map map = new HashMap(); map.put("宇文乾坤", 1500); map.put("尸尊邓尘", 1400); map.put("西夷子", 1450); pageContext.setAttribute("map", map); %> ${ entry.key }: ${ entry.value },

遍历从0到10

${ i }

遍历100到200 每次加2 到第三个数的时候 将该数字变为蓝色

${ i } ${ i }

javaWeb-2 JSP_第37张图片

  • 查询数据库并显示到页面

<%@page import="com.toroidals.domain.User"%>
<%@ page language="java" contentType="text/html; charset=UTF-8"
    pageEncoding="UTF-8"%>
<%@ taglib uri="http://java.sun.com/jsp/jstl/core" prefix="c" %>


Insert title here


<%
	if(request.getSession().getAttribute("existUser") == null){
%>		
	

您还没有登录!请先去登录

<% }else{ %>

用户登录成功!

<% User existUser = (User)request.getSession().getAttribute("existUser"); %>

您好:<%= existUser.getNickName() %> 退出

显示所有用户信息
<% } %>
package com.toroidals.controller;

import java.io.IOException;
import java.sql.SQLException;
import java.util.List;

import javax.servlet.ServletException;
import javax.servlet.http.HttpServlet;
import javax.servlet.http.HttpServletRequest;
import javax.servlet.http.HttpServletResponse;

import com.toroidals.domain.User;
import com.toroidals.model.UserModel;

/**
   * 查询所有用户信息
 */
public class QueryAll extends HttpServlet {
	
	protected void doGet(HttpServletRequest request, HttpServletResponse response) throws ServletException, IOException {
		//处理中文乱码
		request.setCharacterEncoding("UTF-8");
		//查询所用用户
		UserModel userModel = new UserModel();
		try {
			List users = userModel.queryAllInfo();
			if (users != null) {
				//查询成功
				//将数据存入response
				request.setAttribute("users", users);
				
			}
			request.getRequestDispatcher("/success.jsp").forward(request, response);
		} catch (SQLException e) {
			// TODO Auto-generated catch block
			e.printStackTrace();
		}
		
	}

	protected void doPost(HttpServletRequest request, HttpServletResponse response) throws ServletException, IOException {
		// TODO Auto-generated method stub
		doGet(request, response);
	}

}


javaWeb-2 JSP_第38张图片


你可能感兴趣的:(JavaWeb)

用户id 用户名 密码 昵称
${ user.userId } ${ user.userName } ${ user.password } ${ user.nickName }