用VScode编写LaTex-最新教程
哎,学习latex,首先要搭建环境,当然百度一下你会发现大多首推CTeX套装,下载下来之后,觉得好丑有古老。于是去知乎看看有什么好用的编辑器,推荐了不少,我采用了自己稍稍熟悉一些、界面好看一点的方案:
系统:Windows 10
编辑器:VScode(必)
插件:LaTex Workshop(必)
LaTeX发行版:MiKTeX(必)
PDF阅读器:SumatraPDF(推荐)
LaTeX发行版也可以用Texlive,我觉得比较大,而且不好下,初学者也用不到太多的东东,所有我选择一个小巧玲珑的编译包MiKTeX。
虽然MiKTeX有自带的编辑器TeXworks,但界面略丑吧,还是选择VScode来写,这样看着舒服多了o( ̄︶ ̄)o。
轻量级PDF阅读器SumatraPDF,可以用于正向搜索与反向搜索,意思就是点击代码定位到文档,点击文档定位到代码。vscode也有内置pdf查看器,但无法搜索,如果不用搜索功能,这个可以不用下。
下载&安装软件
1.VScode
自己写的笔记。
VScode下载和安装
2.MiKTeX
进入官网下载
Windows用户
 安装之前最好确保电脑中没有其他的排版编译器
如有CTeX套装,请删除后安装MiKTeX
下载好之后双击exe程序安装,选择个人,因为官方说个人好维护。。。
 安装路径随便,最好不要有中文,不要奇怪的字符(有个学妹的文件夹竟然有表情。。。。。)
安装好之后会自动添加环境变量,如果你运气不好,就要手动添加了。
去确认一下,嗯~ o( ̄▽ ̄)o 我运气好,自动添加好了。
没有自动添加的找到…\miktex\bin\x64\ 安装目录,添加上环境变量,然后移动到最上面就好。

3.插件LaTex Workshop
在扩展商店里,搜索latex,下载LaTex Workshop。

配置文件
打开settings.json文件,步骤如图:
1.左下角点击小齿轮
2.设置
3.输入settings
4.左侧一栏选择LTeX
5.选择在settings.json中编辑。
 将下面代码粘贴到setting.json文件中。
注意:
1.因为我写中文论文所以用xelatex编译,在latex-worshop.latex.recipes中把xelatex放在首位,你要写英文论文就把latexmk放在第一位。
2.将 tools 中的 %DOC%替换成%DOCFILE%就可以支持中文路径下的文件了
3.要使用 pdflatex,只需在 tex 文档首加入以下代码:
%!TEX program = pdflatex
默认保存文档时自动重新编译。
添加下面代码到settings.json中可以取消保存时自动编译。
"latex-workshop.latex.autoBuild.run": "never",
settings.json代码:
{
  "latex-workshop.latex.recipes": [
    {
  "name": "xelatex",
  "tools": [
      "xelatex"
  ]
},
{
  "name": "latexmk",
  "tools": [
      "latexmk"
  ]
},
{
  "name": "xelatex -> bibtex -> xelatex*2",
  "tools": [
      "xelatex",
      "bibtex",
      "xelatex",
      "xelatex"
  ]
}
],
"latex-workshop.latex.tools": [
  {
"name": "xelatex",
"command": "miktex-xelatex",
"args": [
  "-synctex=1",
  "-interaction=nonstopmode",
  "-file-line-error",
  "%DOC%"
]
}, {
  "name": "latexmk",
"command": "miktex-latexmk",
"args": [
  "-synctex=1",
  "-interaction=nonstopmode",
  "-file-line-error",
  "-pdf",
  "%DOC%"
]
}, {
"name": "pdflatex",
"command": "miktex-pdflatex",
"args": [
  "-synctex=1",
  "-interaction=nonstopmode",
  "-file-line-error",
  "%DOC%"
]
}, {
"name": "bibtex",
"command": "miktex-bibtex",
"args": [
  "%DOCFILE%"
]
}
],

//清除辅助文件
"latex-workshop.latex.autoClean.run": "onBuilt",
"latex-workshop.latex.clean.fileTypes": [
"*.aux",
"*.bbl",
"*.blg",
"*.idx",
"*.ind",
"*.lof",
"*.lot",
"*.out",
"*.toc",
"*.acn",
"*.acr",
"*.alg",
"*.glg",
"*.glo",
"*.gls",
"*.ist",
"*.fls",
"*.log",
"*.fdb_latexmk",
],
  "latex-workshop.view.pdf.viewer": "tab", //用内置pdf阅读器查看

"latex-workshop.showContextMenu":true,   //右键菜单
}
如图所示
 这里VScode已经配置好了。
能成功编写latex了。
测试
打开一个空文件夹,新建一个.tex文件,简单写一写。
 按Ctrl+Alt+B进行编译。
再按Ctrl+Alt+V进行查看。效果如图所示:
 到这里可以结束了。如果向用定位功能,继续往下看。
SumatraPDF设置
下载安装SumatraPDF。
** 注意:以下内容为最新的配置格式,与以前的不同。 **
就是因为格式已经更新,按照原来的方案配置了好久都不行,欲哭无泪!!。百度许久查阅最新的配置方案,终于成功了!
1.使用SumatraPDF查看
使用外置阅读器SumatraPDF查看pdf文件。
再此打开settings.json文件。
latex-workshop.view.pdf.viewer改为**“external”**
"latex-workshop.view.pdf.viewer": "external",
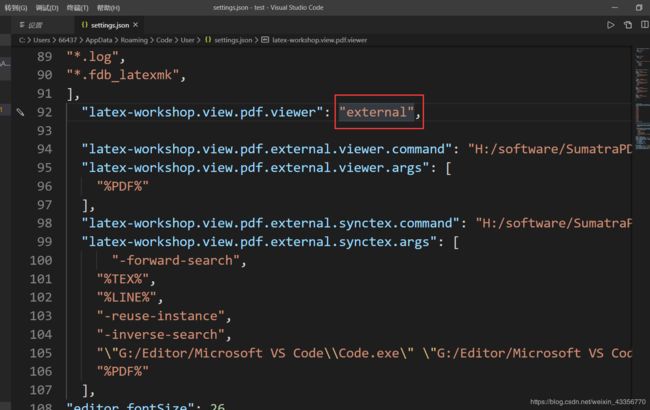 添加下面代码,command是程序SumatraPDF.exe的路径,按照你的安装路径自行修改
"latex-workshop.view.pdf.external.viewer.command": "H:/software/SumatraPDF\\SumatraPDF.exe",
  "latex-workshop.view.pdf.external.viewer.args": [
    "%PDF%"
  ],
2.配置正向搜索
添加以下代码到配置文件中:
倒数第三行,添加的code.exe是你自己vscode的路径,还有cli.js文件也是Microsoft VS Code\resources\app\out\中的文件,请按照自己的安装路径自行修改。
注意:路径使用反斜杠/或者双斜杠\\。
"latex-workshop.view.pdf.external.synctex.command": "H:/software/SumatraPDF\\SumatraPDF.exe",
  "latex-workshop.view.pdf.external.synctex.args": [
      "-forward-search",
    "%TEX%",
    "%LINE%",
    "-reuse-instance",
    "-inverse-search",
    "\"G:/Editor/Microsoft VS Code\\Code.exe\" \"G:/Editor/Microsoft VS Code\\resources\\app\\out\\cli.js\" -r -g \"%f:%l\"",
    "%PDF%"
  ],
配置后可以按ctrl+alt+J进行正向搜索,或者右键SyncTex from cursor。就可以定位到文档

https://pic1.zhimg.com/v2-17c9a491422e57f94429364cae367220_b.webp]
3.配置反向搜索
打开SumatraPDF软件,
左上角三道杠->设置->选项。

修改这里面的内容:
添加 \Code.exe 和 \cli.js ,还是上一步的那两个路径,这里填写路径的时候** 一个斜杠\ **就好,路径用双引号括起来。
添加两个参数 -r -g “%f:%l”
这是我修改后的:
"G:\Editor\Microsoft VS Code\Code.exe" "G:\Editor\Microsoft VS Code\resources\app\out\cli.js" -r -g "%f:%l"

在pdf文档中双击内容,就可以定位到代码。
注意:.synctex.gz文件不要删除用于搜索定位的。
我的最终配置文件:
{
  "latex-workshop.latex.recipes": [
    {
  "name": "xelatex",
  "tools": [
      "xelatex"
  ]

},
{
  "name": "latexmk",
  "tools": [
      "latexmk"
  ]
},
{
  "name": "xelatex -> bibtex -> xelatex*2",
  "tools": [
      "xelatex",
      "bibtex",
      "xelatex",
      "xelatex"
  ]
}

],
"latex-workshop.latex.tools": [
  {
"name": "xelatex",
"command": "miktex-xelatex",
"args": [
  "-synctex=1",
  "-interaction=nonstopmode",
  "-file-line-error",
  "%DOC%"
]
}, {
  "name": "latexmk",
"command": "miktex-latexmk",
"args": [
  "-synctex=1",
  "-interaction=nonstopmode",
  "-file-line-error",
  "-pdf",
  "%DOC%"
]
}, {
"name": "pdflatex",
"command": "miktex-pdflatex",
"args": [
  "-synctex=1",
  "-interaction=nonstopmode",
  "-file-line-error",
  "%DOC%"
]
}, {
"name": "bibtex",
"command": "miktex-bibtex",
"args": [
  "%DOCFILE%"
]
}
],

//清除辅助文件
"latex-workshop.latex.autoClean.run": "onBuilt",
"latex-workshop.latex.clean.fileTypes": [
"*.aux",
"*.bbl",
"*.blg",
"*.idx",
"*.ind",
"*.lof",
"*.lot",
"*.out",
"*.toc",
"*.acn",
"*.acr",
"*.alg",
"*.glg",
"*.glo",
"*.gls",
"*.ist",
"*.fls",
"*.log",
"*.fdb_latexmk",
],
  "latex-workshop.view.pdf.viewer": "external",

  "latex-workshop.view.pdf.external.viewer.command": "H:/software/SumatraPDF\\SumatraPDF.exe",
  "latex-workshop.view.pdf.external.viewer.args": [
    "%PDF%"
  ],
  "latex-workshop.view.pdf.external.synctex.command": "H:/software/SumatraPDF\\SumatraPDF.exe",
  "latex-workshop.view.pdf.external.synctex.args": [
      "-forward-search",
    "%TEX%",
    "%LINE%",
    "-reuse-instance",
    "-inverse-search",
    "\"G:/Editor/Microsoft VS Code\\Code.exe\" \"G:/Editor/Microsoft VS Code\\resources\\app\\out\\cli.js\" -r -g \"%f:%l\"",
    "%PDF%"
  ],

"latex-workshop.showContextMenu":true,   //右键菜单
}
搞了许久,终于搞定了,开心!!!!