使用cuda加速图像缩放的例子
一、前言
本文主要讲解了cuda并行加速的一个小例子,对图像缩放的最近邻插值算法做加速。
二、代码实现
由于进行缩放时,每个新像素点的计算方法均一致,故可使用并行计算,opencv中的resize也是这么做的。
//main.cu////
#include "cuda_runtime.h"

#include
#include

#include
#include
#include

using namespace cv;
using namespace std;

void resizeImage(const Mat &_src, Mat &_dst, const Size &s )
{
	_dst = Mat::zeros(s, CV_8UC3);
	double fRows = s.height / (float)_src.rows;
	double fCols = s.width / (float)_src.cols;
	int pX = 0;
	int pY = 0;
	for (int i = 0; i != _dst.rows; ++i){
		for (int j = 0; j != _dst.cols; ++j){
			pX = cvRound(i/(double)fRows);
			pY = cvRound(j/(double)fCols);
			if (pX < _src.rows && pX >= 0 && pY < _src.cols && pY >= 0){
				_dst.at(i, j)[0] = _src.at(pX, pY)[0];
				_dst.at(i, j)[1] = _src.at(pX, pY)[1];
				_dst.at(i, j)[2] = _src.at(pX, pY)[2];
			}
		}
	}
}

bool initCUDA()
{
	int count;
	cudaGetDeviceCount(&count);
	if (count == 0){
		fprintf(stderr, "There is no device.\n");
		return false;
	}

	int i;
	for (i = 0; i < count; i++){
		cudaDeviceProp prop;
		if (cudaGetDeviceProperties(&prop, i) == cudaSuccess){
			if (prop.major >= 1){
				break;
			}
		}
	}

	if (i == count){
		fprintf(stderr, "There is no device supporting CUDA 1.x.\n");
		return false;
	}

	cudaSetDevice(i);
	return true;
}


__global__ void kernel(uchar* _src_dev, uchar * _dst_dev, int _src_step, int _dst_step ,
	int _src_rows, int _src_cols, int _dst_rows, int _dst_cols)
{
	int i = blockIdx.x;
	int j = blockIdx.y;

	double fRows = _dst_rows / (float)_src_rows;
	double fCols = _dst_cols / (float)_src_cols;

	int pX = 0;
	int pY = 0;

	pX = (int)(i / fRows);
	pY = (int)(j / fCols);
	if (pX < _src_rows && pX >= 0 && pY < _src_cols && pY >= 0){
		*(_dst_dev + i*_dst_step + 3 * j + 0) = *(_src_dev + pX*_src_step + 3 * pY);
		*(_dst_dev + i*_dst_step + 3 * j + 1) = *(_src_dev + pX*_src_step + 3 * pY + 1);
		*(_dst_dev + i*_dst_step + 3 * j + 2) = *(_src_dev + pX*_src_step + 3 * pY + 2);

	}

}


void resizeImageGpu(const Mat &_src, Mat &_dst, const Size &s)
{
	_dst = Mat(s, CV_8UC3);
	uchar *src_data = _src.data;
	int width = _src.cols;
	int height = _src.rows;
	uchar *src_dev , *dst_dev;

	cudaMalloc((void**)&src_dev, 3 * width*height * sizeof(uchar) );
	cudaMalloc((void**)&dst_dev, 3 * s.width * s.height * sizeof(uchar));
	cudaMemcpy(src_dev, src_data, 3 * width*height * sizeof(uchar), cudaMemcpyHostToDevice);

	double fRows = s.height / (float)_src.rows;
	double fCols = s.width / (float)_src.cols;
	int src_step = _src.step;
	int dst_step = _dst.step;

	dim3 grid(s.height, s.width);
	kernel << < grid, 1 >> >(src_dev, dst_dev, src_step, dst_step, height, width, s.height, s.width);

	cudaMemcpy(_dst.data, dst_dev, 3 * s.width * s.height * sizeof(uchar), cudaMemcpyDeviceToHost);


}


int main()
{
	Mat src = cv::imread("E:\\学习资料\\测试标准图\\lena.bmp" , 1);
	Mat dst_cpu;

	double start = GetTickCount();
	resizeImage(src, dst_cpu, Size(src.cols * 2, src.rows * 2));
	double  end = GetTickCount();

	cout << "cpu缩放所耗费的时间:" << end - start << "\n";

	initCUDA();

	Mat dst_gpu;

	start = GetTickCount();
	resizeImageGpu(src, dst_gpu, Size(src.cols * 2, src.rows * 2));
	end = GetTickCount();
	cout << "gpu缩放所耗费的时间:" << end - start << "\n";

	cv::imshow("Demo", dst_cpu);
	waitKey(0);

	return 0;
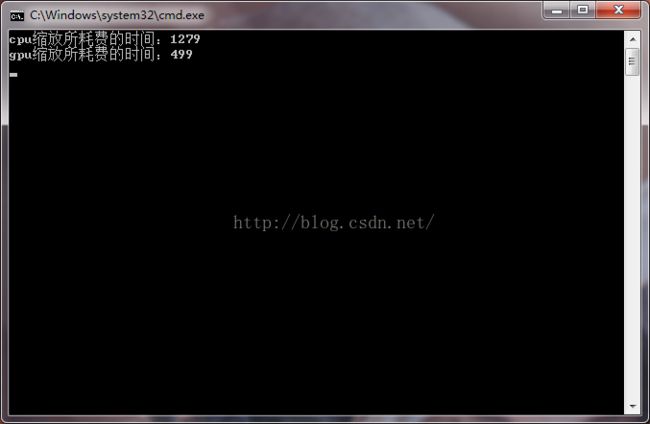
} 本文实验环境为vs2013+cuda7.0+opencv2.4.9,可以得到结果如下,当在将512*512的lena图像放大为1024*1024时,使用gpu并行计算的方法加快了一倍多,但若要进行缩小运算时,使用gpu加速则不一定会快,因为数据上传会占用时间。
