Tensorflow实战(四):网络可视化
网络的可视化可以帮助我们更加了解网络的结构,可以根据可视化发现网络结构的不足,可以进行针对性的改造。该项目利用Tensorflow框架实现对VGG19的可视化。
VGG19网络百度网盘
提取码:nt51
原理:首先得到VGG19的网络框架,然后提取网络中的每一层的weights,
一层一层的输出特征
- 导入包
import scipy.io
import numpy as np
import os
import scipy.misc
import matplotlib.pyplot as plt
import tensorflow as tf
- 构建项目的工具库函数
这一部分十分重要,在一个项目中除了基础的框架之外,最重要的就是工具库函数,在做每一个项目的时候我都会很关注这一部分,并做好备份,在以后做其他项目时,如果用到相同功能的可直接调用,可极大的提高工作效率。
#卷积操作
def _conv_layer(input, weights, bias):
    conv = tf.nn.conv2d(input, tf.constant(weights), strides=(1, 1, 1, 1), padding='SAME')
    return tf.nn.bias_add(conv, bias)

#池化操作
def _pool_layer(input):
    return tf.nn.max_pool(input, ksize=(1, 2, 2, 1), strides=(1, 2, 2, 1), padding='SAME')

#对图像进行减均值的操作
def preprocess(image, mean_pixel):
    return image - mean_pixel

#对图像进行加均值的操作
def unprocess(image, mean_pixel):
    return image + mean_pixel

#从某个路径中读取图片
def imread(path):
    return scipy.misc.imread(path).astype(np.float)

#将图片保存到某个路径
def imsave(path, img):
    img = np.clip(img, 0, 255).astype(np.uint8)
    scipy.misc.imsave(path, img)
- 得到每一层的特征
def net(data_path, input_image):

    #VGG19的网络框架
    layers = (
        'conv1_1', 'relu1_1', 'conv1_2', 'relu1_2', 'pool1',
        'conv2_1', 'relu2_1', 'conv2_2', 'relu2_2', 'pool2',
        'conv3_1', 'relu3_1', 'conv3_2', 'relu3_2', 'conv3_3',
        'relu3_3', 'conv3_4', 'relu3_4', 'pool3',
        'conv4_1', 'relu4_1', 'conv4_2', 'relu4_2', 'conv4_3',
        'relu4_3', 'conv4_4', 'relu4_4', 'pool4',
        'conv5_1', 'relu5_1', 'conv5_2', 'relu5_2', 'conv5_3',
        'relu5_3', 'conv5_4', 'relu5_4'
    )
    #加载模型
    data = scipy.io.loadmat(data_path)
    #该模型有将图片进行减均值的操作,得到均值
    mean = data['normalization'][0][0][0]
    mean_pixel = np.mean(mean, axis=(0, 1))
    #加载权重
    weights = data['layers'][0]
    net = {}
    current = input_image
    for i, name in enumerate(layers):
        #用前三个字符判断是conv、pool、relu
        kind = name[:4]
        if kind == 'conv':
            kernels, bias = weights[i][0][0][0][0]
            # matconvnet: weights are [width, height, in_channels, out_channels]
            # tensorflow: weights are [height, width, in_channels, out_channels]
            kernels = np.transpose(kernels, (1, 0, 2, 3))
            bias = bias.reshape(-1)
            current = _conv_layer(current, kernels, bias)
        elif kind == 'relu':
            current = tf.nn.relu(current)
        elif kind == 'pool':
            current = _pool_layer(current)
        #字典的key是layer,value是这一layer的特征
        net[name] = current
    assert len(net) == len(layers)
    return net, mean_pixel, layers
- 得到特征图
#得到当前路径、模型路径、测试图片路径
cwd  = os.getcwd()
VGG_PATH = cwd + "/data/imagenet-vgg-verydeep-19.mat"
IMG_PATH = cwd + "/data/parts.jpg"
input_image = imread(IMG_PATH)
shape = (1,input_image.shape[0],input_image.shape[1],input_image.shape[2])
with tf.Session() as sess:
    image = tf.placeholder('float', shape=shape)
    nets, mean_pixel, all_layers = net(VGG_PATH, image)
    input_image_pre = np.array([preprocess(input_image, mean_pixel)])
    layers = all_layers # For all layers

    for i, layer in enumerate(layers):
        print ("[%d/%d] %s" % (i+1, len(layers), layer))
        #由于有占位符所以需要feed
        features = nets[layer].eval(feed_dict={image: input_image_pre})

        print (" Type of 'features' is ", type(features))
        print (" Shape of 'features' is %s" % (features.shape,))
        #输出特征图
        if 1:
            plt.figure(i+1, figsize=(10, 5))
            plt.matshow(features[0, :, :, 0], cmap=plt.cm.gray, fignum=i+1)
            plt.title("" + layer)
            plt.colorbar()
            plt.show()
- 输入图片

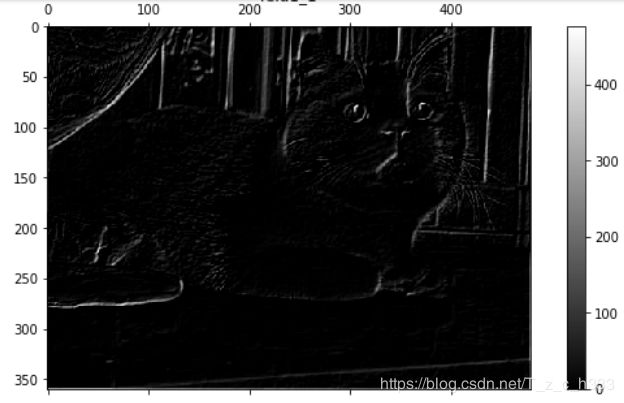
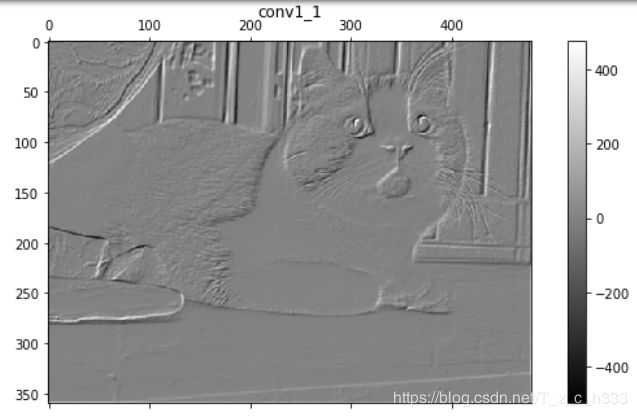
- conv特征图片
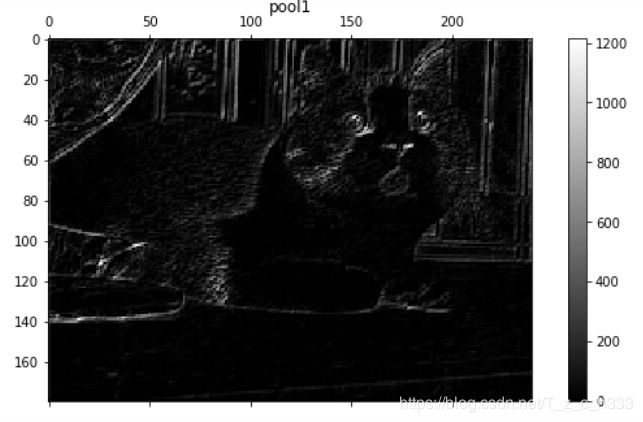
- pool特征图片
- relu特征图片