C++框架设计 【1-加载CNN模型】
任务
现有如下格式的CNN模型描述文件:
# net description
type:conv name:conv1 knlW:3 knlH:3 StdW:2 StdH:2
type:conv name:conv2 knlW:3 knlH:3 StdW:1 StdH:1
type:pooling name:pooling1 knlW:4 knlH:4 StdW:1 StdH:1 Max:1
type:softmax name:sft
每一行定义一个层。type表示层的类型,系统中会根据type来创建实例。name为该层的名字,后面则是一些参数。我们要根据这样一个配置文件来创建一个神经网络实例。
设计思路
任务比较简单,分解析文件和创建层对象集合这两个部分。各个层有大量的相同操作部分,自然使用一个基类来定义。因为每个层的参数个数是不同的,这里不想去对每个层做不同的声明。就用一个map
核心代码实现
主调逻辑
parse部分是解析txt文件,得到类名并创建对象。所有的对象都存在layers中。后面代码就是面向接口编程了,若业务有变动,需要加新层。主调的代码是不需要动的。
#include"layerBase.h"
#include"layerUtil.h"
#include"layerFactory.h"
int main()
{
string filename = "net.txt";
vector<string> layerInfo;
vector<LayerBase*> layers;
LoadModelFile(filename, layerInfo);
// parse
for (auto s : layerInfo)
{
string className;
if (SUCCESS == ExtractClassName(s, className))
{
auto layer = LayerFactory(className);
if (nullptr != layer)
{
layer->parse(s);
layers.push_back(layer);
}
}
}
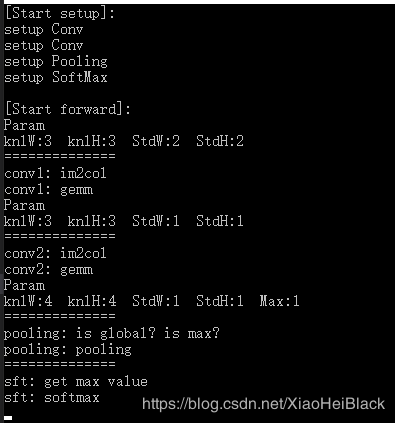
cout << "[Start setup]:" << endl;
// setup
for (auto layer : layers)
{
layer->setup();
}
cout << endl << "[Start forward]:" << endl;
// forward
for (auto layer : layers)
{
layer->forward();
}
// deconstruct
for (auto &layer : layers)
{
delete layer;
layer = nullptr;
}
layers.clear();
return 0;
}
层基类LayerBase的定义与实现
// layerBase.h
#ifndef _LAYER_BASE_H_
#define _LAYER_BASE_H_


#include"global_def.h"


typedef map<string, float> LayerParam;
typedef vector<string> LayerParamName;

class LayerBase
{
public:
	STATE parse(string  str);

	string getLayerName();

	virtual void setup() = 0;

	void forward();

	virtual void prepare() = 0;

	virtual void action() = 0;

	virtual ~LayerBase(){}

protected:
	LayerParamName m_paramName;
	LayerParam m_param;
	string m_layerName;
	bool m_debug;
};

#define OP_CLASS_DECLARE(type) \
class Layer##type : public LayerBase \
{ \
public: \
	Layer##type(); \
	virtual void setup(); \
	virtual void prepare(); \
	virtual void action(); \
	virtual ~Layer##type(); \
};

OP_CLASS_DECLARE(Conv)
OP_CLASS_DECLARE(Pooling)
OP_CLASS_DECLARE(Softmax)


#endif
这里没有把LayerBase的每个函数都定义为纯虚的,因为把参数模式化的存在了map里,所以就没必要每个子类去实现load参数了,用一个通用写法。而forward的不同的层想设计成一个固定流程所以也做了实现,但是实际处理的prepare和action都是接口,需要子类各自实现。
// layerBase.cpp
#include"layerBase.h"
#includeLayerConv层的实现
因为没什么实际的逻辑,所以没多少代码了。就是要注意在构造函数中吧参数map中的key设置好(和配置文件一致)。pooling和softmax也是一样的实现就不贴了。
#include"layerBase.h"

LayerConv::LayerConv()
{
	m_debug = true;
	m_paramName.push_back("knlW");
	m_paramName.push_back("knlH");
	m_paramName.push_back("StdW");
	m_paramName.push_back("StdH");
}

void LayerConv::setup()
{
	cout << "setup Conv" << endl;
}

void LayerConv::prepare()
{
	cout << "==============" << endl;
	cout << getLayerName() << ": im2col" << endl;
}

void LayerConv::action()
{
	cout << getLayerName() << ": gemm " << endl;
}

LayerConv::~LayerConv()
{

}
对象创建
通过字符串判断来创建实例,下一章把这部分代码改写成工厂模式,去除if else,在添加新类的时候写一句注册的代码即可。ExtractClassName和layer基类的解析参数一样,用正则表达式来提取。
LayerBase *LayerFactory(string classname)
{
	if (classname == "conv")
		return new LayerConv();
	else if (classname == "pooling")
		return new LayerPooling();
	else if (classname == "softmax")
		return new LayerSoftmax();
	else
		return nullptr;
}

STATE ExtractClassName(const string str, string &className)
{
	regex r = regex(":(\\S+)");
	vector<string> v(std::sregex_token_iterator(str.begin(), str.end(), r, 1), std::sregex_token_iterator());
	className = v[0];
	return SUCCESS;
}
小结
- 这篇博客里CNN模型只是一堆没有关联的层描述,配置文件并没有给出层间关系。即不知道整个网络的拓扑关系。
- 框架设计知识点
1)抽象类设计接口,有一个涵盖了“网络层”主要行为的抽象基类。
2)在forward接口中应用了设计模式的模板方法模式 - 为了demo里没有依赖库,所以没有使用XML或JSON。
结果:
reference
1.面向接口编程
2.模板方法模式