Android最佳实践之UI
为多屏设计(一) - 支持多个屏幕尺寸
参考地址:http://developer.android.com/training/multiscreen/index.html
Android UI设计提供了一个灵活的框架,允许应用程序为不同设备显示不同的布局,创建自定义UI部件,在App外部控制系统的Window。
Android的设备尺寸参差不齐,从几寸的小手机到几十寸的TV设备,我们需要学会为这么多的设备做出适配让尽可能多的人有更好的体验。支持多个屏幕尺寸有以下几种方式:
- 确保你的布局可以充分调整大小以适应屏幕
- 根据屏幕配置提供适当的UI布局
- 确保正确的布局应用到正确的屏幕
- 提供可缩放的Bitmap
使用”wrap_content” 和”match_parent”
一句话:少用固定的dp来设置宽高,不利于屏幕适配。
<LinearLayout xmlns:android="http://schemas.android.com/apk/res/android"
    android:orientation="vertical"
    android:layout_width="match_parent"
    android:layout_height="match_parent">
    <LinearLayout android:layout_width="match_parent"
                  android:id="@+id/linearLayout1"
                  android:gravity="center"
                  android:layout_height="50dp">
        <ImageView android:id="@+id/imageView1"
                   android:layout_height="wrap_content"
                   android:layout_width="wrap_content"
                   android:src="@drawable/logo"
                   android:paddingRight="30dp"
                   android:layout_gravity="left"
                   android:layout_weight="0" />
        <View android:layout_height="wrap_content"
              android:id="@+id/view1"
              android:layout_width="wrap_content"
              android:layout_weight="1" />
        <Button android:id="@+id/categorybutton"
                android:background="@drawable/button_bg"
                android:layout_height="match_parent"
                android:layout_weight="0"
                android:layout_width="120dp"
                style="@style/CategoryButtonStyle"/>
    LinearLayout>

    <fragment android:id="@+id/headlines"
              android:layout_height="fill_parent"
              android:name="com.example.android.newsreader.HeadlinesFragment"
              android:layout_width="match_parent" />
LinearLayout>
使用相对布局(RelativeLayout)
虽然你可以使用LinearLayout和”wrap_content” 、”match_parent”来创建一个相当复杂的布局,但不能精确地控制子View之间以及子View和父View之间的关系。比如屏幕方向变化时,为保证子View能随着变化而保持对父View的相对位置不变,这时,就必须使用RelativeLayout了。
<RelativeLayout xmlns:android="http://schemas.android.com/apk/res/android"
    android:layout_width="match_parent"
    android:layout_height="match_parent">
    <TextView
        android:id="@+id/label"
        android:layout_width="match_parent"
        android:layout_height="wrap_content"
        android:text="Type here:"/>
    <EditText
        android:id="@+id/entry"
        android:layout_width="match_parent"
        android:layout_height="wrap_content"
        android:layout_below="@id/label"/>
    <Button
        android:id="@+id/ok"
        android:layout_width="wrap_content"
        android:layout_height="wrap_content"
        android:layout_below="@id/entry"
        android:layout_alignParentRight="true"
        android:layout_marginLeft="10dp"
        android:text="OK" />
    <Button
        android:layout_width="wrap_content"
        android:layout_height="wrap_content"
        android:layout_toLeftOf="@id/ok"
        android:layout_alignTop="@id/ok"
        android:text="Cancel" />
RelativeLayout>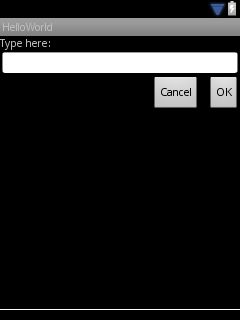
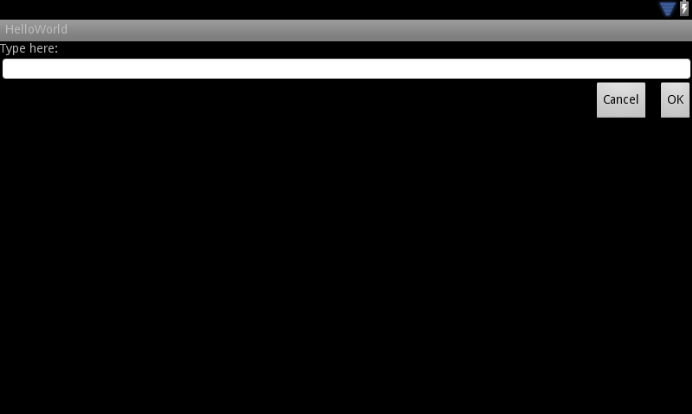
以上两张图显示,横竖屏切换时,Cancel和OK按钮的相对位置以及相对屏幕的位置都没变。
使用Size限定符
上面两种布局虽然可以适配一定的屏幕,但无法适配一些特定的屏幕尺寸。
比如,对于“列表”和“详细”,一些屏幕实现“两屏”的模式,特别是在平板和TV上,但在手机上,必须将两屏分开在两个界面显示。
- res/layout/main.xml
<LinearLayout xmlns:android="http://schemas.android.com/apk/res/android"
    android:orientation="vertical"
    android:layout_width="match_parent"
    android:layout_height="match_parent">

    <fragment android:id="@+id/headlines"
              android:layout_height="fill_parent"
              android:name="com.example.android.newsreader.HeadlinesFragment"
              android:layout_width="match_parent" />
LinearLayout>- res/layout-large/main.xml
<LinearLayout xmlns:android="http://schemas.android.com/apk/res/android"
    android:layout_width="fill_parent"
    android:layout_height="fill_parent"
    android:orientation="horizontal">
    <fragment android:id="@+id/headlines"
              android:layout_height="fill_parent"
              android:name="com.example.android.newsreader.HeadlinesFragment"
              android:layout_width="400dp"
              android:layout_marginRight="10dp"/>
    <fragment android:id="@+id/article"
              android:layout_height="fill_parent"
              android:name="com.example.android.newsreader.ArticleFragment"
              android:layout_width="fill_parent" />
LinearLayout>
注意:large限定符,它修饰的布局,在大屏幕上显示(如在7寸及以上尺寸的平板上),而没有任何限定符的,则在一些较小的设备上显示。
使用最小宽度限定符( Smallest-width Qualifier)
很多App希望不同的大屏上显示不同的布局(比如在5寸和7寸的大屏上),这就是为什么在Android 3.2上出现最小宽度限定符的原因。
Smallest-width限定符允许你使用一个确定的最小的dp单位的宽度应用到目标设备上。如果你想在大屏上使用左右窗格显示,可以像上面那种模式一样,写多个相同的布局,这次不用large限定符了,用sw600dp,表示在宽度600dp及以上的设备上将使用我们定义的布局:
- res/layout/main.xml
<LinearLayout xmlns:android="http://schemas.android.com/apk/res/android"
    android:orientation="vertical"
    android:layout_width="match_parent"
    android:layout_height="match_parent">

    <fragment android:id="@+id/headlines"
              android:layout_height="fill_parent"
              android:name="com.example.android.newsreader.HeadlinesFragment"
              android:layout_width="match_parent" />
LinearLayout>- res/layout-sw600dp/main.xml
<LinearLayout xmlns:android="http://schemas.android.com/apk/res/android"
    android:layout_width="fill_parent"
    android:layout_height="fill_parent"
    android:orientation="horizontal">
    <fragment android:id="@+id/headlines"
              android:layout_height="fill_parent"
              android:name="com.example.android.newsreader.HeadlinesFragment"
              android:layout_width="400dp"
              android:layout_marginRight="10dp"/>
    <fragment android:id="@+id/article"
              android:layout_height="fill_parent"
              android:name="com.example.android.newsreader.ArticleFragment"
              android:layout_width="fill_parent" />
LinearLayout>
这意味着宽度大于等于600dp的设备将使用layout-sw600dp/main.xml(双窗格模式)的布局,小于这个宽度的设备使用layout/main.xml(单窗格模式)。
然而,在Android3.2以前的设备,是不能识别sw600dp这种限定符的,所以为了兼容你必须使用large限定符。再增加res/layout-large/main.xml,让里面的内容和res/layout-sw600dp/main.xml一模一样。在下一部分,你将看到一种技术,它允许你避免重复定义这样的布局文件。
使用布局别名(Layout Alias)
在使用smallest-width限定符时,由于它是3.2才有的,所以在兼容以前老版本时,需要再重复定义large限定符的布局文件,这样会对以后的开发维护带来麻烦。为了避免这种情况,我们使用布局别名,比如:
- res/layout/main.xml, 单窗格
res/layout/main_twopanes.xml,多窗格
然后加下面两个文件:res/values-large/layout.xml:
<resources>
    <item name="main" type="layout">@layout/main_twopanesitem>
resources>- res/values-sw600dp/layout.xml:
<resources>
    <item name="main" type="layout">@layout/main_twopanesitem>
resources>
这样解决了维护多个相同布局文件的麻烦。
使用方向限定符
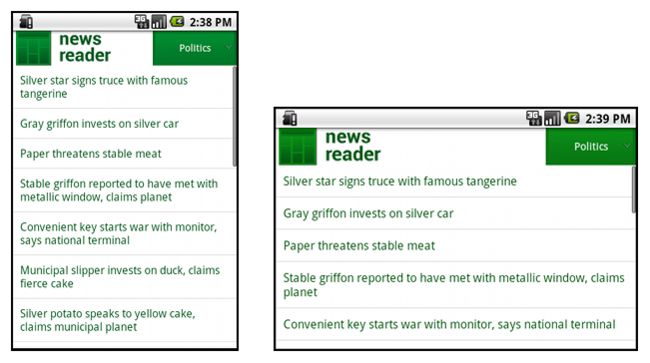
一些布局可以在横屏和竖屏自动调整的很好,但大部分还是需要手工调整的。比如在NewsReader例子中,不同的屏幕尺寸不同的方向,显示的Bar是不一样的:
- small screen, portrait: single pane, with logo
- small screen, landscape: single pane, with logo
- 7” tablet, portrait: single pane, with action bar
- 7” tablet, landscape: dual pane, wide, with action bar
- 10” tablet, portrait: dual pane, narrow, with action bar
- 10” tablet, landscape: dual pane, wide, with action bar
- TV, landscape: dual pane, wide, with action bar
所以每一个布局都定义在res/layout/目录下,每一个布局都对应一个屏幕配置(大小和方向)。app使用布局别名来匹配它们到各自对应的设备:
res/layout/onepane.xml:
<LinearLayout xmlns:android="http://schemas.android.com/apk/res/android"
    android:orientation="vertical"
    android:layout_width="match_parent"
    android:layout_height="match_parent">

    <fragment android:id="@+id/headlines"
              android:layout_height="fill_parent"
              android:name="com.example.android.newsreader.HeadlinesFragment"
              android:layout_width="match_parent" />
LinearLayout>
res/layout/onepane_with_bar.xml:
<LinearLayout xmlns:android="http://schemas.android.com/apk/res/android"
    android:orientation="vertical"
    android:layout_width="match_parent"
    android:layout_height="match_parent">
    <LinearLayout android:layout_width="match_parent"
                  android:id="@+id/linearLayout1"
                  android:gravity="center"
                  android:layout_height="50dp">
        <ImageView android:id="@+id/imageView1"
                   android:layout_height="wrap_content"
                   android:layout_width="wrap_content"
                   android:src="@drawable/logo"
                   android:paddingRight="30dp"
                   android:layout_gravity="left"
                   android:layout_weight="0" />
        <View android:layout_height="wrap_content"
              android:id="@+id/view1"
              android:layout_width="wrap_content"
              android:layout_weight="1" />
        <Button android:id="@+id/categorybutton"
                android:background="@drawable/button_bg"
                android:layout_height="match_parent"
                android:layout_weight="0"
                android:layout_width="120dp"
                style="@style/CategoryButtonStyle"/>
    LinearLayout>

    <fragment android:id="@+id/headlines"
              android:layout_height="fill_parent"
              android:name="com.example.android.newsreader.HeadlinesFragment"
              android:layout_width="match_parent" />
LinearLayout>
res/layout/twopanes.xml:
<LinearLayout xmlns:android="http://schemas.android.com/apk/res/android"
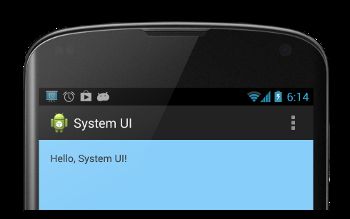
    android:layout_width="fill_parent"
    android:layout_height="fill_parent"
    android:orientation="horizontal">
    <fragment android:id="@+id/headlines"
              android:layout_height="fill_parent"
              android:name="com.example.android.newsreader.HeadlinesFragment"
              android:layout_width="400dp"
              android:layout_marginRight="10dp"/>
    <fragment android:id="@+id/article"
              android:layout_height="fill_parent"
              android:name="com.example.android.newsreader.ArticleFragment"
              android:layout_width="fill_parent" />
LinearLayout>
res/layout/twopanes_narrow.xml:
<LinearLayout xmlns:android="http://schemas.android.com/apk/res/android"
    android:layout_width="fill_parent"
    android:layout_height="fill_parent"
    android:orientation="horizontal">
    <fragment android:id="@+id/headlines"
              android:layout_height="fill_parent"
              android:name="com.example.android.newsreader.HeadlinesFragment"
              android:layout_width="200dp"
              android:layout_marginRight="10dp"/>
    <fragment android:id="@+id/article"
              android:layout_height="fill_parent"
              android:name="com.example.android.newsreader.ArticleFragment"
              android:layout_width="fill_parent" />
LinearLayout>
既然所有的布局都定义好了,现在就只需要将正确的布局对应到每个配置的文件中。如下使用布局别名技术:
res/values/layouts.xml:
<resources>
    <item name="main_layout" type="layout">@layout/onepane_with_baritem>
    <bool name="has_two_panes">falsebool>
resources>
res/values-sw600dp-land/layouts.xml:
<resources>
    <item name="main_layout" type="layout">@layout/twopanesitem>
    <bool name="has_two_panes">truebool>
resources>
res/values-sw600dp-port/layouts.xml:
<resources>
    <item name="main_layout" type="layout">@layout/onepaneitem>
    <bool name="has_two_panes">falsebool>
resources>
res/values-large-land/layouts.xml:
<resources>
    <item name="main_layout" type="layout">@layout/twopanesitem>
    <bool name="has_two_panes">truebool>
resources>
res/values-large-port/layouts.xml:
<resources>
    <item name="main_layout" type="layout">@layout/twopanes_narrowitem>
    <bool name="has_two_panes">truebool>
resources>
使用Nine-patch图片
要支持不同的屏幕分辨率,那么图片也需要做成多个尺寸的,这样势必增加美工的工作量。如果应用图片较多,那么可想而知这时一件多么可怕的事情。这时,9-patch图片可以很好的解决这个问题,它可以随着屏幕的变化而伸展而不变形。
9-patch图片是.9.png为后缀的图片,它使用SDK目录下tools文件夹下的draw9patch.bat的工具来制作。
样例代码:NewsReader
为多屏设计(二) - 支持不同的屏幕密度
参考地址:http://developer.android.com/training/multiscreen/screendensities.html
本文向你展示如何通过提供不同的资源和使用分辨率无关的测量单位支持不同的屏幕密度。
使用像素密度
一句话,使用dp(尺寸、距离等)、sp(文本)单位,尽量不用px单位。
例如:
<Button android:layout_width="wrap_content"
    android:layout_height="wrap_content"
    android:text="@string/clickme"
    android:layout_marginTop="20dp" />
指定文本大小,使用sp:
<TextView android:layout_width="match_parent"
    android:layout_height="wrap_content"
    android:textSize="20sp" />
提供可选择的Bitmap
因为Android运行在各个屏幕密度不同的设备中,所以你需要为不同的密度设备提供不同的图片资源 low, medium, high and xhigh 等等。
- xhdpi: 2.0
- hdpi: 1.5
- mdpi: 1.0 (baseline)
- ldpi: 0.75
意思是说,如果你为一个密度是2 的设备准备了200x200的图片,那么同时需要为密度为1.5的设备准备150x150的图片,为密度为1的设备准备100x100的图片,为密度为0.75的设备准备75x75的图片。
然后在res目录下生成多个drawable文件夹:
MyProject/
  res/
    drawable-xhdpi/
        awesomeimage.png
    drawable-hdpi/
        awesomeimage.png
    drawable-mdpi/
        awesomeimage.png
    drawable-ldpi/
        awesomeimage.png
你通过引用@drawable/awesomeimage,系统将通过屏幕的dpi找到合适的图片。
将app启动logo放在mipmap/文件夹下:
res/...
    mipmap-ldpi/...
        finished_launcher_asset.png
    mipmap-mdpi/...
        finished_launcher_asset.png
    mipmap-hdpi/...
        finished_launcher_asset.png
    mipmap-xhdpi/...
        finished_launcher_asset.png
    mipmap-xxhdpi/...
        finished_launcher_asset.png
    mipmap-xxxhdpi/...
        finished_launcher_asset.png
你应该将app启动图片放在res/mipmap-[density]/文件夹,而不是drawable/下面,以确保使用最佳的分辨率
为多屏设计(三) - 实现适配的UI流
参考地址:http://developer.android.com/training/multiscreen/adaptui.html
根据应用程序目前显示的布局,界面流可能会有所不同。例如,如果你的App是双窗格模式,点击左侧窗格上的一个item,将在右边的面板中显示对应的内容;如果是在单窗格模式下,显示的内容应该在一个新的Activity里。
确定当前的布局
判断当前布局是单窗格模式还是多窗格模式(如在NewsReader App中):
public class NewsReaderActivity extends FragmentActivity {
    boolean mIsDualPane;

    @Override
    public void onCreate(Bundle savedInstanceState) {
        super.onCreate(savedInstanceState);
        setContentView(R.layout.main_layout);

        View articleView = findViewById(R.id.article);
        mIsDualPane = articleView != null &&
                        articleView.getVisibility() == View.VISIBLE;
    }
}
在使用一个组件之前需要检测是否为null。比如,在NewsReader的例子App中,有一个按钮只在Android 3.0 一下的版本下运行时才出现,3.0以上的版本显示Actionbar(API11+),所以在操作这个按钮时,应该这样做:
Button catButton = (Button) findViewById(R.id.categorybutton);
OnClickListener listener = /* create your listener here */;
if (catButton != null) {
    catButton.setOnClickListener(listener);
}
根据当前的布局React
当前布局不同,那么点击同样的item,会产生不同的效果。比如,在NewsReader中,单窗格模式,点击item,会进入一个新的Activity,双窗格模式下,点击item(左侧),右侧则显示相应的内容:
@Override
public void onHeadlineSelected(int index) {
    mArtIndex = index;
    if (mIsDualPane) {
        /* display article on the right pane */
        mArticleFragment.displayArticle(mCurrentCat.getArticle(index));
    } else {
        /* start a separate activity */
        Intent intent = new Intent(this, ArticleActivity.class);
        intent.putExtra("catIndex", mCatIndex);
        intent.putExtra("artIndex", index);
        startActivity(intent);
    }
}
同样,在双窗格模式下,你应该在ActionBar上创建Tabs导航,反而言之,如果app是单窗格模式,你应该使用Spinner组件进行导航。所以代码如下:
final String CATEGORIES[] = { "Top Stories", "Politics", "Economy", "Technology" };

public void onCreate(Bundle savedInstanceState) {
    ....
    if (mIsDualPane) {
        /* use tabs for navigation */
        actionBar.setNavigationMode(android.app.ActionBar.NAVIGATION_MODE_TABS);
        int i;
        for (i = 0; i < CATEGORIES.length; i++) {
            actionBar.addTab(actionBar.newTab().setText(
                CATEGORIES[i]).setTabListener(handler));
        }
        actionBar.setSelectedNavigationItem(selTab);
    }
    else {
        /* use list navigation (spinner) */
        actionBar.setNavigationMode(android.app.ActionBar.NAVIGATION_MODE_LIST);
        SpinnerAdapter adap = new ArrayAdapter(this,
                R.layout.headline_item, CATEGORIES);
        actionBar.setListNavigationCallbacks(adap, handler);
    }
}
在其他Activities重用Fragments
复用模式在多屏状态下比较常用。比如在NewsReader App中,News详情采用一个Fragment,那么它既可以用在双窗格模式的右边,又可以用在单窗格模式下的详情Activity中。
ArticleFragment在双窗格模式下:
<LinearLayout xmlns:android="http://schemas.android.com/apk/res/android"
    android:layout_width="fill_parent"
    android:layout_height="fill_parent"
    android:orientation="horizontal">
    <fragment android:id="@+id/headlines"
              android:layout_height="fill_parent"
              android:name="com.example.android.newsreader.HeadlinesFragment"
              android:layout_width="400dp"
              android:layout_marginRight="10dp"/>
    <fragment android:id="@+id/article"
              android:layout_height="fill_parent"
              android:name="com.example.android.newsreader.ArticleFragment"
              android:layout_width="fill_parent" />
LinearLayout>
在单窗格模式下,不需要为ArticleActivity创建布局,直接使用ArticleFragment:
ArticleFragment frag = new ArticleFragment();
getSupportFragmentManager().beginTransaction().add(android.R.id.content, frag).commit();要深深记住的一点是,不要让Fragment和你的Activity有强的耦合性。你可以在Fragment中定义接口,由Activity来实现。比如News Reader app的HeadlinesFragment :
public class HeadlinesFragment extends ListFragment {
    ...
    OnHeadlineSelectedListener mHeadlineSelectedListener = null;

    /* Must be implemented by host activity */
    public interface OnHeadlineSelectedListener {
        public void onHeadlineSelected(int index);
    }
    ...

    public void setOnHeadlineSelectedListener(OnHeadlineSelectedListener listener) {
        mHeadlineSelectedListener = listener;
    }
}
当用户选择了一个标题,fragment就会通知绑定到指定Activity的监听器:
public class HeadlinesFragment extends ListFragment {
    ...
    @Override
    public void onItemClick(AdapterView parent,
                            View view, int position, long id) {
        if (null != mHeadlineSelectedListener) {
            mHeadlineSelectedListener.onHeadlineSelected(position);
        }
    }
    ...
}
处理屏幕配置更改(Configuration Changes)
如果你使用单独的Activity实现界面的一些部分,那么就应该记住当屏幕变化时(比如旋转屏幕)需要重构界面。
比如,在7寸运行Android3.0及以上版本的平板上,NewsReader App在竖屏时新闻详情界面在单独的一个Activity中,但是在横屏时,它使用双窗格模式,左右各一个Fragment。
这意味着,当用户竖屏切换到横屏来看一个新闻详情,你需要监测到屏幕的变化,来进行适当的重构:结束当前的Activity,显示左右两个窗格。
public class ArticleActivity extends FragmentActivity {
    int mCatIndex, mArtIndex;

    @Override
    protected void onCreate(Bundle savedInstanceState) {
        super.onCreate(savedInstanceState);
        mCatIndex = getIntent().getExtras().getInt("catIndex", 0);
        mArtIndex = getIntent().getExtras().getInt("artIndex", 0);

        // If should be in two-pane mode, finish to return to main activity
        if (getResources().getBoolean(R.bool.has_two_panes)) {
            finish();
            return;
        }
        ...
}
示例代码:NewsReader
AppBar(ActionBar->ToolBar)
参考地址:http://developer.android.com/training/appbar/index.html
创建应用程序栏(AppBar)
在大多数的App中都会有标题栏这个组件,这个组件能让App有统一的风格,它一般由标题和溢出菜单(overflow menu)组成。

从Android3.0开始,使用默认主题的Activity都有一个ActionBar作为标题栏。然而,随着版本的不断升级,不断有新的特性加到ActionBar中,导致不同的版本ActionBar的行为不太一样。相比之下,支持库(support library)中的ToolBar不断集成了最新的特性,而且可以无差异的运行到任意的设备上。
基于此,我们使用支持库中的Toolbar作为AppBar,他提供各种设备一致的行为。
在Activity中添加Toolbar
- 添加v7 appcompat support library到工程中
- 确保Activity继承AppCompatActivity
- 在manifest文件的 元素中使用 NoActionBar主题
<application
    android:theme="@style/Theme.AppCompat.Light.NoActionBar"
    />
4.在Activity的布局中添加Toolbar
.support.v7.widget.Toolbar
   android:id="@+id/my_toolbar"
   android:layout_width="match_parent"
   android:layout_height="?attr/actionBarSize"
   android:background="?attr/colorPrimary"
   android:elevation="4dp"
   android:theme="@style/ThemeOverlay.AppCompat.ActionBar"
   app:popupTheme="@style/ThemeOverlay.AppCompat.Light"/>
Material Design specification推荐App Bar有一个4dp的elevation。
5.在Activity的onCreate()方法中,调用Activity的setSupportActionBar(),使ToolBar作为Activity的App bar。
@Override
protected void onCreate(Bundle savedInstanceState) {
    super.onCreate(savedInstanceState);
    setContentView(R.layout.activity_my);
    Toolbar myToolbar = (Toolbar) findViewById(R.id.my_toolbar);
    setSupportActionBar(myToolbar);
}这样你就创建了一个基本的actionbar,上面默认是app的名称和一个溢出菜单。菜单中只有Settings选项。
使用 App Bar的实用方法
在Activity的标题栏创建了toolbar 之后,你可以使用v7 appcompat support library提供的ActionBar类的很多实用方法,比如显示和隐藏App bar。
通过getSupportActionBar()得到兼容的ActionBar,如果要隐藏它,可以调用ActionBar.hide()。
添加和处理Actions
Appbar是有限的,所以在它上面添加action,就会溢出(overflow),可以选择将其放到menu中。

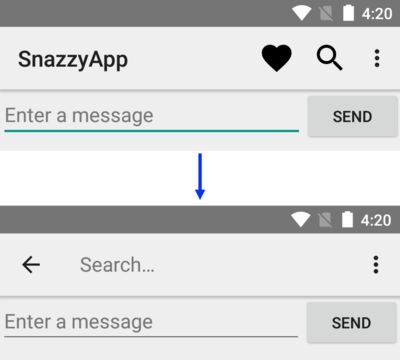
图:添加了一个按钮的AppBar
添加Action 按钮
在menu资源中添加item来添加菜单选项:
<menu xmlns:android="http://schemas.android.com/apk/res/android" >


    <item
        android:id="@+id/action_favorite"
        android:icon="@drawable/ic_favorite_black_48dp"
        android:title="@string/action_favorite"
        app:showAsAction="ifRoom"/>


    <item android:id="@+id/action_settings"
          android:title="@string/action_settings"
          app:showAsAction="never"/>

menu>app:showAsAction属性表示哪个action可以显示到appbar上。如果设置为app:showAsAction=”ifRoom”,则appbar上有空间显示在appbar上,没有空间就藏在菜单中;如果设置app:showAsAction=”never”,则这个action永远都在菜单中,不会显示在appbar上。
响应Actions
在Activity中的onOptionsItemSelected()中处理菜单的点击事件:
@Override
public boolean onOptionsItemSelected(MenuItem item) {
    switch (item.getItemId()) {
        case R.id.action_settings:
            // User chose the "Settings" item, show the app settings UI...
            return true;

        case R.id.action_favorite:
            // User chose the "Favorite" action, mark the current item
            // as a favorite...
            return true;

        default:
            // If we got here, the user's action was not recognized.
            // Invoke the superclass to handle it.
            return super.onOptionsItemSelected(item);

    }
}
添加一个Up Action
为了用户方便的返回主界面,我们需要在Appbar上提供一个Up 按钮。当用户点击Up按钮,app则返回到父Activity。
声明父Activity
例如:
... >
    ...


    "com.example.myfirstapp.MainActivity" ...>
        ...


    "com.example.myfirstapp.MyChildActivity"
        android:label="@string/title_activity_child"
        android:parentActivityName="com.example.myfirstapp.MainActivity" >


        "android.support.PARENT_ACTIVITY"
            android:value="com.example.myfirstapp.MainActivity" />
让Up按钮可用(Enable)
要让Up按钮可用,需要在onCreate()方法中调用appbar的setDisplayHomeAsUpEnabled()方法。
@Override
protected void onCreate(Bundle savedInstanceState) {
    super.onCreate(savedInstanceState);
    setContentView(R.layout.activity_my_child);

    // my_child_toolbar is defined in the layout file
    Toolbar myChildToolbar =
        (Toolbar) findViewById(R.id.my_child_toolbar);
    setSupportActionBar(myChildToolbar);

    // Get a support ActionBar corresponding to this toolbar
    ActionBar ab = getSupportActionBar();

    // Enable the Up button
    **ab.setDisplayHomeAsUpEnabled(true);**
}
我们不需要在onOptionsItemSelected()处理Up按钮的事件,我们只需要调用这个方法的父类方法即可,即super.onOptionsItemSelected()。因为系统已经通过manifest中的定义自动处理了这个事件。
Action 视图(View)和Action 提供者(Provider)
- Action View 是在Appbar上提供功能丰富的action。比如一个搜索action,它可以在appbar输入搜索内容,而不改变Activity或Fragment的样式
- Action Provider是一个有自定义布局的action。这个action一开始是一个button或menu,但用户点击了action后,你可以通过action provider任意控制你定义的action的行为。
添加一个Action View
在toolbar的菜单资源文件中添加一个item来添加一个ActionView,比如搜索框SearchView的定义:
- "@+id/action_search"
android:title="@string/action_search"
android:icon="@drawable/ic_search"
app:showAsAction="ifRoom|collapseActionView"
app:actionViewClass="android.support.v7.widget.SearchView" />
也可以配置action,通过getActionView()得到actionview的对象,然后进行操作。例如SearchView:
@Override
public boolean onCreateOptionsMenu(Menu menu) {
    getMenuInflater().inflate(R.menu.main_activity_actions, menu);

    MenuItem searchItem = menu.findItem(R.id.action_search);
    SearchView searchView =
            (SearchView) MenuItemCompat.getActionView(searchItem);

    // Configure the search info and add any event listeners...

    return super.onCreateOptionsMenu(menu);
}
响应action view的伸展行为
如果菜单的item中设置了collapseActionView 标记,则这个action View会在appbar上显示一个icon,那么点击这个icon,这个actionview就会展开,同样也可以缩回来,展开和缩回的行为我们可以为它设置监听。我们使用MenuItem.OnActionExpandListener来监听,我们可以在里面处理展开和缩回来时改变Activity的UI:
@Override
public boolean onCreateOptionsMenu(Menu menu) {
    getMenuInflater().inflate(R.menu.options, menu);
    // ...

    // Define the listener
    OnActionExpandListener expandListener = new OnActionExpandListener() {
        @Override
        public boolean onMenuItemActionCollapse(MenuItem item) {
            // Do something when action item collapses
            return true;  // Return true to collapse action view
        }

        @Override
        public boolean onMenuItemActionExpand(MenuItem item) {
            // Do something when expanded
            return true;  // Return true to expand action view
        }
    };

    // Get the MenuItem for the action item
    MenuItem actionMenuItem = menu.findItem(R.id.myActionItem);

    // Assign the listener to that action item
    MenuItemCompat.setOnActionExpandListener(actionMenuItem, expandListener);

    // Any other things you have to do when creating the options menu…

    return true;
}
添加一个Action Provider
在菜单的item中添加actionProviderClass属性来添加一个action provider。例如,我们定义一个ShareActionProvider如下:
<item android:id="@+id/action_share"
    android:title="@string/share"
    app:showAsAction="ifRoom"
    app:actionProviderClass="android.support.v7.widget.ShareActionProvider"/>
这里不需要为ShareActionProvider提供一个icon因为系统已经定义了,不过可以自定义一个icon,Just do it!
使用Snackbar代替Toast
参考地址:http://developer.android.com/training/snackbar/index.html
很多时候我们都需要短暂的弹出一个消息提示用户,然后自动消失。Android以前是用Toast类来实现的,现在我们偏向于首选使用Snackbar组件来代替Toast实现这样的需求,当然,Toast依然是支持的。
创建和显示一个Pop-Up 消息
Snackbar组件是弹出消息的理想选择。
使用CoordinatorLayout
Snackbar是绑定在CoordinatorLayout上的,而且增加了一些新特性:
- Snackbar可以通过手势滑动dismiss掉
- Snackbar显示时将移动在它上面的布局。
CoordinatorLayout类提供FrameLayout功能的超集,所以如果你使用了FrameLayout,Just将其换成CoordinatorLayout,因为CoordinatorLayout提供了Snackbar的功能。如果你的布局采用了其他的布局方式,下面展示将你的布局包在CoordinatorLayout之中:
<android.support.design.widget.CoordinatorLayout
    android:id="@+id/myCoordinatorLayout"
    xmlns:android="http://schemas.android.com/apk/res/android"
    xmlns:app="http://schemas.android.com/apk/res-auto"
    android:layout_width="match_parent"
    android:layout_height="match_parent">


    <LinearLayout
        android:layout_width="match_parent"
        android:layout_height="match_parent"
        android:orientation="vertical">


    LinearLayout>

android.support.design.widget.CoordinatorLayout>注意:必须为CoordinatorLayout设置android:id属性,因为Snackbar显示pop消息需要CoordinatorLayout的id。
显示一个消息
2步:1、创建Snackbar对象;2、调用show方法
Snackbar mySnackbar = Snackbar.make(viewId, stringId, duration);viewId一般参入与之绑定的CoordinatorLayout的layoutId。
mySnackbar.show();系统在同一时间不能显示多个Snackbar。所以要显示第二个Snackbar,要等第一个Snackbar过期或被dismiss。
如果不用调用Snackbar其他实用方法,仅仅是显示一条消息而不用持有Snackbar的引用,你也可以将创建和显示一起写:
Snackbar.make(findViewById(R.id.myCoordinatorLayout), R.string.email_sent,
                        Snackbar.LENGTH_SHORT)
        .show();
在消息中添加一个Action
可以在Snackbar中添加一个Action。比如加一个undo按钮,那么在删除一个邮件之后,可以点击这个undo按钮恢复刚刚删除的邮件。

为Snackbar中的button设置事件监听,使用Snackbar的setAction()方法:
public class MyUndoListener implements View.OnClickListener{

    &Override
    public void onClick(View v) {

        // Code to undo the user's last action
    }
}

Snackbar mySnackbar = Snackbar.make(findViewById(R.id.myCoordinatorLayout),
                                R.string.email_archived, Snackbar.LENGTH_SHORT);
mySnackbar.setAction(R.string.undo_string, new MyUndoListener());
mySnackbar.show();
注意:Snackbar 只是短暂的显示一个消息,你不能指望用户看到消息时还有机会按到这个按钮。所以,你得考虑另一种方法去执行这个action。
自定义View(一) - 定义自己的View类
参考地址:http://developer.android.com/training/custom-views/create-view.html
自定义View的第一种方式是定义自己的View类,并为它设置自定义的属性。
创建View的子类
继承View必须至少有一个里面有Context和AttributeSet的构造方法。
class PieChart extends View {
    public PieChart(Context context, AttributeSet attrs) {
        super(context, attrs);
    }
}
定义自定义属性
给自定义的View力添加自定义的属性,从而在XML布局时使用,有如下步骤:
1、在资源文件中添加自定义属性
2、在XML布局中为自定义属性赋值
3、在运行时提取出属性的值
4、将属性的值应用到自定义的View上
例如,下面是res/values/attrs.xml的例子:
<resources>
   <declare-styleable name="PieChart">
       <attr name="showText" format="boolean" />
       <attr name="labelPosition" format="enum">
           <enum name="left" value="0"/>
           <enum name="right" value="1"/>
       attr>
   declare-styleable>
resources>上面的代码定义了showText 和labelPosition的属性,他俩属于名为PieChart的styleable。 styleable实体的名称一般和自定义View的名称相同,但这不是必须的。
定义好了自定义属性,就要去自己的布局文件中使用了,必须声明命名空间。http://schemas.android.com/apk/res/[your package name]。比如:
<LinearLayout xmlns:android="http://schemas.android.com/apk/res/android"
   xmlns:custom="http://schemas.android.com/apk/res/com.example.customviews">
 <com.example.customviews.charting.PieChart
     custom:showText="true"
     custom:labelPosition="left" />
LinearLayout>注意:自定义View在XML布局中使用,必须使用完整的包名+类名;如果自定义的View是一个类的内部类,那么需要从它的外部类访问它了。比如,这个例子中的自定义View是PieView,是PieChart的内部类,则这样使用它:com.example.customviews.charting.PieChart$PieView。
应用自定义属性
虽然我们可以从AttributeSet 中读出属性值,但有两个不好的地方:
- 资源强引用属性值
- 不支持Style
所以,我们不使用AttributeSet而使用obtainStyledAttributes()得到一个TypedArray。TypedArray里面的属性值解除了引用,而且被样式化(styled)了。例如:
public PieChart(Context context, AttributeSet attrs) {
   super(context, attrs);
   TypedArray a = context.getTheme().obtainStyledAttributes(
        attrs,
        R.styleable.PieChart,
        0, 0);

   try {
       mShowText = a.getBoolean(R.styleable.PieChart_showText, false);
       mTextPos = a.getInteger(R.styleable.PieChart_labelPosition, 0);
   } finally {
       **a.recycle();**
   }
}注意:TypedArray不是共享的资源,在使用完后必须手动释放。
增加属性和事件
为自定义View的类中的属性增加get和set方法,以动态的改变View的外观和行为。例如:
public boolean isShowText() {
   return mShowText;
}

public void setShowText(boolean showText) {
   mShowText = showText;
   invalidate();
   requestLayout();
}注意:setShowText调用了invalidate()和requestLayout(),这个确保能让View正确的展示。改变View的属性后需要调用invalidate以及时刷新,同样如果View属性改变影响尺寸和形状的话也要调用requestLayout,否则会产生一些难以捕捉的bug。
辅助性设计
我们的App需要为一些有残障的人士使用,那么我们需要做一些额外的工作:
- 在输入控件上添加android:contentDescription属性。(视力障碍者使用Google的一些服务可以通过声音读出来)
- 在合适的地方调用sendAccessibilityEvent()发送辅助的事件
- 支持备用控制器,方向键和轨迹球等
自定义View(二) - 自定义绘制
参考地址:http://developer.android.com/training/custom-views/custom-drawing.html
自定义View的最重要的部分就是绘制外观(重写onDraw()),而根据应用程序的不同需求,绘制可易可难。
创建绘制对象
canvas,表示画什么;paint,表示怎么画。
private void init() {
   mTextPaint = new Paint(Paint.ANTI_ALIAS_FLAG);
   mTextPaint.setColor(mTextColor);
   if (mTextHeight == 0) {
       mTextHeight = mTextPaint.getTextSize();
   } else {
       mTextPaint.setTextSize(mTextHeight);
   }

   mPiePaint = new Paint(Paint.ANTI_ALIAS_FLAG);
   mPiePaint.setStyle(Paint.Style.FILL);
   mPiePaint.setTextSize(mTextHeight);

   mShadowPaint = new Paint(0);
   mShadowPaint.setColor(0xff101010);
   mShadowPaint.setMaskFilter(new BlurMaskFilter(8, BlurMaskFilter.Blur.NORMAL));

   ...
提前创建Paint对象是一个重要的优化。View经常需要不断的重绘(reDraw),在onDraw中创建Paint对象将严重降低性能,有可能使界面卡顿。
处理布局事件
为了正确地画出你的自定义View,您需要知道它的大小。复杂的自定义View通常需要根据自己在屏幕上的区域大小和形状执行多次布局计算。对于View大小你不能猜测要进行明确的计算。即使只有一个应用程序使用你的View,应用程序需也要处理不同的屏幕尺寸,多个屏幕密度以及不同宽高比、横屏竖屏等情况。
尽管View有很多方法处理测量行为,其中大部分是不需要覆盖的。如果你认为不需要特殊控制其大小,你只需要覆盖一个方法:onSizeChanged()。
当你的View初次分配一个size时会调用onSizeChanged(),当因为任何理由改变了size都会再次调用。在onSizeChanged()中它会计算位置、尺寸、和任何与View有关的值,而不是在onDraw()中进行重新计算。在PieChart的例子中,onSizeChanged()就是PieChart的View用来计算的边界矩形饼图和文本标签以及其他可见UI元素的相对位置的。
当你的View被分配一个size,布局管理器会假定size里包含了包括了所有View的Padding。你必须处理Padding的值来计算你的View的大小。在例子中PieChart.onSizeChanged()是这样做的:
  // Account for padding
       float xpad = (float)(getPaddingLeft() + getPaddingRight());
       float ypad = (float)(getPaddingTop() + getPaddingBottom());

       // Account for the label
       if (mShowText) xpad += mTextWidth;

       float ww = (float)w - xpad;
       float hh = (float)h - ypad;

       // Figure out how big we can make the pie.
       float diameter = Math.min(ww, hh);
如果你要更好的控制你的布局参数(Layout Parameters),需要实现onMeasure()方法。这个方法的参数是View.MeasureSpec的值,这个值告诉你的View的父视图希望你的View多大,或者允许你的View最大是多少甚至建议是多少。作为一个优化,这些值通过包装的int整型数值存储,然后使用View.MeasureSpec的静态方法拆包出存储在每个int值里的信息。
下面是onMeasure()的一个例子,PieChart 试图让自己的view区域足够大以至让饼图和文本一样大。
@Override
protected void onMeasure(int widthMeasureSpec, int heightMeasureSpec) {
   // Try for a width based on our minimum
   int minw = getPaddingLeft() + getPaddingRight() + getSuggestedMinimumWidth();
   int w = resolveSizeAndState(minw, widthMeasureSpec, 1);

   // Whatever the width ends up being, ask for a height that would let the pie
   // get as big as it can
   int minh = MeasureSpec.getSize(w) - (int)mTextWidth + getPaddingBottom() + getPaddingTop();
   int h = resolveSizeAndState(MeasureSpec.getSize(w) - (int)mTextWidth, heightMeasureSpec, 0);

   setMeasuredDimension(w, h);
}
上面的代码有三个重要的点:
- 将padding值参与了计算,前面提到的这是view的责任。
- 方法resolveSizeAndState()用于帮助决定最终的宽度和高度值。这个方法通过比较view期望得到的值和onMeasure规则指定的值返回一个View.MeasureSpec的值。
- onMeasure()方法没有返回值。相反,它通过调用setMeasuredDimension()传递算出来的结果。setMeasuredDimension方法调用是必须的,如果你忽略了,系统会报一个运行时异常。
Draw!!
接下来就是绘制了。每个View的绘制方法都不一样,但有一些共同的操作是一样的:
- 使用drawText()绘制文本。通过setTypeface()设置字体,setColor()设置文本颜色
- 使用drawRect(), drawOval(), 和drawArc()绘制原始图形。setStyle()方法控制几何图形如何被解析。
- 使用drawPath()绘制复杂的图形。
- 使用LinearGradient对象定义线性填充。
- 使用drawBitmap()绘制bitmap
PieChart中绘制了文本、线条以及图形:
protected void onDraw(Canvas canvas) {
   super.onDraw(canvas);

   // Draw the shadow
   canvas.drawOval(
           mShadowBounds,
           mShadowPaint
   );

   // Draw the label text
   canvas.drawText(mData.get(mCurrentItem).mLabel, mTextX, mTextY, mTextPaint);

   // Draw the pie slices
   for (int i = 0; i < mData.size(); ++i) {
       Item it = mData.get(i);
       mPiePaint.setShader(it.mShader);
       canvas.drawArc(mBounds,
               360 - it.mEndAngle,
               it.mEndAngle - it.mStartAngle,
               true, mPiePaint);
   }

   // Draw the pointer
   canvas.drawLine(mTextX, mPointerY, mPointerX, mPointerY, mTextPaint);
   canvas.drawCircle(mPointerX, mPointerY, mPointerSize, mTextPaint);
}
示例下载:PieChart。
自定义View(三) - 添加View事件模拟现实
参考地址:http://developer.android.com/training/custom-views/making-interactive.html#motion
绘制了View之后,我们需要给View添加一些事件,让它更接近于现实。比如滑动一个View,当快速滑动并突然放手时,View会因为惯性继续滑动。本文介绍通过AndroidFramework来给自定义的View添加“现实世界”的事件。
手势事件
Android中最多最常见的事件就是touch事件。我们可以在View的onTouchEvent(android.view.MotionEvent)方法中处理:
@Override
   public boolean onTouchEvent(MotionEvent event) {
    return super.onTouchEvent(event);
   }
现代的touch UI事件是由手势tapping、pulling、pushing、flinging和flinging定义的。将原始的触摸事件转换为手势,Android中使用GestureDetector。
创建GestureDetector需要实现GestureDetector.OnGestureListener接口,如果你只需要处理一些手势,可以继承GestureDetector.SimpleOnGestureListener。
class mListener extends GestureDetector.SimpleOnGestureListener {
   @Override
   public boolean onDown(MotionEvent e) {
       return true;
   }
}
mDetector = new GestureDetector(PieChart.this.getContext(), new mListener());
不管你是否使用GestureDetector.SimpleOnGestureListener,你总需要在onDown()中返回true。因为如果返回false,系统会认为你要忽略其他手势,GestureDetector.OnGestureListener的其他方法将都得不到调用。返回false的情况只有一种,就是你真的要忽略掉其他手势(情况极少)。
创建完GestureDetector之后就要在onTouchEvent().中拦截触摸事件了:
@Override
public boolean onTouchEvent(MotionEvent event) {
   boolean result = mDetector.onTouchEvent(event);
   if (!result) {
       if (event.getAction() == MotionEvent.ACTION_UP) {
           stopScrolling();
           result = true;
       }
   }
   return result;
}
在onTouchEvent()中,如果一些触摸事件不能识别为手势事件,则返回false,我们可以用自己的代码来检测手势。
仿生运动
Android提供Scroller类来处理惯性这种手势事件。
当快速滑动时,在fling()中使用启动速度和最小和最大x和y的值。对于速度,你可以使用GestureDetector计算出来的值。
@Override
public boolean onFling(MotionEvent e1, MotionEvent e2, float velocityX, float velocityY) {
   mScroller.fling(currentX, currentY, velocityX / SCALE, velocityY / SCALE, minX, minY, maxX, maxY);
   postInvalidate();
}
注意:尽管GestureDetector本身计算速度比较准确,但许多开发人员认为使用这个值还是太大,所以一般将x和y速度除以4到8倍。
fling()的调用是建立在快速滑动手势的物理模型上的。然后你需要每隔一定时间调用Scroller.computeScrollOffset()来更新Scroller。Scroller.computeScrollOffset()通过读取当前时间以及在当前时间使用物理模型计算出的x、y值来更新Scroller的内部状态。调用getCurrX()和getCurrY()可以提取到这些值。
大多数View直接传递Scroller的x、y值给scrollTo()。PieChart例子有一点不同,他是用当前Scroller的y值来设置图表的旋转角。
if (!mScroller.isFinished()) {
    mScroller.computeScrollOffset();
    setPieRotation(mScroller.getCurrY());
}
Scroller类帮你计算滚动位置,但它不能自动帮你应用这些位置到你的View上。所以必须由你确保将最新获得的坐标及时应用到滚动动画上,让它看起来很平滑。有两种方式:
- 在onFling()后调用postInvalidate()以强制重绘。这样会在onDraw中重新计算滚动偏移量
- 在fling的时候创建一个ValueAnimator进行动画,并调用addUpdateListener()添加一个监听来处理动画更新
PieChart 例子使用的第二种方案。这个技术使用起来稍微复杂点,但它运行更接近于动画系统,并且不会带来潜在的View的无效刷新。缺点是ValueAnimator是Android3.0(API 11)才出来的,以前的老版本用不了。
注意:为系统兼容性,你需要在使用ValueAnimator的地方判断系统版本号。
  mScroller = new Scroller(getContext(), null, true);
       mScrollAnimator = ValueAnimator.ofFloat(0,1);
       mScrollAnimator.addUpdateListener(new ValueAnimator.AnimatorUpdateListener() {
           @Override
           public void onAnimationUpdate(ValueAnimator valueAnimator) {
               if (!mScroller.isFinished()) {
                   mScroller.computeScrollOffset();
                   setPieRotation(mScroller.getCurrY());
               } else {
                   mScrollAnimator.cancel();
                   onScrollFinished();
               }
           }
       });
平滑过渡
用户希望UI变换时有个平滑的过渡,而不是突然变化。在Android3.0以后,Android使用 property animation framework,可以很容易的处理平滑过渡问题。
当一个View的属性改变而导致它的展示发生改变时,我们可以使用ValueAnimator来做,这样不会使改变太唐突。例如:
mAutoCenterAnimator = ObjectAnimator.ofInt(PieChart.this, "PieRotation", 0);
mAutoCenterAnimator.setIntValues(targetAngle);
mAutoCenterAnimator.setDuration(AUTOCENTER_ANIM_DURATION);
mAutoCenterAnimator.start();
如果你想要改变View基本属性,做动画更容易,因为View有一个内置的ViewPropertyAnimator,它对多个属性同时动画进行了优化。如:
animate().rotation(targetAngle).setDuration(ANIM_DURATION).start();PieChart下载。
自定义View(四) - 优化View性能
参考地址:http://developer.android.com/training/custom-views/optimizing-view.html#less
来自官网的优化View的描述:
现在,你已经有了一个精心设计的View,我们要确保使用手势以及状态之间的切换运行流畅,避免UI卡顿;使动画始终运行在每秒60帧以保证动画运行不断断续续。
为加速你的View,在onDraw()中不要添加无意义的代码,因为这个方法执行的非常频繁。在onDraw()中也不要有分配内存的操作,因为每一次内存操作都会引发潜在的GC操作,从而导致卡顿。永远不要在运行动画时分配内存。
保证onDraw()代码简洁,从而让它尽可能快的执行。尽可能消除不必要的invalidate()来减少onDraw()的执行。
另一个耗时的操作是遍历布局。任何时候,view调用requestLayout,Android UI系统都要遍历整个view的层级结构找到每个View到底应该多大,如果遇到冲突的测量值,它可能重复几次遍历整个View层级。
UI设计师经常设计的很深的View的层级,嵌在ViewGroup里,来方便实现需求。很深的View层级会带来性能问题。请保证你的View层级越浅越好。
如果你有一个很复杂的UI,请自定义一个ViewGroup来实现它。不像内置的View,你自定义的View可以特定自己子View的形状和大小,而避免遍历所有的子View并测量其size和shape。PieChart 例子展示了如何继承于ViewGroup作为自定义View,PieChart 有子View,但从未测量过它们,它是通过自定义布局的算法给子View设置特定的Size。
向下兼容
参考地址:http://developer.android.com/training/backward-compatible-ui/index.html
本文用 Android3.0以后才有的Action Bar Tabs的例子,展示如何用抽象的方法做向下兼容。
抽象出Tab的接口
我们假设要设计出一个顶部的Tab选项卡,有如下需求:
- Tab选项卡由文本和icon组成
- 每一个Tab都和一个Fragment对应
- Activity能响应Tab切换的事件
本文使用Eclair (API level 5) 和 Honeycomb (API Level 11)两个系统版本来做例子讨论如何使用抽象做向下兼容。下面这张图显示了类的抽象和接口的设计:
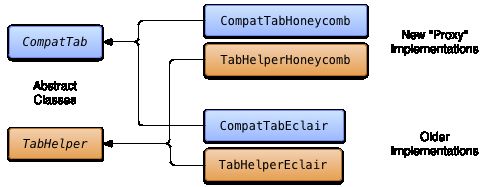
将ActionBar.Tab抽象
我们模仿ActionBar.Tab类中的方法进行抽象,相当于我们定义了自己的兼容Tab类:
public abstract class CompatTab {
    ...
    public abstract CompatTab setText(int resId);
    public abstract CompatTab setIcon(int resId);
    public abstract CompatTab setTabListener(
            CompatTabListener callback);
    public abstract CompatTab setFragment(Fragment fragment);

    public abstract CharSequence getText();
    public abstract Drawable getIcon();
    public abstract CompatTabListener getCallback();
    public abstract Fragment getFragment();
    ...
}
然后创建一个抽象类,允许你创建和添加Tab,类似于ActionBar.newTab() 和ActionBar.addTab():
public abstract class TabHelper {
    ...

    public CompatTab newTab(String tag) {
        // This method is implemented in a later lesson.
    }

    public abstract void addTab(CompatTab tab);

    ...
}
我们创建的CompatTab 类和TabHelper类是一种代理模式的实现。你可以在这些具体类中使用更新的API而不会导致设别crash,因为比如只要你不在Honeycomb (API Level 11)之前的设备上使用Honeycomb的API,系统就不会报VerifyError异常。
一种比较好的实现方法是用版本号命名定义这些抽象类的实现类,比如使用CompatTabHoneycomb和TabHelperHoneycomb来实现在Android3.0上的设备使用Tab的实现:

实现CompatTabHoneycomb
我们使用新的ActionBar.Tab的API来实现CompatTabHoneycomb:
public class CompatTabHoneycomb extends CompatTab {
    // The native tab object that this CompatTab acts as a proxy for.
    ActionBar.Tab mTab;
    ...

    protected CompatTabHoneycomb(FragmentActivity activity, String tag) {
        ...
        // Proxy to new ActionBar.newTab API
        mTab = activity.getActionBar().newTab();
    }

    public CompatTab setText(int resId) {
        // Proxy to new ActionBar.Tab.setText API
        mTab.setText(resId);
        return this;
    }

    ...
    // Do the same for other properties (icon, callback, etc.)
}
实现TabHelperHoneycomb
直接使用代理调用ActionBar的API:
public class TabHelperHoneycomb extends TabHelper {
    ActionBar mActionBar;
    ...

    protected void setUp() {
        if (mActionBar == null) {
            mActionBar = mActivity.getActionBar();
            mActionBar.setNavigationMode(
                    ActionBar.NAVIGATION_MODE_TABS);
        }
    }

    public void addTab(CompatTab tab) {
        ...
        // Tab is a CompatTabHoneycomb instance, so its
        // native tab object is an ActionBar.Tab.
        mActionBar.addTab((ActionBar.Tab) tab.getTab());
    }

    // The other important method, newTab() is part of
    // the base implementation.
}
接下来我们就要实现在旧的版本设备上实现一样的Tab了,需要寻找一个替代的解决方案:
使用Older APIs实现Tabs
我们使用TabWidget和TabHost 作为替代方案实现TabHelperEclair和CompatTabEclair,因为TabWidget和TabHost的API在Android 2.0 (Eclair)以后就有了。
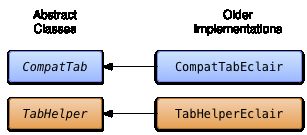
CompatTabEclair实现了一个文本和icon的存储,因为在Eclair版本上没有ActionBar.Tab的API:
public class CompatTabEclair extends CompatTab {
    // Store these properties in the instance,
    // as there is no ActionBar.Tab object.
    private CharSequence mText;
    ...

    public CompatTab setText(int resId) {
        // Our older implementation simply stores this
        // information in the object instance.
        mText = mActivity.getResources().getText(resId);
        return this;
    }

    ...
    // Do the same for other properties (icon, callback, etc.)
}
TabHelperEclair类的实现是使用TabHost组件创建TabHost.TabSpec 实现:
public class TabHelperEclair extends TabHelper {
    private TabHost mTabHost;
    ...

    protected void setUp() {
        if (mTabHost == null) {
            // Our activity layout for pre-Honeycomb devices
            // must contain a TabHost.
            mTabHost = (TabHost) mActivity.findViewById(
                    android.R.id.tabhost);
            mTabHost.setup();
        }
    }

    public void addTab(CompatTab tab) {
        ...
        TabSpec spec = mTabHost
                .newTabSpec(tag)
                .setIndicator(tab.getText()); // And optional icon
        ...
        mTabHost.addTab(spec);
    }

    // The other important method, newTab() is part of
    // the base implementation.
}
现在有两个CompatTab和TabHelper的实现:一个运行在Android 3.0或更高版本,并使用新的api;另一个运行Android 2.0或更高版本,并使用老的api。下面将讨论在应用程序中使用这些实现:
添加切换逻辑
TabHelper 类扮演了一个工厂,由他创建兼容各种设备的TabHelper 和CompatTab实例:
public abstract class TabHelper {
    ...
    // Usage is TabHelper.createInstance(activity)
    public static TabHelper createInstance(FragmentActivity activity) {
        if (Build.VERSION.SDK_INT >= Build.VERSION_CODES.HONEYCOMB) {
            return new TabHelperHoneycomb(activity);
        } else {
            return new TabHelperEclair(activity);
        }
    }

    // Usage is mTabHelper.newTab("tag")
    public CompatTab newTab(String tag) {
        if (Build.VERSION.SDK_INT >= Build.VERSION_CODES.HONEYCOMB) {
            return new CompatTabHoneycomb(mActivity, tag);
        } else {
            return new CompatTabEclair(mActivity, tag);
        }
    }
    ...
}
创建版本兼容的布局(layout)
在Android3.0以上我们使用ActionBar,而在2.0以上我们使用TabHost,所以在布局上使用老版本时我们需要在XML布局中定义TabHost和TabWidget。
res/layout/main.xml:
<TabHost xmlns:android="http://schemas.android.com/apk/res/android"
    android:id="@android:id/tabhost"
    android:layout_width="match_parent"
    android:layout_height="match_parent">

    <LinearLayout
        android:orientation="vertical"
        android:layout_width="match_parent"
        android:layout_height="match_parent"
        android:padding="5dp">

        <TabWidget
            android:id="@android:id/tabs"
            android:layout_width="match_parent"
            android:layout_height="wrap_content" />

        <FrameLayout
            android:id="@android:id/tabcontent"
            android:layout_width="match_parent"
            android:layout_height="0dp"
            android:layout_weight="1" />

    LinearLayout>
TabHost>
在Android3.0以后的布局是这样的:
res/layout-v11/main.xml:
<FrameLayout xmlns:android="http://schemas.android.com/apk/res/android"
    android:id="@android:id/tabcontent"
    android:layout_width="match_parent"
    android:layout_height="match_parent" />
系统运行时,Android会根据系统本身的版本自动选择main.xml布局文件。
在Activity中使用TabHelper
@Override
public void onCreate(Bundle savedInstanceState) {
    setContentView(R.layout.main);

    TabHelper tabHelper = TabHelper.createInstance(this);
    tabHelper.setUp();

    CompatTab photosTab = tabHelper
            .newTab("photos")
            .setText(R.string.tab_photos);
    tabHelper.addTab(photosTab);

    CompatTab videosTab = tabHelper
            .newTab("videos")
            .setText(R.string.tab_videos);
    tabHelper.addTab(videosTab);
}
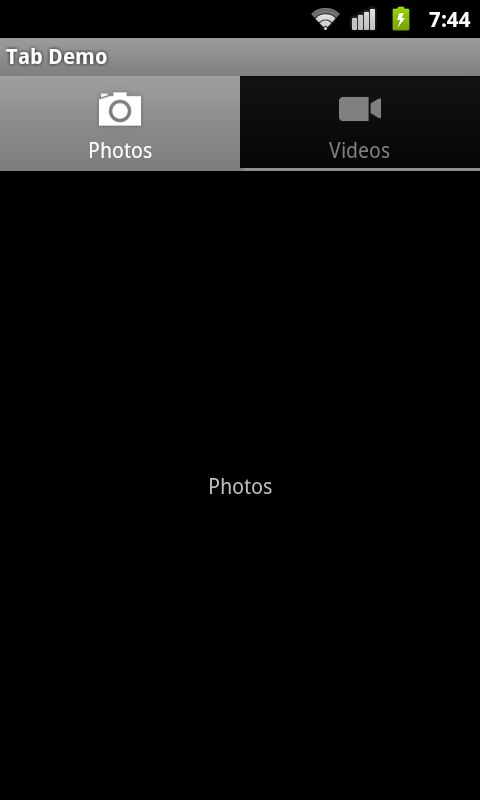
下面是两个分别运行在Android 2.3和Android 4.0设备的截图:

代码示例下载:TabCompat.zip
实现辅助(外挂)
参考地址:http://developer.android.com/training/accessibility/index.html
我们设计开发的App需要给更广泛的人群使用,有一部分的在视力、手脚等方面可能有残障,这时为了提高他们这部分人的用户体验,我们需要使用辅助服务来帮助他们来完成交互。也就是Android Framework中定义的Accessibility Services。
设计辅助程序
添加android:contentDescription属性
利用Google基于声音的TalkBack服务 ,在UI元素上加 android:contentDescription属性,可以使用这个服务将其读出来,使得视力障碍者可以通过声音访问这些元素。例如:
有一些有状态的UI(比如ToggleButton,CheckBox),就不能通过在布局中设置android:contentDescription来实现,这时可以在代码中动态设置:
String contentDescription = "Select " + strValues[position];
label.setContentDescription(contentDescription);
代码很简单,但是却很有用。下载TalkBack服务,然后在 Settings > Accessibility > TalkBack中开启服务即可使用。
Android不仅仅提供了触摸屏的导航方式,还可以通过D-Pad、方向键或轨迹球来操作。后来Android还提供了通过USB或蓝牙连接的外置键盘来操作。
要使用这种形式的操作方式,必须让设置操作的元素处于获取焦点状态(Focus),使用View.setFocusable()或在XML布局中设置 android:focusable属性。
另外,每个UI控件都有四个属性android:nextFocusUp, android:nextFocusDown, android:nextFocusLeft和android:nextFocusRight,你可以用这些属性定义在某个方向哪个控件将获取焦点,因为系统默认是采用布局临近原则来自动决定顺序的,采用这四个属性可以人工干预。
例如:有一个Button和一个TextView,都可以focus,当按下方向键的时候焦点从button跳到TextView,按上焦点返回到button:
最好的验证方式是在模拟器上,操作上下方向键,来查看控件的焦点情况。
发送辅助事件
如果你使用AndroidFramework中的控件,那么不管何时它的选中状态或焦点状态发生变化,都可以发送AccessibilityEvent。这个事件是由accessibility service检查的,可以提供像TTS那样的功能。
如果你写一个自定义的View,要保证在适当的时候发送accessibility event。通过调用sendAccessibilityEvent(int)方法,其中参数代表发生的事件类,来创建一个事件。AccessibilityEvent提供了完整的事件类型列表。
例如,你想继承imageview以致于在它获取焦点时可以通过键盘输入标题上去,这时需要发生一个 TYPE_VIEW_TEXT_CHANGED事件,尽管这个事件一般没有在内置定义在imageview中。代码如下:
public void onTextChanged(String before, String after) {
    ...
    if (AccessibilityManager.getInstance(mContext).isEnabled()) {
        sendAccessibilityEvent(AccessibilityEvent.TYPE_VIEW_TEXT_CHANGED);
    }
    ...
}
开发一个Accessibility Service
创建一个Accessibility Service
package com.example.android.apis.accessibility;

import android.accessibilityservice.AccessibilityService;

public class MyAccessibilityService extends AccessibilityService {
...
    @Override
    public void onAccessibilityEvent(AccessibilityEvent event) {
    }

    @Override
    public void onInterrupt() {
    }

...
}
在Manifest中注册Service,要特别指定android.accessibilityservice,当应用程序发出一个AccessibilityEvent时可以接收到。
...>
...
".MyAccessibilityService">

         "android.accessibilityservice.AccessibilityService" />

     . . .

...
配置Accessibility Service
配置Accessibility Service有两种方式,兼容的方式是在代码中配置。在onServiceConnected()中调用setServiceInfo(android.accessibilityservice.AccessibilityServiceInfo)来配置辅助服务:
@Override
public void onServiceConnected() {
    // Set the type of events that this service wants to listen to.  Others
    // won't be passed to this service.
    info.eventTypes = AccessibilityEvent.TYPE_VIEW_CLICKED |
            AccessibilityEvent.TYPE_VIEW_FOCUSED;

    // If you only want this service to work with specific applications, set their
    // package names here.  Otherwise, when the service is activated, it will listen
    // to events from all applications.
    info.packageNames = new String[]
            {"com.example.android.myFirstApp", "com.example.android.mySecondApp"};

    // Set the type of feedback your service will provide.
    info.feedbackType = AccessibilityServiceInfo.FEEDBACK_SPOKEN;

    // Default services are invoked only if no package-specific ones are present
    // for the type of AccessibilityEvent generated.  This service *is*
    // application-specific, so the flag isn't necessary.  If this was a
    // general-purpose service, it would be worth considering setting the
    // DEFAULT flag.

    // info.flags = AccessibilityServiceInfo.DEFAULT;

    info.notificationTimeout = 100;

    this.setServiceInfo(info);

}从Android4.0开始,我们可以将配置写在一个XML文件中,一些配置选项比如canRetrieveWindowContent只能在XML中配置。和上面代码同样的配置选项的XML配置如下:
<accessibility-service
     android:accessibilityEventTypes="typeViewClicked|typeViewFocused"
     android:packageNames="com.example.android.myFirstApp, com.example.android.mySecondApp"
     android:accessibilityFeedbackType="feedbackSpoken"
     android:notificationTimeout="100"
     android:settingsActivity="com.example.android.apis.accessibility.TestBackActivity"
     android:canRetrieveWindowContent="true"
/>
如果使用XML配置,还需要在Manifest文件中配置 属性,指定辅助服务的resource为上面的XML配置文件:
<service android:name=".MyAccessibilityService">
     <intent-filter>
         <action android:name="android.accessibilityservice.AccessibilityService" />
     intent-filter>
     <meta-data android:name="android.accessibilityservice"
     android:resource="@xml/serviceconfig" />
service>
响应AccessibilityEvents
覆盖onAccessibilityEvent(AccessibilityEvent)方法来处理AccessibilityEvents事件:
@Override
public void onAccessibilityEvent(AccessibilityEvent event) {
    final int eventType = event.getEventType();
    String eventText = null;
    switch(eventType) {
        case AccessibilityEvent.TYPE_VIEW_CLICKED:
            eventText = "Focused: ";
            break;
        case AccessibilityEvent.TYPE_VIEW_FOCUSED:
            eventText = "Focused: ";
            break;
    }

    eventText = eventText + event.getContentDescription();

    // Do something nifty with this text, like speak the composed string
    // back to the user.
    speakToUser(eventText);
    ...
}
查询View Heirarchy获取的Context
这个是 Android 4.0 (API Level 14) 上AccessibilityService 才有的能力,这种能力非常有用!我们需要在XML的配置中配置android:canRetrieveWindowContent=”true”。
通过getSource()获得AccessibilityNodeInfo对象,如果事件源的窗口仍然是活动窗口,则这个调用返回一个对象;否则返回null。
下面的例子是一个代码片段,它接收到一个事件时,作如下事情:
1、直接抓住事件源View的父视图
2、在父View里,寻找一个label和checkbox作为子View
3、如果找到了,创建一个string发给用户,标识checkbox是否被选中
4、如果遍历了整个view hierarchy返回null,则默默的放弃
// Alternative onAccessibilityEvent, that uses AccessibilityNodeInfo

@Override
public void onAccessibilityEvent(AccessibilityEvent event) {

    AccessibilityNodeInfo source = event.getSource();
    if (source == null) {
        return;
    }

    // Grab the parent of the view that fired the event.
    AccessibilityNodeInfo rowNode = getListItemNodeInfo(source);
    if (rowNode == null) {
        return;
    }

    // Using this parent, get references to both child nodes, the label and the checkbox.
    AccessibilityNodeInfo labelNode = rowNode.getChild(0);
    if (labelNode == null) {
        rowNode.recycle();
        return;
    }

    AccessibilityNodeInfo completeNode = rowNode.getChild(1);
    if (completeNode == null) {
        rowNode.recycle();
        return;
    }

    // Determine what the task is and whether or not it's complete, based on
    // the text inside the label, and the state of the check-box.
    if (rowNode.getChildCount() < 2 || !rowNode.getChild(1).isCheckable()) {
        rowNode.recycle();
        return;
    }

    CharSequence taskLabel = labelNode.getText();
    final boolean isComplete = completeNode.isChecked();
    String completeStr = null;

    if (isComplete) {
        completeStr = getString(R.string.checked);
    } else {
        completeStr = getString(R.string.not_checked);
    }
    String reportStr = taskLabel + completeStr;
    speakToUser(reportStr);
}
现在,你有一个功能完整的accessibility servicel了。试着配置TTS引擎来更好的与用户交互,或者使用振动提供触摸反馈。
系统状态栏和导航栏
参考地址:http://developer.android.com/training/system-ui/index.html
变暗系统状态栏
在Android 4.0(API14)及以上可以使用SYSTEM_UI_FLAG_LOW_PROFILE这个Flag很容易的变暗状态栏。Android早期版本系统不提供一个内置的API变暗状态栏。
// This example uses decor view, but you can use any visible view.
View decorView = getActivity().getWindow().getDecorView();
int uiOptions = View.SYSTEM_UI_FLAG_LOW_PROFILE;
decorView.setSystemUiVisibility(uiOptions);
当用户触摸状态或导航栏,这个flag就消失了,就恢复了明亮。如果想再次变暗它,就需要重新设置它。
如果你要通过代码清除flag,使用setSystemUiVisibility():
View decorView = getActivity().getWindow().getDecorView();
// Calling setSystemUiVisibility() with a value of 0 clears
// all flags.
decorView.setSystemUiVisibility(0);
隐藏状态栏
在Android 4.0及以下版本上隐藏状态栏
...
    android:theme="@android:style/Theme.Holo.NoActionBar.Fullscreen" >
    ...
或者
public class MainActivity extends Activity {

    @Override
    protected void onCreate(Bundle savedInstanceState) {
        super.onCreate(savedInstanceState);
        // If the Android version is lower than Jellybean, use this call to hide
        // the status bar.
        if (Build.VERSION.SDK_INT < 16) {
            getWindow().setFlags(WindowManager.LayoutParams.FLAG_FULLSCREEN,
                    WindowManager.LayoutParams.FLAG_FULLSCREEN);
        }
        setContentView(R.layout.activity_main);
    }
    ...
}可以使用FLAG_LAYOUT_IN_SCREEN这个flag设置你的Activity使用相同的屏幕区域,这样就不会使状态栏不停的隐藏和显示了。
在Android 4.1隐藏状态栏
View decorView = getWindow().getDecorView();
// Hide the status bar.
int uiOptions = View.SYSTEM_UI_FLAG_FULLSCREEN;
decorView.setSystemUiVisibility(uiOptions);
// Remember that you should never show the action bar if the
// status bar is hidden, so hide that too if necessary.
ActionBar actionBar = getActionBar();
actionBar.hide();
注意:设置UI的flag只是当时生效。比如你在onCreate()中设置隐藏状态栏,点击home回到桌面状态栏显示,再次进入之后onCreate()不会再执行,状态栏就一直显示,就会有问题了。解决方法是:在onResume()或onWindowFocusChanged()中设置flag使其消失。
setSystemUiVisibility()方法只对可见的View有效
设置过setSystemUiVisibility()的View再导航离开后,flag会消失。
让界面内容显示在状态栏的后面
在Android 4.1及以后,可以设置界面内容在状态栏的后面,这样界面就不会因为状态栏显示和隐藏而resize了。使用SYSTEM_UI_FLAG_LAYOUT_FULLSCREEN这个flag就可以了,还可以使用SYSTEM_UI_FLAG_LAYOUT_STABLE这个flag帮助app维持一个稳定的布局。当你使用这种方法时,你就要对它负责,来确保你的某些UI(比如地图的内置控件)不会被遮住而影响使用。多数情况下你可以在XML布局中设置android:fitsSystemWindows属性为true来处理这种情况,这对大多数应用都适用。
某些情况下,可能你需要修改默认的padding值来得到想要的合理布局。要直接操作内容布局相对于状态栏的位置(占据的那部分空间称content insets),需要覆盖fitSystemWindows(Rect insets)方法。fitSystemWindows方法在content insets发生变化被 view hierarchy时调用,允许window调整它的content。通过覆盖这个方法,不管你想不想,你都可以处理这个insets 。
让Actionbar和状态栏同步
在Android 4.1及以上版本中,为避免在actionbar隐藏和显示时resize你的布局,你可以为actionbar开启覆盖(overlay)模式。在覆盖模式中,你的Activity使用尽可能大的空间好像Actionbar不在那儿一样,其实actionbar是在布局的上面,只是布局顶部有一部分变模糊了,但现在actionbar不管显示和隐藏,都不会resize布局了。
打开覆盖模式,需要创建一个自定义的主题,继承一个带有actionbar的主题,设置 android:windowActionBarOverlay=true。然后使用上面提到的SYSTEM_UI_FLAG_LAYOUT_FULLSCREEN Flag,设置你的Activity在打开SYSTEM_UI_FLAG_FULLSCREEN flag时使用相同的屏幕区域。当你要隐藏SystemUI时,使用SYSTEM_UI_FLAG_FULLSCREEN的flag。这个也会隐藏action bar(因为android:windowActionBarOverlay=true),而且在隐藏和显示时有一个和谐的动画。
隐藏导航栏

隐藏导航栏,但我们要设计成让它容易访问到它。给用户提供一个更加沉浸式的用户体验。你可以在Android4.0(API 14)
及以上版本,使用SYSTEM_UI_FLAG_HIDE_NAVIGATION的flag来隐藏导航栏。
View decorView = getWindow().getDecorView();
// Hide both the navigation bar and the status bar.
// SYSTEM_UI_FLAG_FULLSCREEN is only available on Android 4.1 and higher, but as
// a general rule, you should design your app to hide the status bar whenever you
// hide the navigation bar.
int uiOptions = View.SYSTEM_UI_FLAG_HIDE_NAVIGATION
              | View.SYSTEM_UI_FLAG_FULLSCREEN;
decorView.setSystemUiVisibility(uiOptions);
使用这个方法,用户点击屏幕任何地方将导致导航栏(和状态栏)都重新显示并保持。
这个flag被清除后,需要重新设置它进行隐藏导航栏
其他部分都和状态栏的注意部分一样
让界面内容显示在导航栏下面
在Android4.1及以上版本,使用SYSTEM_UI_FLAG_LAYOUT_HIDE_NAVIGATION的flag使界面布局显示在导航栏的下面,并使用SYSTEM_UI_FLAG_LAYOUT_STABLE保持布局。
其他部分和状态栏部分注意部分相同
使用沉浸式的全屏模式
在Android 4.4 (API Level 19)中为setSystemUiVisibility()新介绍了SYSTEM_UI_FLAG_LAYOUT_STABLE的flag,它让你的app真实的进入“全屏”模式,和SYSTEM_UI_FLAG_HIDE_NAVIGATION以及SYSTEM_UI_FLAG_FULLSCREEN结合起来时,隐藏状态栏和导航栏,app将捕获全屏的触摸事件。
当沉浸式全屏模式开启后,你的Activity持续的接收全屏的触摸事件。当用户沿着system bar一般显示的地方向内滑动时会让system bar显示出来。这个动作清除了SYSTEM_UI_FLAG_HIDE_NAVIGATION flag (以及 SYSTEM_UI_FLAG_FULLSCREEN,如果应用的话),于是system bar变得可见,这会触发View.OnSystemUiVisibilityChangeListener。然而,你希望system bar一会儿后再自动隐藏,你可以使用SYSTEM_UI_FLAG_IMMERSIVE_STICKY的flag。注意这个粘性(”sticky” )的版本不会触发任何监听事件,因为system bar在这种模式下只是暂时性的显示。
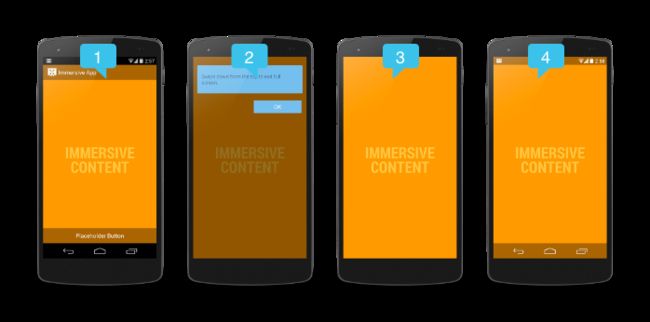
- 非沉浸式模式。在app进入沉浸式模式前的状态。它也表示如果你使用沉浸式flag,当用户滑动时清除了SYSTEM_UI_FLAG_HIDE_NAVIGATION 和 SYSTEM_UI_FLAG_FULLSCREEN显示system bar的情况。这是保持UI控件和system bar同步的最好实践,它最小化了屏幕的状态数。这个提供了更加无缝的用户体验,所以这里所有的UI控件和状态栏一起显示。一旦进入沉浸模式,UI控件将随着system bar的隐藏而隐藏。为确保你的UI和system bar保持可见,使用View.OnSystemUiVisibilityChangeListener监听可见性的变化。
- 提示气泡。当用户第一次进入沉浸模式时,系统将显示一个提示气泡。这个气泡提示用户将怎样显示system bar。注意:如果你想强制性的显示提示气泡用作测试意图,你可以将app进入沉浸模式,然后关闭屏幕,然后在5秒内点亮屏幕。
- 沉浸模式。app进入沉浸模式,system bars和其他UI控件都隐藏。
- 粘性Flag。这个UI是你使用IMMERSIVE_STICKY的Flag,然后用户滑动使system bar显示的。半透明的bar临时显示然后会再隐藏。滑动行为不会清除任何flag,所以也不会触发system UI可见性变化的监听。
注意:沉浸的FLag只有你使用SYSTEM_UI_FLAG_HIDE_NAVIGATION, SYSTEM_UI_FLAG_FULLSCREEN的Flag或两者都有的时候才会生效。通常情况下当你使用“全屏沉浸”模式会隐藏状态栏和导航栏。
SYSTEM_UI_FLAG_IMMERSIVE 和SYSTEM_UI_FLAG_IMMERSIVE_STICKY可以提供一个差异化的沉浸式的体验。
下面是一些情况,你需要使用其中一个,而不是另一个:
- 当你开发一个阅读app,新闻app或杂志app时,使用沉浸flag需要和SYSTEM_UI_FLAG_FULLSCREEN、 SYSTEM_UI_FLAG_HIDE_NAVIGATION两者结合起来用。
- 当你开发一个完全沉浸模式的app,期望用户和屏幕的边缘进行交互而不期望用户频繁的和system UI交互,使用粘性沉浸的flag,结合SYSTEM_UI_FLAG_FULLSCREEN 和SYSTEM_UI_FLAG_HIDE_NAVIGATION使用。
- 如果你开发一个视频播放器或其他很少需要用户交互的app,你可能需要老一点版本的方法了( Android 4.0 (API Level 14)及以上)。因为对于这类app,简单的使用SYSTEM_UI_FLAG_FULLSCREEN和会SYSTEM_UI_FLAG_HIDE_NAVIGATION的Flag就足够了,不需要沉浸的flag。
使用非粘性沉浸
这段代码演示了如何隐藏和显示状态栏和导航栏,而不用resize界面的内容。
// This snippet hides the system bars.
private void hideSystemUI() {
    // Set the IMMERSIVE flag.
    // Set the content to appear under the system bars so that the content
    // doesn't resize when the system bars hide and show.
    mDecorView.setSystemUiVisibility(
            View.SYSTEM_UI_FLAG_LAYOUT_STABLE
            | View.SYSTEM_UI_FLAG_LAYOUT_HIDE_NAVIGATION
            | View.SYSTEM_UI_FLAG_LAYOUT_FULLSCREEN
            | View.SYSTEM_UI_FLAG_HIDE_NAVIGATION // hide nav bar
            | View.SYSTEM_UI_FLAG_FULLSCREEN // hide status bar
            | View.SYSTEM_UI_FLAG_IMMERSIVE);
}

// This snippet shows the system bars. It does this by removing all the flags
// except for the ones that make the content appear under the system bars.
private void showSystemUI() {
    mDecorView.setSystemUiVisibility(
            View.SYSTEM_UI_FLAG_LAYOUT_STABLE
            | View.SYSTEM_UI_FLAG_LAYOUT_HIDE_NAVIGATION
            | View.SYSTEM_UI_FLAG_LAYOUT_FULLSCREEN);
}
1、注册一个监听让你的app得到system UI可见性变化的通知。
2、实现onWindowFocusChanged()方法。如果你获得window的焦点,你可能想重新隐藏system bar。如果你失去了window的焦点,例如一个对话框或弹出菜单,你可能想取消之前的Handler.postDelayed()或类似方法安排的隐藏操作。
3、实现一个GestureDetector ,让它监测onSingleTapUp(MotionEvent),让用户可以通过触摸content手动控制system bar的可见性。简单的click监听不是最好的解决方案因为当用户在屏幕滑动手指都可以触发。
使用粘性沉浸
当你使用SYSTEM_UI_FLAG_IMMERSIVE_STICKY的flag,在system bar内部区域的滑动会导致其半透明状态并暂时性的显示但没有flag被清除,你的system UI的可见性监听没有被触发。system bar会在一会儿以后再次隐藏或用户在content交互下。
下图展示了当使用IMMERSIVE_STICKY的flag时半透明的system bar短暂的显示然后隐藏

下面是一个简单的方法来使用这个flag:
@Override
public void onWindowFocusChanged(boolean hasFocus) {
        super.onWindowFocusChanged(hasFocus);
    if (hasFocus) {
        decorView.setSystemUiVisibility(
                View.SYSTEM_UI_FLAG_LAYOUT_STABLE
                | View.SYSTEM_UI_FLAG_LAYOUT_HIDE_NAVIGATION
                | View.SYSTEM_UI_FLAG_LAYOUT_FULLSCREEN
                | View.SYSTEM_UI_FLAG_HIDE_NAVIGATION
                | View.SYSTEM_UI_FLAG_FULLSCREEN
                | View.SYSTEM_UI_FLAG_IMMERSIVE_STICKY);}
}
如果你喜欢IMMERSIVE_STICKY的flag的自动隐藏行为,但是需要同时显示你自己的UI控件,使用 IMMERSIVE和Handler.postDelayed()或者其它一些类似的在一会儿之后可以重新进入沉浸模式的方式。
响应UI可见性的变化
要获得UI可见性变化的通知,需要为你的View注册View.OnSystemUiVisibilityChangeListener,例如在你的Activity中的onCreate()中:
View decorView = getWindow().getDecorView();
decorView.setOnSystemUiVisibilityChangeListener
        (new View.OnSystemUiVisibilityChangeListener() {
    @Override
    public void onSystemUiVisibilityChange(int visibility) {
        // Note that system bars will only be "visible" if none of the
        // LOW_PROFILE, HIDE_NAVIGATION, or FULLSCREEN flags are set.
        if ((visibility & View.SYSTEM_UI_FLAG_FULLSCREEN) == 0) {
            // TODO: The system bars are visible. Make any desired
            // adjustments to your UI, such as showing the action bar or
            // other navigational controls.
        } else {
            // TODO: The system bars are NOT visible. Make any desired
            // adjustments to your UI, such as hiding the action bar or
            // other navigational controls.
        }
    }
});
通常保持UI与system bar可见性变化的一致性是不错的实践。例如,你可以通过这种方式让action bar和状态栏保持一致的变化状态。
沉浸模式的样例代码下载。ImmersiveMode.zip
