springboot + mybatis + nodejs + vue + nginx 搭建第一个前后端分离的项目
一. 开发环境和工具的准备
- jdk1.8
- maven
- mysql数据库
- Navicat
- nodejs
- vuejs
- 后端工具idea
- 前端工具WebStorm
二. 数据库设计
create database fontandback
use fontandback
create table user(
id int(10) primary key auto_increment,
username varchar(20),
password varchar(20)
)
insert into user(username,password) values('admin','admin');
三. 后端
1.创建项目

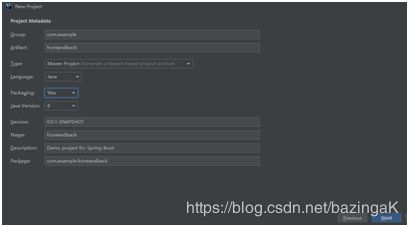

2.添加maven依赖
        org.springframework.boot
        spring-boot-starter-web


        org.springframework.boot
        spring-boot-starter-tomcat
        provided


        org.springframework.boot
        spring-boot-starter-test
        test


        mysql
        mysql-connector-java
        runtime


        org.mybatis.spring.boot
        mybatis-spring-boot-starter
        1.3.2
3.配置application.properties
#后端端口号
server.port=8081
#数据库的配置
spring.datasource.url=jdbc:mysql://127.0.0.1:3306/fontandback?useUnicode=true&characterEncoding=utf-8&useSSL=false&serverTimezone = GMT
spring.datasource.username=root
spring.datasource.password=123456
spring.datasource.driver-class-name=com.mysql.cj.jdbc.Driver
#映射配置
mybatis.type-aliases-package=com.example.frontandback.entity
mybatis.mapper-locations=classpath:mapper/*Mapper.xml
4.去除掉用不到的文件,最终的目录结构:

5.User
package com.example.frontandback.entity;

public class User {

    private int id;
    private String username;
    private String password;

    private User(){

    }
    private User(int id,String username,String password){
        this.id = id;
        this.username = username;
        this.password = password;
    }

    public int getId() {
        return id;
    }

    public void setId(int id) {
        this.id = id;
    }

    public String getUsername() {
        return username;
    }

    public void setUsername(String username) {
        this.username = username;
    }

    public String getPassword() {
        return password;
    }

    public void setPassword(String password) {
        this.password = password;
    }

    @Override
    public String toString() {
        return "User{" +
                "id=" + id +
                ", username='" + username + '\'' +
                ", password='" + password + '\'' +
                '}';
    }
}
6.UserMapper
package com.example.frontandback.mapper;

import com.example.frontandback.entity.User;
import org.apache.ibatis.annotations.Mapper;
import org.apache.ibatis.annotations.Param;
import org.springframework.stereotype.Component;

@Mapper
@Component("userMapper")
public interface UserMapper {

    public User getUser(@Param("username")String username, @Param("password")String password);
}
7.UserMapper.xml
8.省略UserService。。。。。。。。。。。。
UserServiceImpl
package com.example.frontandback.service.impl;

import com.example.frontandback.entity.User;
import com.example.frontandback.mapper.UserMapper;
import com.example.frontandback.service.UserService;
import org.springframework.beans.factory.annotation.Autowired;
import org.springframework.stereotype.Service;

@Service
public class UserServiceImpl implements UserService {

    @Autowired
    UserMapper userMapper;

    @Override
    public User getUser(String username, String password) {
        return userMapper.getUser(username,password);
    }
}
9.SystemController
package com.example.frontandback.controller;

import com.example.frontandback.entity.User;
import com.example.frontandback.service.impl.UserServiceImpl;
import org.springframework.beans.factory.annotation.Autowired;
import org.springframework.stereotype.Controller;
import org.springframework.web.bind.annotation.RequestMapping;
import org.springframework.web.bind.annotation.RequestParam;
import org.springframework.web.bind.annotation.ResponseBody;

@Controller
public class SystemController {

    @Autowired
    UserServiceImpl userService;

    @RequestMapping(value="checkLogin")
    @ResponseBody
    public User checkLogin(@RequestParam("username")String username,
                           @RequestParam("password")String password){
        return userService.getUser(username,password);
    }
}
四. 前端
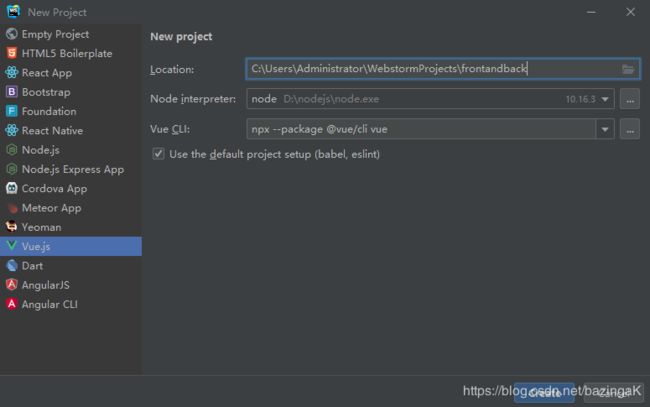
生成的目录结构为

直接在所给页面进行编写
HelloWorld.vue
{{ msg }}
App.vue

五. nginx
此时前后端代码便写完了,分别运行前后端服务器。。。
然后运行nginx
nginx的配置:listen后面为切入端口号,第一个location配置的是前端的端口号,默认为8080,第二个location配置的是后端的端口号。
进入解压出nginx的目录输入命令:start nginx.exe


六. 运行结果

