你好! 在本文中,我将介绍Spring Boot应用程序中的验证。 您了解该主题的唯一要求是能够在Spring Boot中创建控制器,并且当然要熟悉Java。
You can find source code for examples here: https://github.com/kamer/validations-in-spring-boot
Why do we need both client-side and server-side validation?
在Web应用程序中,我们通常将客户端验证和服务器端验证同时用于表单数据或任何其他发送到服务器端的数据。 我们为什么要打扰他们两个?
因为我们使用客户端验证来快速验证和响应。 例如,我们有一个接受电话号码的字段。 因此,首先,我们应防止用户键入数字以外的任何字符。 另外,我们有一个验证电话号码的模式。 如果我们在客户端控制并拒绝任何不正确的输入值,则可以消除此请求进入服务器端并被拒绝的时间。 因此,可以说客户端验证主要用于向用户提供快速反馈并验证语法内容。 (例如图案,长度,字符)
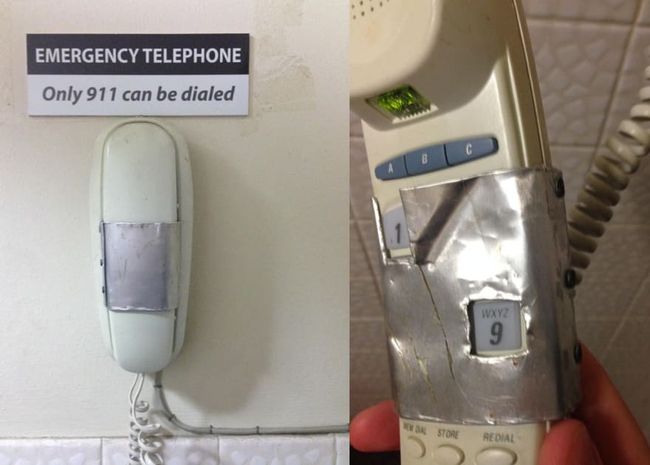
但是客户端验证可以被认为是无用的,因为它们很容易被操纵或禁用。 这很好地代表了信任任何类型的客户端验证的感觉。
如果继续上面的图片,我们应该创建一个验证机制,拒绝输入除911之外的任何其他数字。 这是服务器端验证起作用的地方。 简要地说,服务器端验证是我们正确拒绝错误输入的最后机会。 另外,我们验证需要在服务器端进行更多逻辑操作的约束。 例如,如果尚未分配部门经理,则拒绝创建员工。 够介绍了,让我们动手吧。
Javax Validation Constraints
javax.validation是Bean验证API的顶级程序包,它在其中具有一些基于预定义注释的约束约束包供我们使用。 这里有些例子。
- 如果我们要检查字段是否为空,则使用@NotNull.
  @NotNull(message = "Name cannot be null.")
  private String name;
在上面的例子中名称字段不能为空。但是它可以是空的。如果我们使用@NotBlank名称cannotbenullandmustcontainatleastnon-whitespaceonecharacterorifweuse@不是空的annotation名称cannotbenulland名称.length()>0.SoitcanacceptaStringthathaswhitespacecharacter.
-如果我们限制任何数字输入,我们将使用@Max和@Min注释。
  @Min(value = 3, message = "Experience must be at least 3 years.")
  private Integer experienceInYears;
--@正,@负,@正OrZero和@负OrZero注解的作用与名称相同。
  @PositiveOrZero(message = "You cannot have negative numbers of children.")
  private Integer numberOfChildren;
--@尺寸批注给出任何大小的最小值和最大值。 (字符序列,采集,地图,数组)
  @Size(min = 2, max = 35, message = "Surname must be 2-35 characters long.")
  private String surname;
--@过去,@未来,@过去OrPresent,@未来OrPresent批注根据其名称验证日期类型。
  @Past(message = "Date input is invalid for a birth date.")
  private LocalDate dateOfBirth;
-您可以使用验证任何正则表达式模式@图案注解。
  @Pattern(regexp = "^4[0-9]{12}(?:[0-9]{3})?$", message = "Only Visa cards are accepted.")
  private String cardNumber;
-无需解释@邮件注解。
  @Email(message = "Enter a valid email address.")
  private String email;
I explained the most important ones above. If you want to see the others you can find them here.
我创建了一个虚拟示例来尝试这些约束,并使用Thymeleaf在表单输入上显示验证消息。 我们应该用@有效激活这些约束。
@PostMapping("/javax-constraints")
    String postJavaxConstraints(@Valid JavaxValidationConstraints javaxValidationConstraints, BindingResult bindingResult) {
        ...
        ...
        ...
    }
然后在Thymeleaf上显示错误消息。
Creating Your Own Validation Annotations
如果您已经很好地遵循了上一章,那么您应该已经发现,使用Javax验证约束几乎可以实现任何目标。 但是有时定义自己的注释似乎是一个更好的选择。
这是一个例子。 我们要验证信用卡场与@图案。
@NotEmpty(message = "You must enter a credit card number.")
@Pattern(regexp = "^(?:4[0-9]{12}(?:[0-9]{3})?|[25][1-7]"
                + "[0-9]{14}|6(?:011|5[0-9][0-9])[0-9]{12}"
                + "|3[47][0-9]{13}|3(?:0[0-5]|[68][0-9])"
                + "[0-9]{11}|(?:2131|1800|35\\d{3})\\d{11})$",
            message = "Invalid card number.")
private String creditCard;
您在这里看到任何问题吗? 考虑到我们将至少再有5个字段具有至少2个验证注释,以此类推,这似乎太难看了。 在这种情况下,我们可以选择定义自己的注释。
首先创建如下的注释。
@Documented
@Constraint(validatedBy = CreditCardValidator.class)
@Target({ ElementType.FIELD })
@Retention(RetentionPolicy.RUNTIME)
public @interface CreditCard {

    String message() default "Invalid card number";
    Class[] groups() default {};
    Class extends Payload>[] payload() default {};
 }
我们希望注释在运行时提供服务,与字段类型一起使用并由CreditCardValidator类进行验证。
这是我们的验证器类。
public class CreditCardValidator implements ConstraintValidator<CreditCard, String> {

    private static final String CREDIT_CARD_REGEX = "^(?:4[0-9]{12}(?:[0-9]{3})?|[25][1-7][0-9]{14}|6(?:011|5[0-9][0-9])[0-9]{12}|3[47][0-9]{13}|3(?:0[0-5]|[68][0-9])[0-9]{11}|(?:2131|1800|35\\d{3})\\d{11})$";

    private static final Pattern CREDIT_CARD_PATTERN = Pattern.compile(CREDIT_CARD_REGEX);

    @Override
    public void initialize(CreditCard constraintAnnotation) {

    }

    @Override
    public boolean isValid(String creditCardNumber, ConstraintValidatorContext context) {

        Matcher matcher = CREDIT_CARD_PATTERN.matcher(creditCardNumber);

        return matcher.matches();

    }
}
We implement ConstraintValidator<[AnnotationsName], [TargetType]>和enforcedly override 初始化()和已验证()方法。初始化 method is guaranteed to be run before any use of this validation和已验证方法是我们拒绝或接受任何值的地方。
我们的注释已准备就绪。 让我们像上面一样使用它们。
@PostMapping("/custom-constraint-annotation")
    String postCustomConstraint(@Valid CustomConstraintAnnotation customConstraintAnnotation, BindingResult bindingResult) {

        if(bindingResult.hasErrors()){

            return "custom-constraint-annotation";
        }
        ...
        ...
        ...
    }
}
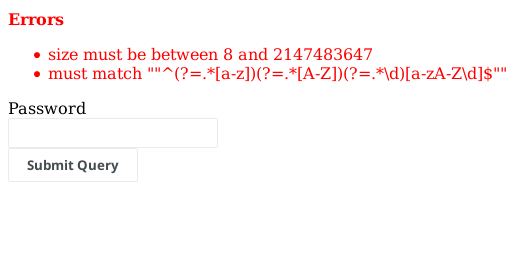
所有验证错误都保存在BindingResult对象中,我们可以使用Thymeleaf显示错误消息。
<form role="form" th:object="${customConstraintAnnotation}" th:action="@{/custom-constraint-annotation}" th:method="post">

    <div style="color: red;" th:if="${#fields.hasErrors('*')}">
        <p><strong>Errorsstrong>p>
        <ul>
            <li th:each="err : ${#fields.errors('*')}" th:text="${err}">li>
        ul>
    div>

    <label>Credit Card Numberlabel>
    <br>
    <input type="text" id="creditCard" name="creditCard" th:field="*{creditCard}">
    <br>
    <input type="submit">
form>
Combining Multiple Annotations
Another way of implementing good validations is combining multiple validation annotations. Hibernate documentation calls it Constraint composition. It’s quite simple. First of all create an annotation type and fill as below.
@NotEmpty
@Size(min = 8)
@Pattern(regexp = "\"^(?=.*[a-z])(?=.*[A-Z])(?=.*\\d)[a-zA-Z\\d]$\"")
@Target({ METHOD, FIELD, ANNOTATION_TYPE })
@Retention(RUNTIME)
@Constraint(validatedBy = {})
@Documented
public @interface CombinedPasswordConstraint {

    String message() default "Invalid password.";

    Class[] groups() default {};

    Class extends Payload>[] payload() default {};
}
您可以为每个注释添加不同的消息。 然后像其他约束一样使用它。
Creating Custom Validator Class
到目前为止,我们已经克服了限制。 是时候使用自定义验证程序类创建更复杂的验证了。 在前面的示例中,我们已经验证了语法内容。 但是通常我们需要更复杂的东西,可能需要数据库查询。
我重复前面的例子。 您已经在您的假想应用程序中创建了一个部门。 然后,您尝试向该部门添加新员工。 但是您想添加一个约束,该约束要求在分配员工之前先分配经理。 因此,您应该添加一个验证器,以检查该部门是否有经理。 使用自定义验证程序可以做到这一点。 但是您也可以验证简单的东西,例如正则表达式模式。
让我们创建一个。
我将向您展示一个简化的示例。 首先,创建一个虚拟类,并如下所示进行填充。
public class CustomValidationEntity {

    private String email;

    private Long departmentId;

    public Boolean existManagerByDepartmentId(Long departmentId) {

        return false;
    }

    public Boolean existEmployeeWithMail(String email) {

        return true;
    }

}
无论我们输入什么,它总是会说“部门没有经理”和“此电子邮件已经存在”。
然后按如下所示创建验证器类。 我将解释细节。
@Component
public class CustomValidator implements Validator {

    @Override
    public boolean supports(Class clazz) {
        return CustomValidationEntity.class.isAssignableFrom(clazz);
    }

    @Override
    public void validate(Object target, Errors errors) {

        CustomValidationEntity customValidationEntity = (CustomValidationEntity) target;

        if (customValidationEntity.existEmployeeWithMail(customValidationEntity.getEmail())) {

            errors.rejectValue("email", null, "Employee with this email is already exists.");
        }

        if (!customValidationEntity.existManagerByDepartmentId(customValidationEntity.getDepartmentId())) {

            errors.reject(null, "Department does not have a manager.");
        }

    }
}
我们扩展的Validator接口是org。springframework。validation。Validator;。 不是javax。 该接口为我们提供了两种方法。support()方法控制目标对象是否是我们要验证的对象,以及validate()方法是我们控制和拒绝事物的地方。 您可以拒绝整个对象,并使用以下命令添加全局错误消息:拒绝()或拒绝单个值,并为此错误添加一个错误消息rejectValue()。 然后,您应该使用@零件。
让我们使用我们的验证器。 但是我们将做一些与使用约束不同的事情。 在使用控制器注释对象参数后@有效,我们将在该控制器中添加一个InitBinder方法。
@InitBinder
private void bindValidator(WebDataBinder webDataBinder) {
    webDataBinder.addValidators(customValidator);
}
这个@InitBinder带注释的方法将初始化Web数据绑定器。 以来Web数据绑定器准备来自控制器请求的对象,它可以在请求到达控制器之前进行验证。 而已。 让我们尝试我们的例子。
在本文中,我们介绍了Spring Application中的验证。
如有任何疑问,建议或更正,请随时与我联系:
Ëmail: [email protected]
Ťwitter: https://twitter.com/kamer_ee


