eosio之nodeos初体验
预备知识
1. 什么是EOSIO智能合约。
2. EOS相关概念(EOS 软件、EOS平台、EOS代币、EOS币EOS社区之间的关系)。
环境
- 开发环境:nodejs;
- 操作系统:macOS 10.14.1;
- 浏览器:Chrome;
- 浏览器插件:scatter(scatter简介);
- 第三方库:scatterjs(scatterjs简介), nodeos(eosio开发者文档);
- 库版本号:scatterjs-core v2.5.0; scatterjs-plugin-eosjs v1.4.0;eosjs v16.0.9.
eosio组成部分简介
- nodeos (node + eos = nodeos) - 核心eosio的node守护进程,主要应用场景有:区块产生,专用api终端,本地开发等。
- cleos (cli + eos = cleos) - 与区块链交互以及管理钱包的命令行接口。
- keosd (key + eos = keosd) - 负责安全存储钱包的eosio密钥。
- eosio-cpp - eosio.cdt的一部分, 能将c++代码编译成wasm(WebAssembly字节码技术),然后生成ABI(应用程序二进制接口)。
关于eosjs与nodeos关系
eosjs简介
- eosjs是与EOSIO区块链网络交互的方法库
- 通过eosjs可以程序化与区块链网络交互,代替cleos命令行交互
当前v16.0.9的eosjs库对应v1.5.0版本的nodeos。
正文
1. 库依赖安装
- scatterjs-core,当前版本2.5.0。
我使用了yarn(yarn安装, yarn对比npm:最大优点速度快),终端命令如下: yarn add scatterjs-core。
注意: 对于npm下可以找到的库依赖,都可以到这个网址(yarn仓库)搜索看看yarn有没有对应的安装库,一般都是有的。
- scatterjs-plugin-eosjs, 当前版本1.4.0。
终端命令:yarn add scatterjs-plugin-eosjs。
关于版本的说明
scatterjs-plugin-eosjs适用于eosjs 16.0.9及以下版本, 而scatterjs-plugin-eosjs2适用于eosjs的其它beta版本(scatter官方指南)。
注意:以上两个库都可以用npm安装。
- eosjs, 当前版本16.0.9。
终端命令: yarn add eosjs。
2. App说明
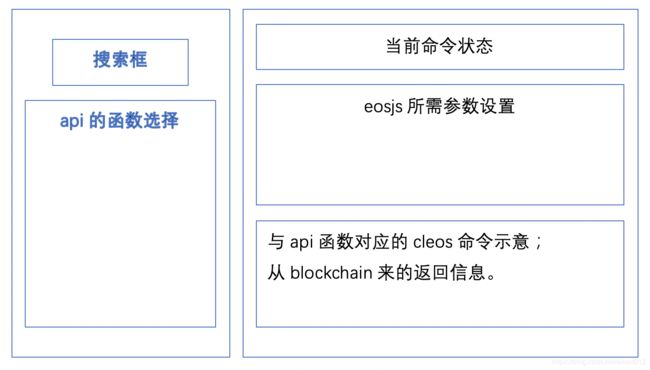
前端使用Vue框架(Vue.js),UI使用element框架(Element-ui),这两者都有中文开发文档参考。
组件示意图如下
3. 如何使用nodeos
nodeos官方开发文档
cleos官方文档
说明:使用cleos的最简单的方式,就是下载eosio的docker image,具体教程在这。
但是要注意即便是官方文档,nodeos和cleos对相同action的参数描述可能是不同的,建议两篇对照看。
更多内容后续再填...
4. 如何使用scatterjs
通过scatterjs这个库可以调用scatter的chrome插件(或scatter的桌面版,目前支持win,macOS,Linux操作系统),这次使用的是scatter的chrome插件,因为本web app通过浏览器访问,与chrome插件搭配使用十分方便。
在使用scatterjs之前,我们需要安装好scatter的chrome插件,以及进行相关的配置,可参考这篇教程。
完成上述工作之后,就可以使用scatterjs提供的api来获取scatter授权,而不需要将eos的私钥明文传递给nodeos,私钥明文在网络上传输十分不安全,因为在EOS体系中私钥被盗可能造成钱包被窃取。
- 基本流程(工作流与示例)
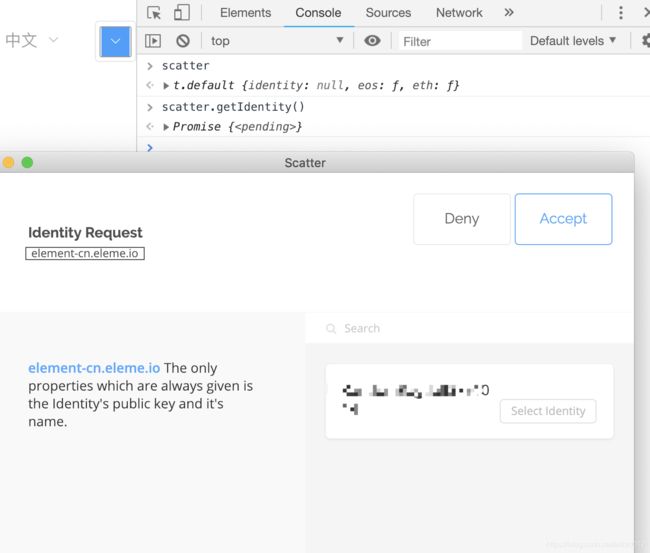
scatterjs连接scatter浏览器插件后,可以login(通过getIdentity()这个函数),在这过程中,scatter插件会询问用户使用哪个identity来登录,在用户选择identity并授权确认之后,在后续与nodeos交互过程中需要用到私钥的时候,都可以将scatter实例作为keyProvider参数的值传递给nodeos(后面会根据代码详细解释)。
- 关于window.scatter
安装scatter浏览器插件后,window对象就有了scatter这个实例,每打开一个新标签页,就会新建一个scatter实例。
可以利用window.scatter来判断用户浏览器有没有安装scattter插件,如果没安装,就给出先安装插件的提醒。代码如下:
if (typeof window.scatter === 'undefined') {
  this.$notify({
    title: 'Error',
    message: 'Scatter is not installed. Refresh page after installing.',
    type: 'error',
  });
}
判断window.scatter类型是否为undefined即可。this.$notify()调用了element-ui的通知组件(详见notification组件)。
但是,如果后续的身份认证也直接使用这个scatter实例会使我们的应用变得不安全,此时的window.scatter在当前标签页console中能被访问并使用(见下图)。
在此选择了scatter官方例程中的做法,app中使用ScatterJS.scatter对象,初始化设置window.scatter为null。代码如下:
export class ScatterService {
  static isScatterExtensionReady = false;
  static isScatterExtensionExist = false;

  static connectionOption = { initTimeout: 1000 };

  static init() {
    console.log('ScatterService init() start...');

    ScatterJS.scatter.connect('your_app_name', this.connectionOption).then((connected) => {
      // User does not have Scatter Desktop, Mobile or Classic installed.
      if (!connected) {
        console.log('scatter connect failed.');
        this.isScatterExtensionReady = false;
        return;
      }
      window.scatter = null;
      this.isScatterExtensionExist = true;
      this.isScatterExtensionReady = true;
    });
  }
}
以下是使用scatter实例的代码:
if (ScatterService.isScatterExtensionExist === false) {
  this.$notify({
    title: 'Error',
    message: 'Scatter is not installed. Refresh page after installing.',
    type: 'error',
  });
} else {
  const promiseGetId = ScatterJS.scatter.getIdentity();
  promiseGetId.catch((err) => {
  if (err.type === 'locked') {
    this.$notify({
      title: 'Warning',
      message: 'Scatter is locked. Refresh page after unlocking.',
      type: 'warning',
    });
  }
  // 更改前端显示:当scatter extension处于locked状态时,更改使用scatter的设置为false;
  this.form.keyAuthMode = false;
  this.keyAuthMode = false;
  });

  const identity = ScatterJS.scatter.identity;
  // 搜索identity的publicKey中是否以EOS字符串开头,确保scatter获取identity成功。
  if (identity !== null && identity.publicKey.indexOf('EOS') === 0) {
    this.$notify({
      title: 'Success',
      message: 'Scatter Authoration Completed.',
      type: 'success',
    });
  }
}
Demo链接
参考
1. scatter官网指南(scatterjs简介)和eosio开发者文档(eosio开发者文档)。
2. 引用:EOS简明教程。
3. 网络碎片资料整理,同时加入作者的个人理解,如有错误,欢迎留言指正。


