React的菜鸟之路(三):搭建后台系统
此篇基于React 16.12.0 版(2019-12-19),大部分是一些配置以及插件的使用及配置,不足之处,请多多指教。
目录
初始化项目
暴露配置文件(此操作不可逆)
使用scss
使用Ant Design组件库
使用阿里矢量图标库
使用react-router-dom路由
封装axios和管理api
安装lodash
安装Redux、React-redux、redux-thunk
-
初始化项目
create-react-app 项目名
cd 项目名
npm run start
有时候需要修改webpack的配置,react16.X的版本精简了很多配置,所以在根目录下也没有了config文件夹,所以如果要修改,有两种方法 :1.暴露配置文件; 2.使用react-app-rewired,重写config覆盖原来的(这个还有点懵┭┮﹏┭┮)。
-
暴露配置文件(此操作不可逆)
暴露配置文件:npm run eject
运行该命令时可能会报错:This git repository has untracked files or uncommitted changes;是因为git地址问题
git add .
git commit -am "Save before ejecting"
npm run eject
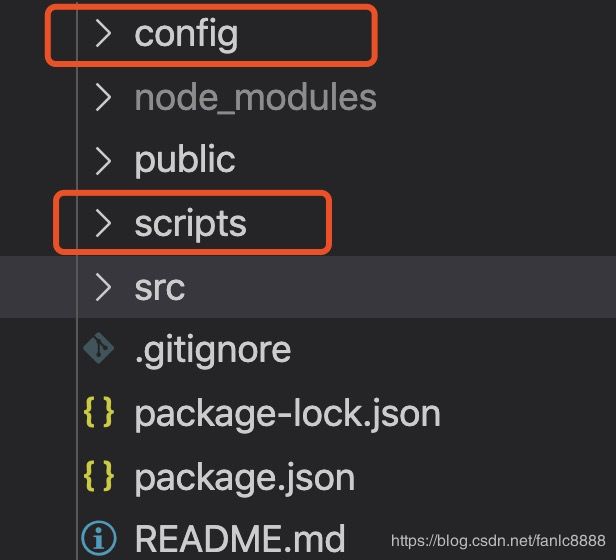
执行成功后会多出config和scripts文件夹
-
使用scss
npm install node-sass --save-dev
配置全局scss(不需要全局scss的可以忽略)
修改config文件下的webpack.config.js文件,在getStyleLoaders函数后面加上sass-resources-loader的配置
(此种方式是基于npm run eject操作后的,若是没有暴露配置文件,可以去node_modules里的react-script中的config去修改)
......

 module: {
      strictExportPresence: true,
      rules: [
         ......
            {
              test: sassRegex,
              exclude: sassModuleRegex,
              use: getStyleLoaders(
                {
                  importLoaders: 2,
                  sourceMap: isEnvProduction && shouldUseSourceMap,
                },
                'sass-loader'
              ).concat([{
                loader: 'sass-resources-loader',
                options: {
                  resources: path.join(__dirname, "../src/assets/scss/public.scss")
                }
              }
              ])
           ......

          ],
      },
修改配置后记得重新运行
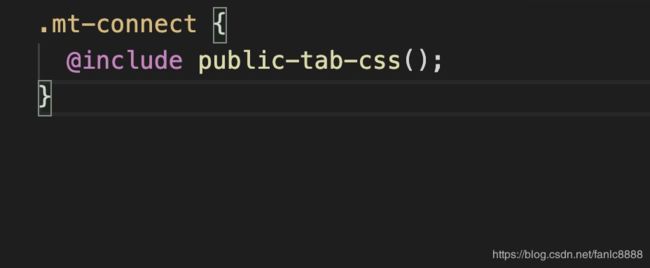
在组件中使用
-
使用Ant Design组件库
安装ant design
npm install antd --save
全局使用antd 样式可以在入口index.js文件中导入
import 'antd/dist/antd.css';
也可以按需导入样式,使用方法看官网:https://ant.design/docs/react/introduce-cn
-
使用阿里矢量图标库
虽然Ant Design组件库中有很多图标,但是还是会有很多UI自己设计的图标,我们公司用的是阿里矢量图标库,需要将文件下载到本地。
1、将字体文件拷贝到assets/css文件夹下。
import './assets/css/iconfont.css';
3、若是想按需引用,在需要引入的组件的样式文件引用font.css文件:
@import "./assets/css/iconfont.css"
使用方法:
icon-shanchu:这个不是固定的,看UI心情哈
-
使用react-router-dom路由
使用React构建的单页面应用,要想实现页面间的跳转,首先想到的就是使用路由。在React中,常用的有两个包可以实现这个需求,那就是react-router和react-router-dom。
npm install react-router-dom --save-dev // 使用npm安装路由
基本使用:新建login.js ,admin.js,home.js
login.js
// 登录的路由组件
import React, { Component } from 'react';
class Login extends Component {
constructor (props) {
super (props)
}
render () {
这是login.js}
}
export default Login;
home.js
import React, { Component } from 'react';
// 默认首页
class Home extends Component {
constructor(props) {
super(props);
}
render() {
return (
欢迎使用React后台管理系统
);
}
}
export default Home;
admin.js
// 管理的路由组件
import React, { Component } from 'react';
class Admin extends Component {
constructor (props) {
super (props)
}
render () {
这是admin.js}
}
export default Admin;
在应用的根组件中,当然你也可以再写一个路由组件
App.js
import React from 'react';
import { BrowserRouter as Router, Route, Switch } from 'react-router-dom';
import Login from './pages/login;
import Admin from './pages/admin';
// 应用的根组件
function App() {
return (
{/*Switch: 只匹配其中的一个路由 */}
);
}
export default App;
路由嵌套:照着login.js再新建product.js,detail.js,productHome.js, 文件,然后改造上面的admin.js
product.js
import React, { Component } from 'react';
import { Switch, Route, Redirect } from 'react-router-dom';
import Detail from './detail';
import ProductHome from './productHome';
import './product.less';

class Product extends Component {
  constructor(props) {
    super(props);
    this.state = {

    }
  }

  render() {
    return (


     );
  }
}

export default Product;
改造admin.js文件
import React, { Component } from 'react';
import { Redirect, Route, Switch } from 'react-router-dom';
import Home from '../home';
import Product from '../product';
// 管理的路由组件
class Admin extends Component {
constructor(props) {
super(props);
}
render() {
return (
);
}
}
export default Admin路由传参:
1.通过url传参:
获取方法:this.props.match.params
2.隐式传参:
获取方法:this.props.location.state
......
-
封装axios和管理api
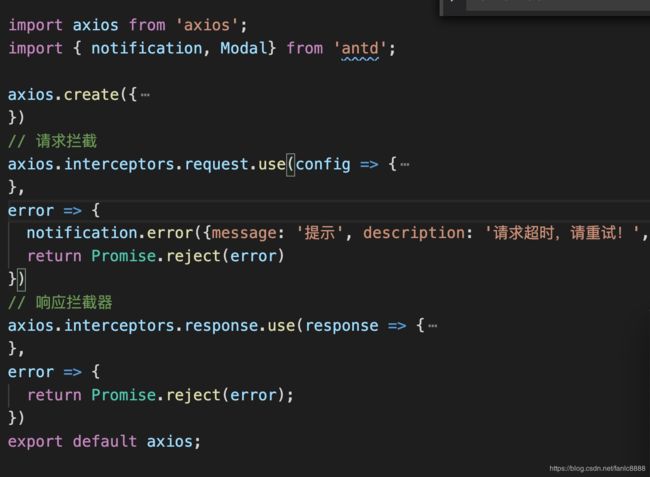
可能是习惯用Vue了,封装方法跟Vue的时候差不多(网上有很多种),因为项目有权限,所以请求拦截的时候我在请求头中加上了token,同时单独用一个文件管理api,这样方便查找,但是没有把请求方法单独写,网上很多都是单独管理的。
图二是request.js(封装axios),图三localtion.js(管理接口路径)
不想每个组件都去引入axios和location.js,所以我在入口index.js文件里边全局引入了(懒人总是能找到偷懒的方法)
import axios from './axios/request';
import location from './axios/location';
React.$axios = axios;
React.$location = location;
// 使用方法
React.$axios.post(React.$location.api_url, data).then(res=>{ })
// 成功的整的跟Vue一样一样了,咱也不知道好不好呐
安装lodash
npm install lodash --save
举个栗子:去抖和节流函数
import _ from 'lodash';
1、debounce (函数去抖) 多次触发,只在最后一次触发时,执行目标函数。
_.debounce(func, [wait=0], [options={}])
2、throttle (函数节流)限制目标函数调用的频率,比如:1s内不能调用2次。
_.throttle(func, [wait=0], [options={}])
-
安装Redux、React-redux、redux-thunk
npm install redux react-redux redux-thunk
react-redux:是redux的官方react绑定库,能够使组件从redux store中读取数据,并且向store分发actions以更新数据;
react-redux 并不是redux内置的,需要单独安装,一般会结合redux一起使用。
React-Redux 提供
组件,能够使整个app访问到Redux store中的数据。 React-Redux提供一个connect方法能够让你把组件和store连接起来。
- [mapStateToProps(state, [ownProps]): stateProps] (Function): 如果定义该参数,组件将会监听 Redux store 的变化。任何时候,只要 Redux store 发生改变,mapStateToProps 函数就会被调用。
- [mapDispatchToProps(dispatch, [ownProps]): dispatchProps] (Object or Function): 如果传递的是一个对象,那么每个定义在该对象的函数都将被当作 Redux action creator,对象所定义的方法名将作为属性名;每个方法将返回一个新的函数,函数中dispatch方法会将 action creator 的返回值作为参数执行。这些属性会被合并到组件的 props 中。
redux-thunk:是一个常用的redux异步action的中间件(不是react的中间件),通常用来处理axios请求;
redux-thunk中间件可以让action创建函数先不返回一个action对象,而是返回一个函数。
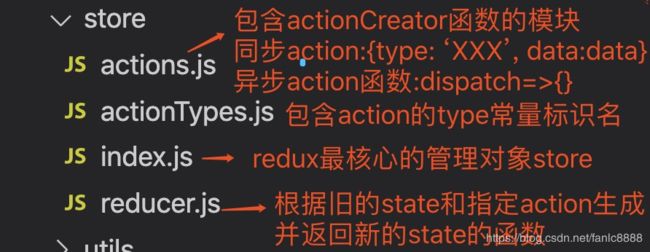
在src目录下创建store目录,栗子(水平有限,手下留情)
store/index.js
import { createStore, applyMiddleware, compose } from "redux";
import thunk from 'redux-thunk';
import reducer from './reducer';

// 增强函数
const composeEnhancers = window.__REDUX_DEVTOOLS_EXTENSION_COMPOSE__
  ? window.__REDUX_DEVTOOLS_EXTENSION_COMPOSE__({})
  : compose;
const enhancer = composeEnhancers(applyMiddleware(thunk));
const store = createStore(reducer, enhancer);

// 若不使用插件
// const store = createStore(reducer, applyMiddleware(thunk));

export default store;

/**
 * 1.redux库向外暴露下面几个函数
 *    createStore():接收的参数为reducer函数,返回为store对象
 *    combinerReducers():接收包含n个reducer方法的对象,返回一个新的reducer函数
 *    applyMiddleware()
 * 2.store对象的内部结构
 *    getStore():返回值为内部保存的state数据
 *    dispatch():参数为action对象
 *    subscribe():参数为监听内部的state更新的回调函数
 */
store/actionTypes.js
export const GET_USER_INFO = 'get_user_info';
store/reducer.js
import {combineReducers} from 'redux';
import { GET_USER_INFO } from './actionTypes';

const defaultState = {
  user: {}
}

function user (state = defaultState.user, action) {
  switch(action.type){
    case GET_USER_INFO:
      return action.user
    default:
      return state
  }
}

// combineReducers 向外默认暴露的是合并产生的总的reducer函数
export default combineReducers({
  user,
 ......
})
store/actions.js
import { GET_USER_INFO } from './actionTypes';
import { reqLogin } from '../api';


// 同步action
export const getUserInfo = (user) => ({type: GET_USER_INFO, user})

// 异步action
export const login = (username, password) => {
  return async dispatch => {
    // 执行异步请求
    const res = await reqLogin(username, password);
    // 如果成功,分发成功action
    if (res.code === '0') {
      dispatch(getUserInfo(res.data))
    } else {
       // 如果失败,分发失败的action
    }
  }
}
待续~~~


