openresty
openresty防cc
同步系统时间(非必须)
yum install ntpdate
ntpdate cn.pool.ntp.org
安装工具
yum install wget unzip git -y
准备编译环境
yum -y install gcc gcc-c++
下载并解压源码包
wget https://openresty.org/download/openresty-1.13.6.2.tar.gz
tar xf openresty-1.13.6.2.tar.gz
pcre
wget https://ftp.pcre.org/pub/pcre/pcre-8.32.tar.gz
tar zxvf pcre-8.32.tar.gz
zlib
wget http://www.zlib.net/fossils/zlib-1.2.7.3.tar.gz
tar zxvf zlib-1.2.7.3.tar.gz
openssl
wget https://www.openssl.org/source/old/1.0.2/openssl-1.0.2k.tar.gz
tar zxvf openssl-1.0.2k.tar.gz
upstream_check扩展
git clone https://github.com/yaoweibin/nginx_upstream_check_module.git
解决依赖
yum -y install perl libxml2 libxml2-devel libxslt libxslt-devel gd gd-devel perl-ExtUtils-Embed geoip geoip-devel
修改服务器版本号
默认为OpenResty 1.13.6.1 这里修改为OpenResty
vim bundle/nginx-1.13.6/src/core/nginx.h
修改:#define NGINX_VER “openresty”
编译安装openrestry
cd /srv/openresty-1.13.6.2
./configure \
--prefix=/usr/local/nginx \
--with-http_iconv_module \
--with-luajit \
--sbin-path=/usr/local/nginx/sbin/nginx \
--modules-path=/usr/local/nginx/modules \
--conf-path=/usr/local/nginx/conf/nginx.conf \
--error-log-path=/usr/local/nginx/logs/error.log \
--http-log-path=/usr/local/nginx/logs/access.log \
--pid-path=/usr/local/nginx/nginx.pid \
--lock-path=/usr/local/nginx/run/nginx.lock \
--http-client-body-temp-path=/usr/local/nginx/cache/client_temp \
--http-proxy-temp-path=/usr/local/nginx/cache/proxy_temp \
--http-fastcgi-temp-path=/usr/local/nginx/cache/fastcgi_temp \
--http-uwsgi-temp-path=/usr/local/nginx/cache/uwsgi_temp \
--http-scgi-temp-path=/usr/local/nginx/cache/scgi_temp \
--user=cpadmin \
--group=cpadmin \
--with-threads \
--with-file-aio \
--with-http_v2_module \
--with-http_realip_module \
--with-http_addition_module \
--with-http_xslt_module=dynamic \
--with-http_image_filter_module=dynamic \
--with-http_geoip_module=dynamic \
--with-http_sub_module \
--with-http_dav_module \
--with-http_flv_module \
--with-http_mp4_module \
--with-http_gunzip_module \
--with-http_gzip_static_module \
--with-http_auth_request_module \
--with-http_random_index_module \
--with-http_secure_link_module \
--with-http_degradation_module \
--with-http_slice_module \
--with-http_stub_status_module \
--with-http_perl_module=dynamic \
--with-mail=dynamic \
--with-stream \
--with-stream_ssl_module \
--with-pcre \
--with-http_ssl_module \
--with-cc-opt='-O2 -g -pipe -Wall -Wp,-D_FORTIFY_SOURCE=2 -fexceptions -fstack-protector-strong --param=ssp-buffer-size=4 -grecord-gcc-switches -m64 -mtune=generic -fPIC' \
--with-openssl=/srv/openssl-1.0.2k \
--with-pcre=/srv/pcre-8.32 \
--with-zlib=/srv/zlib-1.2.7.3 \
--add-module=/srv/nginx_upstream_check_module
gmake
gmake install
创建需要的目录
mkdir -p /usr/local/nginx/cache/client_temp
mkdir -p /usr/local/nginx/cache/proxy_temp
mkdir -p /usr/local/nginx/cache/fastcgi_temp
mkdir -p /usr/local/nginx/cache/uwsgi_temp
mkdir -p /usr/local/nginx/cache/scgi_temp
设置环境变量
vim /etc/profile
末尾添加
export PATH=$PATH:/usr/local/nginx/sbin
让其生效 source /etc/profile
nginx -v
nginx -t
自启动配置
vim /usr/lib/systemd/system/nginx.service
[Service]
Type=forking
PIDFile=/usr/local/nginx/nginx.pid
ExecStartPre=/usr/local/nginx/sbin/nginx -t
ExecStart=/usr/local/nginx/sbin/nginx
ExecReload=/bin/kill -s HUP $MAINPID
ExecStop=/bin/kill -s QUIT $MAINPID
PrivateTmp=true
[Install]
WantedBy=multi-user.target
启动nginx
systemctl daemon-reload
systemctl enable nginx
systemctl start nginx
systemctl status nginx
部署Nginx-Lua-WAF
在浏览器中 https://www.7198.net/Waf/
ngx_lua_waf_new.zip
拷贝到 /srv
解压缩
unzip ngx_lua_waf_new.zip 得到 ngx_lua_waf_new
对文件夹重命名
mv ngx_lua_waf_new nginx-lua-waf
将nginx-lua-waf文件夹复制到nginx/conf目录下
cp -r nginx-lua-waf /usr/local/nginx/conf
修改文件和目录所属权限
chown -R cpadmin.cpadmin /usr/local/nginx/conf/nginx-lua-waf
在nginx.conf中添加配置
vim /usr/local/nginx/conf/nginx.conf
在http级别添加以下内容:
#nginx-lua-waf配置
lua_package_path "/usr/local/nginx/conf/nginx-lua-waf/?.lua;";
lua_shared_dict limit 100m;
#开启lua代码缓存功能
/usr/local/nginx/conf/nginx-lua-waf/init.lua
修改日志目录权限,使nginx对目录可写
这里需要注意:需要修改目录的权限和创建新文件夹
mkdir -p /var/log/nginx/
chmod o+w /var/log/nginx/
mkdir -p /usr/local/nginx/conf/vhost
mkdir -p /usr/local/nginx/bak_conf
chown -R cpadmin.cpadmin /usr/local/nginx/*
chown root.root /usr/local/nginx/sbin/nginx
chown root.root /usr/local/nginx/nginx.pid
chmod ug+s /usr/local/nginx/sbin/nginx
这时重启还会遇到报错 这时
rm -rf /usr/local/nginx/logs
mkdir /usr/local/nginx/nginx/logs
ln -s /usr/local/nginx/nginx/logs /usr/local/nginx/logs
chown -R cpadmin.cpadmin /usr/local/nginx/logs
chown -R cpadmin.cpadmin /usr/local/nginx/nginx/logs
重载nginx使配置生效
nginx -t #检查配置文件语法是否正确
nginx -s reload #重载nginx
测试waf是否工作正常
部署完毕可以尝试如下命令:
curl http://xxxx/test.php?id=../etc/passwd
返回”WAF Block page”字样,说明规则生效。
curl http://127.0.0.1/test.zip
若返回 “规则过滤测试” 字样,则说明waf已生效,url.rule中定义有规则阻止下载zip文件,此时/var/log/nginx/目录中应有类似2018-05-04_waf.log的JSON格式日志文件
若返回 404 说明waf未生效
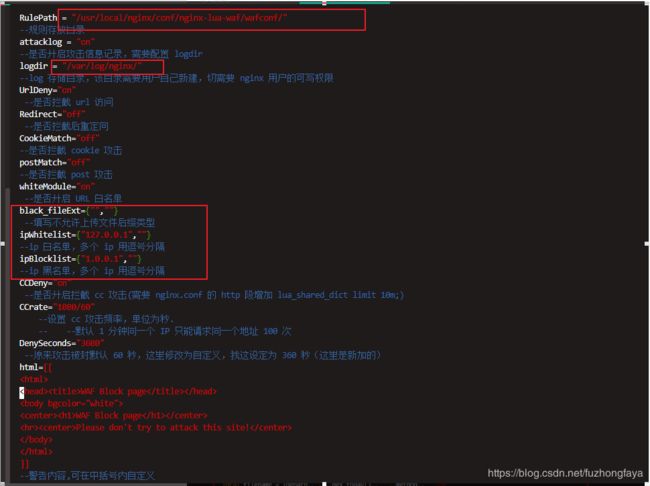
waf配置文件:nginx-lua-waf/config.lua,各项配置均有注释说明
使用前请检查过滤规则是否符合自己实际情况,根据实际增删条目,防止误伤
规则文件中以”—“开头的为注释内容,除最后一行外,不能留有空行,且结尾字符应为LF
在用于生产环境时,可先将模式设置为jinghuashuiyue并检查拦截日志,确认有无误伤,该模式仅记录日志,不实际进行拦截(对IP黑名单和CC攻击过滤不适用,详见处理流程图)
更新规则文件后,使用reload命令(/usr/local/nginx/sbin/nginx -s reload)使用配置生效,该命令不会中断服务,不建议使用restart


