「实战系列」Greenplum内核优化,手把手教你提升数倍SELECT性能
Greenplum是世界领先的开源MPP数据库,Greenplum 6的混合负载HTAP性能有了大幅度的提升,已经可以满足大部分OLTP应用场景。这个过程非一日之功,也涉及到系统的各个层面的优化和重构,本文将手把手的示范如何分析发现瓶颈,以及如何优化内核提升性能,揭秘MPP数据库内核调优,鼓励欢迎更多人在社区里参与这类工作。
环境设置
本文的例子采用分支6.0.0-beta.1。测试环境是GCP的机器,32 vCPUs, 28.8 GB, 512 SSD persistent disk. 操作系统是Ubuntu 18.04.2 LTS。
发现和分析问题
确定目标
进行优化之前,先得有一个目标,我们希望提升什么?本文希望优化单条简单select的并发吞吐量。这个目标是OLTP场景,而Greenplum 6的Postgres内核版本号是9.4,因此我们可以跟Postgres9.4进行pk。用pgbench可以跑一些并发的负载,最简单的就是纯select的并发,通过测试我们发现和Postgres有一定差距,接下来的任务就是如何去优化?
CPU和IO资源初步观察
先在这个版本的代码上用pgbench跑select-only的测试,同时用htop检测系统负载。这一步可以快速发现一些初步线索(如IO繁重还是CPU空闲)。
进行性能测试的时候,编译选项要尽可能优化,比如去掉cassert,开O3优化等,本文的编译参数是:
./configure --prefix=/home/gpadmin/workspace/local/gpdb --with-perl --with-python --with-libxml --disable-cassert --enable-debug --enable-depend --disable-gpcloud --without-zstd --disable-orca
一开始先快速用demo cluster进行测试。
make create-demo-cluster WITH\_MIRRORS=false
把pgbench的纯select负载跑起来
 cd gpdb/contrib/pgbench
 make
 createdb
 ./pgbench -i -s 10
 run pgbench for a long time
 gpadmin@zlv-performance:~/gpdb/contrib/pgbench$ ./pgbench -c 50 -j 50 -T 6000 -P 1 -r -S
 starting vacuum…end.
 progress: 1.0 s, 31103.6 tps, lat 1.570 ms stddev 1.401
 progress: 2.0 s, 32537.9 tps, lat 1.535 ms stddev 1.202
 progress: 3.0 s, 33123.4 tps, lat 1.508 ms stddev 1.219
 …
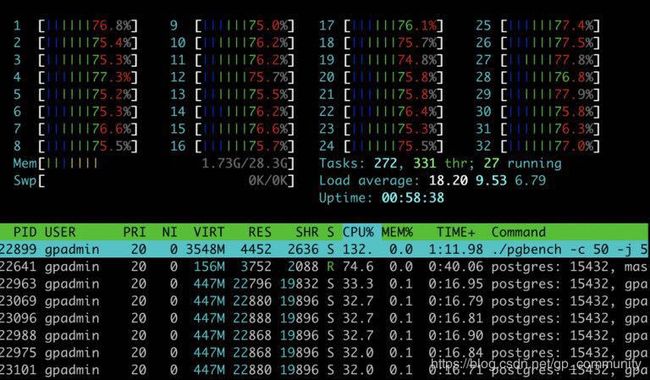
同时HTOP检测系统资源:
htop的数据
由htop可以发现CPU跑不满,由此怀疑可能是锁竞争浪费了CPU (这也可能是IO瓶颈引发等待,这里可以通过IOtop工具排除)。select-only的查询,在数据库对象(Relation等)上锁竞争的可能不大,进一步怀疑是lwlock上的锁竞争。为了精准找到具体锁竞争的代码,需要使用systemtap进行深度分析。
使用 systemtap 分析 lwlock 锁竞争情况
介绍
systemtap是一个linux提供工具,通过在程序里埋点,编写脚本,可以采集运行时候的数据进行分析。
有一些资料可以参考:
- Tracing PostgreSQL performance (https://www.youtube.com/watch?v=RpoC3UcG5YA&t=1141s)
- PostgreSQL and SystemTap (https://simply.name/postgresql-and-systemtap.html)
安装
首先需要安装使用systemtap的基础设施。ubuntu如下进行安装:
sudo apt-get install systemtap systemtap-client systemtap-common systemtap-doc systemtap-runtime systemtap-sdt-dev systemtap-server tuned-utils-systemtap
 stap --version
 Systemtap translator/driver (version 3.1/0.170, Debian version 3.1-3ubuntu0.1 (bionic-proposed))
 Copyright (C) 2005-2017 Red Hat, Inc. and others
 This is free software; see the source for copying conditions.
 tested kernel versions: 2.6.18 … 4.10-rc8
 enabled features: AVAHI LIBSQLITE3 NLS NSS
开启Dtrace编译GPDB
要想用systemtap采集GPDB运行时数据,编译时候要开启–enable-dtrace选项,新的编译参数是:
./configure --prefix=/home/gpadmin/workspace/local/gpdb --with-perl --with-python --with-libxml --disable-cassert --enable-debug --enable-depend --disable-gpcloud --without-zstd --disable-orca --enable-dtrace
编写systemtap脚本
编写systemtap脚本之前要有目标,这次已经怀疑是lwlock的冲突,那么就去Postgres既定事件中寻找相关的。通过事件lwlock__wait__start和lwlock__wait__done我们可以知道lwlock等候事件,以及这次等候的时间,这些信息对于我们初步分析已经足够了。
Systemtap脚本如下:
global lwlockwait_time, lwlockwait_summary
 probe process("/home/gpadmin/workspace/local/gpdb/bin/postgres").mark("lwlock__wait__start") {
 lwlockwait_time[tid(), $arg2, $arg3] = gettimeofday_us();
 }
 probe process("/home/gpadmin/workspace/local/gpdb/bin/postgres").mark("lwlock__wait__done") {
 p = tid()
 t = lwlockwait_time[p, $arg2, $arg3]; delete lwlockwait_time[p, $arg2, $arg3]
 if (t) {
 lwlockwait_summary[p, $arg2, $arg3] <<< (gettimeofday_us() - t);
 }
 }
 probe end {
 #printf("\nlwlockwait_summary\n");
 #printf("pid\tlockid\tmode\tcount\tmin\tavg\tmax\n");
 foreach ( [p,q1, q2] in lwlockwait_summary) {
 printf("%d\t%d\t%d\t%d\t%d\t%d\t%d\n", p, q1, q2, @count(lwlockwait_summary[p,q1, q2]),
 @min(lwlockwait_summary[p,q1, q2]), @avg(lwlockwait_summary[p,q1, q2]), @max(lwlockwait_summary[p,q1, q2]));
 }
 }
使用systemtap收集数据
先让pgbench的select-only一直跑着,然后用systemtap分析,运行stap需要root。Pass 5开始后过10秒左右ctrl-c掉就好了。
root@zlv-performance:~# stap -v a.stap -o stap_result
 Pass 1: parsed user script and 465 library scripts using 116076virt/49232res/6848shr/42680data kb, in 180usr/40sys/228real ms.
 Pass 2: analyzed script: 9 probes, 3 functions, 4 embeds, 2 globals using 118056virt/52876res/8336shr/44660data kb, in 30usr/250sys/273real ms.
 Pass 3: translated to C into "/tmp/stapdOmGfq/stap_e755a06ad1a1548fdc0983bf87d34490_7818_src.c" using 118188virt/53148res/8528shr/44792data kb, in 50usr/130sys/188real ms.
 Pass 4: compiled C into "stap_e755a06ad1a1548fdc0983bf87d34490_7818.ko" in 4590usr/850sys/5091real ms.
 Pass 5: starting run.
 ^C
分析数据
可以把之前的输出文件导入gpdb进行分析:
CREATE TABLE t
 (
 pid INT,
 lockid INT,
 MODE INT,
 count INT,
 min INT,
 avg INT,
 max INT
 );
 copy t from '/home/gpadmin/stap_result';
 select
 lockid,
 sum(count) as total_wait_num,
 (sum(count * avg)::decimal / sum(count)) as avg_wait_time,
 sum(count * avg) as total_wait_time
 from
 t
 group by lockid
 order by sum(count * avg) desc;
结果如下:
lockid | total_wait_num | avg_wait_time | total_wait_time
----- +------------+--------------------+---------------
 4 | 556755 | 1356.3575720020475793 | 755158860
 40 | 5092 | 11.8874705420267086 | 60531
可以发现lockid是4的这个lwlock竞争非常激烈,等候时间也很长。
使用GDB锁定问题代码
lockid是4的lwlock是procarraylock,我们用gdb在发生等候的埋点处设置断点(lwlock.c:671),然后看是哪个函数发生等候。我们先只关注QD。发现全部是这个函数发生竞争:clearAndResetGxact
修复的思路和commit
锁定问题的函数后,就需要通过阅读代码来思考如何修复。从而产生的一个直接的思路就是:纯select语句,为啥需要两阶段?如果做了这个优化,就自然而然的,没有了这个锁的问题,还可以获得优化两阶段的额外好处。
对应commit: ee78a84fe92c2b13fa86d4663d0c83812f753306
然后再就看不到这个lwlock的冲突了。我们也就看到了如之前博文中纯select的pgbench效果的显著提升。

