Mac安装PHP性能分析工具之xhgui+xhprof+mongo
参考网上很多文章发的都不能用,只能一步一步老老实实安装了, 还是自己来踩坑吧!方便后来人!
环境
- xhprof +
xhgui php 7.2mongodbmcrypt(装这玩意儿需要首先安装libmcrypt,否则甭想成功)
1.安装mongodb
brew install mongodb
2. 安装php 的mongo扩展
wget http://pecl.php.net/get/mongodb-1.4.3.tgz
tar -zxvf  mongodb-1.4.3.tgz
cd mongodb-1.4.3
phpize
./configure --with-php-config=/usr/local/bin/php-config  && make && make install
php -m|grep mongo 查看是否安装成功
然后别忘了启动下mongo哦 nohup mongod --bind_ip 127.0.0.1 --port 27017 &
3.安装php的xhprof扩展(先是安装了PHP的tideways扩展【.so 文件叫tideways_xhprof.so】github上叫这个 tideways/php-xhprof-extension,发现这玩意儿配合xhgui使用时总是报错,各种不兼容,可能是我的版本没配套对?最后果断放弃tideways,另寻出路安装了xhprof)
git clone https://github.com/longxinH/xhprof

cd xhprof

./configure --with-php-config=/usr/local/bin/php-config --enable-xhprof

make && make install

php -m | grep xhprof  查看是否安装成功(记得重启php-fpm)
4.安装 xhgui
git clone https://github.com/laynefyc/xhgui-branch.git

mv xhgui-branch xhgui

cd xhgui

最坑的恐怕就在这里了,网上很多文章直接就开始php install.php这一步了,mmp的!要先执行composer install !!  再php install.php
然后再配置xhgui(extension, profiler.enable, db.host, db.db参数)
cp config.default.php config.php(愿意cp一下也行,看着好看!)
vim config.php
return array(
    'debug' => false,
    'mode' => 'development',

    'extension' => 'xhprof',

    // Can be either mongodb or file.

    //'save.handler' => 'file',
    //'save.handler.filename' => dirname(__DIR__) . '/cache/' . 'xhgui.data.' . microtime(true) . '_' . substr(md5($url), 0, 6),
    'save.handler' => 'mongodb',

    // Needed for file save handler. Beware of file locking. You can adujst this file path
    // to reduce locking problems (eg uniqid, time ...)
    //'save.handler.filename' => __DIR__.'/../data/xhgui_'.date('Ymd').'.dat',
    'db.host' => 'mongodb://127.0.0.1:27017',
    'db.db' => 'xhprof',

    // Allows you to pass additional options like replicaSet to MongoClient.
    // 'username', 'password' and 'db' (where the user is added)
    'db.options' => array(),
    'templates.path' => dirname(__DIR__) . '/src/templates',
    'date.format' => 'M jS H:i:s',
    'detail.count' => 6,
    'page.limit' => 25,

    // Profile 1 in 100 requests.
    // You can return true to profile every request.
    'profiler.enable' => function() {
          return true;
    },

    'profiler.simple_url' => function($url) {
        return preg_replace('/\=\d+/', '', $url);
    }

);
5. 把xhgui配置成web服务
vim /usr/local/etc/nginx/conf/xhgui.conf
server
{
    listen 8888;
    server_name localhost;
    index index.html index.htm index.php;
    root  /projects/webroot/xhgui/webroot/;

    location ~ \.php
    {
        try_files $uri =404;
        fastcgi_pass  127.0.0.1:9000;
        fastcgi_index index.php;
        fastcgi_param SCRIPT_FILENAME $document_root$fastcgi_script_name;
        include fastcgi_params;
    }

    location / {
        try_files $uri $uri/ /index.php?$args;
    }

    location ~ .*\.(gif|jpg|jpeg|png|bmp|swf)$ {
        expires      30d;
    }

    location ~ .*\.(js|css)?$ {
        expires      30d;
    }

    access_log  /data/logs/xhgui.access.log;
    error_log  /data/logs/xhgui.error.log;
}
想抓哪个端口的请求,在其server里的location配置如下两句:
fastcgi_param TIDEWAYS_SAMPLERATE 100; # 是否采样取决xhgui的随机数配置和这里的采样率配置,设成100时由xhgui控制
fastcgi_param PHP_VALUE "auto_prepend_file=/projects/webroot/xhgui/external/header.php"; # 配置使用xhgui分析性能
注意:重启nginx是必要的!
6.由于调用栈等信息都是保存到mongo的(当然你也可以在config里配置保存到file),在mongo建上索引,优化下查询:
$ mongo
> use xhprof
> db.results.ensureIndex( { 'meta.SERVER.REQUEST_TIME' : -1 } )
> db.results.ensureIndex( { 'profile.main().wt' : -1 } )
> db.results.ensureIndex( { 'profile.main().mu' : -1 } )
> db.results.ensureIndex( { 'profile.main().cpu' : -1 } )
> db.results.ensureIndex( { 'meta.url' : 1 } )
7.配置php.ini
还需要安装mcrypt这个东西,否则甭想正确运行
先安装libmcrypt
wget http://softlayer.dl.sourceforge.net/sourceforge/mcrypt/libmcrypt-2.5.8.tar.gz
再安装mcrypt
wget http://pecl.php.net/get/mcrypt-1.0.1.tgz
最后配置php.ini
extension=xhprof.so
extension=mongodb.so
extension=mcrypt.so
这个时候就可以浏览器访问localhost:8888试试了!
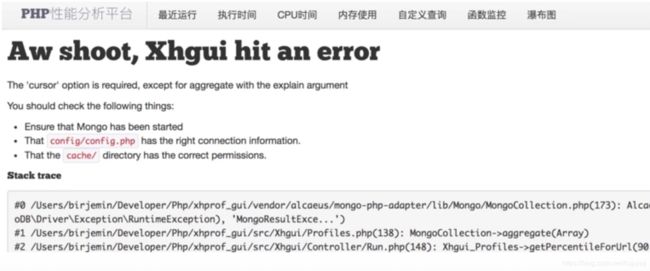
ok 这个时候应该可以看到页面了,点击抓到的请求发现报错!
经过查看xhgui的error日志和google之后,发现xhprof有bug需要修复下 参考这个链接 https://github.com/perftools/xhgui/issues/221
