PyQt5之QGraphics 011 QGraphicsItem之绘画OpenCV contours
QPainterPath可以画出各种各样的图形,以下就是画OpenCV的findcontours的轮廓线。
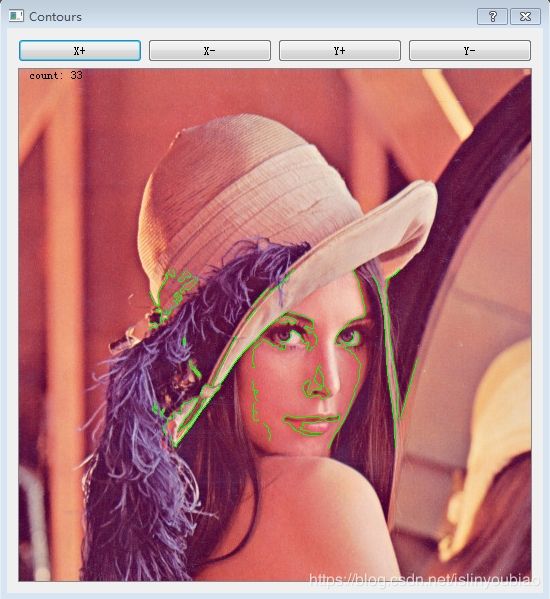
左上角显示区域所有contours的数量。
先用findContours找到轮廓线,之后就可以用moveTo一点一点画出来。代码如下:
"""
有趣的事情
没有结束
2020/4/6 15:53
"""
from PyQt5.QtWidgets import (QApplication, QGraphicsItem, QGraphicsScene, QGraphicsView,
                             QPushButton, QLabel, QDialog, QHBoxLayout, QVBoxLayout)
from PyQt5.QtGui import (QBrush, QPen, QPixmap, QPicture, QImage, QPainterPath)
from PyQt5.QtCore import (QPoint, QPointF, QLine, QLineF, QRect, QRectF, Qt)
import numpy as np
import cv2 as cv
import random


class Shape(QGraphicsItem):
    def __init__(self):
        super(Shape, self).__init__()
        self.path = QPainterPath()
        self.ROIx1 = 20
        self.ROIy1 = 30
        self.ROIx2 = 200
        self.ROIy2 = 300
        self.indexStr = "0"
        self.cvimage = cv.imread("d:/pic/lena.jpg", cv.IMREAD_GRAYSCALE)
        width, height = self.cvimage.shape[0:2]
        self.w = width
        self.h = height
        self.setContours()

    def updateCountour(self, x, y):
        if ((self.ROIx1 + x) < 10) | ((self.ROIy1 + y) < 10) | \
                ((self.ROIx2 + x) > self.h - 10) | ((self.ROIy2 + y) > self.w - 10):
            print("out!")
            return
        self.ROIx1 += x
        self.ROIy1 += y
        self.ROIx2 += x
        self.ROIy2 += y
        self.path = QPainterPath()
        self.prepareGeometryChange()
        self.setContours()

    def setContours(self):
        imgROI = self.cvimage[self.ROIx1:self.ROIx2, self.ROIy1:self.ROIy2]
        imgBlur = cv.blur(imgROI, (3, 3))
        ret, thresh = cv.threshold(imgBlur, 127, 255, 0)
        imgCanny = cv.Canny(thresh, 120, 120)
        contours, hierarchy = cv.findContours(imgCanny, cv.RETR_EXTERNAL, cv.CHAIN_APPROX_SIMPLE)

        if len(contours) < 1:
            exit(1)

        imgDrawEx = np.empty((self.w, self.h, 3), np.uint8)
        imgDrawEx[:] = 0
        imgDraw = imgDrawEx[self.ROIx1:self.ROIx2, self.ROIy1:self.ROIy2]

        count = 0
        index = []
        for cnt in contours:
            if cv.arcLength(cnt, True) > 30:
                count += 1
                cv.drawContours(imgDraw, [cnt], -1,
                                (random.randint(100, 255), random.randint(100, 255), random.randint(100, 255)), 1)
                index.append(cnt)

        if len(index) < 1:
            exit(1)

        self.indexStr = str(count)

        contoursCount = len(index)

        for selectIndex in range(contoursCount):
            if len(index[selectIndex]) < 1:
                exit(1)

            self.path.moveTo(index[selectIndex][0][0][0]+self.ROIy1, index[selectIndex][0][0][1]+self.ROIx1)
            for i in index[selectIndex]:
                self.path.lineTo(i[0][0]+self.ROIy1, i[0][1]+self.ROIx1)

    def boundingRect(self):
        return QRectF(0, 0, self.w, self.h)

    def paint(self, painter, option, widget=None):
        image = QImage("d:/pic/lena.jpg")
        painter.drawImage(QPoint(0, 0), image)
        painter.setPen(Qt.NoPen)
        painter.setPen(QPen(Qt.green, 1))
        painter.drawPath(self.path)
        painter.setPen(Qt.NoPen)
        painter.setPen(QPen(Qt.black, 2))
        painter.drawText(QPointF(10, 10), "count: " + self.indexStr)


class Scene(QGraphicsScene):
    def __init__(self):
        super(Scene, self).__init__()


class View(QGraphicsView):
    def __init__(self):
        super(View, self).__init__()


class Form(QDialog):
    def __init__(self, parent=None):
        super(Form, self).__init__(parent)
        self.shape = Shape()
        self.scene = Scene()
        self.scene.addItem(self.shape)
        self.view = View()
        self.view.setScene(self.scene)
        self.button1 = QPushButton(self)
        self.button1.setText("X+")
        self.button2 = QPushButton(self)
        self.button2.setText("X-")
        self.button3 = QPushButton(self)
        self.button3.setText("Y+")
        self.button4 = QPushButton(self)
        self.button4.setText("Y-")
        self.button1.clicked.connect(self.clicked_btn1)
        self.button2.clicked.connect(self.clicked_btn2)
        self.button3.clicked.connect(self.clicked_btn3)
        self.button4.clicked.connect(self.clicked_btn4)
        self.buttonLayout = QHBoxLayout()
        self.buttonLayout.addWidget(self.button1)
        self.buttonLayout.addWidget(self.button2)
        self.buttonLayout.addWidget(self.button3)
        self.buttonLayout.addWidget(self.button4)
        self.layout = QVBoxLayout()
        self.layout.addLayout(self.buttonLayout)
        self.layout.addWidget(self.view)
        self.setLayout(self.layout)
        self.setWindowTitle("Contours")

    def clicked_btn1(self):
        self.shape.updateCountour(10, 0)

    def clicked_btn2(self):
        self.shape.updateCountour(-10, 0)

    def clicked_btn3(self):
        self.shape.updateCountour(0, 10)

    def clicked_btn4(self):
        self.shape.updateCountour(0, -10)


if __name__ == "__main__":
    import sys

    app = QApplication(sys.argv)

    form = Form()
    form.show()

    sys.exit(app.exec_())
通过X+,X-,Y+,Y-控制ROI区域,可以显示我们要的地方的轮廓线。
通过改变ROI可以见到如下效果:

多谢,美美。