caffe Segnet 语义分割(一)
2018.02.26 learning journal
by 赵木木
Segnet论文下载
1. 编译slam3d出错记录
- Qt 编译器可以清楚的查到错误所在位置;
在Issues中查看
【error1】:
could not convert‘Eigen::PlainObject...
'Eigen::Map...
  PCL_ADD_POINT4D;....
【error2】:
/usr/local/include/eigen3/Eigen/src/Core/arch/CUDA/Half.h:48: error: using typedef-name '__half' after 'struct'
 struct __half {
        ^
解决方案
将已有的第三方库eigen-3-2-10安装
cmake..
make
sudo make install
也就是使用slam3d自带的eigen的库,就不会报错。
2. 学习segnet-caffe
学习链接:
Segnet分割网络caffe教程
对照Segnet-Tutorial文件内容 
caffe-segnet官方英文教程学习
github上有开源的两套源码,其中caffe-segnet是支持cudnn v2 版本;
另有支持cudnn v5版本的:源码地址为 https://github.com/TimoSaemann/caffe-segnet-cudnn5
已经下载好源码至本地并安装。
另有贝叶斯Segnet和Segnet教程:SegNet and Bayesian SegNet Tutorial
说明:
This repository contains all the files for you to complete the ‘Getting Started with SegNet’ and the ‘Bayesian SegNet’ tutorials here: http://mi.eng.cam.ac.uk/projects/segnet/tutorial.html
Please see this link for detailed instructions.
教程
2.1 Setting Up Caffe and the Dataset
请注意,本教程假设您将所有文件下载到本地的文件夹/ SegNet /中。如果您选择使用不同的目录,请在适当的地方修改命令。
Segnet 从监督学习来预测像素点的分类标签,因此我们需要一个具有相应 ground truth 标签的输入图像的数据集,标签图像必须是单通道,每个像素都标有其类别。在本教程中,我们将使用CamVid数据集,其中包含367个训练和233个道路场景的测试图像。该数据集是在英国剑桥附近拍摄的,包含白天和黄昏场景。我们将使用图像大小为360 x 480的11类版本。从 Github-Segnet教程 下载SegNet所需的这个数据集以及本教程所需的其余文件。
文件组织如下:
/SegNet/
    CamVid/
        test/
        testannot/
        train/
        trainannot/
        test.txt
        train.txt
    Models/
        # SegNet and SegNet-Basic model files for training and testing
    Scripts/
        compute_bn_statistics.py
        test_segmentation_camvid.py
    caffe-segnet/
        # caffe implementation
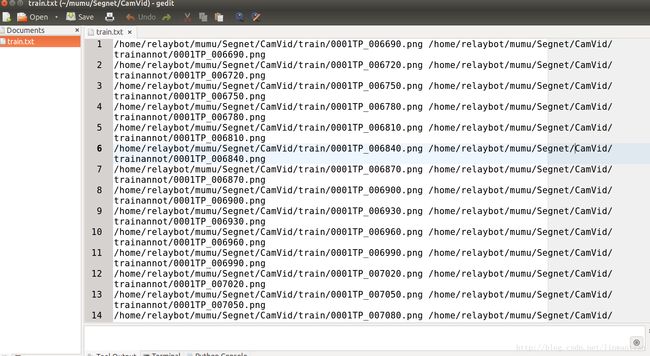
我们现在需要修改 CamVid/train.txt和 CamVid/test.txt ,以便SegNet知道在哪里找到数据。 SegNet需要一个由空白分隔的路径的图像文件(.jpg或.png)和相应的标签图像(.png)。例如:
/path/to/image1.png /another/path/to/label1.png /path/to/image2.png /path/label2.png ...请在文本编辑器中打开这两个文件,并使用查找和替换工具将 ‘/ SegNet / …’ 更改为数据的绝对路径。 
2.2 Training SegNet
下一步是建立一个训练模型。您可以使用SegNet或SegNet basic进行训练。首先,打开模型文件Models/segnet_train.prototxt和推理模型文件 Models/segnet_inference.prototxt 。您将需要修改所有模型数据层中的数据输入的源代码行,将其替换为本地电脑中到您的数据文件的绝对目录。根据您的GPU大小,您可能需要修改培训模型中的批量大小。在12GB的GPU上,如NVIDIA K40或Titan X,您应该可以分别使用10或6的批量大小来处理SegNet-Basic或SegNet。如果你有一个更小的GPU,那么尽量使它尽可能大,然而即使是低至2或3的批量也应该训练得好。其次,请打开解算器文件Models/segnet_solver.prototxt并更改两行; net和snapshot_prefix目录应该将目录与您的数据匹配。
caffe训练参数详解:https://www.cnblogs.com/denny402/p/5074049.html
对SegNet-Basic模型,推理模型和解算器原型文件重复以上步骤。创建一个文件夹以存储您的训练权重和解算器详细信息:mkdir /SegNet/Models/Training
我们现在准备好培训SegNet!打开一个终端并发出这些命令:
./SegNet/caffe-segnet/build/tools/caffe train -gpu 0 -solver /SegNet/Models/segnet_solver.prototxt  # This will begin training SegNet on GPU 0
./SegNet/caffe-segnet/build/tools/caffe train -gpu 0 -solver /SegNet/Models/segnet_basic_solver.prototxt  # This will begin training SegNet-Basic on GPU 0
./SegNet/caffe-segnet/build/tools/caffe train -gpu 0 -solver /SegNet/Models/segnet_solver.prototxt -weights /SegNet/Models/VGG_ILSVRC_16_layers.caffemodel  # This will begin training SegNet on GPU 0 with a pretrained encoder
第三个命令初始化来自在ImageNet上训练的VGG模型的编码器权重。如果你想试试这个,你可以在这里 http://www.robots.ox.ac.uk/~vgg/research/very_deep/ 下载这些权重。(google chrome 浏览器打开)
对这个小数据集的培训不应该花太长时间。大约50-100个时期后,你应该看到它收敛。你应该寻找超过90%的训练准确性。一旦你对模型的汇合结果感到满意,我们现在可以对其进行测试。
2.3 Testing SegNet
首先打开脚本Scripts/compute_bn_statistics.py和Scripts/test_segmentation_camvid.py并将第10行更改为您的SegNet Caffe安装目录。
SegNet中的批处理规范化层根据训练期间每个小批量的均值和方差统计信息对输入特征映射进行移位。在测试时间,我们必须使用整个数据集的统计数据。为此,请使用以下命令运行脚本Scripts/compute_bn_statistics.py。确保您将训练权重文件更改为您希望使用的权重文件。
python /Segnet/Scripts/compute_bn_statistics.py /SegNet/Models/segnet_train.prototxt /SegNet/Models/Training/segnet_iter_10000.caffemodel /Segnet/Models/Inference/  # compute BN statistics for SegNet
python /Segnet/Scripts/compute_bn_statistics.py /SegNet/Models/segnet_basic_train.prototxt /SegNet/Models/Training/segnet_basic_iter_10000.caffemodel /Segnet/Models/Inference/ # compute BN statistics for SegNet-Basic该脚本将输出目录中的最终测试权重保存为/SegNet/Models/Inference/test_weights.caffemodel请将它们重命名为更具描述性的内容。
现在我们可以查看SegNet的输出了!
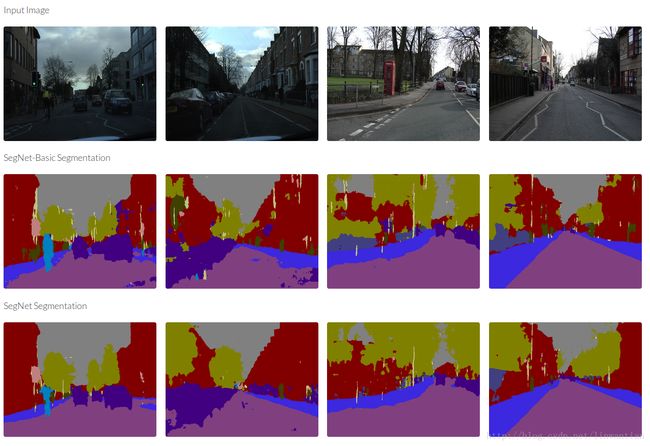
test_segmentation_camvid.py运行命令将显示每个测试图像的输入图像,地面实况和分割预测。尝试使用这些命令,使用正确的推理统计信息将权重文件更改为刚才处理的权重文件:
python /SegNet/Scripts/test_segmentation_camvid.py --model /SegNet/Models/segnet_inference.prototxt --weights /SegNet/Models/Inference/test_weights.caffemodel --iter 233  # Test SegNet
python /SegNet/Scripts/test_segmentation_camvid.py --model /SegNet/Models/segnet_basic_inference.prototxt --weights /SegNet/Models/Inference/test_weights.caffemodel --iter 233  # Test SegNetBasic
2.4 Results
下表显示了我们在CamVid数据集上使用SegNet获得的性能。如果你已经正确地遵循了本教程,你应该能够获得前两个结果。最终的结果是通过公开可用的数据集对3.5K额外的标记图像进行了训练,请参阅该论文获取更多详细信息。 webdemo已经接受了未公开的更多数据和额外的类别(道路标记)的训练。 
以下是记录网页浏览
(1)针对语义地图的一些资料索引:
SLAM++ 2.3 https://sourceforge.net/p/slam-plus-plus/wiki/Home/
(2)KITTI数据集
http://www.cvlibs.net/datasets/kitti/eval_odometry.php
(3)Awesome SLAM
github SLAM 资源
(4)SLAMCN 网址: http://www.slamcn.org/index.php/%E9%A6%96%E9%A1%B5
PPT文献:Incorporating Manhattan and Piecewise Planar Priors in RGB Monocular SLAM
【http://webdiis.unizar.es/~neira/SLAM/SLAM_5_Trends.pdf】
(5)2D-3D Semantic
【https://github.com/alexsax/2D-3D-Semantics】
【有关2D-3D-Semantics Data的github】
(6)【https://arxiv.org/pdf/1703.07334.pdf】
Pop-up SLAM: Semantic Monocular Plane SLAM for Low-texture Environments
论文文献
(7)【http://www.cnblogs.com/denny402/p/5679037.html】
caffe的python接口学习(1):生成配置文件

