-
CMake 3.2.1
-
dlib-18.14
-
VS2013
使用CMake制作lib文件以及Dlib机器学习库的安装和使用-亲测可行
第一步骤:使用CMake制作lib文件
CMake是一个跨平台的安装(编译)工具,可以用简单的语句来描述所有平台的安装(编译过程)。他能够输出各种各样的makefile或者project文件,能测试编译器所支持的C++特性,类似UNIX下的automake。
这里使用Dlib机器学习库做实验,进行打包实验
工具/原料
方法/步骤
我们下载CMake 3.2.1 ,
将dlib-18.14 解压到D盘
建立打包后的文件夹dlib_building,
源文件在dlib-18.14/dlib中,它是是Dlib软件包中的文件夹
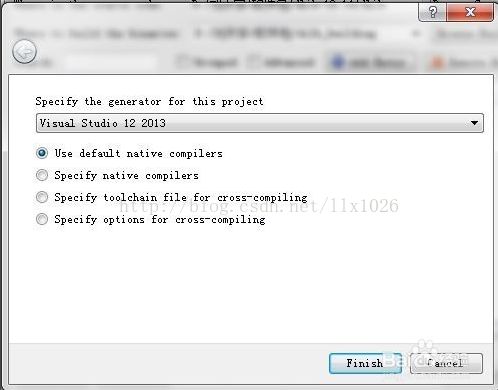
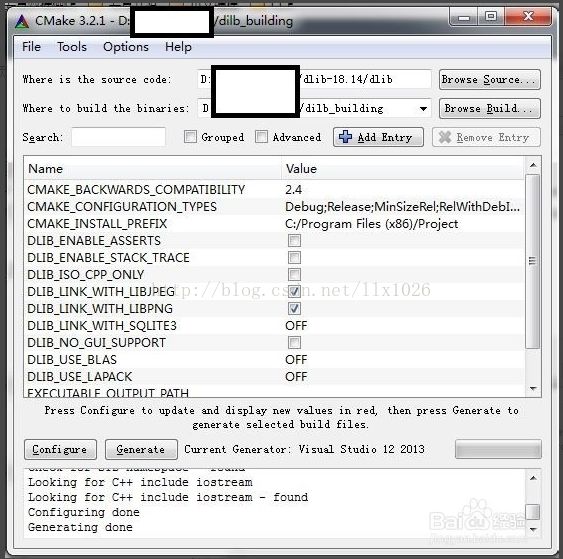
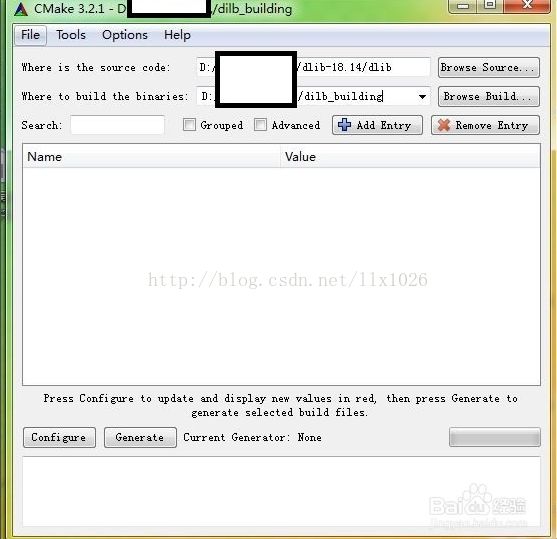
将路径放入CMake中
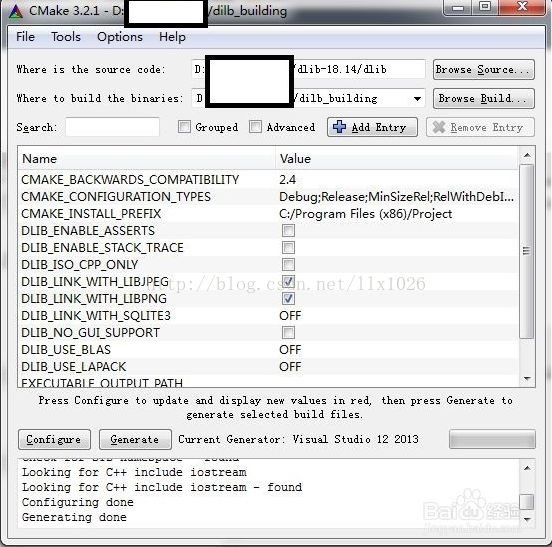
点击Generate 生成项目。(Dlib中有make文件)
成功之后目录为
用VS2013打开 dlib.vcxproj 项目文件
右击重新生成,完成之后我们会发现在原来文件夹多了一个debug文件夹,里面就是dlib.lib文件
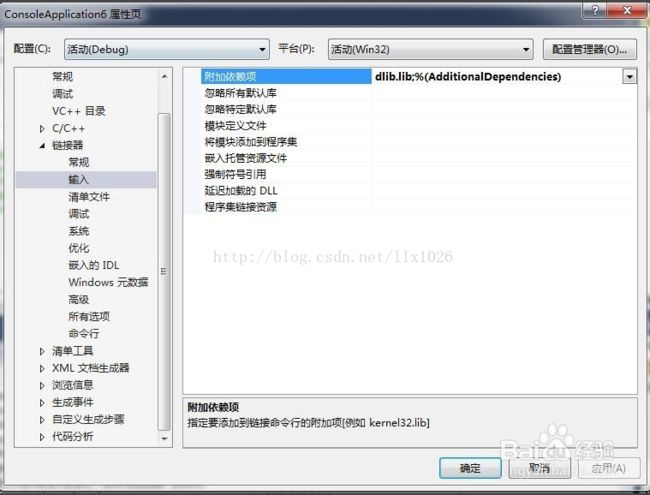
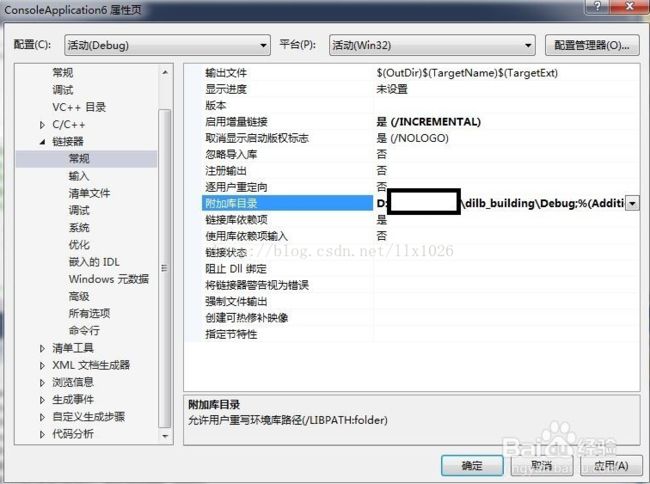
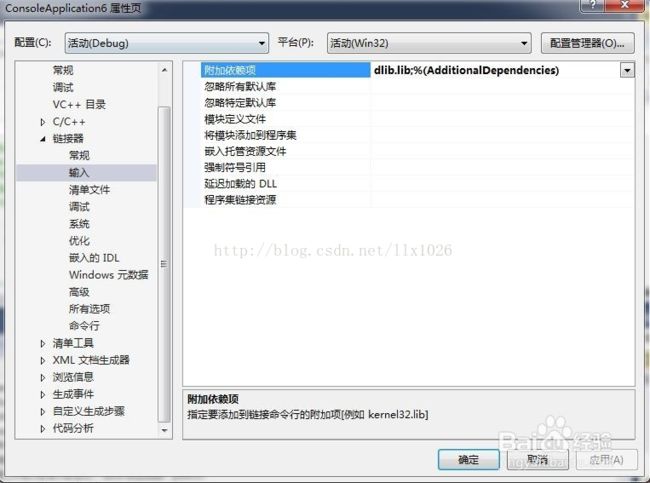
只要将生成的lib文件导入工程中即可 导入步骤为如下:
注意事项
什么架构的工程生成什么工程的lib文件否则不好用
第二步骤:Dlib机器学习库的安装和使用
Dlib是一个机器学习的C++库,包含了许多机器学习常用的算法。而且文档和例子都非常详细。这里介绍该库的安装和使用
工具/原料
VS2013
dlib-18.14
CMake 3.2.1
方法/步骤
我将dlib-18.14 解压到D盘中了
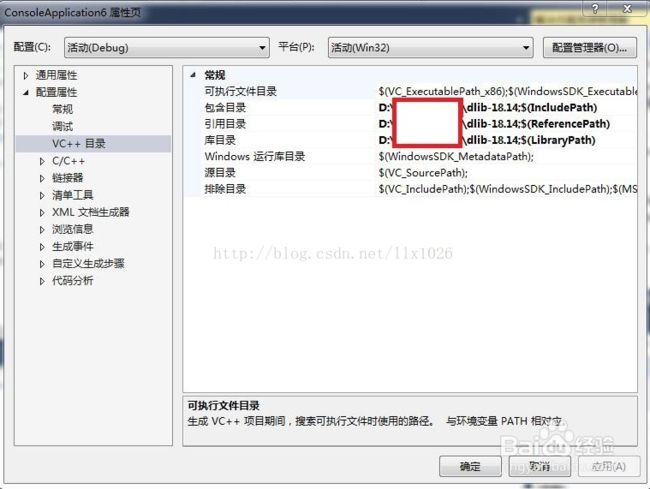
开始新建一个项目,右击解决方案管理器中的该项目打开属性。在项目目录中添加 dlib- 18.14的路径
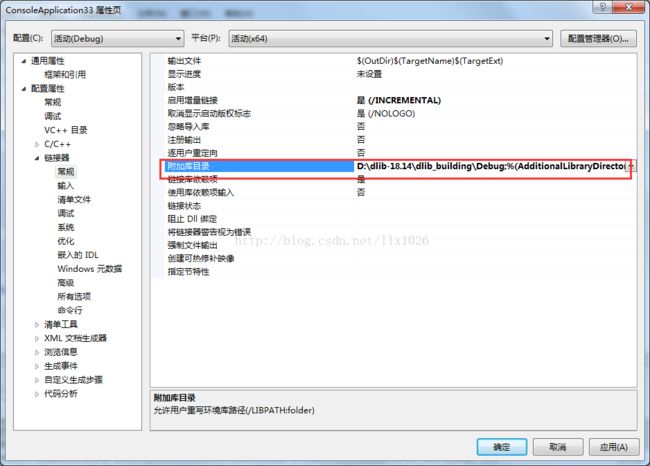
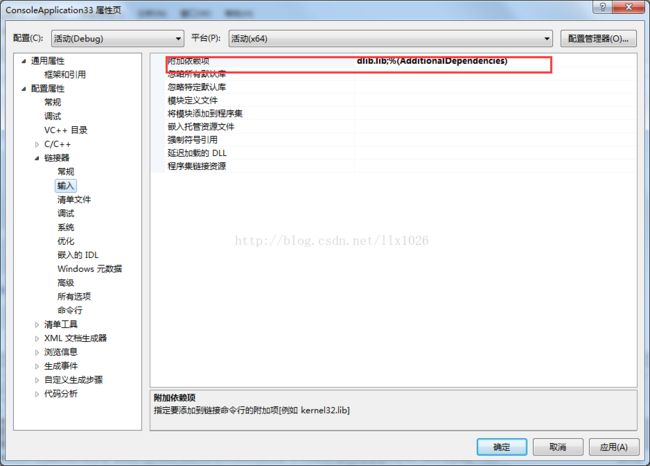
使用软件CMake软件只做Dlib.lib库文件,将其导入工程中,CMake制作lib文件的方式请参考我的上面步骤一的经验。 下面我们就需要把dlib.lib导入到原来的工程中去,右击工程选择属性修改两处地方
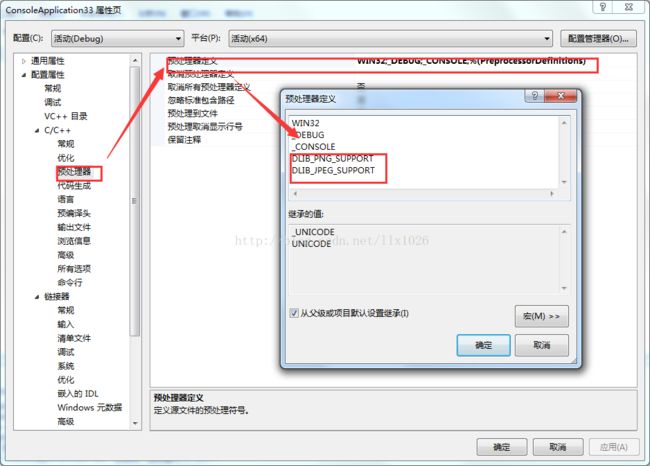
在工程 属性 预处理器 预处理器定义 中加入
DLIB_PNG_SUPPORT
DLIB_JPEG_SUPPORT
两项
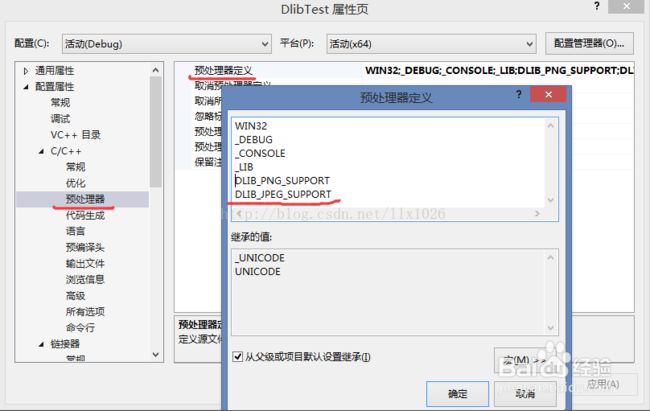
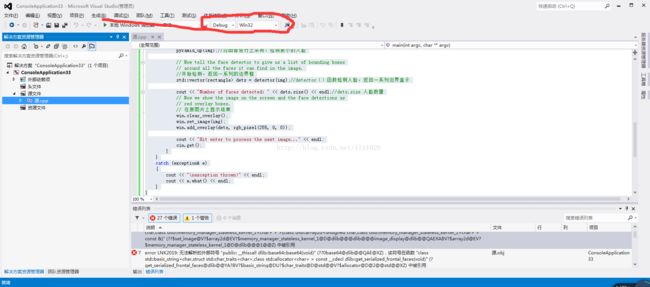
代码测试,本人在debug win32下运行如下代码
#include
#include
#include
#include

using namespace dlib;
using namespace std;

// ----------------------------------------------------------------------------------------

int main(int argc, char** argv)
{
    try
    {
        if (argc == 1)
        {
            cout << "Give some image files as arguments to this program." << endl;
            return 0;
        }

        frontal_face_detector detector = get_frontal_face_detector();//定义一个frontal_face_detctor类的实例detector,用get_frontal_face_detector函数初始化该实例
        image_window win;//一个显示窗口

        // Loop over all the images provided on the command line.
        // 循环所有的图片
        for (int i = 1; i < argc; ++i)
        {
            cout << "processing image " << argv[i] << endl;
            array2d img;
            load_image(img, argv[i]);// 加载一张图片,从argv[i](图片路劲)加载到变量img
            // Make the image bigger by a factor of two.  This is useful since
            // the face detector looks for faces that are about 80 by 80 pixels
            // or larger.  Therefore, if you want to find faces that are smaller
            // than that then you need to upsample the image as we do here by
            // calling pyramid_up().  So this will allow it to detect faces that
            // are at least 40 by 40 pixels in size.  We could call pyramid_up()
            // again to find even smaller faces, but note that every time we
            // upsample the image we make the detector run slower since it must
            // process a larger image.
            /*确保检测图片是检测器的两倍。这第一点是十分有用的,因为脸部检测器搜寻的人脸大小是80*80或者更大。
            因此,如果你想找到比80*80小的人脸,需要将检测图片进行上采样,我们可以调用pyramid_up()函数。
            执行一次pyramid_up()我们能检测40*40大小的了,如果我们想检测更小的人脸,那还需要再次执行pyramid_up()函数。
            注意,上采样后,速度会减慢!*/
            pyramid_up(img);//对图像进行上采用,检测更小的人脸

            // Now tell the face detector to give us a list of bounding boxes
            // around all the faces it can find in the image.
            //开始检测,返回一系列的边界框
            std::vector dets = detector(img);//detector()函数检测人脸,返回一系列边界盒子

            cout << "Number of faces detected: " << dets.size() << endl;//dets.size 人脸数量
            // Now we show the image on the screen and the face detections as
            // red overlay boxes.
            // 在原图片上显示结果
            win.clear_overlay();
            win.set_image(img);
            win.add_overlay(dets, rgb_pixel(255, 0, 0));

            cout << "Hit enter to process the next image..." << endl;
            cin.get();
        }
    }
    catch (exception& e)
    {
        cout << "\nexception thrown!" << endl;
        cout << e.what() << endl;
    }
}
错误 28 error LNK1120: 26 个无法解析的外部命令 F:\VS2012\Test1\ConsoleApplication33\Debug\ConsoleApplication33.exe 1 1 ConsoleApplication33
错误 25 error LNK2019: 无法解析的外部符号 "private: unsigned char const * __thiscall dlib::png_loader::get_row(unsigned int)const " (?get_row@png_loader@dlib@@ABEPBEI@Z),该符号在函数 "public: void __thiscall dlib::png_loader::get_image > >(class dlib::array2d > &)const " (??$get_image@V?$array2d@EV?$memory_manager_stateless_kernel_1@D@dlib@@@dlib@@@png_loader@dlib@@QBEXAAV?$array2d@EV?$memory_manager_stateless_kernel_1@D@dlib@@@1@@Z) 中被引用 F:\VS2012\Test1\ConsoleApplication33\ConsoleApplication33\源.obj ConsoleApplication33
错误 13 error LNK2019: 无法解析的外部符号 "protected: void __thiscall dlib::scrollable_region::set_total_rect_size(unsigned long,unsigned long)" (?set_total_rect_size@scrollable_region@dlib@@IAEXKK@Z),该符号在函数 "public: void __thiscall dlib::image_display::set_image > >(class dlib::array2d > const &)" (??$set_image@V?$array2d@EV?$memory_manager_stateless_kernel_1@D@dlib@@@dlib@@@image_display@dlib@@QAEXABV?$array2d@EV?$memory_manager_stateless_kernel_1@D@dlib@@@1@@Z) 中被引用 F:\VS2012\Test1\ConsoleApplication33\ConsoleApplication33\源.obj ConsoleApplication33
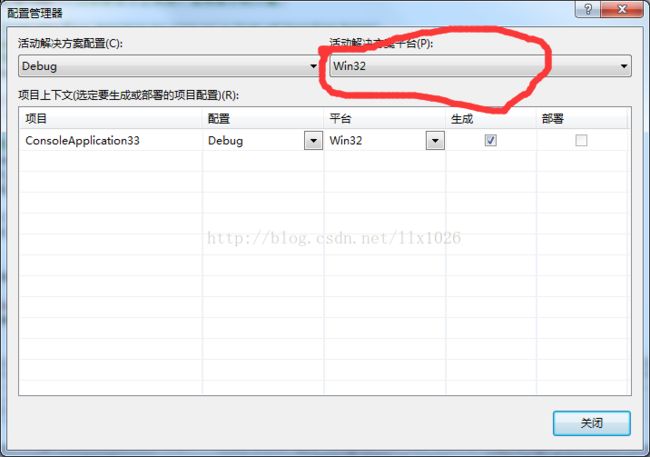
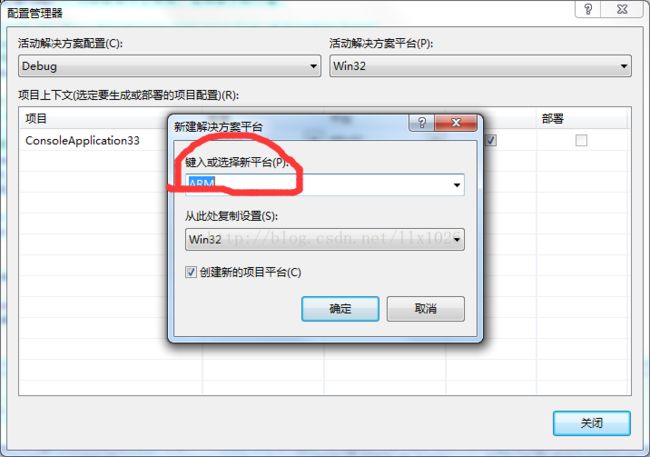
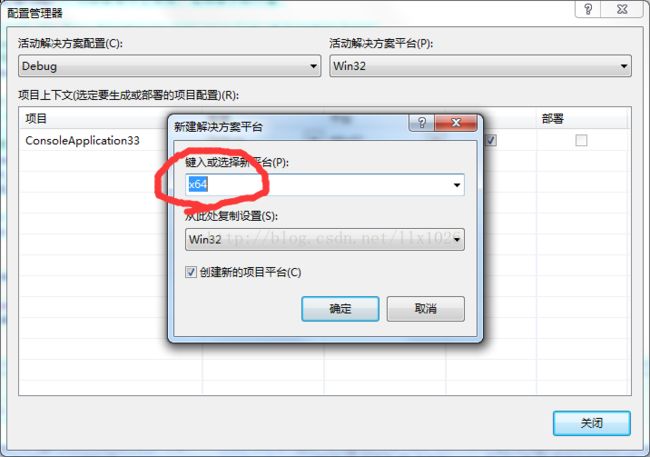
最后选择确定,这就是选择debug x64的过程
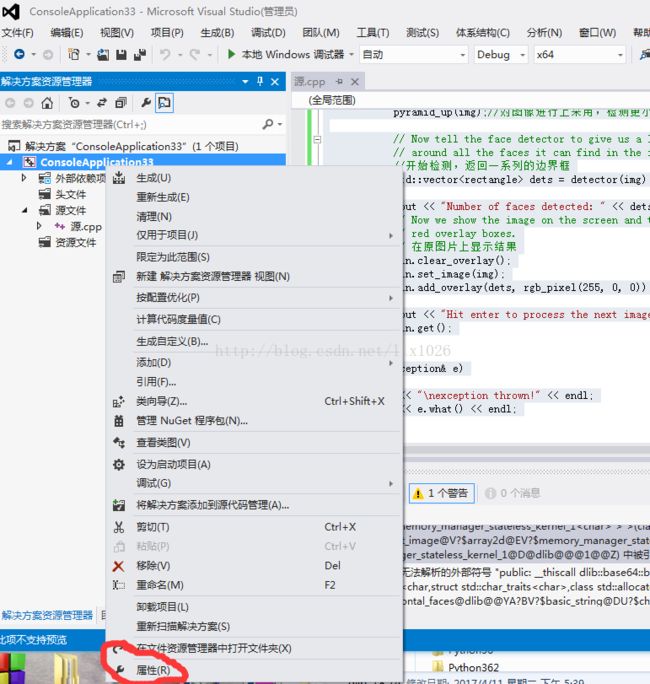
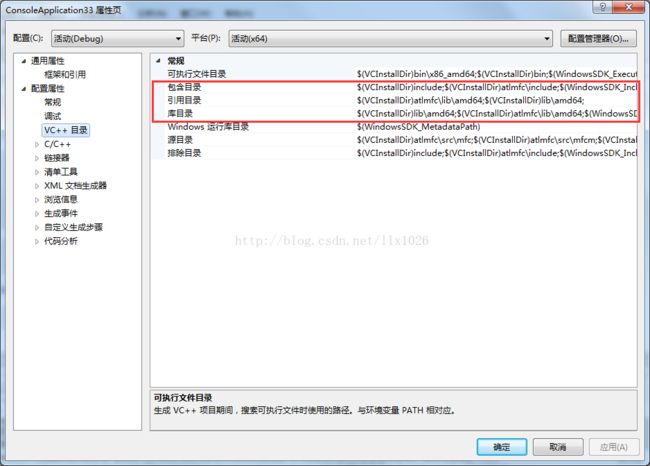
然后打开项目属性,如下图:
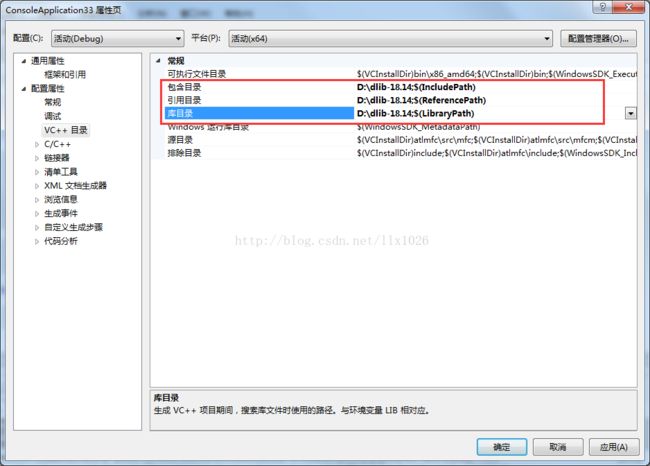
代开属性,找到VC++目录下,进行包含目录、引用目录、库目录的dlib配置
根据自己dlib-18.14所放的路径进行配置,最好不要手动输入,用鼠标直接点到所需要的路径,防止出错
根据最上面的步骤二Dlib机器学习库的安装和使用进行dlib最后三项配置
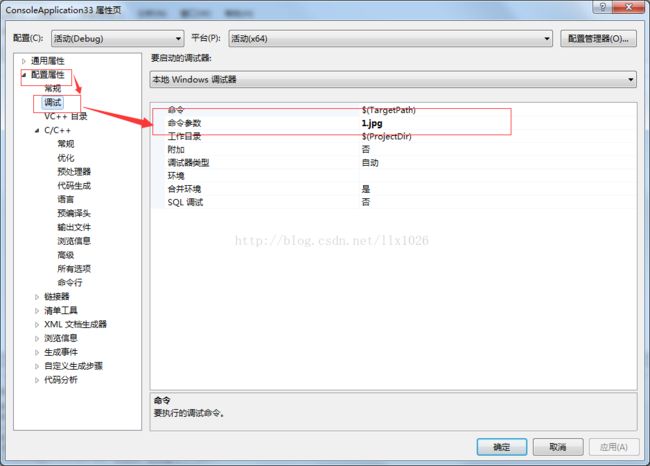
最后因为测试的代码中需要进行参数设置,还需要进行参数设置,即所用到的检测的人来那图片的图片名,本文用1.jpg
测试图片如下:
注意,测试图片要放在源.CPP同一文件夹下
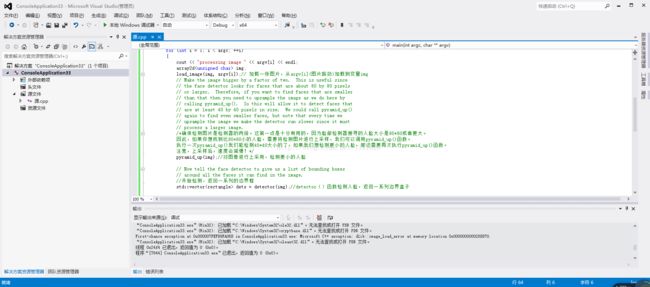
一切准备就绪,重新调试代码,最终没有出错
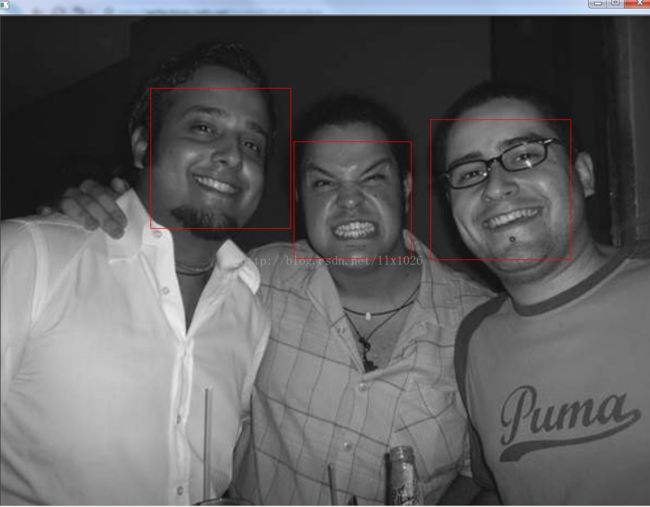
运行的时候,人脸检测比较慢,可以稍微等一下,最终的运行结果效果图如下:
彩色变成灰色了,代码可能需要修改,总之dlib配置算是成功了,CMAKE生成lib是一定要与VS的编译器一致,要不然错误很多,反正我CMAKE编译时,选择的是默认的,没想到默认的编译器不是debug win32,而是debug x64真是出乎我的意料
还有什么不清楚的请小伙伴留言询问,可能有的地方描述的还不到位!!!
参考:http://jingyan.baidu.com/article/25648fc18083af9191fd00b2.html
参考:http://jingyan.baidu.com/article/48b37f8d0461831a6464889c.html

