JavaWeb-Listener
话说:
亲们!又见面了!前面总结了Servlet、Filter;这里为保持一贯性,自然少不了Listener。
这里内容稍微有点多,但是也不便分开来写,所以就辛苦读者,也辛苦自己了。
目录:
案例一、感性认识一下什么是监听器
案例二、测试HttpSessionListener
案例三、测试HttpSessionBindingListener
案例四、测试ServletContextListener
案例五、测试ServletContextAttributeListener
案例六、测试HttpSessionActivationListener
案例一、感性认识一下什么是监听器
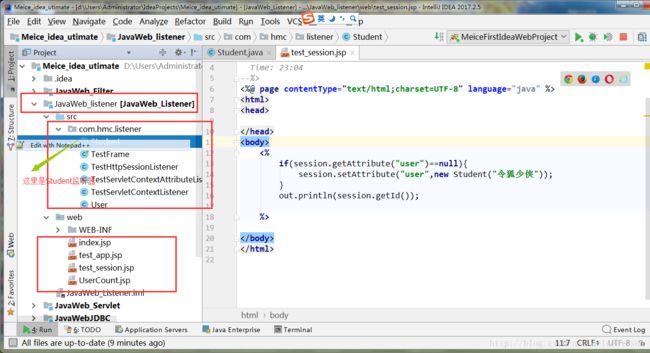
先看一下整体工程架构图吧,读者如果有耐心看完,请把每一个案例对照这个图来创建:
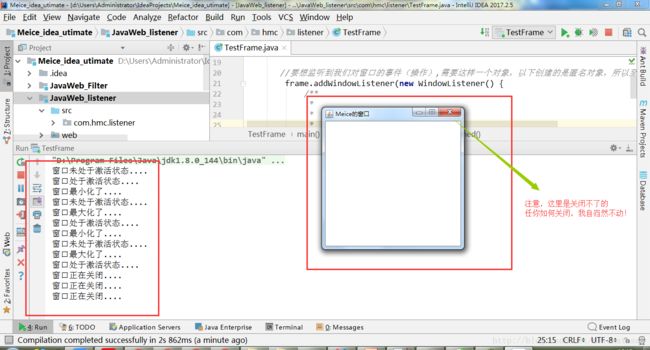
我们用Java写一个窗口,对窗口操作,Window的监听器就会监听到
TestFrame.
package com.hmc.listener;
import java.awt.*;
import java.awt.event.WindowEvent;
import java.awt.event.WindowListener;

/**
 * User:Meice
 * 2017/10/7
 */
public class TestFrame {
    public static void main(String[] args) {
        //创建一个窗体对象,对监听器有个感性的认知
       Frame frame = new Frame();
       frame.setTitle("Meice的窗口");
       frame.setSize(300,300);
       frame.setLocation(200,200);
       frame.setVisible(true);

       //要想监听到我们对窗口的事件(操作),需要这样一个对象,以下创建的是匿名对象,所以至直接重写了方法
        frame.addWindowListener(new WindowListener() {
            @Override
            public void windowOpened(WindowEvent e) {
                System.out.println("窗口打开了....");
            }

            @Override
            public void windowClosing(WindowEvent e) {
                System.out.println("窗口正在关闭....");
                //窗口直接无法关闭,只有关闭猫
                //用事件源来关闭
             Frame f =(Frame) e.getSource();
             f.dispose();
            }

            @Override
            public void windowClosed(WindowEvent e) {
                System.out.println("窗口关闭了....");
            }

            @Override
            public void windowIconified(WindowEvent e) {
                //iconify   n. 图符化;图标化
                System.out.println("窗口最小化了....");
            }

            @Override
            public void windowDeiconified(WindowEvent e) {
                System.out.println("窗口最大化了....");
            }

            @Override
            public void windowActivated(WindowEvent e) {
                System.out.println("窗口处于激活状态....");
            }

            @Override
            public void windowDeactivated(WindowEvent e) {
                System.out.println("窗口未处于激活状态....");
            }
        });


    }

}
效果是这样的:
Java的事件机制这篇博客可以参考
http://blog.csdn.net/crazysusu/article/details/50731991
案例二、测试HttpSessionListene
1) 如何创建呢?跟Servlet、Filter类似,先创建一个类,实现HttpSessionListener接口
2)配置web.xml,然后访问页面即可。
3)这里的页面,我们就直接用index.jsp做测试
后面的几个案例创建流程都和这个类似,不在赘述。
1) 如何创建呢?跟Servlet、Filter类似,先创建一个类,实现HttpSessionListener接口
package com.hmc.listener;
import javax.servlet.http.HttpSession;
import javax.servlet.http.HttpSessionEvent;
import javax.servlet.http.HttpSessionListener;

/**
 * User:Meice
 * 2017/10/7
 */
public class TestHttpSessionListener implements HttpSessionListener {


    @Override
    public void sessionCreated(HttpSessionEvent e) {
        HttpSession session = e.getSession();
        System.out.println("session创建了,sessionID为:"+session.getId());

    }

    @Override
    public void sessionDestroyed(HttpSessionEvent e) {

        System.out.println("session已销毁....");
    }
}
2)配置web.xml,然后访问页面即可。
<web-app xmlns="http://xmlns.jcp.org/xml/ns/javaee"
         xmlns:xsi="http://www.w3.org/2001/XMLSchema-instance"
         xsi:schemaLocation="http://xmlns.jcp.org/xml/ns/javaee http://xmlns.jcp.org/xml/ns/javaee/web-app_3_1.xsd"
         version="3.1">

    <listener>
        <listener-class> com.hmc.listener.TestHttpSessionListenerlistener-class>
    listener>


    <session-config>
        <session-timeout>1session-timeout>
    session-config>
web-app>
3)index.jsp:
<%--
  User: Meice
  Date: 2017/10/7
  Time: 15:40
--%>
<%@ page contentType="text/html;charset=UTF-8" language="java" %>
<html>
  <head>
    <title>$Title$title>
  head>
  <body>
  我是JavaWeb_Listener
  <%--
    这里也完全符合session的工作原理。同义词会话中,之创建一个sessionID,关掉会话,不会自动销毁
    前面说过,销毁session有2中方法,这里采用第2中sesssion.invalidat()
    这样,关闭整个浏览器,就会答应输出session销毁这句话了
  --%>
  <%
      session.invalidate();
  %>

  body>
html>
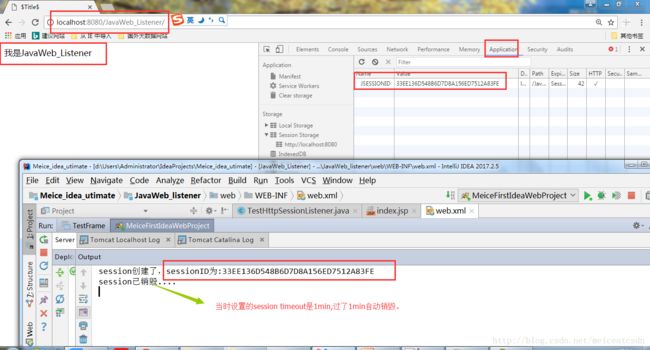
测试后,页面输出效果如图:
总结:
1、销毁一个session有两种方法,法1:调用session.invalidate()方法
法2:设置session-timeout,原谅俺不能写尖括号,页面不支持;
2、关闭页面不会自动销毁session,而需要通过以上两种方法来销毁。
3、HttpSessionListener监听的是整个Web应用(也就是你web工程)下的所有sessiion,web下面的其他页面也都是可以监听到的。
案例三、测试HttpSessionBindingListener
为什么要测试它?因为它和HttpSessionListener不同啊!想一想,这个HttpSessionListener监听了全局的sesssion,实际运用中,当然要精细化操作,我们怎么实现对我想要监听的页面来监听呢?或者选择我要监听的部分来监听呢?监听所有,累不累啊?
HttpSessionBindingListener是一个接口,当然也要实现其中方法,只有两个方法。
HttpSessionBindingListener必须实例化后javaBean放入某一个session中,才能监听。
这句话要好好体会,表示你要写一个类,这里我们写User类,然后实现这个接口并实现其中的方法,同时要实例化这个类,并且把这个类存放到session中。还是不明白?ok,实践出真知。
1)创建一个User类,实现这个BindingListener借口
package com.hmc.listener;
import javax.servlet.http.HttpSessionBindingEvent;
import javax.servlet.http.HttpSessionBindingListener;

/**
 * User:Meice
 * 2017/10/7
 */
public class User implements HttpSessionBindingListener {
    private String name;
    public User(){}
    public  User(String name) {
        this.name = name;
    }

    public String getName() {
        return name;
    }

    public void setName(String name) {
        this.name = name;
    }

    @Override
    public void valueBound(HttpSessionBindingEvent httpSessionBindingEvent) {

        System.out.println("加入了一个用户:"+name);
    }

    @Override
    public void valueUnbound(HttpSessionBindingEvent httpSessionBindingEvent) {

        System.out.println(name+"用户离开了....");
    }


}
2)配置web.xml
认真想一想,这个是没必要配置的。因为我们在访问UserCont.jsp的时候,该页面已经实例化这个类了,而且存放到了session中.Listener配置web.xml的本质意义在哪里?不就是找到这个类,后台给你存到session中,然后调用其中的方法?
3)写页面UserCount.jsp做测试
<%@ page import="com.hmc.listener.User" %><%--
  User: Meice
  Date: 2017/10/7
  Time: 18:08
--%>
<%@ page contentType="text/html;charset=UTF-8" language="java" %>
<html>
<head>
    <title>Titletitle>
head>
<body>
    <%
        User user = new User("宝玉哥哥");
        session.setAttribute("user",user);
    %>
body>
html>
ok!开始测试。当你一访问页面UserCount.jsp的时候,就调用了这个session,自然就执行了其中的方法。结果如下:
session创建了,sessionID为:BEA668C14C7A044A4516CB9656259A98
加入了一个用户:宝玉哥哥
session已销毁….
宝玉哥哥用户离开了….
到这里,我们就可以精细化根据不同的Listener来设计监听页面访问人数啦。也就是大数据相关的类似PV、UV的东东。
案例四、测试ServletContextListener
ServletContext表示的就是服务器,还记得之前的request.getContextPath()方法嘛?获取的就是上下文,也就是我们建立的Web工程的路径呢。对应这个工程就是”/JavaWeb_Listener”这个路径。所以这里针对的就是JSP的内置对象application
因此,只有整个服务器启动或者关闭的时候,才会调用这个session,对吧!
1) 编写类TestServletContextListener,实现ServletContextListener接口
package com.hmc.listener;
import javax.servlet.ServletContextEvent;
import javax.servlet.ServletContextListener;

/**
 * User:Meice
 * 2017/10/7
 */
public class TestServletContextListener implements ServletContextListener {
    /**
     *
     *在应用服务器启动时
     */

    @Override
    public void contextInitialized(ServletContextEvent e) {
        System.out.println("初始化application.....");
    }
    /**
     * 在应用服务器停止的时候
     *
     */
    @Override
    public void contextDestroyed(ServletContextEvent e) {
        System.out.println("销毁application。。。。。");

    }
}
2)配置web.xml
    <listener>
        <listener-class>com.hmc.listener.TestServletContextListenerlistener-class>
    listener>
3) 设置页面test_app.jsp
<%--
  User: Meice
  Date: 2017/10/7
  Time: 19:03
--%>
<%@ page contentType="text/html;charset=UTF-8" language="java" %>
<html>
<head>
    <title>Titletitle>
head>
<body>
    <%
        application.setAttribute("count",1);

    %>
body>
html>
测试效果是这样的:
信息: Stopping service Catalina
销毁application。。。。。
十月 07, 2017 7:05:10 下午 org.apache.coyote.AbstractProtocol stop
信息: Stopping ProtocolHandler [“http-apr-8080”]
十月 07, 2017 7:05:10 下午 org.apache.coyote.AbstractProtocol stop
信息: Destroying ProtocolHandler [“ajp-apr-8009”]
Disconnected from server
总结:
所以,JSP内置的9大对象,明白各自作用域很重要,对于这样的监听,就很容易测试和掌握。
案例五、测试ServletContextAttributeListener
根据名字知道,这是监听application设置的属性值
1)创建TestServletContextAttributeListener
    package com.hmc.listener;
    import javax.servlet.ServletContextAttributeEvent;
    import javax.servlet.ServletContextAttributeListener;
    import java.text.MessageFormat;

    /**
     * User:Meice
     * 2017/10/7
     */
    public class TestServletContextAttributeListener implements ServletContextAttributeListener {
        @Override
        public void attributeAdded(ServletContextAttributeEvent e) {
            //法1 获取ServletContextAttribute
           String name = e.getName();
          String val =(String) e.getValue();
          System.out.println("添加了属性名:"+name+"属性值:"+val);

          //发2 在Java中还可以格式化字符串
           String msg = MessageFormat.format("添加了属性名:-{0},属性值-{1}",e.getName(),e.getValue());
            System.out.println(msg);
        }

        @Override
        public void attributeRemoved(ServletContextAttributeEvent e) {
          String msg =  MessageFormat.format("移除了属性名:-{0},属性值-{1}",e.getName(),e.getValue());
           System.out.println(msg);
        }

        @Override
        public void attributeReplaced(ServletContextAttributeEvent e) {
           String msg = MessageFormat.format("替换了属性名:-{0},属性值:-{1}",e.getName(),e.getValue());
            System.out.println(msg);
        }
    }
2)配置web.xml
    <listener>
        <listener-class>com.hmc.listener.TestServletContextAttributeListenerlistener-class>
    listener>
3) 页面设置application;这里测试还是用test_app.jsp页面
<%--
  User: Meice
  Date: 2017/10/7
  Time: 19:03
--%>
<%@ page contentType="text/html;charset=UTF-8" language="java" %>
<html>
<head>
    <title>Titletitle>
head>
<body>
    <%
        //以下测试ServletContextListener
        application.setAttribute("count",1);

        //以下测试ServletContextAttributeListener
        //applicattion的设置同样名字的属性就是replace
        application.setAttribute("name","林黛玉");
        application.setAttribute("name","黛玉妹妹");
        application.removeAttribute("name");

    %>
body>
html>
访问:localhost:8080/JavaWeb_Listener/test_app.jsp
结果如下:
session创建了,sessionID为:43C5B885B2F42D1EE059AF0AE98FCD4C
添加了属性名:name属性值:林黛玉
添加了属性名:-name,属性值-林黛玉
替换了属性名:-name,属性值:-林黛玉
移除了属性名:-name,属性值-黛玉妹妹
还有很多类似:ServletRequestAttributeListener 、ServletRequestListener 测试方法异曲同工。
案例六、测试HttpSessionActivationListener
实现该接口的对象,如果绑定到Session中,当Session被钝化(passivate)或者激活(activate)时,Servlet容器将通知该对象,位于javax.servlet.http包下
这里创建Student类,来实现这个监听。这个监听不用配置web.xml
student类
package com.hmc.listener;
import javax.servlet.http.HttpSessionActivationListener;
import javax.servlet.http.HttpSessionEvent;
import java.io.Serializable;

/**
 * User:Meice
 * 2017/10/7
 */
public class Student implements Serializable, HttpSessionActivationListener {
    private String name;
    public Student (){}
    public Student (String name) {
        this.name=name;
    }

    public String getName() {
        return name;
    }

    public void setName(String name) {
        this.name = name;
    }

    @Override
    public void sessionWillPassivate(HttpSessionEvent e) {
        //passivate是钝化的意思;表示session被钝化
        System.out.println(e.getSession().getId()+"被序列化");
    }

    @Override
    public void sessionDidActivate(HttpSessionEvent e) {
        //session被激活
        System.out.println(e.getSession().getId()+"被反序列化到内存中....");
    }
}
测试页面test_session.jsp
<%@ page import="com.hmc.listener.Student" %><%--
  User: Meice
  Date: 2017/10/7
  Time: 23:04
--%>
<%@ page contentType="text/html;charset=UTF-8" language="java" %>
<html>
<head>

head>
<body>
    <%
        if(session.getAttribute("user")==null){
            session.setAttribute("user",new Student("令狐少侠"));
        }
        out.println(session.getId());

    %>

body>
html>
测试效果如下:
信息: Stopping service Catalina
6FB687AB8C4332E017D934729A80B9CF被序列化
销毁application。。。。。
十月 07, 2017 11:11:56 下午 org.apache.coyote.AbstractProtocol stop
信息: Stopping ProtocolHandler [“http-apr-8080”]
总结
1、Listener和Servlet、Filter非常类似,作用就是对各种时间进行监听,像一个小侦探;
2、创建流程基本都是:新建一个类,实现对应接口并其方法–》配置web.xml–》配置页面进行测试;
3、格式化字符串输出是一个很好的方式.MessageFormat,对比字符串拼接,后者麻烦多了。不过看这个API有点累;
4、案例6因为涉及到序列化与反序列化,所以也要实现Serializable接口。
5、我们需要深刻体会request、session、cookie、application等JSP几大内置对象的作用域和各自特性,才能不被纷繁复杂的接口搞晕乎。
好了,到这里,这部分内容总结完毕。哈哈,读者如果看到了这里,真是辛苦你了!个人觉得这篇更是对过去的总结。如果CSDN可以录制视频的话,笔者还是更加倾向于录制成视频,因为这些内容前后关联很大,而且细节繁多,仅仅看博客,可能不易理解。当然,如果是高手,就另当别论啦。
好啦,Good Night!


