Spring Boot中使用MongoDB数据库
本章我们来学习Spring Boot中使用MongoDB数据库,有两种使用方式,一是直接使用mongotemplate,二是新建实体相关的repository接口。
引入依赖
在pom.xml中加入spring-boot-starter-data-mongodb引入对mongodb的访问支持依赖,它的实现依赖spring-data-mongodb。
    org.springframework.boot
    spring-boot-starter-data-mongodb
最终pom.xml如下:
  4.0.0
  com.biologic
  23mofang-biologic
  0.0.1-SNAPSHOT


        UTF-8
        UTF-8
        1.8


        org.springframework.boot
        spring-boot-starter-parent
        1.5.3.RELEASE


            org.springframework.boot
            spring-boot-starter-web


        org.springframework.boot
        spring-boot-starter-data-mongodb


        org.springframework.boot
        spring-boot-maven-plugin
数据源的配置
如果mongodb端口是默认端口,并且没有设置密码,可不配置,sprinboot会开启默认的。
spring.data.mongodb.uri=mongodb://localhost:27017/mydb
如何mongodb设置了密码,这样配置:
spring.data.mongodb.uri=mongodb://zzq:123456@localhost:27017/mydb
如果多个节点集群配置
#more ip cluster
#spring.data.mongodb.uri=mongodb://user:pwd@ip1:port1,ip2:port2/database
新建实体
package com.biologic.entity;

@Document(collection = "user")
public class User {

	 @Id
    private String id;
    @Field("username")
	private String username;
	private String password;
	private String registerTime;
	private String phone;
	private String name;
	private String sex;
	private String age;

	public String getId() {
		return id;
	}

	public void setId(String id) {
		this.id = id;
	}

	public String getUsername() {
		return username;
	}

	public void setUsername(String username) {
		this.username = username;
	}

	public String getPassword() {
		return password;
	}

	public void setPassword(String password) {
		this.password = password;
	}

	public String getRegisterTime() {
		return registerTime;
	}

	public void setRegisterTime(String registerTime) {
		this.registerTime = registerTime;
	}

	public String getPhone() {
		return phone;
	}

	public void setPhone(String phone) {
		this.phone = phone;
	}

	public String getName() {
		return name;
	}

	public void setName(String name) {
		this.name = name;
	}

	public String getSex() {
		return sex;
	}

	public void setSex(String sex) {
		this.sex = sex;
	}

	public String getAge() {
		return age;
	}

	public void setAge(String age) {
		this.age = age;
	}

}
方式一直接使用mongotemplate
springboot会自动注入mongotemplate,使用引用
	@Autowired
	MongoTemplate mongotemplate;
即可。如下:
package com.biologic.api;

import org.springframework.beans.factory.annotation.Autowired;
import org.springframework.boot.SpringApplication;
import org.springframework.boot.autoconfigure.EnableAutoConfiguration;
import org.springframework.data.mongodb.core.MongoTemplate;
import org.springframework.data.mongodb.core.query.Criteria;
import org.springframework.data.mongodb.core.query.Query;
import org.springframework.stereotype.Controller;
import org.springframework.web.bind.annotation.RequestMapping;
import org.springframework.web.bind.annotation.ResponseBody;

import com.biologic.entity.User;

@Controller
@EnableAutoConfiguration
public class SampleController {

	@Autowired
	MongoTemplate mongotemplate;

	@RequestMapping("/")
	@ResponseBody
	String home() {
		Query query = new Query();
		query.addCriteria(Criteria.where("name").is("酒仙"));
		String name = mongotemplate.findOne(query, User.class).getName();
		return name;
	}

	public static void main(String[] args) throws Exception {
		SpringApplication.run(SampleController.class, args);
	}

}
方式二新建实体相关的repository接口
新建定义repository接口继承mongoRepository接口
package com.biologic.api.service;

import org.springframework.data.mongodb.repository.MongoRepository;
import org.springframework.stereotype.Service;

import com.biologic.entity.User;


@Service
public interface UserRepository extends MongoRepository {

   public User findByName(String name);

}
写一个接口,继承MongoRepository,这个接口有了几本的CURD的功能。如果你想自定义一些查询,比如根据name来查询,只需要定义一个方法即可。注意firstName严格按照存入的mongodb的字段对应。在典型的Java的应用程序,写这样一个接口的方法,需要自己实现,但是在springboot中,你只需要按照格式写一个接口名和对应的参数就可以了,因为springboot已经帮你实现了。
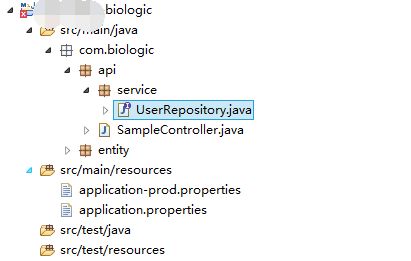
repository接口需要在启动程序的同级目录或者子目录中,例如结构如下:
使用方式如下:
package com.biologic.api;

import org.springframework.beans.factory.annotation.Autowired;
import org.springframework.boot.SpringApplication;
import org.springframework.boot.autoconfigure.EnableAutoConfiguration;
import org.springframework.stereotype.Controller;
import org.springframework.web.bind.annotation.RequestMapping;
import org.springframework.web.bind.annotation.ResponseBody;

import com.biologic.api.service.UserRepository;


@Controller
@EnableAutoConfiguration
public class SampleController {

	@Autowired
	UserRepository userRepository;

	@RequestMapping("/")
	@ResponseBody
	String home() {
		String name = userRepository.findByName("酒仙").getName();
		return name;
	}

	public static void main(String[] args) throws Exception {
		SpringApplication.run(SampleController.class, args);
	}

}
可能遇到的问题
Description:

Field userRepository in com.biologic.api.SampleController required a bean of type 'com.biologic.service.UserRepository' that could not be found.


Action:

Consider defining a bean of type 'com.biologic.service.UserRepository' in your configuration.
原因
SpringBoot项目的Bean装配默认规则是根据Application类所在的包位置从上往下扫描!
“Application类”是指SpringBoot项目入口类。这个类的位置很关键:
如果Application类所在的包为:com.biologic.api,则只会扫描com.biologic.api包及其所有子包,如果service或dao所在包不在com.biologic.api及其子包下,则不会被扫描!
根据英文的提示是在配置中找不到一个指定自动注入类型的bean,经过多方排查得出结论:
正常情况下加上@Component注解的类会自动被Spring扫描到生成Bean注册到spring容器中,既然说没找到,也就是该注解被没有被spring识别,问题的核心关键就在application类的注解SpringBootApplication上。
解决方式
至此,得出两种解决办法:
1 .将接口与对应的实现类放在与application启动类的同一个目录或者他的子目录下,这样注解可以被扫描到,这是最省事的办法
注意这样也是扫描不到的

这样是可以的

2,如果是其他子项目引入进来的包,可以通过对Application类添加@ComponentScan(basePackages={“xxx.xxx”,”xxx.xxx”})来指定扫描的包,但是需要注意的是引入的包路径仍然需要跟application启动类的同一个目录或者他的子目录下。而且一旦指定后就不会在默认扫描Application类下的包,所以需要扫描Application类下的包需要把Application类下的包也加在路径里。在指定的application类上加上扫描路径这么一行注解,手动指定application类要扫描哪些包下的注解,如下:
@ComponentScan(basePackages = {"com.biologic.api","com.biologic.service"})