SpringCloudConfig 主要用于应用的配置热更新。本章主要介绍SpringCloudConfig的热更新原理
SpringCloudConfig 主要用于应用的配置热更新。本章主要介绍SpringCloudConfig的热更新原理
- 数据流
- 配置刷新原理
- extract方法
- 其他
- 参考
数据流
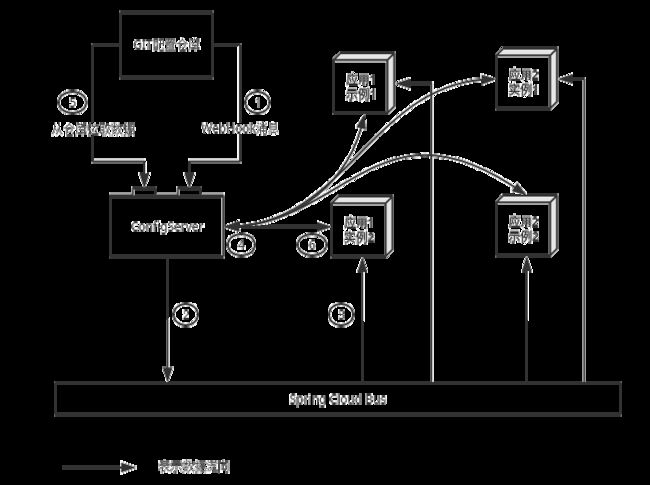
SpringCloudConfig 的 工作流程:
- 将修改的配置信息提交到Git,触发 WebHook。WebHook用 Http 的形式向 ConfigServer 发送 refresh 请求。
- ConfigServer 将这个消息发送给 spring cloud bus(用kafka或者rabbitMQ实现)
- 每个应用实例中有一个 config-client,将会收到这个 refresh 消息
- 如果 destination 和自己匹配,就执行刷新动作。 向 config-server 请求配置
- config-server 拉取配置仓库中的最新配置文件并转成相应的json格式
- 回传给 config-client,随后 config-client 将内容更新到上下文中。
配置刷新原理
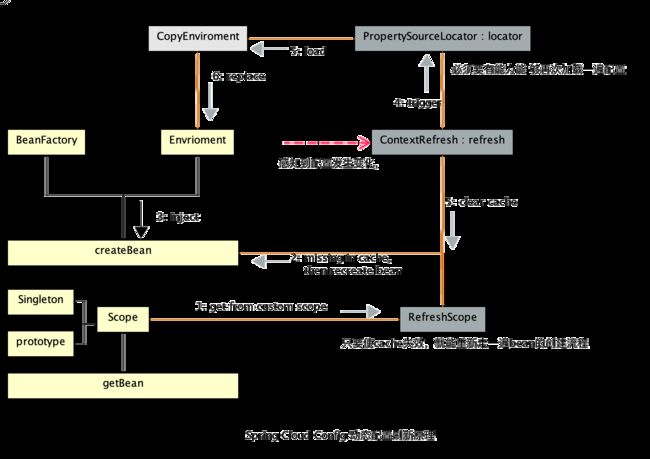
当触发热更新的时候,会调用 ContextRefresher 的 refresh()。方法的实现如下:
public synchronized Set<String> refresh() {
    Set<String> keys = refreshEnvironment();
    this.scope.refreshAll();
    return keys;
}

public synchronized Set<String> refreshEnvironment() {
    //1
    Map<String, Object> before = extract(
            this.context.getEnvironment().getPropertySources());
    //2
    addConfigFilesToEnvironment();
    //3
    Set<String> keys = changes(before,
            extract(this.context.getEnvironment().getPropertySources())).keySet();
    //4
    this.context.publishEvent(new EnvironmentChangeEvent(this.context, keys));
    return keys;
}
extract方法
这个方法接收了环境中所有的 PropertySource ,并将其中的非标准属性源的所有属性汇总到一个 Map 。
这里的标准属性源如下所示:
- systemProperties
- systemEnvironment
- servletContextInitParams
- servletConfigInitParams
- configurationProperties
- jndiProperties
StandardEnvironment 会注册系统变量(System Properties)和环境变量(System Environment)
StandardServletEnvironment 会注册 Servlet 环境下的 Servlet Context 和 Servlet Config 的初始参数(Init Params)和JNDI 的属性。
###addConfigFilesToEnvironment方法
addConfigFilesToEnvironment() 的实现逻辑:
- 创建新的SpingBoot来获取新的属性源
- 对比新旧数据源: 1、将旧的数据源替换成新的数据源;2、将全新的数据源添加到 this.context.getEnvironment中。
 ConfigurableApplicationContext addConfigFilesToEnvironment() {
		ConfigurableApplicationContext capture = null;
		try {
      //复制得到的 environment 主要包含
      //systemProperties、systemEnvironment、refreshArgs和defaultProperties
			StandardEnvironment environment = copyEnvironment(
					this.context.getEnvironment());
      //利用SpringApplicationBuilder,重新加载最新的属性源
			SpringApplicationBuilder builder = new SpringApplicationBuilder(Empty.class)
					.bannerMode(Mode.OFF).web(WebApplicationType.NONE)
					.environment(environment);
			builder.application()
					.setListeners(Arrays.asList(new BootstrapApplicationListener(),
							new ConfigFileApplicationListener()));
			capture = builder.run();
			if (environment.getPropertySources().contains(REFRESH_ARGS_PROPERTY_SOURCE)) {
				environment.getPropertySources().remove(REFRESH_ARGS_PROPERTY_SOURCE);
			}
      //使用新加载的属性源替换原属性源。
			MutablePropertySources target = this.context.getEnvironment()
					.getPropertySources();
			String targetName = null;
			for (PropertySource<?> source : environment.getPropertySources()) {
				String name = source.getName();
				if (target.contains(name)) {
					targetName = name;
				}
				if (!this.standardSources.contains(name)) {
					if (target.contains(name)) {
						target.replace(name, source);
					}
					else {
						if (targetName != null) {
							target.addAfter(targetName, source);
						}
						else {
							// targetName was null so we are at the start of the list
							target.addFirst(source);
							targetName = name;
						}
					}
				}
			}
		}
		finally {
       //忽略
		}
		return capture;
	}
###属性源更新后处理
- 通过
changes方法收集发生改变的key集合。 - 通过
publishEvent方法发送EnvironmentChangeEvent 事件 - 调用 RefreshScope.refreshAll 方法: 将refresh scope中的Bean 缓存失效,当再次从refresh scope中获取这个Bean时,发现取不到,就会重新触发一次Bean的初始化过程。
##EnvironmentChangeEvent
EnvironmentChangeEvent 主要触发两个行为:
- 重新绑定上下文中所有使用了
@ConfigurationProperties注解的 Spring Bean。 - 如果
logging.level.*配置发生了改变,重新设置日志级别。
这两段逻辑分别可以在 ConfigurationPropertiesRebinder 和 LoggingRebinder 中看到。
###ConfigurationPropertiesRebinder
ConfigurationPropertiesRebinder 类的监控方法onApplicationEvent 很简单,主要就是遍历每个 Bean,destroyBean和initializeBean每个bean。
需要注意的是: ConfigurationPropertiesRebinder的beans字段 只包含@ConfigurationProperties注解的Bean。因此配置的热更新只会影响 @ConfigurationProperties注解的Bean.
@ManagedOperation
public void rebind() {
  this.errors.clear();
  // this.beans 表示的是包含@ConfigurationProperties注解的Bean。
  for (String name : this.beans.getBeanNames()) {
    rebind(name);
  }
}

@ManagedOperation
public boolean rebind(String name) {
  if (!this.beans.getBeanNames().contains(name)) {
    return false;
  }
  if (this.applicationContext != null) {
    try {
      Object bean = this.applicationContext.getBean(name);
      if (AopUtils.isAopProxy(bean)) {
        bean = ProxyUtils.getTargetObject(bean);
      }
      if (bean != null) {
        this.applicationContext.getAutowireCapableBeanFactory()
          .destroyBean(bean);
        this.applicationContext.getAutowireCapableBeanFactory()
          .initializeBean(bean, name);
        return true;
      }
    }
    catch (RuntimeException e) {
      this.errors.put(name, e);
      throw e;
    }
    catch (Exception e) {
      this.errors.put(name, e);
      throw new IllegalStateException("Cannot rebind to " + name, e);
    }
  }
  return false;
}
###LoggingRebinder
LoggingRebinder 的逻辑很简单,只是调用了 LoggingSystem 的方法重新设置了日志级别.
@Override
public void onApplicationEvent(EnvironmentChangeEvent event) {
  if (this.environment == null) {
    return;
  }
  LoggingSystem system = LoggingSystem.get(LoggingSystem.class.getClassLoader());
  setLogLevels(system, this.environment);
}

protected void setLogLevels(LoggingSystem system, Environment environment) {
  Map<String, String> levels = Binder.get(environment)
    .bind("logging.level", STRING_STRING_MAP)
    .orElseGet(Collections::emptyMap);
  for (Entry<String, String> entry : levels.entrySet()) {
    setLogLevel(system, environment, entry.getKey(), entry.getValue().toString());
  }
}

private void setLogLevel(LoggingSystem system, Environment environment, String name,
                         String level) {
  try {
    if (name.equalsIgnoreCase("root")) {
      name = null;
    }
    level = environment.resolvePlaceholders(level);
    system.setLogLevel(name, LogLevel.valueOf(level.toUpperCase()));
  }
  catch (RuntimeException ex) {
    this.logger.error("Cannot set level: " + level + " for '" + name + "'");
  }
}
##RefreshScope
public void refreshAll() {
  //清空Refresh Scope 中的缓存
  super.destroy();
  this.context.publishEvent(new RefreshScopeRefreshedEvent());
}
RefreshScope 是用来存放 scope 类型为 refresh 类型的 Bean(即: 使用RefreshScope注解标识的Bean)。
当一个 Bean 既不是 singleton 也不是 prototype 时,就会从自定义的 Scope 中去获取 Bean ( Spring 允许自定义 Scope ),然后调用Scope的get方法来获取一个实例。
Spring Cloud 扩展了Scope,从而控制了整个 Bean 的生命周期。当配置需要动态刷新的时候, 调用this.scope.refreshAll()这个方法,就会将整个RefreshScope的缓存清空,完成配置可动态刷新的可能。
其他
需要在配置中心中添加 force-pull 信息
spring:
  cloud:
    config:
      server:
        git:
          # 由于默认将git文件下载到tmp目录,某些os会修改文件,因此需要 强制 pull
          force-pull: true
参考
Spring Cloud 是如何实现热更新的

