【Spring4.0】如何使用JdbcTemplate
一、什么是JdbcTemplate
为了使 JDBC 更加易于使用, Spring 在 JDBC API 上定义了一个抽象层, 以此建立一个 JDBC 存取框架。
作为 Spring JDBC 框架的核心, JDBC 模板的设计目的是为不同类型的 JDBC 操作提供模板方法. 每个模板方法都能控制整个过程, 并允许覆盖过程中的特定任务. 通过这种方式, 可以在尽可能保留灵活性的情况下, 将数据库存取的工作量降到最低.
二、为什么要使用JdbcTemplate
使用JdbcTemplate能够简化我们对JDBC的操作,它是JDBC的一个辅助类(JDBC Template),它封装了JDBC的操作,使用起来非常方便。
三、使用JdbcTemplate的前的准备工作
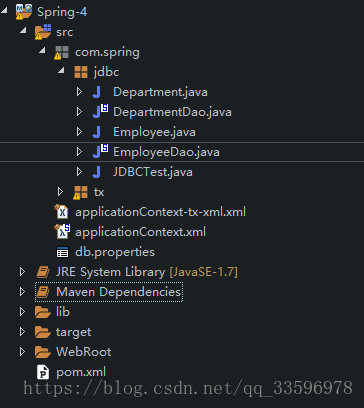
(整个项目的文件位置,tx包可以不创建,这个是讲到事务的时候才会用到)
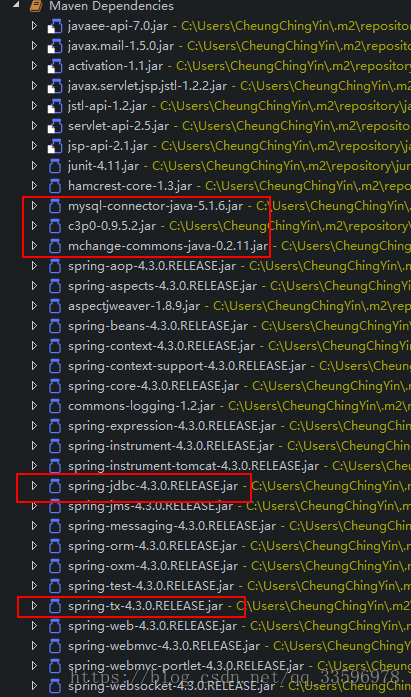
1.导入相关的JAR包
导入spring相关的包,MySQL驱动,C3P0相关的包即可,注意要有下图红框的包,不然可能在写代码的时候不能找到相关的类。
2.在MySQL数据库中创建相关的表
注意!!
下面带有创建整个数据库的脚本文件,只需要把代码在Mysql中执行即可。
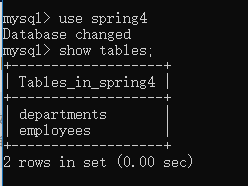
(1)创建一个名为spring4的数据库,数据库中有以下的表
(2)department的表结构
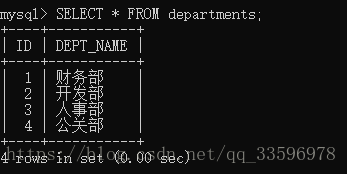
(3)department的表内容
(4)employees的表结构
注意employees表的DEPT_ID的外键是departments表的ID

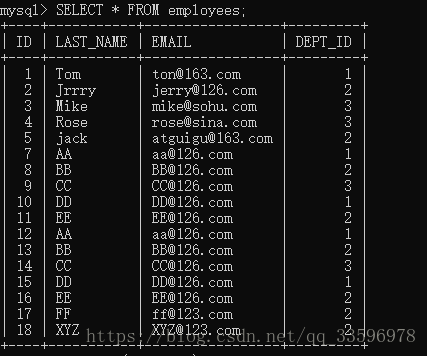
(5)employees的表内容(其实写到第五个id就差不多了)
CREATE DATABASE  IF NOT EXISTS `spring4` /*!40100 DEFAULT CHARACTER SET utf8 */;
USE `spring4`;
-- MySQL dump 10.13  Distrib 5.7.9, for Win64 (x86_64)
--
-- Host: localhost    Database: spring4
-- ------------------------------------------------------
-- Server version	5.7.10-log

/*!40101 SET @OLD_CHARACTER_SET_CLIENT=@@CHARACTER_SET_CLIENT */;
/*!40101 SET @OLD_CHARACTER_SET_RESULTS=@@CHARACTER_SET_RESULTS */;
/*!40101 SET @OLD_COLLATION_CONNECTION=@@COLLATION_CONNECTION */;
/*!40101 SET NAMES utf8 */;
/*!40103 SET @OLD_TIME_ZONE=@@TIME_ZONE */;
/*!40103 SET TIME_ZONE='+00:00' */;
/*!40014 SET @OLD_UNIQUE_CHECKS=@@UNIQUE_CHECKS, UNIQUE_CHECKS=0 */;
/*!40014 SET @OLD_FOREIGN_KEY_CHECKS=@@FOREIGN_KEY_CHECKS, FOREIGN_KEY_CHECKS=0 */;
/*!40101 SET @OLD_SQL_MODE=@@SQL_MODE, SQL_MODE='NO_AUTO_VALUE_ON_ZERO' */;
/*!40111 SET @OLD_SQL_NOTES=@@SQL_NOTES, SQL_NOTES=0 */;

--
-- Table structure for table `departments`
--

DROP TABLE IF EXISTS `departments`;
/*!40101 SET @saved_cs_client     = @@character_set_client */;
/*!40101 SET character_set_client = utf8 */;
CREATE TABLE `departments` (
  `ID` int(11) NOT NULL AUTO_INCREMENT,
  `DEPT_NAME` varchar(45) NOT NULL,
  PRIMARY KEY (`ID`)
) ENGINE=InnoDB AUTO_INCREMENT=5 DEFAULT CHARSET=utf8;
/*!40101 SET character_set_client = @saved_cs_client */;

--
-- Dumping data for table `departments`
--

LOCK TABLES `departments` WRITE;
/*!40000 ALTER TABLE `departments` DISABLE KEYS */;
INSERT INTO `departments` VALUES (1,'财务部'),(2,'开发部'),(3,'人事部'),(4,'公关部');
/*!40000 ALTER TABLE `departments` ENABLE KEYS */;
UNLOCK TABLES;

--
-- Table structure for table `employees`
--

DROP TABLE IF EXISTS `employees`;
/*!40101 SET @saved_cs_client     = @@character_set_client */;
/*!40101 SET character_set_client = utf8 */;
CREATE TABLE `employees` (
  `ID` int(11) NOT NULL AUTO_INCREMENT,
  `LAST_NAME` varchar(45) NOT NULL,
  `EMAIL` varchar(45) NOT NULL,
  `DEPT_ID` int(11) NOT NULL,
  PRIMARY KEY (`ID`),
  KEY `DEPT_ID_idx` (`DEPT_ID`),
  CONSTRAINT `DEPT_ID` FOREIGN KEY (`DEPT_ID`) REFERENCES `departments` (`ID`) ON DELETE NO ACTION ON UPDATE NO ACTION
) ENGINE=InnoDB AUTO_INCREMENT=19 DEFAULT CHARSET=utf8;
/*!40101 SET character_set_client = @saved_cs_client */;

--
-- Dumping data for table `employees`
--

LOCK TABLES `employees` WRITE;
/*!40000 ALTER TABLE `employees` DISABLE KEYS */;
INSERT INTO `employees` VALUES (1,'Tom','[email protected]',1),(2,'Jrrry','[email protected]',2),(3,'Mike','[email protected]',3),(4,'Rose','[email protected]',3),(5,'jack','[email protected]',2),(7,'AA','[email protected]',1),(8,'BB','[email protected]',2),(9,'CC','[email protected]',3),(10,'DD','[email protected]',1),(11,'EE','[email protected]',2),(12,'AA','[email protected]',1),(13,'BB','[email protected]',2),(14,'CC','[email protected]',3),(15,'DD','[email protected]',1),(16,'EE','[email protected]',2),(17,'FF','[email protected]',2),(18,'XYZ','[email protected]',2);
/*!40000 ALTER TABLE `employees` ENABLE KEYS */;
UNLOCK TABLES;
/*!40103 SET TIME_ZONE=@OLD_TIME_ZONE */;

/*!40101 SET SQL_MODE=@OLD_SQL_MODE */;
/*!40014 SET FOREIGN_KEY_CHECKS=@OLD_FOREIGN_KEY_CHECKS */;
/*!40014 SET UNIQUE_CHECKS=@OLD_UNIQUE_CHECKS */;
/*!40101 SET CHARACTER_SET_CLIENT=@OLD_CHARACTER_SET_CLIENT */;
/*!40101 SET CHARACTER_SET_RESULTS=@OLD_CHARACTER_SET_RESULTS */;
/*!40101 SET COLLATION_CONNECTION=@OLD_COLLATION_CONNECTION */;
/*!40111 SET SQL_NOTES=@OLD_SQL_NOTES */;

-- Dump completed on 2018-08-04 11:23:22
四、示例代码
1.在src根目录下新建一个名为db.properties的配置文件
jdbc.user=root
jdbc.password=123456
jdbc.driverClass=com.mysql.jdbc.Driver
jdbc.jdbcUrl=jdbc\:mysql\://localhost\:3306/spring
jdbc.initPoolSize=5
jdbc.maxPoolSize=10
2.在src目录下创建applicationContext.xml,并配置C3P0连接数据库
	<context:property-placeholder location="classpath:db.properties" />


	<bean id="dataSource" class="com.mchange.v2.c3p0.ComboPooledDataSource">
		<property name="user" value="${jdbc.user}">property>
		<property name="password" value="${jdbc.password}">property>
		<property name="jdbcUrl" value="${jdbc.jdbcUrl}">property>
		<property name="driverClass" value="${jdbc.driverClass}">property>
		<property name="initialPoolSize" value="${jdbc.initPoolSize}">property>
		<property name="maxPoolSize" value="${jdbc.maxPoolSize}">property>
	bean>
3.创建一个名为com.spring.jdbc的包
(1)创建实体类Department
package com.spring.jdbc;

public class Department {

	private Integer id;
	private String name;

	public Integer getId() {
		return id;
	}

	public void setId(Integer id) {
		this.id = id;
	}

	public String getName() {
		return name;
	}

	public void setName(String name) {
		this.name = name;
	}

	@Override
	public String toString() {
		return "Department [id=" + id + ", name=" + name + "]";
	}

}
(2)创建实体类Employee
package com.spring.jdbc;

public class Employee {

	private Integer id;
	private String lastName;
	private String email;
	private Integer deptId;

	public Integer getId() {
		return id;
	}

	public void setId(Integer id) {
		this.id = id;
	}

	public String getLastName() {
		return lastName;
	}

	public void setLastName(String lastName) {
		this.lastName = lastName;
	}

	public String getEmail() {
		return email;
	}

	public void setEmail(String email) {
		this.email = email;
	}

	public Integer getDeptId() {
		return deptId;
	}

	public void setDeptId(Integer deptId) {
		this.deptId = deptId;
	}

	@Override
	public String toString() {
		return "Employee [id=" + id + ", lastName=" + lastName + ", email=" + email + ", deptId=" + deptId + "]";
	}

}
(3)创建一个名为JDBCTest的测试类
以下为这个类的全部代码,请配合每个测试方法的注释使用
package com.spring.jdbc;

import java.sql.SQLException;
import java.util.ArrayList;
import java.util.HashMap;
import java.util.List;
import java.util.Map;

import javax.sql.DataSource;

import org.junit.Test;
import org.springframework.context.ApplicationContext;
import org.springframework.context.support.ClassPathXmlApplicationContext;
import org.springframework.jdbc.core.BeanPropertyRowMapper;
import org.springframework.jdbc.core.JdbcTemplate;
import org.springframework.jdbc.core.RowMapper;
import org.springframework.jdbc.core.namedparam.BeanPropertySqlParameterSource;
import org.springframework.jdbc.core.namedparam.NamedParameterJdbcTemplate;
import org.springframework.jdbc.core.namedparam.SqlParameterSource;

public class JDBCTest {

	private ApplicationContext ctx = null;
	private JdbcTemplate jdbcTemplate;
	private EmployeeDao employeeDao;
	private DepartmentDao departmentDao;
	private NamedParameterJdbcTemplate namedParameterJdbcTemplate;

	{
		ctx = new ClassPathXmlApplicationContext("applicationContext.xml");
		jdbcTemplate = (JdbcTemplate) ctx.getBean("jdbcTemplate");
		employeeDao = ctx.getBean(EmployeeDao.class);
		departmentDao = ctx.getBean(DepartmentDao.class);
		namedParameterJdbcTemplate = ctx.getBean(NamedParameterJdbcTemplate.class);
	}

	/*
	 * 测试c3p0连接数据库是否成功
	 */
	@Test
	public void testDataSource() throws SQLException {
		DataSource dataSource = ctx.getBean(DataSource.class);
		System.out.println(dataSource.getConnection());
	}

	/*
	 * 执行update,insert,delete操作
	 */
	@Test
	public void testUpdate() {
		String sql = "UPDATE employees SET LAST_NAME=? WHERE ID=?";
		jdbcTemplate.update(sql, "jack", 5);
	}

	/*
	 * 执行批量更新:批量的update,insert,delete
	 * 最后一个参数是Object[]的list类型:因为修改一条记录需要一个Object的数组,多条则需要多条数组
	 */
	@Test
	public void testBatchUpdate() {
		String sql = "INSERT INTO employees(LAST_NAME,EMAIL,DEPT_ID) VALUES(?,?,?)";
		List<Object[]> batchArgs = new ArrayList<Object[]>();
		batchArgs.add(new Object[] { "AA", "[email protected]", 1 });
		batchArgs.add(new Object[] { "BB", "[email protected]", 2 });
		batchArgs.add(new Object[] { "CC", "[email protected]", 3 });
		batchArgs.add(new Object[] { "DD", "[email protected]", 1 });
		batchArgs.add(new Object[] { "EE", "[email protected]", 2 });
		jdbcTemplate.batchUpdate(sql, batchArgs);
	}

	/*
	 * 从数据库中获取一条记录,实际获得一个对象 不是使用queryForObject(String sql, Class
	 * requiredType, Object... args) throws DataAccessException方法
	 * 而需要调用queryForObject(String sql, RowMapper rowMapper, Object...
	 * args) throws DataAccessException
	 * 1.其中RowMapper指定如何去映射结果及的行,常用的实现类为BeanPropertyRowMapper
	 * 2.使用SQL中列的别名完成列名和类属性名映射,例如LAST_NAME lastName
	 * 3.不支持级联属性,JdbcTemplate到底是一个jdbc的小工具而不是ORM框架
	 */
	@Test
	public void testQueryForObject() {
		String sql = "SELECT ID id,LAST_NAME lastName,EMAIL email FROM employees WHERE ID=?";
		org.springframework.jdbc.core.RowMapper<Employee> rowMapper = new BeanPropertyRowMapper<Employee>(
				Employee.class);
		Employee employee = jdbcTemplate.queryForObject(sql, rowMapper, 1);
		System.out.println(employee);
	}

	/*
	 * 查到实体类的集合 注意调用的不是queryForList方法
	 */
	@Test
	public void testQueryForList() {
		String sql = "SELECT ID id,LAST_NAME lastName,EMAIL email FROM employees WHERE ID > ?";
		RowMapper<Employee> rowMapper = new BeanPropertyRowMapper<Employee>(Employee.class);
		List<Employee> employees = jdbcTemplate.query(sql, rowMapper, 5);

		System.out.println(employees);
	}

	/*
	 * 获取单个列的值,或者做统计查询 使用queryForObject(String sql, Class requiredType)
	 * throws DataAccessException
	 */
	@Test
	public void testQueryForObject2() {
		String sql = "SELECT count(ID) FROM employees";
		long count = jdbcTemplate.queryForObject(sql, Long.class);
		System.out.println(count);
	}

	@Test
	public void testEmployeeDao() {
		System.out.println(employeeDao.get(1));
	}

	@Test
	public void testDepartmentDao() {
		System.out.println(departmentDao.get(1));
	}

	/*
	 * 可以位参数起名字 1.好处:如有多个参数,则不用去对应位置,直接对应参数名,便于维护 2.坏处:较为麻烦
	 */
	@Test
	public void testNamedParameterJdbcTemplate() {
		String sql = "INSERT INTO employees(last_name,email,dept_id) VALUES(:ln,:email,:dept_id)";
		Map<String, Object> paramMap = new HashMap<String, Object>();
		paramMap.put("ln", "FF");
		paramMap.put("email", "[email protected]");
		paramMap.put("dept_id", "2");
		namedParameterJdbcTemplate.update(sql, paramMap);
	}

	/*
	 * 使用具名参数的时候,可以使用update(String sql, SqlParameterSource paramSource) 方法进行更新操作
	 * 1.sql语句中的参数名和类的属性要一致
	 * 2.使用SqlParameterSource的BeanPropertySqlParameterSource实现类作为参数
	 */
	@Test
	public void testNamedParameterJdbcTemplate2() {
		String sql = "INSERT INTO employees(last_name,email,dept_id) VALUES(:lastName,:email,:deptId)";
		Employee employee = new Employee();
		employee.setLastName("XYZ");
		employee.setEmail("[email protected]");
		employee.setDeptId(2);

		SqlParameterSource parameterSource = new BeanPropertySqlParameterSource(employee);
		namedParameterJdbcTemplate.update(sql, parameterSource);
	}

}
五、简化 JDBC 模板查询
- 每次使用都创建一个 JdbcTemplate 的新实例, 这种做法效率很低下。
- JdbcTemplate 类被设计成为线程安全的, 所以可以再 IOC 容器中声明它的单个实例, 并将这个实例注入到所有的 DAO 实例中。
- JdbcTemplate 也利用了 Java 1.5 的特定(自动装箱, 泛型, 可变长度等)来简化开发
###(1)新建一个Dao实例EmployeeDao
package com.spring.jdbc;

import org.springframework.beans.factory.annotation.Autowired;
import org.springframework.jdbc.core.BeanPropertyRowMapper;
import org.springframework.jdbc.core.JdbcTemplate;
import org.springframework.stereotype.Repository;

@Repository
public class EmployeeDao {

	@Autowired
	private JdbcTemplate jdbcTemplate;

	public Employee get(Integer id) {
		String sql = "SELECT ID id,LAST_NAME lastName,EMAIL email FROM employees WHERE ID=?";
		org.springframework.jdbc.core.RowMapper<Employee> rowMapper = new BeanPropertyRowMapper<Employee>(
				Employee.class);
		Employee employee = jdbcTemplate.queryForObject(sql, rowMapper, id);
		return employee;
	}
}
(2)在测试类JDBCTest中建立
private EmployeeDao employeeDao;
{
		employeeDao = ctx.getBean(EmployeeDao.class);
}
(3)直接调用EmployeeDao的get()方法
@Test
	public void testEmployeeDao() {
		System.out.println(employeeDao.get(1));
	}
六、使用辅助类JdbcDaoSupport来做查询(不推荐)
(1)新建Dao实例DepartmentDao
package com.spring.jdbc;

import javax.sql.DataSource;

import org.springframework.beans.factory.annotation.Autowired;
import org.springframework.jdbc.core.BeanPropertyRowMapper;
import org.springframework.jdbc.core.RowMapper;
import org.springframework.jdbc.core.support.JdbcDaoSupport;
import org.springframework.stereotype.Repository;

/*
 * 不推荐使用JdbcDaoSupport,而推荐使用JdbcTempate作为Dao的成员变量
 */
@Repository
public class DepartmentDao extends JdbcDaoSupport {

	@Autowired
	public void setDataSource2(DataSource dataSource){
		setDataSource(dataSource);
	}

	public Department get(Integer id){
		String sql = "SELECT id,dept_name name FROM departments WHERE id = ?";
		RowMapper<Department> rowMapper = new BeanPropertyRowMapper<Department>(Department.class);
		return getJdbcTemplate().queryForObject(sql, rowMapper,id);
	}
}
(2)在测试类JDBCTest中创建DepartmentDao
private DepartmentDao DepartmentDao;
{
		DepartmentDao = ctx.getBean(DepartmentDao.class);
}
(3)直接调用DepartmentDao的get()方法
@Test
	public void testDepartmentDao() {
		System.out.println(departmentDao.get(1));
	}
七、在 JDBC 模板中使用具名参数(named parameter)
- 在经典的 JDBC 用法中, SQL 参数是用占位符 ? 表示,并且受到位置的限制. 定位参数的问题在于, 一旦参数的顺序发生变化, 就必须改变参数绑定.。
- 在 Spring JDBC 框架中, 绑定 SQL 参数的另一种选择是使用具名参数(named parameter)。
- 具名参数: SQL 按名称(以冒号开头)而不是按位置进行指定. 具名参数更易于维护, 也提升了可读性. 具名参数由框架类在运行时用占位符取代。
- 具名参数只在 NamedParameterJdbcTemplate 中得到支持。
(1)在applicationContext.xml中配置namedParameterJdbcTemplate
	<bean id="namedParameterJdbcTemplate"
		class="org.springframework.jdbc.core.namedparam.NamedParameterJdbcTemplate">
		<constructor-arg ref="dataSource">constructor-arg>
	bean>
(2)在测试类JDBCTest中声明
private NamedParameterJdbcTemplate namedParameterJdbcTemplate;
	{
		namedParameterJdbcTemplate = ctx.getBean(NamedParameterJdbcTemplate.class);
	}
(3)在测试类JDBCTest中测试
/*
	 * 可以位参数起名字 1.好处:如有多个参数,则不用去对应位置,直接对应参数名,便于维护 2.坏处:较为麻烦
	 */
	@Test
	public void testNamedParameterJdbcTemplate() {
		String sql = "INSERT INTO employees(last_name,email,dept_id) VALUES(:ln,:email,:dept_id)";
		Map<String, Object> paramMap = new HashMap<String, Object>();
		paramMap.put("ln", "FF");
		paramMap.put("email", "[email protected]");
		paramMap.put("dept_id", "2");
		namedParameterJdbcTemplate.update(sql, paramMap);
	}

	/*
	 * 使用具名参数的时候,可以使用update(String sql, SqlParameterSource paramSource) 方法进行更新操作
	 * 1.sql语句中的参数名和类的属性要一致
	 * 2.使用SqlParameterSource的BeanPropertySqlParameterSource实现类作为参数
	 */
	@Test
	public void testNamedParameterJdbcTemplate2() {
		String sql = "INSERT INTO employees(last_name,email,dept_id) VALUES(:lastName,:email,:deptId)";
		Employee employee = new Employee();
		employee.setLastName("XYZ");
		employee.setEmail("[email protected]");
		employee.setDeptId(2);

		SqlParameterSource parameterSource = new BeanPropertySqlParameterSource(employee);
		namedParameterJdbcTemplate.update(sql, parameterSource);
	}
