Github上利用win10使用TensorFlow(GPU)上如何去训练一个目标多分类检测的例子
Github上利用win10使用TensorFlow(GPU)上如何去训练一个目标多分类检测的例子
我们从github找到一个用fast-rcnn训练模型用于目标物体检测的例子,文中是实现检测扑克牌的例子,根据作者提供的方法我们可以用来训练自己的图片标签。文中作者给出了非常详细的步骤以及介绍,但是在自己运行中还是会遇到一些小bug,下面是我的运行和配置步骤,和大家一起讨论分享。
github:
https://github.com/EdjeElectronics/TensorFlow-Object-Detection-API-Tutorial-Train-Multiple-Objects-Windows-10
实现图中扑克牌识别效果。
需要经过一下几步:
1.安装TensorFlow-GPU**
2.创建目标检测目录和Anaconda虚拟环境
3.图片采集与标注
4.生成训练数据
5.创建标签映射和训练配置
6.训练
7.导出推理图
8.测试和使用新训练的目标检测分类**
作者提供了训练一个“皮诺奇牌库”所需的所有文件,它能够精确地检测九、十、Q、K、A。并描述如何用您自己的文件替换这些文件,以训练检测分类器。它还具有Python脚本,用于在图像、视频或网络摄像头的输入下测试分类器。
Steps
1. tensorflow-GPU安装
官网:https://www.tensorflow.org/install/install_windows

查看tensorflow在windows下的安装步骤和要求,我们看到需要装CUDA9.0和cuDNN,所以先安装CUDA9.0和cuDNN。
注意: cuda官网默认是9.2版本的,我们要找到9.0版本下载,避免版本高会遇到很多问题!
1)安装cuda
https://developer.nvidia.com/cuda-90-download-archive?target_os=Windows&target_arch=x86_64&target_version=10&target_type=exelocal
下载界面:

下载完成后双击运行:

选择ok,等进度条走完进入安装界面。

安装加载界面:

一路傻瓜试安装,
安装选项时选择【精简(E)】
然后安装完成后会在C:Program Files文件夹下生成
![]()
2)cudnn配置
对于tensorflow而言,真正实现加速的是cudnn,然后cudnn调用的是cuda显卡驱动。所以最后我们要配置cudnn这个模块。
cuDNN的全称为NVIDIA CUDA® Deep Neural Network library,是NVIDIA专门针对深度神经网络(Deep Neural Networks)中的基础操作而设计基于GPU的加速库。cuDNN为深度神经网络中的标准流程提供了高度优化的实现方式,例如convolution、pooling、normalization以及activation layers的前向以及后向过程。
①下载cudnn:https://developer.nvidia.com/cudnn 压缩包
建议把压缩包重命名为.tgz格式。解压后的文件夹名为cuda,其中包含三个文件夹:一个为include,另一个为lib,还有一个是bin,然后复制到你的CUDA路径下面,如下。

运行检验:
import tensorflow as tf
import numpy as np
hello=tf.constant(‘hhh’)
sess=tf.Session()
print (sess.run(hello))
如果检验运行没有报错就安装成功!过程中可能cuda会报错,那就卸掉重新安装一遍就会好。
3)继续安装tensorflow
还是回到官网安装步骤:
https://www.tensorflow.org/install/install_windows

检验tensorflow安装:
import tensorflow as tf
import numpy as np hello=tf.constant(‘hhh’)
print (sess.run(hello))
注:
1.在安装的过程中,总会程序默认按照我的anaconda2跑,总是报错。我通过删除ancaconda2的环境变量,只留anaconda3的环境变量依然不奏效,顾卸载anaconda2之后就可以正常运行了。
2.怎么查看自己的tensorflow版本?
![]()
3.如何查看自己用的是cpu还是gpu?
在Python环境中输入:
import numpy
import tensorflow as tf
a = tf.constant([1.0, 2.0, 3.0, 4.0, 5.0, 6.0], shape=[2, 3], name=’a’)
b = tf.constant([1.0, 2.0, 3.0, 4.0, 5.0, 6.0], shape=[3, 2], name=’b’)
c = tf.matmul(a, b)
sess = tf.Session(config=tf.ConfigProto(log_device_placement=True))
print(sess.run(c))
之后就会出现详细的信息:

tensorflow安装好了~
2.创建目标检测目录和Anaconda虚拟环境
2.a Download TensorFlow Object Detection API repository from GitHub
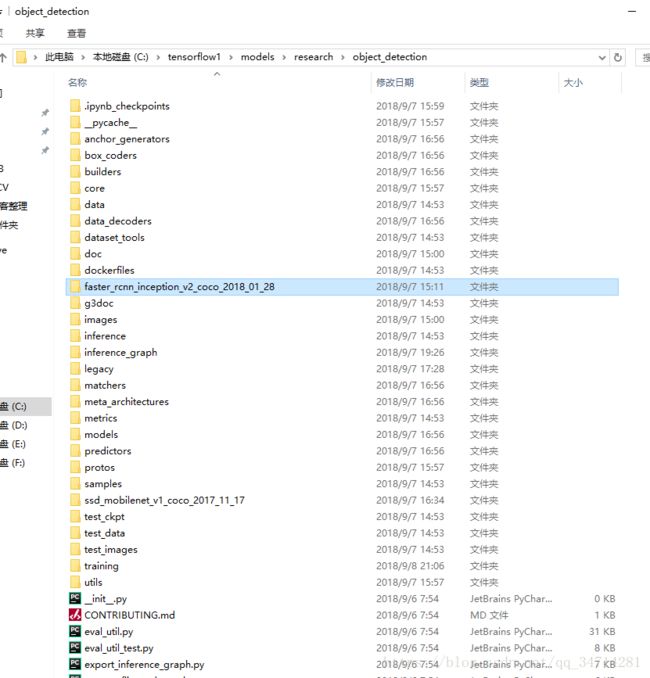
在C盘创建名为tensorflow1的文件夹。
从github上下载 https://github.com/tensorflow/models 目标检测完整库。
解压之后重命名为“models”
2.b Download the Faster-RCNN-Inception-V2-COCO model from TensorFlow’s model zoo

本文选择Faster-RCNN-Inception-V2 模型,下载地址:http://download.tensorflow.org/models/object_detection/faster_rcnn_inception_v2_coco_2018_01_28.tar.gz
下载后解压到同名文件夹下放到
C:\tensorflow1\models\research\object_detection路径下:

2c.从github上下载教程存储库
放到 C:\tensorflow1\models\research\object_detection directory目录下

这个存储库包含图像、注释数据、.csv文件和训练一个“Pinochle Deck”扑克检测器所需的TFRecords。你可以使用这些图像和数据来练习制作你自己的PioCoCK卡探测器。它还包含用于生成训练数据的Python脚本。它有脚本来测试图像、视频或网络摄像机进给中的对象检测分类器。
TFRecord files (train.record and test.record) as described in Step 4.
其中教程中给了一个连接
https://www.dropbox.com/s/va9ob6wcucusse1/inference_graph.zip?dl=0 打不开,可以在步骤2a-2f中的所有设置指令完成之后对其进行测试。
★如果想对自己的数据集进行目标检测需要删除指定文件夹下的文件:
- All files in \object_detection\images\train and \object_detection\images\test
- The “test_labels.csv” and “train_labels.csv” files in \object_detection\images
- All files in \object_detection\training
All files in \object_detection\inference_graph
2d. Set up new Anaconda virtual environment
为tensorflow1创建虚拟环境。C:> conda create -n tensorflow1 pip python=3.5
Then, activate the environment by issuing:
C:> activate tensorflow1
Install tensorflow-gpu in this environment by issuing:
(tensorflow1) C:> pip install –ignore-installed –upgrade tensorflow-gpu
Install the other necessary packages by issuing the following commands:
(tensorflow1) C:> conda install -c anaconda protobuf
(tensorflow1) C:> pip install pillow
(tensorflow1) C:> pip install lxml
(tensorflow1) C:> pip install Cython
(tensorflow1) C:> pip install jupyter
(tensorflow1) C:> pip install matplotlib
(tensorflow1) C:> pip install pandas
(tensorflow1) C:> pip install opencv-python
(注意:TensorFlow不需要“pandas”和“opencv-python”包,但是在Python脚本中使用它们来生成TFRecords并使用图像、视频和webcam提要)。
2e. Configure PYTHONPATH environment variable
A PYTHONPATH variable must be created that points to the \models, \models\research, and \models\research\slim directories. Do this by issuing the following commands (from any directory):
(tensorflow1) C:> set PYTHONPATH=C:\tensorflow1\models;C:\tensorflow1\models\research;C:\tensorflow1\models\research\slim
2f. Compile Protobufs and run setup.py
接下来,编译ProtoBuf文件,ProtoBuf使用这些文件来配置模型和训练参数。不幸的是,张贴在TensorFlow的对象检测API安装页面上的简短的protoc编译命令在Windows上不起作用。Every .proto file in the \object_detection\protos directory must be called out individually by the command.
在Anaconda命令提示符中,将目录更改为\models\research 目录,并将以下命令复制并粘贴到命令行中,然后按Enter:
protoc –python_out=. .\object_detection\protos\anchor_generator.proto .\object_detection\protos\argmax_matcher.proto .\object_detection\protos\bipartite_matcher.proto .\object_detection\protos\box_coder.proto .\object_detection\protos\box_predictor.proto .\object_detection\protos\eval.proto .\object_detection\protos\faster_rcnn.proto .\object_detection\protos\faster_rcnn_box_coder.proto .\object_detection\protos\grid_anchor_generator.proto .\object_detection\protos\hyperparams.proto .\object_detection\protos\image_resizer.proto .\object_detection\protos\input_reader.proto .\object_detection\protos\losses.proto .\object_detection\protos\matcher.proto .\object_detection\protos\mean_stddev_box_coder.proto .\object_detection\protos\model.proto .\object_detection\protos\optimizer.proto .\object_detection\protos\pipeline.proto .\object_detection\protos\post_processing.proto .\object_detection\protos\preprocessor.proto .\object_detection\protos\region_similarity_calculator.proto .\object_detection\protos\square_box_coder.proto .\object_detection\protos\ssd.proto .\object_detection\protos\ssd_anchor_generator.proto .\object_detection\protos\string_int_label_map.proto .\object_detection\protos\train.proto .\object_detection\protos\keypoint_box_coder.proto .\object_detection\protos\multiscale_anchor_generator.proto .\object_detection\protos\graph_rewriter.proto
This creates a name_pb2.py file from every name.proto file in the \object_detection\protos folder.
Finally, run the following commands from the C:\tensorflow1\models\research directory:
(tensorflow1) C:\tensorflow1\models\research> python setup.py build
(tensorflow1) C:\tensorflow1\models\research> python setup.py install
2g. Test TensorFlow setup to verify it works
The TensorFlow Object Detection API is now all set up to use pre-trained models for object detection, or to train a new one. You can test it out and verify your installation is working by launching the object_detection_tutorial.ipynb script with Jupyter. From the \object_detection directory, issue this command:
(tensorflow1) C:\tensorflow1\models\research\object_detection> jupyter notebook object_detection_tutorial.ipynb
3.采集图片以及给图片标注
Make sure the images aren’t too large. They should be less than 200KB each, and their resolution shouldn’t be more than 720x1280. The larger the images are, the longer it will take to train the classifier. You can use the resizer.py script in this repository to reduce the size of the images.
3a. Gather Pictures
首先采集要识别的图片,然后缩放至200kb以内。
3b. Label Pictures
然后给图片打标签,分成测试和训练数据集。
(tensorflow1) C:\tensorflow1\models\research\object_detection> python sizeChecker.py –move
4 生成训练数据
到object_detection路径下运行
(tensorflow1) C:\tensorflow1\models\research\object_detection> python xml_to_csv.py
生成train_labels.csv和 test_labels.csv 两个csv文件。
Next, open the generate_tfrecord.py file in a text editor. Replace the label map starting at line 31 with your own label map, where each object is assigned an ID number. This same number assignment will be used when configuring the labelmap.pbtxt file in Step 5b.
修改generate_tfrecord.py文件成你需要的样子:
def class_text_to_int(row_label):
if row_label == ‘Fan’:
return 1
elif row_label == ‘YellowMouse’:
return 2
elif row_label == ‘RedMouse’:
return 3
else:
return None
Then, generate the TFRecord files by issuing these commands from the \object_detection folder:
python generate_tfrecord.py –csv_input=images\train_labels.csv –image_dir=images\train –output_path=train.record
python generate_tfrecord.py –csv_input=images\test_labels.csv –image_dir=images\test –output_path=test.record
5. Create Label Map and Configure Training
5a. Label map
to create a new file and save it as labelmap.pbtxt in the
C:\tensorflow1\models\research\object_detection\training folder. 内容如下:
item {
id: 1
name: ‘Fan’
}
item {
id: 2
name: ‘YellowMouse’
}
item {
id: 3
name: ‘RedMouse’
}
5b. Configure training
Navigate to C:\tensorflow1\models\research\object_detection\samples\configs and copy the faster_rcnn_inception_v2_pets.config file into the \object_detection\training directory. Then, open the file with a text editor.
运行:
python train.py –logtostderr –train_dir=training/ –pipeline_config_path=training/faster_rcnn_inception_v2_pets.config
Line 9. Change num_classes to the number of different objects you want the classifier to detect. For the above basketball, shirt, and shoe detector, it would be num_classes : 3 .
Line 110. Change fine_tune_checkpoint to:
fine_tune_checkpoint : “C:/tensorflow1/models/research/object_detection/faster_rcnn_inception_v2_coco_2018_01_28/model.ckpt”
Lines 126 and 128. In the train_input_reader section, change input_path and label_map_path to:
input_path : “C:/tensorflow1/models/research/object_detection/train.record”
label_map_path: “C:/tensorflow1/models/research/object_detection/training/labelmap.pbtxt”
Line 132. Change num_examples to the number of images you have in the \images\test directory.
Lines 140 and 142. In the eval_input_reader section, change input_path and label_map_path to:
input_path : “C:/tensorflow1/models/research/object_detection/test.record”
label_map_path: “C:/tensorflow1/models/research/object_detection/training/labelmap.pbtxt”
Save the file after the changes have been made. That’s it! The training job is all configured and ready to go!
6.开始训练
在 \object_detection 目录下运行:
python train.py –logtostderr –train_dir=training/ –pipeline_config_path=training/faster_rcnn_inception_v2_pets.config

现在就开始训练了!
开始的时候loss在3.0,会快速下降到0.8,然后等它迭代大约40000步时候,大概两小时(速度看电脑的CPU/GPU配置)
在这个时候你可以另外打开一个Anaconda prompt 切换tensorflow1环境,然后运行:
(tensorflow1) C:\tensorflow1\models\research\object_detection>tensorboard –logdir=training
命令窗口会出现一个网址,复制网址就会出现一个你正在训练的动态loss曲线。
如下图:
7. 导出图形接口
Now that training is complete, the last step is to generate the frozen inference graph (.pb file). From the \object_detection folder, issue the following command, where “XXXX” in “model.ckpt-XXXX” should be replaced with the highest-numbered .ckpt file in the training folder:
python export_inference_graph.py –input_type image_tensor –pipeline_config_path training/faster_rcnn_inception_v2_pets.config –trained_checkpoint_prefix training/model.ckpt-XXXX –output_directory inference_graph
▲注意:把里面的XXXX替换成你的 \object_detection 目录下生成最大编号的数字,例如我的会换成4574,这里容易被忽略~

This creates a frozen_inference_graph.pb file in the \object_detection\inference_graph folder. The .pb file contains the object detection classifier.
8.使用你最新训练的目标检测分类
从C:\tensorflow1\models\research\object_detection路径下作者已经写好三个脚本用于测试:

切换到该路径下直接运行:
python Object_detection_image.py
之后下面是我的测试结果:
下面写几个容易忽略的点:
- 首先是环境,检查自己的tensorflow-gpu以及cuda是否安好,环境变量是否配置好。
- 然后是注意切换目录,在指定的目录下运行,观察每一步运行出来的结果,以及生成的文件。
- 然后是修改文件里面的内容,对应你要训练测试的数据名称和数量。注意单双引号以及中文的冒号 还有generate_tfrecord.py里面最后一句是 else:return None,不是else : None
- 注意把第7步里面的XXXX替换成你训练生成文件的最大数字。
- 如果需要训练其他数据集就按照步骤2里面的★开始删除原来的训练数据以及模型生成文件。重新再训练就可以了。
- 文中作者的程序包里面自带了所有的运行程序和脚本,以及图片和标签素材,可以直接使用训练看效果。
- 本文中带▲的地方也是需要注意容易出错的地方。


