【Jena使用手册】用Python访问Apache Jena数据库 利用Fuseki搭建HTTP访问服务器
在上一篇博文中我们已经探讨了如何通过Jena的命令行工具构建TDB数据库,并导入RDF数据。
本文讨论通过Fuseki构建基于HTTP的RDF查询、修改框架,最终可以通过Python构建SPARQL查询,访问RDF Triple Store获取结果。
1、运行Fuseki
首先下载Fuseki,下载地址,解压。
我们暂且将上一篇文章中构建的Triple Store文件夹db/放入Fuseki所在文件夹。
我们可以通过Fuseki Server脚本运行这个服务,具体的指令可以是以下几种:
fuseki-server --mem  /DatasetPathName

fuseki-server --file=FILE /DatasetPathName

fuseki-server --loc=DB /DatasetPathName

fuseki-server --config=ConfigFile
--port=PORT是指定端口的指令,默认3030;
/DatasetPathName是指定数据库的名字;
官网有下面的一段说明,可以参考:
--mem
Create an empty, in-memory (non-persistent) dataset.
--file=FILE
Create an empty, in-memory (non-persistent) dataset, then load FILE into it.
--loc=DIR
Use an existing TDB database. Create an empty one if it does not exist.
--desc=assemblerFile
Construct a dataset based on the general assembler description.
--config=ConfigFile
Construct one or more service endpoints based on the configuration description.
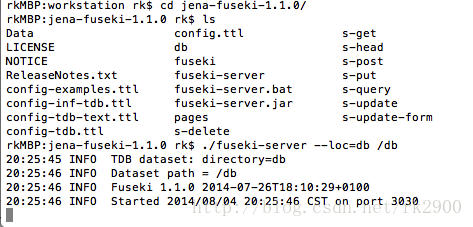
我们这边已经有了导入过数据的TDB数据库,这样我们就使用下面这行命令:
./fuseki-server --loc=db /db这里的--loc参数的值可以是d:\data\dbpedia\3.0\db,而最后一个参数是HTTP接口的对应访问路径,例如通过localhost:3030/db/query进行SPARQL查询。
这里要注意的是最后一个参数/db前面的“/”不能遗漏,否则启动失败。
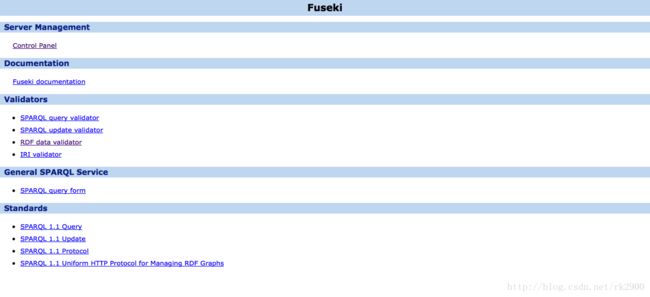
此时打开浏览器访问:localhost/3030,会看到如下界面:
在这个网页端接口中,能够通过GUI进行SPARQL查询、更新等。
查询的网址:localhost:3030/db/sparql
如果要使Fuseki服务器支持多个不同的datasets同时能够被查询,那么需要使用config文件。
使用命令:
D:\jena-fuseki-1.1.1>fuseki-server.bat --config=config-multiTDB.ttl配置多个datasets的config文件如下:config-multiTDB.ttl
# Licensed under the terms of http://www.apache.org/licenses/LICENSE-2.0

## Example of a TDB dataset published using Fuseki: persistent storage.

@prefix :        <#> .
@prefix fuseki:   .
@prefix rdf:      .
@prefix rdfs:     .
@prefix tdb:      .
@prefix ja:       .

[] rdf:type fuseki:Server ;
   # Timeout - server-wide default: milliseconds.
   # Format 1: "1000" -- 1 second timeout
   # Format 2: "10000,60000" -- 10s timeout to first result, then 60s timeout to for rest of query.
   # See java doc for ARQ.queryTimeout
   # ja:context [ ja:cxtName "arq:queryTimeout" ;  ja:cxtValue "10000" ] ;
   # ja:loadClass "your.code.Class" ;

   fuseki:services (
     <#dbp30>
	 <#dbp37>
	 <#dbp39>
	 <#yago2s>
   ) .

# TDB
[] ja:loadClass "com.hp.hpl.jena.tdb.TDB" .
tdb:DatasetTDB  rdfs:subClassOf  ja:RDFDataset .
tdb:GraphTDB    rdfs:subClassOf  ja:Model .

## ---------------------------------------------------------------
## Read-only TDB dataset (only read services enabled).

<#dbp30> rdf:type fuseki:Service ;
    rdfs:label                      "DBpedia3.0" ;
    fuseki:name                     "dbp30" ;
    fuseki:serviceQuery             "sparql" ;
    fuseki:dataset           <#dbpedia_30> ;
    .

<#dbpedia_30> rdf:type      tdb:DatasetTDB ;
    tdb:location "D:\\kren\\data\\dbpedia\\3.0\\db" ;
    ##	tdb:unionDefaultGraph true ;
    .

## ---------------------------------------------------------------
## Read-only TDB dataset (only read services enabled).

<#dbp37> rdf:type fuseki:Service ;
    rdfs:label                      "DBpedia3.7" ;
    fuseki:name                     "dbp37" ;
    fuseki:serviceQuery             "sparql" ;
    fuseki:dataset           <#dbpedia_37> ;
    .

<#dbpedia_37> rdf:type      tdb:DatasetTDB ;
    tdb:location "D:\\kren\\data\\dbpedia\\3.7\\db" ;
    ##	tdb:unionDefaultGraph true ;
    .

## ---------------------------------------------------------------
## Read-only TDB dataset (only read services enabled).

<#dbp39> rdf:type fuseki:Service ;
    rdfs:label                      "DBpedia3.9" ;
    fuseki:name                     "dbp39" ;
    fuseki:serviceQuery             "sparql" ;
    fuseki:dataset           <#dbpedia_39> ;
    .

<#dbpedia_39> rdf:type      tdb:DatasetTDB ;
    tdb:location "D:\\kren\\data\\dbpedia\\3.9\\db" ;
    ##	tdb:unionDefaultGraph true ;
    .

## ---------------------------------------------------------------
## Read-only TDB dataset (only read services enabled).

<#yago2s> rdf:type fuseki:Service ;
    rdfs:label                      "YAGO 2s" ;
    fuseki:name                     "yago2s" ;
    fuseki:serviceQuery             "sparql" ;
    fuseki:dataset           <#yagodb2s> ;
    .

<#yagodb2s> rdf:type      tdb:DatasetTDB ;
    tdb:location "D:\\kren\\data\\yago\\2s\\db" ;
    ##	tdb:unionDefaultGraph true ;
    .
在启动后我们能够在Fuseki的服务器panel中看到多个datasets的列表,同时能够支持多个datasets同时被查询、访问。
如有in-memory或者从文件形式数据库启动的需求,参考官方文档:http://jena.apache.org/documentation/serving_data/index.html#fuseki-configuration-file
2、Python进行SPARQL查询
在Python中,我们使用一个包:SPARQLWrapper,一个Python下面的SPARQL查询终端,下载地址在这里。
在主页上有一段测试代码,我们略微做了一些修改:
from SPARQLWrapper import SPARQLWrapper, JSON

# sparql = SPARQLWrapper("http://dbpedia.org/sparql")
sparql = SPARQLWrapper("http://localhost:3030/db/query")
sparql.setQuery("""
    PREFIX rdfs:
    SELECT ?s
    WHERE { ?s ?p ?o .}
    LIMIT 3
""")
sparql.setReturnFormat(JSON)
results = sparql.query().convert()

for result in results["results"]["bindings"]:
    print(result["s"]["value"])
通过命令行运行Python解释器解析脚本获得输出结果如下:
通过以上结果我们可以发现已经成功获得查询结果。而代码中“http://localhost:3030/db/query”是Fuseki HTTP server中我们的数据库/db的查询接口。
其它接口罗列如下:
SPARQL query: http://localhost:3030/db/query
SPARQL update: http://localhost:3030/db/update
SPARQL HTTP update: http://localhost:3030/db/data
Fuseki相关文档:http://jena.apache.org/documentation/serving_data/#running-a-fuseki-server
SPARQLWrapper相关文档:http://rdflib.github.io/sparqlwrapper/


