Espresso测试框架
Espresso 是 Google 在 2013 年推出的 Android UI 测试的开源框架,是基于AndroidJUnitRunner test runner 和
instrumentation-based 的框架,它可以运行在API是10以上的机器上。为什么叫Espresso?我猜测应该是Google的本意是在用这个框架跑UI测试用例时候,你可以泡一杯espresso咖啡,静静等待用例测试结果,从而解放人力。
Espresso的引入也很简单,主要是依赖几个库。
Espresso测试组成
ViewMachers :寻找用来测试的VIEW
ViewActions :发送交互事件
ViewAssertions:检验测试结果
上述的操作可以简单归结为定位到某个控件,对某个控件执行某项操作,检查操作结束后的结果。
Espresso的library
espresso-core
这个是espresso的核心库,espresso的整个机制的实现都在这个库里,引入方式就是
androidTestCompile 'com.android.support.test.espresso:espresso-core:2.2.2',
这里需要注意在引入这个库之前需要把test runner 和 test rules这两个测试库引入,引入方式如下:
androidTestCompile "com.android.support.test:runner:0.5"

androidTestCompile "com.android.support.test:rules:0.5"
espresso-contrib
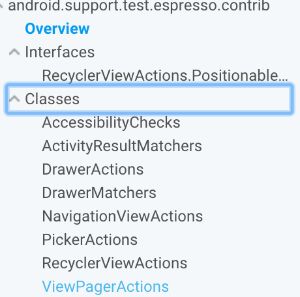
这个库主要就是recyclerview和drawerlayout和time picker、date picker等的view action
引入方式是
androidTestCompile "com.android.support.test.espresso:espresso-contrib:2.2.2"
espresso-intents
这个库主要用来测试intent的内容,显式和隐式的intent都支持,引入方式是
androidTestCompile "com.android.support.test.espresso:espresso-intents:2.2.2"
espresso-web
这个库主要是web 相关的测试,我们app使用的场景主要是测试有js交互的UI,使用这个库可以直接找到H5页面中的某个元素,对这个元素进行操作,依赖方式是
androidTestCompile "com.android.support.test.espresso:espresso-web:2.2.2"
espresso-idling-resource
这个库是用来处理UI上的异步引起的数据或者view没有加载完成而导致当前UI不可测的情况,依赖方式是
compile "com.android.support.test.espresso:espresso-idling-resource:2.2.2"
Espresso的几个核心概念
ActivityTestRuleActivityTestRule
控制着测试页面的“生命周期”,我们看一下Google是怎么解释它的:
ActivityTestRule的主要的构造函数如下:
public ActivityTestRule(Class activityClass, boolean initialTouchMode,
        boolean launchActivity) {
    mActivityClass = activityClass;
    mInitialTouchMode = initialTouchMode;
    mLaunchActivity = launchActivity;
    mInstrumentation = InstrumentationRegistry.getInstrumentation();
}
当我们创建一个ActivityTestRule的时候可以控制是否launch这个测试的activity。launchActivity这个值是true还是false,影响着测试的流程。
IdlingResource
官方解释:
Represents a resource of an application under test which can cause asynchronous background work to happen during test execution (e.g. an intent service that processes a button click). By default, Espresso synchronizes all view operations with the UI thread as well as AsyncTasks; however, it has no way of doing so with "hand-made" resources. In such cases, test authors can register the custom resource via IdlingRegistry and Espresso will wait for the resource to become idle prior to executing a view operation.
我的理解:
这个是用来处理UI异步的,举个栗子:当我打开一个订单列表页面,这个页面发起了网络请求,在这个请求结束之前,我的页面可能是空白,测试的UI资源是在变化的,这个是不能用来测试的,只有当请求结束后,我的页面显示正常了,这样写的test case才是能用来保证测试质量的
下面看一下这个interface,这个interface就只有三个接口:
public interface IdlingResource {

  public String getName();

  public boolean isIdleNow();

  public void registerIdleTransitionCallback(ResourceCallback callback);

  public interface ResourceCallback {

    public void onTransitionToIdle();
  }
}
getName()这个函数是幂等的,可以理解为一次调用和多次调用的效果是一样的,这个逻辑在注册IdlingResource的时候会表现出来:
public boolean registerResources(final List resourceList) {
  if (Looper.myLooper() != looper) {
    ......
  } else {
    boolean allRegisteredSuccesfully = true;
    for (IdlingResource resource : resourceList) {
      checkNotNull(resource.getName(), "IdlingResource.getName() should not be null");

      boolean duplicate = false;
      for (IdlingResource oldResource : resources) {
        if (resource.getName().equals(oldResource.getName())) {
          // This does not throw an error to avoid leaving tests that register resource in test
          // setup in an undeterministic state (we cannot assume that everyone clears vm state
          // between each test run)
          Log.e(TAG, String.format("Attempted to register resource with same names:"
              + " %s. R1: %s R2: %s.\nDuplicate resource registration will be ignored.",
              resource.getName(), resource, oldResource));
          duplicate = true;
          break;
        }
      }

      if (!duplicate) {
        ......
      } else {
        allRegisteredSuccesfully = false;
      }
    }
    return allRegisteredSuccesfully;
  }
}
isIdleNow()是说明是否处于idle状态,如果是处于idle状态则会调用ResourceCallback的onTransitionToIdle()。
目前Espresso提供了一个最基本的CountingIdlingResource,
使用起来想到便利,后面会讲解一下使用方法。
ViewInteraction
官方解释:
Provides the primary interface for test authors to perform actions or asserts on views.
Each interaction is associated with a view identified by a view matcher. All view actions and asserts are performed on the UI thread (thus ensuring sequential execution). The same goes for retrieval of views (this is done to ensure that view state is "fresh" prior to execution of each operation).
我的理解:
onView()返回的对象就是ViewInteraction类型的,我们可以对这个对象进行一些action的操作,例如点击,也可以对这个对象进行assert check,例如是否显示,而且可以定制这个view查找失败的日志返回的handler,看一下API就更清晰了:
public ViewInteraction perform(final ViewAction... viewActions) {
  checkNotNull(viewActions);
  for (ViewAction action : viewActions) {
    doPerform(action);
  }
  return this;
}

public ViewInteraction check(final ViewAssertion viewAssert) {
  checkNotNull(viewAssert);
  runSynchronouslyOnUiThread(new Runnable() {
    @Override
    public void run() {
      uiController.loopMainThreadUntilIdle();

      View targetView = null;
      NoMatchingViewException missingViewException = null;
      try {
        targetView = viewFinder.getView();
      } catch (NoMatchingViewException nsve) {
        missingViewException = nsve;
      }
      viewAssert.check(targetView, missingViewException);
    }
  });
  return this;
}

public ViewInteraction inRoot(Matcher rootMatcher) {
  this.rootMatcherRef.set(checkNotNull(rootMatcher));
  return this;
}

public ViewInteraction withFailureHandler(FailureHandler failureHandler) {
  this.failureHandler = checkNotNull(failureHandler);
  return this;
}
DataInteraction
官方解释:
An interface to interact with data displayed in AdapterViews.This interface builds on top of ViewInteraction and should be the preferred way to interact with elements displayed inside AdapterViews.
我的理解:
这个是onData()的返回对象,主要是使用在像list view 、grid view、spinner view这些AdapterViews的,因为这类view会复用view holder,所以不容易通过view的属性去匹配找到,所以就先通过这个view holder的data去匹配,然后再根据ViewInteraction去匹配到具体的view进行一系列的action或者assert check的操作。
ViewMatchers
官方解释:
A collection of hamcrest matchers that match View
我的理解:
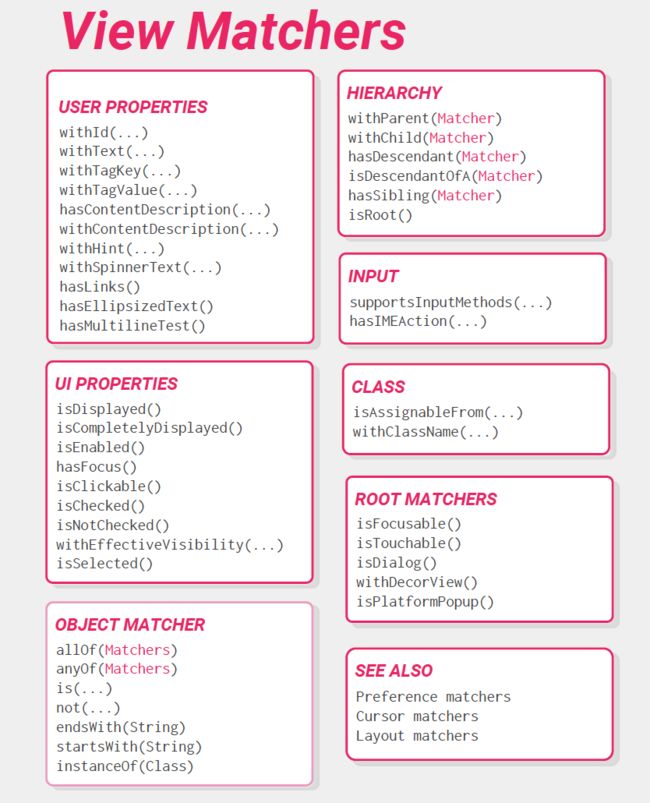
这个类就是提供了一系列的匹配方法,而且我们也可以自定义Matchers,看一下Google提供的cheat sheet里:
自定义Matcher
自定义View Matcher
首先看一下view的Matcer的自定义,举一个栗子,这是我在订单列表里写的用来匹配列表的某个位置的view:
private static Matcher childAtPositionInListView(final int position) {

    return new TypeSafeMatcher() {
        @Override
        public void describeTo(Description description) {
            description.appendText("Child at position " + position + " in parent ");
            withId(R.id.trades_list).describeTo(description);
        }

        @Override
        public boolean matchesSafely(View view) {
            ViewParent parent = view.getParent();
            return parent instanceof ViewGroup && withId(R.id.trades_list).matches(parent)
                    && view.equals(((ViewGroup) parent).getChildAt(position));
        }
    };
}
可以看到主要是创建TypeSafeMatcher
自定义Object Matcher
当我们要为adapter view 通过data去匹配某个view的时候,是必然需要自己定义一个matcher的,举一个栗子,是我在订单列表里根据订单ID去匹配某个item:
private static Matcher看到这个列子里跟刚才使用的TypeSafeMatcher不一样了,而是BoundedMatcher,这个类需要把你的adapter里的item的数据类型传递进来,订单列表的就是TradesItem,这样根据data就可以制定自己的数据匹配规则啦。。。其余的跟自定义 view matcher是一样的
UI测试初体验之微商城订单模块
引入library
在app的build.gradle里引入前文提到的几个espresso相关的library,这里面会涉及到实际项目中的各种support包的版本冲突的问题,根据实际情况去解决
在微商城里是这样的:
androidTestCompile "com.android.support.test:runner:$ESPRESSO_RUNNER_VERSION", {
    exclude group: 'com.android.support', module: 'support-annotations'
};
androidTestCompile "com.android.support.test:rules:$ESPRESSO_RULES_VERSION", {
    exclude group: 'com.android.support', module: 'support-annotations'
};
androidTestCompile "com.android.support.test.espresso:espresso-core:$ESPRESSO_VERSION", {
    exclude group: 'com.android.support', module: 'support-annotations'
};

androidTestCompile "com.android.support.test.espresso:espresso-contrib:$ESPRESSO_VERSION", {
    exclude group: 'com.android.support', module: 'support-annotations'
    exclude group: 'com.android.support', module: 'recyclerview-v7'
    exclude group: 'com.android.support', module: 'support-v4'
    exclude group: 'com.android.support', module: 'appcompat-v7'
    exclude group: 'com.android.support', module: 'design'
};

androidTestCompile "com.android.support.test.espresso:espresso-intents:$ESPRESSO_VERSION", {
    exclude group: 'com.android.support', module: 'support-annotations'
};

androidTestCompile "com.android.support.test.espresso:espresso-web:$ESPRESSO_VERSION",{
    exclude group: 'com.android.support', module: 'support-annotations'
}
compile "com.android.support.test.espresso:espresso-idling-resource:$ESPRESSO_VERSION", {
    exclude group: 'com.android.support', module: 'support-annotations'
};
androidTestCompile 'com.android.support.test.uiautomator:uiautomator-v18:2.1.1'
测试用例写起来
手写test case
首先创建测试入口,用@Rule标记,测试入口是TradesListPagerContainerActivity
 @Rule
public ActivityTestRule activityActivityTestRule = new ActivityTestRule<>(TradesListPagerContainerActivity.class);
然后开始写测试用例了,在一个test case开始之前,可以做一些配置,例如下面的唤醒屏幕,也可以是一些其他的内容,用来服务后面的test case的,有了@Before那就会有@After了,@After是test case执行结束后开始的
@Before
public void init(){
    UiDevice uiDevice = UiDevice.getInstance(InstrumentationRegistry.getInstrumentation());
    Point[] coordinates = new Point[4];
    coordinates[0] = new Point(248, 1520);
    coordinates[1] = new Point(248, 929);
    coordinates[2] = new Point(796, 1520);
    coordinates[3] = new Point(796, 929);
    try {
        if (!uiDevice.isScreenOn()) {
            uiDevice.wakeUp();
            uiDevice.swipe(coordinates, 10);
        }
    } catch (RemoteException e) {
        e.printStackTrace();
    }
    activityTestRule.getActivity();
}
一个test case是用@Test标记的,当一个test case执行完以后会把当前的activity 给finish掉,下一个test case开始会再relaunch这个activity,前文已经讲解过 ActivityTestRule 的生命周期了,这里不做介绍了,看一个真正的test case吧
@Test
public void goto_change_price_for_wait_paid(){
    onData(allOf(instanceOf(TradesItem.class), tidInList("E20170808094143146352574")))
            .inAdapterView(allOf(withId(R.id.trades_list),withEffectiveVisibility(VISIBLE), isFocusable()))
            .onChildView(allOf(withId(R.id.custom_button_layout_tv), withText("改价"), isDisplayed()))
            .perform(click());
    onView(withText("修改价格")).check(matches(isDisplayed()));
}
一个test case的内容是包括三个部分的,
ViewMachers(寻找用来测试的VIEW)
ViewActions(发送交互事件)
ViewAssertions(检验测试结果)
例子里的test case是要找到订单列表里订单ID是E20170808094143146352574的改价按钮,点击这个按钮,检测修改价格页面是否打开。
到目前为止,一个简单的测试用例算是基本完成了。
录制测试用例
Google有提供录制espresso test的功能哦,打开android studio,点击Run→record espresso test,然后操作机器,根据操作路径和添加的assert 会自动生成一个测试文件。
但是这个功能在实际应用中会有不少问题:
1、录制的脚本在下一次跑的时候跑不过的概率很大,原因有很多,可能是由于网络请求导致UI没有准备好,可能是界面的数据发生变化,可能是UI发生调整等等
2、录制的脚本是从启动页作为入口,如果操作路径很深,那这个脚本会很长,可读性很差
3、录制的脚本不容易发现业务问题
4、等待你们发现还有什么坑
当然也不能完全否定这个录制的功能,当你在写一些case 没有头绪的时候,看看录制的脚本,也是可以找到一点灵感的。
执行test case
在android studio里创建一个run/debug configurations,如下:
然后点击Run或者执行 ./gradlew connectedAndroidTest,就可以去泡咖啡了~~~
在微商城里应用espresso的大概情况就是这样,后续会针对每个library的功能,具体的应用,继续连载~~


