Gunicorn(gevent)+ Django HTTP请求处理过程全分析 —— Gunicorn篇【一】
背景
前段时间排查了个内存泄露的故障,花了几天时间把Gunicorn + Django 从头到尾看了下。在排查问题时,网上普遍都是零碎的分析文章,需要自己多处拼接与查证,才可以勉强窥见全貌。于是萌生了写一篇按照实际流程来梳理的博客,为这次排查画上句号。
由于涉及的东西较多,如Gunicorn、wsgi、Django、元类等都可单独成文,所以将以系列文章的方式来做记录。
框架&依赖版本如下。
Django 2.1.15
Gunicorn 20.0.4
Python3.x
从启动命令开始
大部分文章都是直接看代码,但我觉得不太易懂。从启动命令开始解析我觉得会更有条理一些。
官方文档
Gunicorn Github
根据官方文档所示,我们的启动命令如下:

我们先从gunicorn这个入口开始。
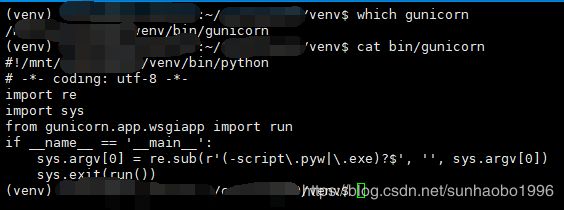
gunicorn可执行命令从何而来
gunicorn这个命令是怎么来的呢?他到底是何方神圣?

从上图我们可以看出,gunicorn这个命令,是一个去掉了后缀的py脚本。
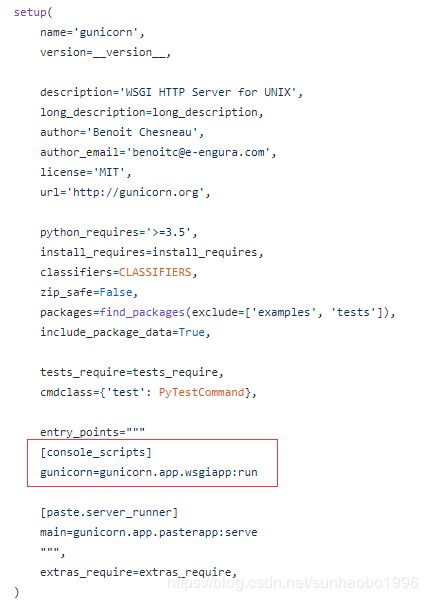
从这里可以引申出另外一个知识点(构建python包,有兴趣可以自行了解,具体不展开说):gunicorn的setup.py
顺着代码看下去:
class WSGIApplication(Application):
	.......
	# 根据配置中的路径import django(app),也就是我们的业务代码
    def load_wsgiapp(self):
        return util.import_app(self.app_uri)

    def load_pasteapp(self):
        from .pasterapp import get_wsgi_app
        return get_wsgi_app(self.app_uri, defaults=self.cfg.paste_global_conf)

	# 加载wsgi(也就是加载django框架生成的wsgi对象)
    def load(self):
        if self.cfg.paste is not None:
            return self.load_pasteapp()
        else:
            return self.load_wsgiapp()

def run():
    """\
    The ``gunicorn`` command line runner for launching Gunicorn with
    generic WSGI applications.
    """
    from gunicorn.app.wsgiapp import WSGIApplication
    WSGIApplication("%(prog)s [OPTIONS] [APP_MODULE]").run()
查找Application,跳到 app/base.py:
class Application(BaseApplication):
	.......
    def run(self):
        ........
        if self.cfg.daemon:
            util.daemonize(self.cfg.enable_stdio_inheritance)
        .....
        super().run()
class BaseApplication(object):
    .......
    def wsgi(self):
        if self.callable is None:
            self.callable = self.load()
        return self.callable
    ........
    def run(self):
        try:
            Arbiter(self).run()
        except RuntimeError as e:
            ......
终于,我们到了其他文章一直会提到的Arbiter。
Arbiter
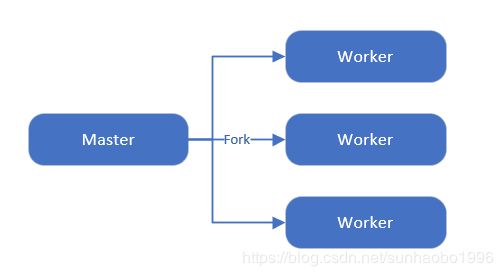
讲Arbiter之前,大概讲下pre-fork模式。
说白了,就是作为Master的进程通过fork生成共享listen-fd/accept-fd 的 Worker。
Master保证Worker数量,同时监控Worker的工作状态,重启无响应的进程。
class Arbiter(object):
    ......
    def start(self):
        """\
        Initialize the arbiter. Start listening and set pidfile if needed.
        """

        .....

        if not self.LISTENERS:
            fds = None
            listen_fds = systemd.listen_fds()
            if listen_fds:
                self.systemd = True
                fds = range(systemd.SD_LISTEN_FDS_START,
                            systemd.SD_LISTEN_FDS_START + listen_fds)

            elif self.master_pid:
                fds = []
                for fd in os.environ.pop('GUNICORN_FD').split(','):
                    fds.append(int(fd))

            self.LISTENERS = sock.create_sockets(self.cfg, self.log, fds) #创建所有子进程共享的的listen fd
        ........

    def run(self):
        "Main master loop."
        self.start()
        util._setproctitle("master [%s]" % self.proc_name)

        try:
            self.manage_workers() # 保持Worker数量,启动后Worker数量是0,调用这个函数之后会卡在这里开始新建子进程,直到满足配置

            while True:
                self.maybe_promote_master()

                sig = self.SIG_QUEUE.pop(0) if self.SIG_QUEUE else None # 读取事件(如HUP热重载)
                if sig is None: # 没有事件,休眠 & 杀死已经挂了的Worker & 保持进程数不变
                    self.sleep()
                    self.murder_workers()
                    self.manage_workers()
                    continue

                if sig not in self.SIG_NAMES:
                    self.log.info("Ignoring unknown signal: %s", sig)
                    continue

                signame = self.SIG_NAMES.get(sig)
                handler = getattr(self, "handle_%s" % signame, None)
                if not handler:
                    self.log.error("Unhandled signal: %s", signame)
                    continue
                self.log.info("Handling signal: %s", signame)
                handler()
                self.wakeup()
        except (StopIteration, KeyboardInterrupt):
            self.halt()
        except HaltServer as inst:
            self.halt(reason=inst.reason, exit_status=inst.exit_status)
        except SystemExit:
            raise
        except Exception:
            self.log.info("Unhandled exception in main loop",
                          exc_info=True)
            self.stop(False)
            if self.pidfile is not None:
                self.pidfile.unlink()
            sys.exit(-1)
    ........
    def manage_workers(self):
        """\
        Maintain the number of workers by spawning or killing
        as required.
        """
        if len(self.WORKERS) < self.num_workers:
            self.spawn_workers()

        workers = self.WORKERS.items()
        workers = sorted(workers, key=lambda w: w[1].age)
        while len(workers) > self.num_workers:
            (pid, _) = workers.pop(0)
            self.kill_worker(pid, signal.SIGTERM)

        active_worker_count = len(workers)
        if self._last_logged_active_worker_count != active_worker_count:
            self._last_logged_active_worker_count = active_worker_count
            self.log.debug("{0} workers".format(active_worker_count),
                           extra={"metric": "gunicorn.workers",
                                  "value": active_worker_count,
                                  "mtype": "gauge"})
Master进程的功能其实很简单,就是监控子进程的状态 & 提供公共的数据(Listen fd)。
下面我们看下master如何拉起子进程。
	def spawn_workers(self):
        """\
        Spawn new workers as needed.

        This is where a worker process leaves the main loop
        of the master process.
        """

        for _ in range(self.num_workers - len(self.WORKERS)):
            self.spawn_worker()
            time.sleep(0.1 * random.random())
manage函数中首先调用的是spawn_workers,从上面可以看出他就是循环调用spawn_worker,拉起后随机退避等待 0~100ms(防止子进程同时启动对系统造成过大压力,每个子进程CPU资源都导致每个子进程都无法完成初始化而被kill。
下面我们看下spawn_worker。
    def spawn_worker(self):
        self.worker_age += 1
        # 这里的这个self.app,就是之前的WSGIApplication。
        worker = self.worker_class(self.worker_age, self.pid, self.LISTENERS,
                                   self.app, self.timeout / 2.0,
                                   self.cfg, self.log)
        self.cfg.pre_fork(self, worker)
        pid = os.fork()
        if pid != 0:
            worker.pid = pid
            self.WORKERS[pid] = worker
            return pid

        # Do not inherit the temporary files of other workers
        for sibling in self.WORKERS.values():
            sibling.tmp.close()

        # Process Child
        worker.pid = os.getpid()
        try:
            util._setproctitle("worker [%s]" % self.proc_name)
            self.log.info("Booting worker with pid: %s", worker.pid)
            self.cfg.post_fork(self, worker)
            worker.init_process() # worker根据你选择得种类不同,具体得实现也不相同,但他们都会在此处阻塞,之后会用gevent worker来进行讲解
            sys.exit(0)
        except SystemExit:
            raise
        except AppImportError as e:
            self.log.debug("Exception while loading the application",
                           exc_info=True)
            print("%s" % e, file=sys.stderr)
            sys.stderr.flush()
            sys.exit(self.APP_LOAD_ERROR)
        except:
            self.log.exception("Exception in worker process")
            if not worker.booted:
                sys.exit(self.WORKER_BOOT_ERROR)
            sys.exit(-1)
        finally:
            self.log.info("Worker exiting (pid: %s)", worker.pid)
            try:
                worker.tmp.close()
                self.cfg.worker_exit(self, worker)
            except:
                self.log.warning("Exception during worker exit:\n%s",
                                  traceback.format_exc())
调用 worker.init_process() 之后,子进程便开始了工作。init_process具体的行为会根据worker的不同而不同,下篇文章会以gevent作为例子来进行讲解。
gunicorn其实还是很简单的,代码也不多,很适合拿来练习。

