Angular2 脏检查过程
Angular 强大之处在于能将数据变化自动应用到视图上面,这大大减少了开发工作量。 Angular 在脏检查的过程中到底做了哪些事呢?
zone.js
想要将数据变化应用到页面上面,首先需要检测数据的变化,那么数据会在什么情况下发生变化呢?
数据变化一般发生异步事件中,例如:
- 浏览器事件,例如 click, mouseover, keyup
- setTimout 和 setInterval
- Ajax 请求
于是 Angular 使用了 zone.js 这个大杀器来跟踪异步任务,并进行脏检查。
zone.js 这个工具给所有 JavaScript 异步事件 都提供了一个上下文。zone.js 可以实现异步任务的跟踪、分析、错误记录。
zone.js 是利用重写浏览器异步函数的方法来实现的。下面是一个简单的例子。
var realTetTimeout = window.setTimeout;

var beforeTask = ()=> { console.log('before task') };
var afterTask = ()=> { console.log('after task') };

window.setTimeout = (fn, time)=> {
  realTetTimeout(()=> {
    beforeTask();
    fn();
    afterTask();
  }, time);
};
Angular 会在初始化的时候调用zone,下面的代码是 Angular 的 ApplicationRef_ 的构造函数中的一部分,this._zone 是 NgZone 的一个实例。 NgZone 是 zone 的一个简单封装,当异步事件结束的时候由 onMicrotaskEmpty 提示 Angular 更新视图。
this._zone.onMicrotaskEmpty.subscribe({
  next: () => {
    this._zone.run(() => { this.tick();});
  }
});
tick() 函数会对所有附在 ApplicationRef_ 上的视图进行脏检查。这也就是为什么我们在需要手动调用脏检查的时候一般会使用 tick() 或 setTimeout() 的方法。
tick(): void {
  this._views.forEach((view) => view.ref.detectChanges());
}
脏检查过程
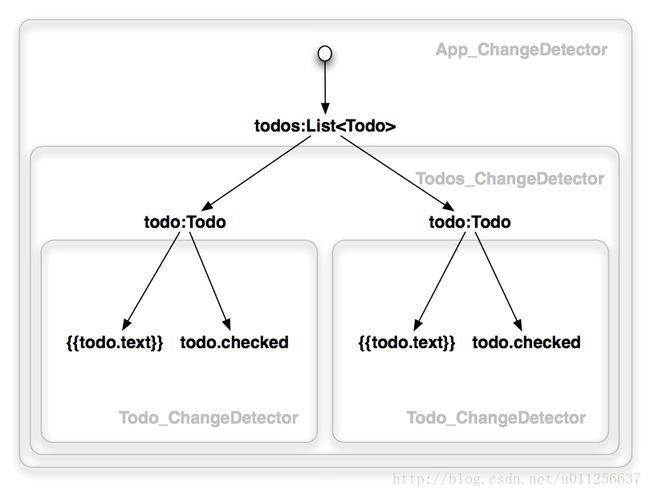
在 Angular 中,每一个组件都都它自己的检测器(detector),用于负责检查其自身模板上绑定的变量。所以每一个组件都可以独立地决定是否进行脏检查,这到后面再说。
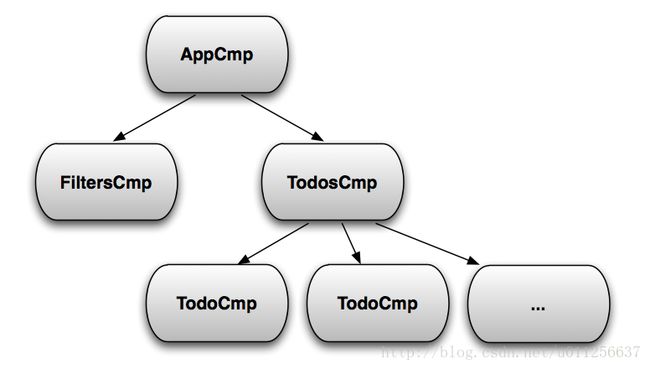
因为在 Angular 中组件是以树的形式组织起来的,相应地,检测器也是一棵树的形状。当一个异步事件发生时,脏检查会从根组件开始,自上而下对树上的所有子组件进行检查。相比 Angular1 中的带有环的结构,这样的单向数据流效率更高,而且容易预测。
下面从 angular aot 编译结果来看看脏检查的具体过程。
使用 ./node_modules/.bin/ngc 命令编译,每一个 component 都可以得到一个 *.ngfactory.ts 文件,里面包含以下3个类:
- Wrapper_AppComponent
- View_AppComponent0
- View_AppComponent_Host0
其中 AppComponent 是组件的名称。
Wrapper_AppComponent: 包装了实际的类,里面包含了 AppComponent 的实例,以及对生命周期函数的处理。
View_AppComponent0: 包含了模板中绑定的变量和嵌套的子组件,主要负责脏检测、视图更新,以及对子组件的脏检查
View_AppComponent_Host0: 即 HostView,用于渲染 entryComponent。即在NgModule中声明的 entryComponent,一般情况下只有根组件会用到。如果某一个组件是动态创建的,而不是声明在组件模板中,就会用到这个 HostView。
下面看一个实际的例子
@Component({
  selector: 'app-root',
  template: `
    {{title}}</h1>
    todos>
`
})
export class AppComponent {
  title = 'app works!';

  todos:Todo[]=[
    {text:'clean',checked:false},
    {text:'wash',checked:false}
  ];
}
其结构可以用下面的图来简单表示
使用 ngc 编译之后得到的 View_AppComponent0
export class View_AppComponent0 extends import1.AppView {
  _text_0:any;
  _el_1:any;
  _text_2:any;
  _text_3:any;
  _el_4:any;
  compView_4:import1.AppView;
  _TodosComponent_4_3:import9.Wrapper_TodosComponent;
  _text_5:any;
  /*private*/ _expr_8:any;
  constructor(viewUtils:import3.ViewUtils,parentView:import1.AppView,parentIndex:number,parentElement:any) {
    super(View_AppComponent0,renderType_AppComponent,import5.ViewType.COMPONENT,viewUtils,parentView,parentIndex,parentElement,import6.ChangeDetectorStatus.CheckAlways);
    this._expr_8 = import10.UNINITIALIZED;
  }
  createInternal(rootSelector:string):import7.ComponentRef {
    const parentRenderNode:any = this.renderer.createViewRoot(this.parentElement);
    this._text_0 = this.renderer.createText(parentRenderNode,'\n    ',(null as any));
    this._el_1 = import3.createRenderElement(this.renderer,parentRenderNode,'h1',import3.EMPTY_INLINE_ARRAY,(null as any));
    this._text_2 = this.renderer.createText(this._el_1,'',(null as any));
    this._text_3 = this.renderer.createText(parentRenderNode,'\n    ',(null as any));
    this._el_4 = import3.createRenderElement(this.renderer,parentRenderNode,'todos',import3.EMPTY_INLINE_ARRAY,(null as any));
    this.compView_4 = new import9.View_TodosComponent0(this.viewUtils,this,4,this._el_4);
    this._TodosComponent_4_3 = new import9.Wrapper_TodosComponent();
    this.compView_4.create(this._TodosComponent_4_3.context);
    this._text_5 = this.renderer.createText(parentRenderNode,'\n',(null as any));
    this.init((null as any),((<any>this.renderer).directRenderer? (null as any): [
        this._text_0,
        this._el_1,
        this._text_2,
        this._text_3,
        this._el_4,
        this._text_5
      ]
    ),(null as any));
    return (null as any);
  }
  injectorGetInternal(token:any,requestNodeIndex:number,notFoundResult:any):any {
    if (((token === import8.TodosComponent) && (4 === requestNodeIndex))) { return this._TodosComponent_4_3.context; }
    return notFoundResult;
  }
  detectChangesInternal(throwOnChange:boolean):void {
    const currVal_4_0_0:any = this.context.todos;
    this._TodosComponent_4_3.check_todos(currVal_4_0_0,throwOnChange,false);
    this._TodosComponent_4_3.ngDoCheck(this,this._el_4,throwOnChange);
    const currVal_8:any = import3.inlineInterpolate(1,'',this.context.title,'');
    if (import3.checkBinding(throwOnChange,this._expr_8,currVal_8)) {
      this.renderer.setText(this._text_2,currVal_8);
      this._expr_8 = currVal_8;
    }
    this.compView_4.internalDetectChanges(throwOnChange);
  }
  destroyInternal():void {
    this.compView_4.destroy();
  }
}
首先在 createInternal() 中将组件模板编译成视图的操作,但这里用的是 Renderer 这个对象,可以认为是比 DOM 操作更高层次的抽象,这样不仅在浏览器上可以运行,也支持服务器渲染。
createInternal() 中还创建了 View_TodosComponent0 和 Wrapper_TodosComponent 这两个对象,因为在 AppComponent 的模板中嵌套了一个 组件。
在 detectChangesInterna() 中脏检查的时候,使用 check_todos()把 todos 数据传递进去,并检查有没有发生变化,但这里的检查只是为了在 ngDoCheck 中触发 ngOnChanges 这个生命周期函数。
接下来就是对当前 AppComponent 中的数据进行检查了。 checkBinding() 这个函数就是使用 === 来判断是否相等的,如下所示, 后面判断 NaN 是因为 NaN === NaN 为 false。
a === b || typeof a === 'number' && typeof b === 'number' && isNaN(a) && isNaN(b);如果发生了变化则应用到视图上。
最后就是调用子组件的脏检查方法。
this.compView_4.internalDetectChanges(throwOnChange);脏检查策略: OnPush
现在默认是脏检查方法是从根组件开始,遍历所有的子组件进行脏检查。但是这种检查方式的性能存在很大问题。
如果我们能让组件只在其输入改变的时候才进行脏检查,那性能会得到大大提高。
Angular 提供了 OnPush 脏检查策略,可以用下面的方式使用:
@Component({
  selector: 'todos',
  changeDetection: ChangeDetectionStrategy.OnPush,
  templateUrl: 'todos.component.html'
})
export class TodosComponent{
  @Input()
  todos: Todo[];
}
使用 OnPush 后,组件只有在输入改变的时候才会进行脏检查,这里的改变是指:使用 === 判断为 false。
因此在上面的例子中,即使往 todos 数组中通过 push 添加新数据也不会触发脏检查。只有给 todos 重新赋值才会触发。
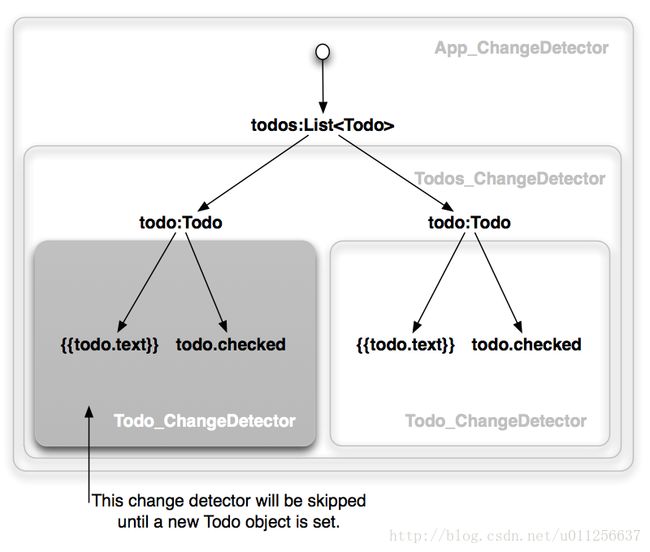
这样子,我们就有机会在脏检查中跳过一个组件的子树,减少检查次数。

具体是怎么实现的呢?再看加上 OnPush 后的编译结果:
在父组件(AppComponent)的脏检查过程中多了这一步
if (this._TodosComponent_4_3.ngDoCheck(this,this._el_4,throwOnChange)) {
  this.compView_4.markAsCheckOnce();
}
markAsCheckOnce() 函数会将 cdMode 置为 CheckOnce, 所以组件在初始化检查一次后就不会再检查了。
detectChanges(throwOnChange: boolean): void {
  if (this.cdMode === ChangeDetectorStatus.Checked ||
    this.cdMode === ChangeDetectorStatus.Errored)
    return;

  this.detectChangesInternal(throwOnChange);
  if (this.cdMode === ChangeDetectorStatus.CheckOnce) this.cdMode = ChangeDetectorStatus.Checked;

}
使用 Observable 优化脏检查
但是 js 中可以随意修改一个对象内部的值,如果使用 OnPush 但修改了对象内部的值,此时不会执行脏检查,也就不会更新视图。这可能会导致不易察觉的 bug。 因此可以选择两种方式 Immutable.js 或 Observable。
下面是一个使用 Observable 的例子。当设置 OnPush 时,因为输入没有变化,所以不会执行脏检查,因此需要手动调用 markForCheck(),该方法会将当前组件到根组件的一条路径上的组件都设置为 CheckOnce
@Component({
  selector: 'todos',
  changeDetection: ChangeDetectionStrategy.OnPush,
  template: `todo amount: {{counter}}`
})
export class TodosComponent implements OnInit {

  @Input()
  todos: Observable;
  counter: number = 0;
  constructor(private cd: ChangeDetectorRef){}

  ngOnInit() {
    this.todos.subscribe(todos=>{
      this.counter = todos.length;
      this.cd.markForCheck();
    })
  }
}
参考资料
Ahead-of-Time Compilation in Angular
Trotyl Yu 的知乎回答
ANGULAR CHANGE DETECTION EXPLAINED
How does Angular Change Detection Really Work ?


