2019独角兽企业重金招聘Python工程师标准>>> ![]()
最近工作不忙,抽空阅读了下《spring源码深度剖析》,特此做一下记录。
先说下BeanFactoryPostProcessor接口和BeanPostProcessor接口,这两个接口都是spring 初始化bean时对外暴露的扩展点。两个接口名称看起来很相似,但作用及使用场景却不同。
1.BeanFactoryPostProcessor
public interface BeanFactoryPostProcessor {
        void postProcessBeanFactory(ConfigurableListableBeanFactory beanFactory) throws BeansException;
}实现该接口,可以在spring的bean创建之前,修改bean的定义属性。也就是说,Spring允许BeanFactoryPostProcessor在容器实例化任何其它bean之前读取配置元数据,并可以根据需要进行修改,例如可以把bean的scope从singleton改为prototype,也可以把property的值给修改掉。可以同时配置多个BeanFactoryPostProcessor,实现类可以通过实现PriorityOrdered接口来控制各个BeanFactoryPostProcessor的执行次序。
注意:BeanFactoryPostProcessor是在spring容器加载了bean的定义文件之后,在bean实例化之前执行的。接口方法的入参是ConfigurrableListableBeanFactory,使用该参数,可以获取到相关bean的定义信息。
spring中内置了一些BeanFactoryPostProcessor实现类,常用的有: (org.springframework.beans.factory.config包下)
1.PropertyPlaceholderConfigurer 替换xml中的占位符为*.properties文件中的值
2.PropertyOverrideConfigurer 比PropertyPlaceholderConfigurer功能高级些,支持缺省值
3.CustomEditorConfigurer:用来注册自定义的属性编辑器
例如自定义一个BeanFactoryPostProcessor:
public MyBeanFactoryPostProcessor implements BeanFactoryPostProcessor {
        public void postProcessBeanFactory(ConfigurableListableBeanFactory beanFactory)
                throw BeansException {
            BeanDefinition bd = beanFactory.getBeanDefinition("myJavaBean");
            MutablePropertyValues mpv = bd.getPropertyValues();
            mpv.addPropertyValue("propertyName", "newValue");
        }
}public interface BeanPostProcessor {
Object postProcessBeforeInitialization(Object bean, String beanName) throws BeansException;
Object postProcessAfterInitialization(Object bean, String beanName) throws BeansException;
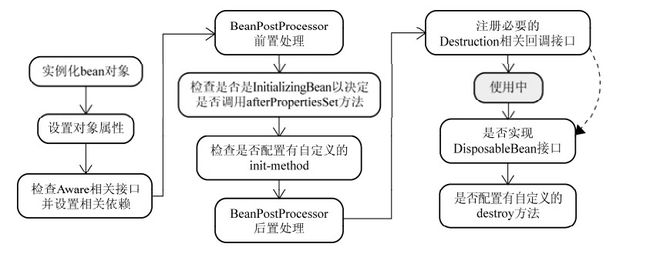
}BeanPostProcessor可以在spring容器实例化bean之后,在执行bean的初始化方法前后,添加一些自己的处
理逻辑。这里的初始化方法包括bean实现InitializingBean接口的afterPropertiesSet方法和在配置文件中指定
的init-method方法。
其具体的执行过程为:

spring中有一些内置的BeanPostProcessor实现类,例如
1.org.springframework.context.annotation.CommonAnnotationBeanPostProcessor: 支持@Resource注解的注入
2.org.springframework.beans.factory.annotation.RequiredAnnotationBeanPostProcessor: 支持@Required注解的注入
3.org.springframework.beans.factory.annotation.AutowiredAnnotationBeanPostProcessor: 支持@Autowired注解的注入
4.org.springframework.orm.jpa.support.PersistenceAnnotationBeanPostProcessor:支持@PersistenceUnit和@PersistenceContext注解的注入
5.org.springframework.context.support.ApplicationContextAwareProcessor: 用来为bean注入ApplicationContext等容器对象
这些注解类会在配置文件中通过配置
还有aop中的功能也是通过实现BeanPostProcessor接口去做的代理,有兴趣的同学可以去看下
AspectJAwareAdvisorAutoProxyCreator类,其父类AbstractAutoProxyCreator中实现了postProcessAfterInitialization
接口完成了对方法的代理。代码如下:
public Object postProcessAfterInitialization(Object bean, String beanName) throws BeansException {
        if (bean != null) {
            Object cacheKey = getCacheKey(bean.getClass(), beanName);
            if (!this.earlyProxyReferences.containsKey(cacheKey)) {
                return wrapIfNecessary(bean, beanName, cacheKey);
            }
        }
        return bean;
    }

    protected Object wrapIfNecessary(Object bean, String beanName, Object cacheKey) {
        if (beanName != null && this.targetSourcedBeans.containsKey(beanName)) {
            return bean;
        }
        if (Boolean.FALSE.equals(this.advisedBeans.get(cacheKey))) {
            return bean;
        }
        if (isInfrastructureClass(bean.getClass()) || shouldSkip(bean.getClass(), beanName)) {
            this.advisedBeans.put(cacheKey, Boolean.FALSE);
            return bean;
        }

        // Create proxy if we have advice.
        Object[] specificInterceptors = getAdvicesAndAdvisorsForBean(bean.getClass(), beanName, null);
        if (specificInterceptors != DO_NOT_PROXY) {
            this.advisedBeans.put(cacheKey, Boolean.TRUE);
            Object proxy = createProxy(bean.getClass(), beanName, specificInterceptors, new SingletonTargetSource(bean));
            this.proxyTypes.put(cacheKey, proxy.getClass());
            return proxy;
        }

        this.advisedBeans.put(cacheKey, Boolean.FALSE);
        return bean;
    }

    protected Object createProxy(
            Class beanClass, String beanName, Object[] specificInterceptors, TargetSource targetSource) {

        ProxyFactory proxyFactory = new ProxyFactory();
        // Copy our properties (proxyTargetClass etc) inherited from ProxyConfig.
        proxyFactory.copyFrom(this);

        if (!shouldProxyTargetClass(beanClass, beanName)) {
            // Must allow for introductions; can't just set interfaces to
            // the target's interfaces only.
            Class[] targetInterfaces = ClassUtils.getAllInterfacesForClass(beanClass, this.proxyClassLoader);
            for (Class targetInterface : targetInterfaces) {
                proxyFactory.addInterface(targetInterface);
            }
        }

        Advisor[] advisors = buildAdvisors(beanName, specificInterceptors);
        for (Advisor advisor : advisors) {
            proxyFactory.addAdvisor(advisor);
        }

        proxyFactory.setTargetSource(targetSource);
        customizeProxyFactory(proxyFactory);

        proxyFactory.setFrozen(this.freezeProxy);
        if (advisorsPreFiltered()) {
            proxyFactory.setPreFiltered(true);
        }

        return proxyFactory.getProxy(this.proxyClassLoader);
    }

    [proxyFactory]
    public Object getProxy(ClassLoader classLoader) {
        return createAopProxy().getProxy(classLoader);
    }

    [JdkDynamicAopProxy]
    public Object getProxy(ClassLoader classLoader) {
        if (logger.isDebugEnabled()) {
            logger.debug("Creating JDK dynamic proxy: target source is " + this.advised.getTargetSource());
        }
        Class[] proxiedInterfaces = AopProxyUtils.completeProxiedInterfaces(this.advised);
        findDefinedEqualsAndHashCodeMethods(proxiedInterfaces);
        return Proxy.newProxyInstance(classLoader, proxiedInterfaces, this);
}3.InitializingBean和init-method
这两个方法的调用点是AbstractAutowireCapableBeanFactory类的invokeInitMethods方法:
我们看下代码:
protected void invokeInitMethods(String beanName, final Object bean, RootBeanDefinition mbd)
throws Throwable {
boolean isInitializingBean = (bean instanceof InitializingBean);
if (isInitializingBean && (mbd == null || !mbd.isExternallyManagedInitMethod("afterPropertiesSet"))) {
if (logger.isDebugEnabled()) {
logger.debug("Invoking afterPropertiesSet() on bean with name '" + beanName + "'");
}
if (System.getSecurityManager() != null) {
try {
AccessController.doPrivileged(new PrivilegedExceptionActionprotected Object initializeBean(final String beanName, final Object bean, RootBeanDefinition mbd) {
if (System.getSecurityManager() != null) {
AccessController.doPrivileged(new PrivilegedAction然后调用上面的bean初始化方法,然后是BeanPostProcessor的后置处理,这正好符合了上图中描述的调用顺序。
其中Aware有很多子接口,像BeanNameAware,BeanClassLoaderAware,BeanFactoryAware等等,用户可以编写实现
了这些接口的bean,这样在spring回调aware相关接口的时候获取到一些容器的相关信息。
下面简单说下使用InitializingBean和init-method方法初始化bean的区别:
1.实现InitializingBean接口是直接调用afterPropertiesSet方法,比通过反射调用init-method指定的方法效率相对来说要高点。
但是init-method方式消除了对spring的依赖
2:如果调用afterPropertiesSet方法时出错,则不调用init-method指定的方法。