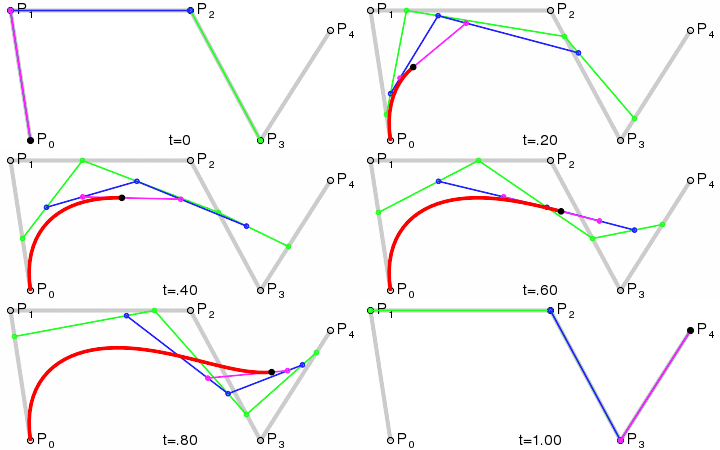
1,最近看了几个不错的自定义view,发现里面都会涉及到贝塞尔曲线知识,深刻的了解到贝塞尔曲线是进阶自定义view的一座大山,so,今天先和大家来了解了解。
2,贝塞尔曲线作用十分广泛,简单举几个的栗子:
  QQ小红点拖拽效果
  360火箭发射
  加入购物车动画
  一些炫酷的下拉刷新控件
  阅读软件的翻书效果
  一些平滑的折线图的制作
  很多炫酷的动画效果
这么多好看的效果,难道不想自己也写一个吗。。。。
- 理解贝塞尔曲线的原理
贝塞尔曲线是用一系列点来控制曲线状态的,我将这些点简单分为两类:数据点、控制点。通过调整控制点,贝塞尔曲线形状会发生变化。
  数据点:确定曲线的起始和结束位置
  控制点:确定曲线的弯曲程度
- 一阶曲线原理
一阶曲线是没有控制点的,仅有两个数据点(A 和 B),最终效果一个线段。
一阶公式如下:
![]()
- 二阶曲线原理
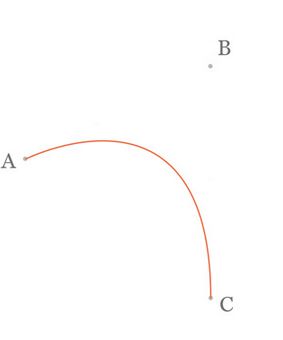
二阶曲线由两个数据点(A 和 C),一个控制点(B)来描述曲线状态,大致如下:
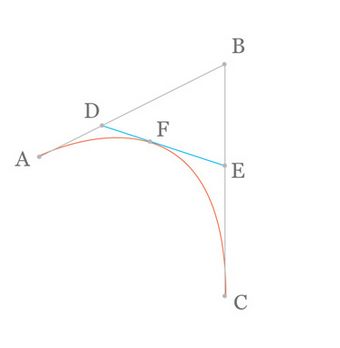
那么ac之间的红线是怎么生成的呢,让我们了解一下
在AB线段和BC线段分别去D、E两点,且满足条件
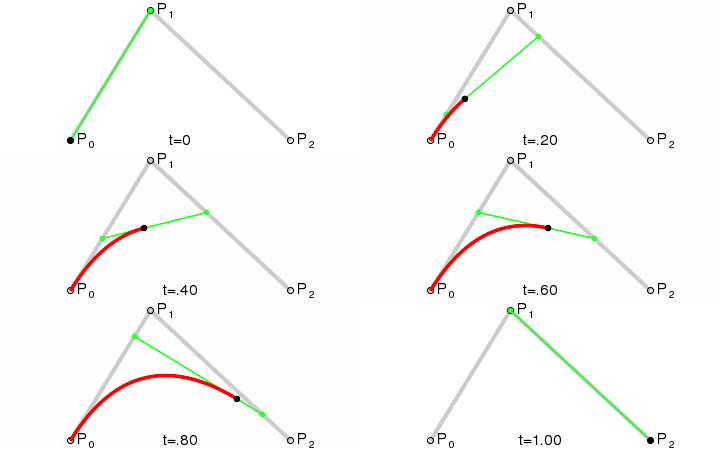
连接DE,取点F,使得: ,这样获取到的点F就是贝塞尔曲线上的一个点,动态图如下:
二阶公式如下:
![]()
-
三阶曲线原理
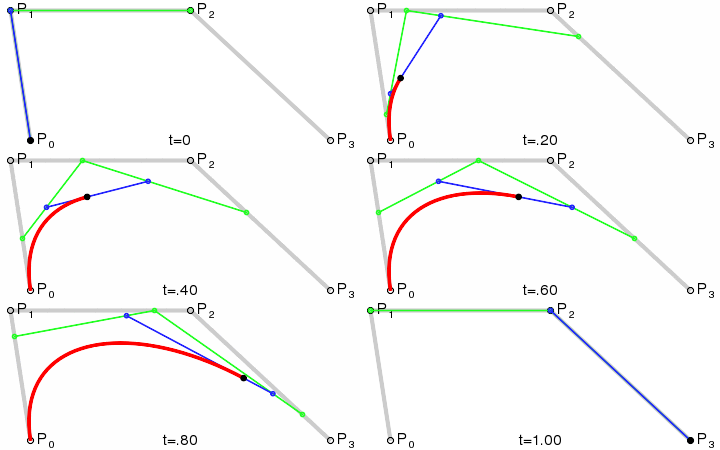
三阶曲线由两个数据点(A 和 D),两个控制点(B 和 C)来描述曲线状态
动态图如下:
三阶公式如下:
![]()
- 四阶曲线
- 五阶曲线
通用公式:
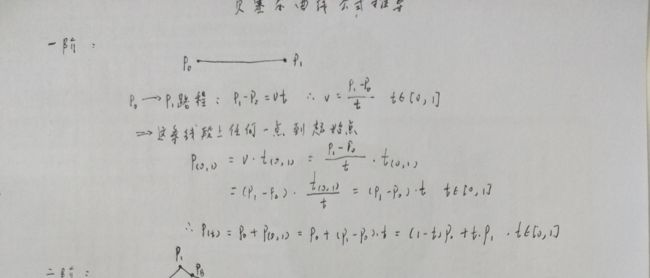
3,公式推导
由于博客园的编辑器无法编写高数公式,所以我这里就在纸上写了,如果有点看不到的话可以把图片下下来再放大看看(见谅)
4,实现简单的小例子
在我们Android中Path类中其实是有已经封装好了关于贝塞尔曲线的函数的
  //二阶贝赛尔
  public void quadTo(float x1, float y1, float x2, float y2)
  public void rQuadTo(float dx1, float dy1, float dx2, float dy2)
  //三阶贝赛尔
  public void cubicTo(float x1, float y1, float x2, float y2,float x3, float y3)
  public void rCubicTo(float x1, float y1, float x2, float y2,float x3, float y3)
- quadTo()方法
让我们先来看一下源码
/**
     * Add a quadratic bezier from the last point, approaching control point
     * (x1,y1), and ending at (x2,y2). If no moveTo() call has been made for
     * this contour, the first point is automatically set to (0,0).
     *
     * @param x1 The x-coordinate of the control point on a quadratic curve
     * @param y1 The y-coordinate of the control point on a quadratic curve
     * @param x2 The x-coordinate of the end point on a quadratic curve
     * @param y2 The y-coordinate of the end point on a quadratic curve
     */
    public void quadTo(float x1, float y1, float x2, float y2) {
        isSimplePath = false;
        native_quadTo(mNativePath, x1, y1, x2, y2);
    }
从源码的注释上我们可以得到的信息如下:参数中(x1,y1)是控制点坐标,(x2,y2)是终点坐标 。
大家可能会有一个疑问:有控制点和终点坐标,那起始点是多少呢? 整条线的起始点是通过Path.moveTo(x,y)来指定的,而如果我们连续调用quadTo(),前一个quadTo()的终点,就是下一个quadTo()函数的起点;如果初始没有调用Path.moveTo(x,y)来指定起始点,则默认以控件左上角(0,0)为起始点;
我们简单的写一下demo,通过我们点击屏幕来动态的获取点击屏幕的坐标,然后将其设置成贝二阶塞尔曲线的控制点,代码很简单
package com.qianmo.beziertest.view;


import android.content.Context;
import android.graphics.Canvas;
import android.graphics.Color;
import android.graphics.Paint;
import android.graphics.Path;
import android.graphics.Point;
import android.support.annotation.Nullable;
import android.util.AttributeSet;
import android.view.MotionEvent;
import android.view.View;

import com.qianmo.beziertest.R;

/**
 * Created by Administrator on 2017/3/30 0030.
 * E-Mail:[email protected]
 */

public class MyView extends View {

    private Point controlPoint = new Point(200, 200);

    public MyView(Context context) {
        super(context);
    }

    public MyView(Context context, @Nullable AttributeSet attrs) {
        super(context, attrs);
    }

    public MyView(Context context, @Nullable AttributeSet attrs, int defStyleAttr) {
        super(context, attrs, defStyleAttr);
    }

    @Override
    protected void onDraw(Canvas canvas) {
        super.onDraw(canvas);

        Paint paint = new Paint();
        paint.setStyle(Paint.Style.STROKE);
        paint.setColor(Color.BLACK);
        paint.setStrokeWidth(10);

        Path path = new Path();
        path.moveTo(100, 500);
        path.quadTo(controlPoint.x, controlPoint.y, 700, 500);
        //绘制路径
        canvas.drawPath(path, paint);
        //绘制辅助点
        canvas.drawPoint(controlPoint.x,controlPoint.y,paint);

    }

    @Override
    public boolean onTouchEvent(MotionEvent event) {
        switch (event.getAction()) {
            case MotionEvent.ACTION_MOVE:
                controlPoint.x = (int) event.getX();
                controlPoint.y = (int) event.getY();
                invalidate();
                break;
        }
        return true;
    }
}
效果图如下:
- rQuadTo()
先来看一下它的源码,代码如下:
/**
     * Same as quadTo, but the coordinates are considered relative to the last
     * point on this contour. If there is no previous point, then a moveTo(0,0)
     * is inserted automatically.
     *
     * @param dx1 The amount to add to the x-coordinate of the last point on
     *            this contour, for the control point of a quadratic curve
     * @param dy1 The amount to add to the y-coordinate of the last point on
     *            this contour, for the control point of a quadratic curve
     * @param dx2 The amount to add to the x-coordinate of the last point on
     *            this contour, for the end point of a quadratic curve
     * @param dy2 The amount to add to the y-coordinate of the last point on
     *            this contour, for the end point of a quadratic curve
     */
    public void rQuadTo(float dx1, float dy1, float dx2, float dy2) {
        isSimplePath = false;
        native_rQuadTo(mNativePath, dx1, dy1, dx2, dy2);
    }
从上面的方法注释我们可以看到,这是一个相对坐标,具体参数意思如下:
dx1:控制点X坐标,表示相对上一个终点X坐标的位移坐标,可为负值,正值表示相加,负值表示相减;
dy1:控制点Y坐标,相对上一个终点Y坐标的位移坐标。同样可为负值,正值表示相加,负值表示相减;
dx2:终点X坐标,同样是一个相对坐标,相对上一个终点X坐标的位移值,可为负值,正值表示相加,负值表示相减;
dy2:终点Y坐标,同样是一个相对,相对上一个终点Y坐标的位移值。可为负值,正值表示相加,负值表示相减;
这里举个例子,假如我们上一个终点坐标是(300,400)那么利用rQuadTo(100,-100,200,100); 得到的控制点坐标是(300+100,400-100)即(500,300) 同样,得到的终点坐标是(300+200,400+100)即(500,500),这个方法和quadTo()方法没什么区别,所以就不写Demo写了
- cubicTo()
这是Android的三阶贝塞尔曲线方法,先来看一下每一参数的意义
/**
     * Add a cubic bezier from the last point, approaching control points
     * (x1,y1) and (x2,y2), and ending at (x3,y3). If no moveTo() call has been
     * made for this contour, the first point is automatically set to (0,0).
     *
     * @param x1 The x-coordinate of the 1st control point on a cubic curve
     * @param y1 The y-coordinate of the 1st control point on a cubic curve
     * @param x2 The x-coordinate of the 2nd control point on a cubic curve
     * @param y2 The y-coordinate of the 2nd control point on a cubic curve
     * @param x3 The x-coordinate of the end point on a cubic curve
     * @param y3 The y-coordinate of the end point on a cubic curve
     */
    public void cubicTo(float x1, float y1, float x2, float y2,
                        float x3, float y3) {
        isSimplePath = false;
        native_cubicTo(mNativePath, x1, y1, x2, y2, x3, y3);
    }
从上面源码可以看到参数(x1,y1)是第一个控制点坐标,(x2,y2)是第二个控制点坐标,(x3,y3)是终点坐标。
整条线的起始点是通过Path.moveTo(x,y)来指定的,而如果我们连续调用cubicTo(),前一个cubicTo()的终点,就是下一个cubicTo()函数的起点;如果初始没有调用Path.moveTo(x,y)来指定起始点,则默认以控件左上角(0,0)为起始点;和我们的quadTo()方法一样。
下面也是通过一个小例子给大家看一下效果,和二阶贝塞尔曲线一样,就是多了一个控制点代码如下:
package com.qianmo.beziertest.view;


import android.content.Context;
import android.graphics.Canvas;
import android.graphics.Color;
import android.graphics.Paint;
import android.graphics.Path;
import android.graphics.Point;
import android.support.annotation.Nullable;
import android.util.AttributeSet;
import android.view.MotionEvent;
import android.view.View;

/**
 * Created by wangjitao on 2017/3/30 0030.
 * E-Mail:[email protected]
 */

public class MyView1 extends View {

    private Point controlPointOne = new Point(200, 200);
    private Point controlPointTwo = new Point(500, 200);

    private boolean isControlPointTwo ;

    private Paint paintBezier;
    private Paint paintLine;

    public MyView1(Context context) {
        this(context, null);
    }

    public MyView1(Context context, @Nullable AttributeSet attrs) {
        this(context, attrs, 0);
    }

    public MyView1(Context context, @Nullable AttributeSet attrs, int defStyleAttr) {
        super(context, attrs, defStyleAttr);

        paintBezier = new Paint();
        paintBezier.setStyle(Paint.Style.STROKE);
        paintBezier.setColor(Color.BLACK);
        paintBezier.setStrokeWidth(10);


        paintLine = new Paint();
        paintLine.setStyle(Paint.Style.STROKE);
        paintLine.setColor(Color.RED);
        paintLine.setStrokeWidth(3);

    }

    @Override
    protected void onDraw(Canvas canvas) {
        super.onDraw(canvas);


        Path path = new Path();
        path.moveTo(100, 500);
        path.cubicTo(controlPointOne.x, controlPointOne.y,controlPointTwo.x, controlPointTwo.y, 900, 500);
        //绘制路径
        canvas.drawPath(path, paintBezier);
        //绘制辅助点
        canvas.drawPoint(controlPointOne.x, controlPointOne.y, paintBezier);
        canvas.drawPoint(controlPointTwo.x, controlPointTwo.y, paintBezier);
        //绘制连线
//        canvas.drawLine(100, 500, controlPointOne.x, controlPointOne.y, paintLine);
//        canvas.drawLine(900, 500, controlPointOne.x, controlPointOne.y, paintLine);
    }

    @Override
    public boolean onTouchEvent(MotionEvent event) {
        switch (event.getAction()) {
            case MotionEvent.ACTION_MOVE:
                if (isControlPointTwo){
                    controlPointOne.x = (int) event.getX();
                    controlPointOne.y = (int) event.getY();
                }else {
                    controlPointTwo.x = (int) event.getX();
                    controlPointTwo.y = (int) event.getY();
                }
                invalidate();
                break;
        }
        return true;
    }


    public boolean isControlPointTwo() {
        return isControlPointTwo;
    }

    public void setControlPointTwo(boolean controlPointTwo) {
        isControlPointTwo = controlPointTwo;
    }
}
效果如下:
同理rCubicTo,这里就不给大家解释了
ok,本篇基本上把贝塞尔的基础知识都了解完了,明天开始试着来撸撸轮子,感觉一大波好看的动画满天飞的控件在等着我们(邪恶脸)。See You Next Time。。。。

