简单的Spring SpringMVC mybatis框架搭建(附源码,jar包)
在sts下创建JavaWeb项目,项目目录入下:(项目jar包和源码在文章最后,需要可以下载)

1.新建一个user数据库,创建一个学生表student
SET FOREIGN_KEY_CHECKS=0;
-- ----------------------------
-- Table structure for student
-- ----------------------------
DROP TABLE IF EXISTS `student`;
CREATE TABLE `student` (
`id` int(11) NOT NULL AUTO_INCREMENT,
`name` varchar(255) DEFAULT NULL,
`sex` varchar(255) DEFAULT NULL,
`age` int(11) DEFAULT NULL,
PRIMARY KEY (`id`)
) ENGINE=InnoDB AUTO_INCREMENT=5 DEFAULT CHARSET=utf8;
-- ----------------------------
-- Records of student
-- ----------------------------
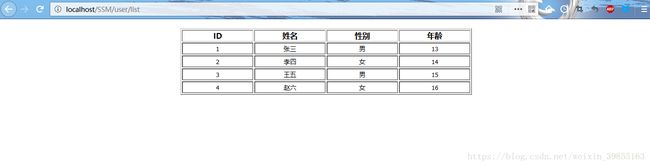
INSERT INTO `student` VALUES ('1', '张三', '男', '13');
INSERT INTO `student` VALUES ('2', '李四', '女', '14');
INSERT INTO `student` VALUES ('3', '王五', '男', '15');
INSERT INTO `student` VALUES ('4', '赵六', '女', '16');2.配置文件springmvc.xml
3.配置文件db.properties,账户密码根据自己的修改
jdbc.driverClass = com.mysql.jdbc.Driver
jdbc.url = jdbc:mysql://localhost:3306/user?useUnicode=true&characterEncoding=utf-8&serverTimezone=GMT
jdbc.username = root
jdbc.password = root
4.applicationContext.xml
5.接下来就是web.xml了
	SSM


		contextConfigLocation
		classpath:applicationContext.xml


		spring监听器
		org.springframework.web.context.ContextLoaderListener


		防止spring内存溢出监听器
		org.springframework.web.util.IntrospectorCleanupListener


		配置SpringMVC核心控制器
		springDispatcherServlet
		org.springframework.web.servlet.DispatcherServlet

			contextConfigLocation
			classpath:springmvc.xml


		1


		springDispatcherServlet
		/


		30
以上这些配置完成。框架就算基本完成了(项目jar包和源码在文章最后,需要可以下载)
接下来写一个简单的查询Demo,我就根据目录由上至下直接给出了(项目jar包和源码在文章最后,需要可以下载)
6.Controller层UserController.java
package com.controller;

import org.springframework.beans.factory.annotation.Autowired;
import org.springframework.stereotype.Controller;
import org.springframework.ui.ModelMap;
import org.springframework.web.bind.annotation.RequestMapping;

import com.service.UserService;

@Controller
@RequestMapping("/user")
public class UserController {

	@Autowired
	private UserService userService;

	public void setUserService(UserService userService) {
		this.userService = userService;
	}

	@RequestMapping("/list")
	public String getList(ModelMap map) {
		map.addAttribute("list", userService.getList());
		return "/list.jsp";
	}
}
6.UserDao.java
package com.dao;

import java.util.List;

import org.springframework.stereotype.Repository;

import com.model.User;

@Repository("userDao")
public interface UserDao {

	public List getList();
}
7.userMapper.xml
8.实体类User.java
package com.model;

public class User {
	private int id;
	private String name;
	private String sex;
	private String age;

	public int getId() {
		return id;
	}
	public void setId(int id) {
		this.id = id;
	}
	public String getName() {
		return name;
	}
	public void setName(String name) {
		this.name = name;
	}
	public String getSex() {
		return sex;
	}
	public void setSex(String sex) {
		this.sex = sex;
	}
	public String getAge() {
		return age;
	}
	public void setAge(String age) {
		this.age = age;
	}
}
9.Service和ServiceImpl
UserService.java(注:interface)
package com.service;

import java.util.List;

import com.model.User;

public interface UserService {

	public List getList();
}
UserServiceImpl.java
package com.service.impl;

import java.util.List;

import org.springframework.beans.factory.annotation.Autowired;
import org.springframework.stereotype.Service;

import com.dao.UserDao;
import com.model.User;
import com.service.UserService;

@Service
public class UserServiceImpl implements UserService {

	@Autowired
	private UserDao useDao;

	@Override
	public List getList() {

		return useDao.getList();
	}

}
10.接下来我们写一个页面来显示数据
创建一个list.jsp页面:
<%@ page language="java" contentType="text/html; charset=UTF-8"
	pageEncoding="UTF-8"%>
<%@taglib prefix="c" uri="http://java.sun.com/jsp/jstl/core"%>


Insert title here


			ID
			姓名
			性别
			年龄
好了所有代码已经写完了,接下来看一下效果:
启动项目,打开浏览器:(我的tomcat是改了80端口的,如何修改tomcat80端口号)
项目源码链接:链接:https://pan.baidu.com/s/1J5gAWVBDgJ19F-9UvqZSLw 密码:zdlx
项目jar包链接:链接:https://pan.baidu.com/s/19EVfB7G5GfNz_4kWR_YWCg 密码:nhhh