有趣的Python--Tkinter图形化界面
Tkinter模块("Tk 接口")是Python的标准Tk GUI工具包的接口.Tk和Tkinter可以在大多数的Unix平台下使用,同样可以应用在Windows和Macintosh系统里.Tk8.0的后续版本可以实现本地窗口风格,并良好地运行在绝大多数平台中。
安装了IDE的小伙伴先来动手试试第一个小例子:
# coding=utf-8
import Tkinter
import tkSimpleDialog

root = Tkinter.Tk()
def inStr11():
r = tkSimpleDialog.askinteger("GDOcom", 'input int ')
return r
a = inStr11()
print a
root.destroy()
这就是一个简单的TK的图形化的界面了.
下面再来复杂一些的:
tkinter 实现用户登录界面
tkinter 创建应用程序创建窗口,以及文本框、按钮、简单消息框等组件的用法
# coding=utf-8
import Tkinter
import tkMessageBox


def login():
    name = entryName.get()
    pwd = entryPwd.get()
    if name == 'admin' and pwd == '123456':
        tkMessageBox.showinfo(title='Python tkinter', message='OK')
    else:
        tkMessageBox.showinfo('Python tkinter', message='Error')


def cancel():
    varName.set('')
    varPwd.set('')


root = Tkinter.Tk()
root.title('系统登录')
varName = Tkinter.StringVar(value='')
varPwd = Tkinter.StringVar(value='')
labelName = Tkinter.Label(root, text='User Name:', justify=Tkinter.RIGHT, width=80)
labelName.place(x=10, y=5, width=80, height=20)
entryName = Tkinter.Entry(root, width=80, textvariable=varName)
entryName.place(x=100, y=5, width=80, height=20)

labelPwd = Tkinter.Label(root, text='User Pwd:', justify=Tkinter.RIGHT, width=80)
labelPwd.place(x=10, y=30, width=80, height=20)
entryPwd = Tkinter.Entry(root, show='*', width=80, textvariable=varPwd)
entryPwd.place(x=100, y=30, width=80, height=20)

buttonOk = Tkinter.Button(root, text='Login', command=login)
buttonOk.place(x=30, y=70, width=50, height=20)
buttonCancel = Tkinter.Button(root, text='Cancel', command=cancel)
buttonCancel.place(x=90, y=70, width=50, height=20)

root.mainloop()
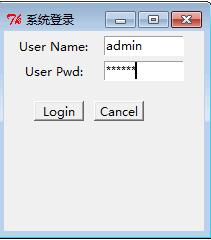
运行上面的代码效果是这样的:
我们来分析上代码中的内置函数用法:
tkMessageBox:
Python GUI - Tkinter tkMessageBox: tkMessageBox模块用于显示在您的应用程序的消息框。此模块提供了一个功能,您可以用它来显示适当的消息
tkMessageBox模块用于显示在您的应用程序的消息框。此模块提供了一个功能,您可以用它来显示适当的消息.
这些功能有些是showinfo,showwarning,showerror,askquestion,askokcancel,askyesno,askretryignore.
mainloop()的理解:
很简单。你把鼠标一个按上会变成手型。或者你在知乎回答问题的文本框里输入文字。甚至你看到的电脑屏幕内容。看上去是动态的。其实和动画电影原理差不多。
现在你鼠标的移动,键盘的按键。都是实实在在输入。这里我们叫做事件。譬如有鼠标移动事件,单击事件,F5按下的事件。
以回答问题 按钮<发布回答>左侧的匿名勾选框为例。你单击一次,就绿色小勾表示选中。再单击就去掉了小勾。现在你这样想。实际上有两幅图(有勾和无勾的)。你单击鼠标移动鼠标就触发了事件,会把你鼠标的坐标和单击这个行为捕获。那假设你单击了,鼠标坐标又在那个框框区域内,我们就把一张图用另外一张图代替,同时后台表示是否匿名的某个变量取反。
root到root.pack()之间,无非就是设计你的部件的类型,尺寸,样式,位置,然后绑定一个事件。
mainloop就进入到事件(消息)循环。一旦检测到事件,就刷新组件。譬如你输入一个字符,就要立即在光标那个位置显示出来(前提是你选中了文本框,也就是鼠标在文本框这个图案的范围内单击过)。又譬如你点了首页这个按钮(就是在这个图形的区域附近单击)那么就要清除你浏览器里的全部部件,然后重新绘制(按照主页设计的布局和内容)。
再给你打个比方。你设计的程序中间有个按钮,你设计的时候就要把一个按钮放到中间去。这个按钮有一个属性(假设和变量x关联,x表示按钮上文字的颜色,如果是1就黑色,0就灰色)。你按一下按钮,文字颜色就会切换。root到root.pack()你就相当于在那里放按钮(其实按钮就是多幅图,某一时刻显示其中一张),具体颜色看x取值。现在到了mainloop。一旦有事件,就又在那里放按钮(不妨直接覆盖原来的图)。所以在那个位置单击鼠标才是触发某个你想要的程序行为的要素,那个按钮的刷新,不过是其中一项程序行为。有没有按钮你都可以点击那个区域触发。但是除了设计者,谁知道呢?无法是视觉效果罢了。
PS:如果你知道连环画,你可以理解为,每个部件都是连环画。root到root.pack()就是你设计连环画。mainloop就是去翻它!实际上不是有很多程序有一个选项就是 动画效果么,关闭可以减少资源消耗。无非就是连环画的页数多。快速翻阅就有动感。如果只有两页,看上去很唐突而已。前面也说了,你看到电脑屏幕也是如此,是不停在刷新的。一般是50-60hz每秒。游戏里不有一个fps么,桢率 就是画面的刷新频率,太慢不就会卡顿么(和网络卡不是一回事)。然后屏幕还有局部刷新的技术,不一定每次都刷新整块屏幕。设计的程序也是。你可以所有组件每次事件都重新画。也可以只是画你需要的部分。
这里很多用法我们看似没见过,只不过是其他的表达方式而已,逻辑思维差不多,如果你想细致的学习可以直接百度Tkinter你会发现有很多内置函数的使用,你会很快的上手。
tkFileDialog有两种形式:
一个是.askopenfilename(option=value, …) 这个是”打开”对话框
另一个是:asksaveasfilename(option=value, …) 这个是另存为对话框
option参数如下:
defaultextension = s 默认文件的扩展名
filetypes = [(label1, pattern1), (label2, pattern2), …] 设置文件类型下拉菜单里的的选项
initialdir = D 对话框中默认的路径
initialfile = F 对话框中初始化显示的文件名
parent = W 父对话框(由哪个窗口弹出就在哪个上端)
title = T 弹出对话框的标题
如果选中文件的话,确认后会显示文件的完整路径,否则单击取消的话会返回空字符串
[python] view plain copy
#coding=UTF-8
# __author__ = '极致'

import Tkinter, Tkconstants, tkFileDialog

class TkFileDialogExample(Tkinter.Frame):

    def __init__(self, root):

        Tkinter.Frame.__init__(self, root)

        # options for buttons
        button_opt = {'fill': Tkconstants.BOTH, 'padx': 5, 'pady': 5}

        # define buttons
        Tkinter.Button(self, text='askopenfile', command=self.askopenfile).pack(**button_opt)
        Tkinter.Button(self, text='askopenfilename', command=self.askopenfilename).pack(**button_opt)
        Tkinter.Button(self, text='asksaveasfile', command=self.asksaveasfile).pack(**button_opt)
        Tkinter.Button(self, text='asksaveasfilename', command=self.asksaveasfilename).pack(**button_opt)
        Tkinter.Button(self, text='askdirectory', command=self.askdirectory).pack(**button_opt)

        # define options for opening or saving a file
        self.file_opt = options = {}
        options['defaultextension'] = '.txt'
        options['filetypes'] = [('all files', '.*'), ('text files', '.txt')]
        options['initialdir'] = 'C:\\'
        options['initialfile'] = 'myfile.txt'
        options['parent'] = root
        options['title'] = 'This is a title'

        # This is only available on the Macintosh, and only when Navigation Services are installed.
        #options['message'] = 'message'

        # if you use the multiple file version of the module functions this option is set automatically.
        #options['multiple'] = 1

        # defining options for opening a directory
        self.dir_opt = options = {}
        options['initialdir'] = 'C:\\'
        options['mustexist'] = False
        options['parent'] = root
        options['title'] = 'This is a title'

    def askopenfile(self):

        """Returns an opened file in read mode."""

        return tkFileDialog.askopenfile(mode='r', **self.file_opt)

    def askopenfilename(self):

        """Returns an opened file in read mode.
        This time the dialog just returns a filename and the file is opened by your own code.
        """

        # get filename
        filename = tkFileDialog.askopenfilename(**self.file_opt)

        # open file on your own
        if filename:
            return open(filename, 'r')

    def asksaveasfile(self):

        """Returns an opened file in write mode."""

        return tkFileDialog.asksaveasfile(mode='w', **self.file_opt)

    def asksaveasfilename(self):

        """Returns an opened file in write mode.
        This time the dialog just returns a filename and the file is opened by your own code.
        """

        # get filename
        filename = tkFileDialog.asksaveasfilename(**self.file_opt)

        # open file on your own
        if filename:
            return open(filename, 'w')

    def askdirectory(self):

        """Returns a selected directoryname."""

        return tkFileDialog.askdirectory(**self.dir_opt)

if __name__ == '__main__':
    root = Tkinter.Tk()
    TkFileDialogExample(root).pack()
    root.mainloop()
写这篇文章的主要目的是让大家知道python的其他领域的使用,希望大家一起好好学习python,共同进步!
