数据库的主从同步、读写分离、HMA
主从同步
一:主的配置
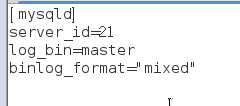
1.master:192.168.137.21
2.mysqladmin -uroot password '123456'
3.vim /etc/my.cnf
4.systemctl restart mariadb
5.grant replication slave on *.* to replicater@"192.168.137.%" identified by "123456";
6.MariaDB [(none)]> show grants for replicater@"192.168.137.%";
7.MariaDB [(none)]> show master status\G;
8.MariaDB [(none)]> reset master;
二:从的配置
1.slave:192.168.137.22
2.mysqladmin -uroot password '123456'
3.vim /etc/my.cnf
4.systemctl restart mariadb
5.MariaDB [(none)]> change master to master_host='192.168.137.21', master_user='replicater', master_password='123456', master_log_file='master.000001', master_log_pos=245;
最后测试:
主:create database db1;
从:show slave status\G; 检查IO/SQL线程是否时yes状态;yes是就同步,no不同步;
show databases; 检查有没有db1,有则同步;
读写分离
一:再master主上配置
1:MariaDB [(none)]> grant replication slave,replication client on *.* to scalemon@"%" identified by "123456";
创建监控用户,并授权replication slave和replication client 权限。
2:MariaDB [(none)]> grant select on mysql.* to maxscale@"%" identified by "123456";
创建路由用户,并授权select查询权限。
3:MariaDB [(none)]> grant all on *.* to student@"%" identfied by "123456";
创建student用户,并授予所有权限。
二: maxscale 上配置
1:继承上面的主从同步后,再起另一台虚拟机(192.168.137.20),hostname=maxscale
2: yum -y localinstall maxscale-2.1.2-1.rhel.7.x86_64.rpm mariadb (mariadb提供mysql工具)
3:vim /etc/maxscale.cnf
4:maxscale --config=/etc/maxscale.cnf 启动maxscale服务
5:netstat -antpu |grep maxscle
6: mysql -h192.168.137.20 -ustudent -p123456 -P4006 用主数据库授权的student 用户来登入maxscale服务器,并通过下面
MySQL [(none)]> select @@hostname 来检测读写分离、


