TensorFlow入门(一) 搭建BP神经网络识别MNIST数据集
编者注:以下涉及的代码,均可在pycharm+python3.6+windows系统中运行。
- 1.学前准备
- 1.1 安装python
- 1.2 安装pycharm
- 1.3 配置Pycharm的interpreter
- 2.基础知识
- 2.1 session会话控制
- 2.2 constant常量
- 2.3 Variable变量
- 2.4 placeholder传值
- 2.5 激励函数
- 3.搭建一个神经网络
- 3.1 搭建一个简单的神经网络
1.学前准备
1.1 安装python
- python的下载地址
1.2 安装pycharm
- pycharm的下载地址
- 进入Download页面后可以选择不同的版本,收费的专业版和免费的社区版,建议选择社区版。
1.3 配置Pycharm的interpreter
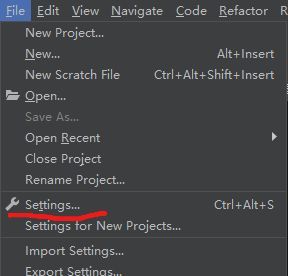
- 1.打开settings选项
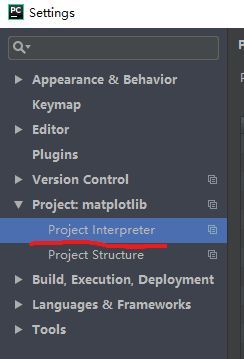
- 打开Project Interpreter选项
- 选择已经下载好的python.exe
- 配置成功,开始快乐的学习之旅吧!(手动滑稽,hhh)
2.基础知识
2.1 session会话控制
-
官网解释:class tf.session是一个运行TensorFlow操作的类,一个session对象封装了操作对象的执行环境,并且计算张量。
-
session的官方文档
-
示例代码1
import tensorflow as tf

#tf.constant是TensorFlow中的常量,后续将会提到
a = tf.constant(5.0)
b = tf.constant(6.0)
c = a * b

sess = tf.Session()
#need release part:sess.close()
print(sess.run(c))
#release session
sess.close()


Output:30.0
- 示例代码2
import tensorflow as tf
a = tf.constant(5.0)
b = tf.constant(6.0)
c = a * b

with tf.Session() as sess:
#don`t need release part:sess.close()
    print(sess.run(c))


Output:30.0
2.2 constant常量
- 函数原型:
tf.constant(value,dtype,shape,name=“constant”,verify_shape)
参数
value:常量
dtype:数据类型,常为tf.float32
shape:value的形状,默认None是一维
name:该常量的名称
verify_shape:常量的形状是否可更改
- 示例代码
import tensorflow as tf

a = tf.constant(1,name="my_constant")
with tf.Session() as sess:
    print(a)


Output:1
2.3 Variable变量
-
官网解释:当模型训练时,用变量来存储和更新参数。
-
Variable官方文档
-
Variable的使用
- 创建:当创建一个变量时,你将一个张量(tensor)传入构造函数Variable(),初始值常常是常量或者随机值。
-
示例代码
import tensorflow as tf

weights = tf.Variable(tf.random_normal([3,2],stddev=0.35),
                      dtype=tf.float32,name="weights")
x = tf.constant(np.arange(6).reshape([2,3]),dtype=tf.float32,name="x")
biases = tf.Variable(tf.zeros(3),dtype=tf.float32,name="biases")

y = tf.matmul(weights, x) + biases  #tf.matmul为矩阵相乘

#tf.initialize_all_variables()是并行初始化所有的值,将弃用
#官方建议使用tf.gloabal_variables_initializer()
init = tf.initialize_all_variables()
with tf.Session() as sess:
    sess.run(init)
    print(sess.run(y))


Output:
[[ 0.6544827  0.9820475  1.3096123]
 [ 0.9516853  1.8644123  2.7771392]
 [-1.3801799 -1.4455684 -1.510957 ]]
2.4 placeholder传值
- 函数原型:
tf.placeholder(dtype,shape=None,name=None)
参数
dtype:数据类型,常为tf.float32
shape:value的形状,默认None是一维
name:该常量的名称
-
作用:tf.placeholder()在神经网络构建Graph时在模型中占位,此时并没有把输入的数据传入模型,只是会分配必要的内存。
-
Feed机制:
- 官方解释:该机制可以临时替代图中任意操作中的tensor,可以对图中任何操作提交补丁,直接插入一个tensor。
-
代码示例
import tensorflow as tf
import numpy as np

#定义两个占位符a,b
a = tf.placeholder(dtype=tf.float32,shape=[2,3],name="a")
b = tf.placeholder(dtype=tf.float32,shape=[3,2],name="b")

c = tf.matmul(a,b)    #矩阵相乘

with tf.Session() as sess:
#向placeholder()feed数据
    result = sess.run(c,feed_dict={a:np.arange(6).reshape([2,3]), b:np.arange(6).reshape([3,2])})
    print(result)


Output:
[[10. 13.]
 [28. 40.]]
2.5 激励函数
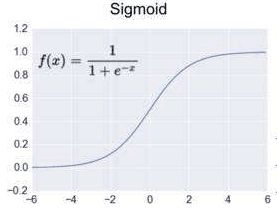
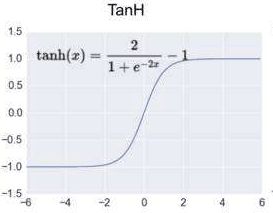
- 官方解释:激活操作为神经网络提供了不同种类的非线性激励函数,包括平滑的激励函数(sigmod,tanh and softplus),连续但是并不处处可微的激励函数(relu,relu6 and relu_x)和随机正则(dropout)
- 常见函数
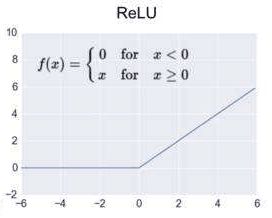
- activation官方文档
- 示例代码
#应用代码将在后序的神经网络搭建过程给出
3.搭建一个神经网络
3.1 搭建一个简单的神经网络
- 代码
def simple_layer(inputs, input_size, output_size, activation_func=None):
    #初始化weights变量,标准差为0.1,shape为[input_size,output_size]的二维矩阵
    weights = tf.Variable(tf.random_normal([input_size,output_size],
                                           stddev=0.1),dtype=tf.float32,name="w")
    #初始化biases变量,形状为一行,ouput_size列的矩阵
    biases = tf.Variable(tf.zeros([1,output_size]) + 0.1,dtype=tf.float32,name="b")
    #wx_plus_b = inputs * weights + biases
    wx_plus_b = tf.matmul(inputs, weights) + biases
    #若有激励函数,则使用激励函数
    if activation_func:
        return activation_func(wx_plus_b)
    else:
        return wx_plus_b

#np.newaxis给部分数据增加一个维度[:,np.newaxis]选取全部的数据增加维度
input_data = np.linspace(-1,1,300)[:,np.newaxis]  #input_data.shape=(300,1)

#加入噪声使得结构非线性
# noise = tf.constant(tf.random_normal(0.05),shape=input_data.shape)
noise = np.random.normal(0,0.05,input_data.shape)

y = np.square(input_data)- 0.05 + noise

xp = tf.placeholder(tf.float32,[None,1])
yp = tf.placeholder(tf.float32,[None,1])
layer1 = simple_layer(xp,1,10,activation_func=tf.nn.relu)
prediction = simple_layer(layer1,10,1,activation_func=None)

loss = tf.reduce_mean(tf.reduce_sum(np.square(prediction - yp), reduction_indices=[1]))

#以梯度下降优化loss
train = tf.train.GradientDescentOptimizer(0.1).minimize(loss)

#全局变量初始化
init = tf.global_variables_initializer()

with tf.Session() as sess:
    sess.run(init)
    for i in range(1000):
        sess.run(train,feed_dict={xp:input_data,yp:y})
        if i%50 == 0:
           #每50步打印损失值 print(sess.run(loss,feed_dict={xp:input_data,yp:y}))


Output:
0.113090664
0.08897156
0.08376087
0.07671956
0.06571197
0.04974751
0.031979006
0.0182825
0.011133177
0.008236016
0.0070663677
0.0064273565
0.005888584
0.00542279
0.0050372137
0.0047619306
0.004534866
0.0043594954
0.0042226757
0.004106492
可以看出loss值不断降低,训练模型是有效的。
