使用python、dlib、PyQt5做人脸识别
人脸识别
- 环境版本
- Windows系统下的应用图形界面
- 功能函数
- 解决中文问题
环境版本
python:3.6
dlib:19.17.0
tensorflow-gpu:2.0
PyQt5:5.13
pyecharts:1.7.1
OpenCV:4.1.1.26
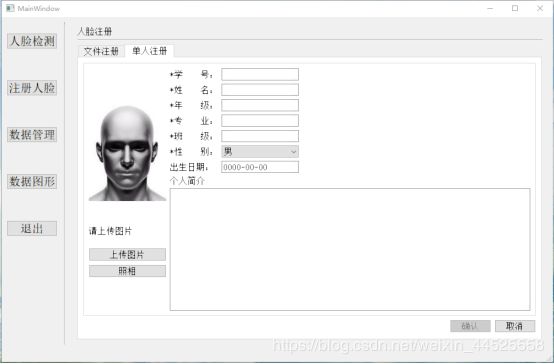
Windows系统下的应用图形界面
- 搭建应用界面可先使用qt designer快速建立基本排版和组件,
界面代码较多不就贴上了。
功能函数
- 摄像头视频流的获取,使用opencv读取没帧图像
部分代码如(之后整理再发完整版):
from datetime import datetime
import cv2
import os #用于文件处理
import numpy as np
import imghdr #用于图片类型判断
from PyQt5.QtGui import QPixmap
from imutils import *
from PIL import Image,ImageDraw,ImageFont
from face002 import face_vies

def functions1(label,label_2,label_6,label_7,label_8,pushButton,pushButton_2):
    print('点击了启动按钮')
    print('即将启动摄像头')
    global isof
    isof = 1
    pushButton.setEnabled(False)
    pushButton_2.setEnabled(True)
    X = []
    y = []
    #打开对应的标签文件
    with open('lt.txt') as fh:
        for line in fh:
            arrLine = line.split(':')
            image = cv2.imread(arrLine[0], 0)
            X.append(image)
            y.append(int(arrLine[1]))
    #定义人脸识别模型
    model = cv2.face.EigenFaceRecognizer_create()
    #进行模型训练
    model.train(np.array(X), np.array(y))
    #保存训练模型数据
    model.save('predict_face.xml')
    #3人脸识别
    #分类名称
    # name = ['1', '2', '3']
    dict_name = ['张', '王', '李']
    dict_gender = ['男', '女', '女']
    dict_ph = ['10086', '10010', '188888']
    #载入训练后的模型
    model = cv2.face.EigenFaceRecognizer_create()
    model.read('predict_face.xml')
    camera = cv2.VideoCapture(1)
    # 加载Haar级联数据文件,用于检测人面
    face_cascade = cv2.CascadeClassifier('haarcascade_frontalface_default.xml')
    while (True):
        # 检测摄像头的人面
        read, img = camera.read()
        img = cv2.cvtColor(img, cv2.COLOR_RGB2BGR)
        faces = face_cascade.detectMultiScale(img, 1.3, 5)
        # 将检测的人面进行识别处理
        if not len(faces)>0:
            label_2.clear()
            label_6.clear()
            label_7.clear()
            label_8.clear()
        for (x, y, w, h) in faces:
            # 画出人面所在位置并灰度处理
            img = cv2.rectangle(img, (x, y), (x + w, y + h), (255, 0, 0), 2)
            gray = cv2.cvtColor(img, cv2.COLOR_BGR2GRAY)
            roi = gray[x:x + w, y:y + h]
                # 将检测的人面缩放200*200大小,用于识别
                # cv2.INTER_LINEAR是图片变换方式,其余变换方式如下:
                # INTER_NN - 最近邻插值。
                # INTER_LINEAR - 双线性插值(缺省使用)
                # INTER_AREA - 使用象素关系重采样。当图像缩小时候,该方法可以避免波纹出现。
                # INTER_CUBIC - 立方插值。
            roi = cv2.resize(roi, (200, 200), interpolation=cv2.INTER_LINEAR)
                # 检测的人面与模型进行匹配识别
            params = model.predict(roi)
            #if len(params)>
            print("Label: %s, Confidence: %.2f" % (params[0], params[1]))
                # 将识别结果显示在摄像头上
                # cv2.FONT_HERSHEY_SIMPLEX 定义字体
                # cv2.putText参数含义:图像,文字内容, 坐标 ,字体,大小,颜色,字体厚度
                # 要是想显示中文文字下方主要有解决方法
            #img2 = cv2.putText(img, name[params[0]], (x, y - 20), cv2.FONT_HERSHEY_SIMPLEX, 1, (0,0,255), 2)
            if len(params) == 0:
                name = '我不认识你'
                gender = '*****'
                ph = '*****'
            else:
                name = dict_name[params[0]]
                gender = dict_gender[params[0]]
                ph = dict_ph[params[0]]
            left = x
            top = y - 50
            textColor = (0, 0, 255)
            textSize = 48
            if (isinstance(img,np.ndarray)):
                img = Image.fromarray(cv2.cvtColor(img,cv2.COLOR_BGR2RGB))
            draw = ImageDraw.Draw(img)
            fontText = ImageFont.truetype("zise/STKAITI.TTF", textSize, encoding="utf-8")
            draw.text((left, top), name, textColor, font=fontText)
            img = cv2.cvtColor(np.asarray(img), cv2.COLOR_RGB2BGR)
            # 以下信息是识别人员的信息,自己传送
            # name = 'liuting'
            #frame2 = cv2.imread(imgpath)
            # 如果预测阀值成功显示右方信息
            if params[1] > 5000.0:
                label_2.setPixmap(QPixmap('imgname{}.jpg'.format(params[0])))
                label_6.setText(name)
                label_7.setText(gender)
                label_8.setText(ph)
            # 否则清空右方信息
            else:
                label_2.clear()
                label_6.clear()
                label_7.clear()
                label_8.clear()
        face_vies(label, img)
        if isof==0:
            label.clear()
            label_2.clear()
            label_6.clear()
            label_7.clear()
            label_8.clear()
            break
         #cv2.imshow("camera", img)
        if cv2.waitKey(120) & 0xff == ord("q"):
            break
    cv2.destroyAllWindows()

def functions2(label,pushButton, pushButton_2):
    global isof
    isof = 0
    print('点击了关闭按钮')
    label.clear()  # 清空摄像头显示图像的部件内容
    pushButton.setEnabled(True)
    pushButton_2.setEnabled(False)  # 按钮是否可点击
dict_stu = {}
def time_str():
    time1 = datetime.now().strftime("%Y-%m-%d %H:%M:%S")
    print(type(time1))
    # 写入txt
    with open('flog.txt', mode='w') as f:
        f.write(strstu)
    # 打开txt
    os.startfile(dirfile + '/' + 'flog.txt')

def edit_tmie(Edit_time, Edit_time2):
    """
    判断是否在该时间内
    :param Edit_time:
    :param Edit_time2:
    :return : T or F
    """
    # print(type(Edit_time.time()), Edit_time2.time().toString())
    str_time = Edit_time.time().toString()
    str_time2 = Edit_time2.time().toString()
    # 范围时间
    d_time = datetime.datetime.strptime(str(datetime.datetime.now().date()) + str_time, '%Y-%m-%d%H:%M:%S')
    d_time1 = datetime.datetime.strptime(str(datetime.datetime.now().date()) + str_time2, '%Y-%m-%d%H:%M:%S')
    # 当前时间
    n_time = datetime.datetime.now()
    # 判断当前时间是否在范围时间内
    if n_time > d_time and n_time < d_time1:
        return True
    return False

if __name__ == '__main__':
    time_str()
-
使用dlib的人脸检测器,跟踪与定位人脸位置
-
剪切出人脸图像,提取人脸特征
# 裁剪坐标为[y0:y1, x0:x1]
img = frame[rec.top() - 30:rec.bottom() + 30,
            rec.left() - 30:rec.right() + 30]
- 保存人脸特征,构建人脸库
# 特征提取,并保存
def feature_extraction(stu_id, img):
    """特征提取,并保存"""
    detector = Configuration().detector
    sp = Configuration().sp
    facerec = Configuration.facerec
    dets = detector(img, 1)
    dets = dets[0]
    rec = dlib.rectangle(
        dets.rect.left(),
        dets.rect.top(),
        dets.rect.right(),
        dets.rect.bottom())
    # 提取68个特征点
    shape = sp(img, rec)
    # 使用特征点识别人脸()
    face_descriptor = facerec.compute_face_descriptor(img, shape)
    # 转换为numpy array
    face_descriptor = np.array(face_descriptor)
    # numpy array转换为list
    face_descriptor = face_descriptor.tolist()
    # 存入json文件
    json_file(stu_id, face_descriptor)
# 保存json文件
def json_file(stu_id, face_descriptor):
    """
    json读写保存
    :return:
    """
    stu_id = str(stu_id)
    da = {}
    # 打开json
    with open('../fileset/jsonfile/test_data.json', 'r') as js:
        da = json.load(js)
    da[stu_id] = face_descriptor
    json_str = json.dumps(da)
    with open('../fileset/jsonfile/test_data.json', 'w') as json_file:
        json_file.write(json_str)
- 是用摄像头,检测人脸并提取人脸特征
部分代码:
detector = Configuration().detector
    sp = Configuration().sp
    facerec = Configuration.facerec
    dets = detector(img, 1)
    dets = dets[0]
    rec = dlib.rectangle(
        dets.rect.left(),
        dets.rect.top(),
        dets.rect.right(),
        dets.rect.bottom())
    # 提取68个特征点
    shape = sp(img, rec)
    # 使用特征点识别人脸()
    face_descriptor = facerec.compute_face_descriptor(img, shape)
    # 转换为numpy array
    face_descriptor = np.array(face_descriptor)
    # numpy array转换为list
    face_descriptor = face_descriptor.tolist()
    # 存入json文件
    json_file(stu_id, face_descriptor)
- 检测后的人脸特征与人脸特征库进行相似度计算
def find_nearest_class_for_image(face_descriptor, k_label, v_label):
	# 设置阀值 0.5
    threshold = Configuration.threshold
    temp = face_descriptor - v_label
    e = np.linalg.norm(temp, axis=1, keepdims=True)
    min_distance = e.min()
    if min_distance > threshold:
		# 语音播报
        infos = '没有比配的人脸,请先注册'
        t1 = threading.Thread(
            target=voice_broadcast,
            name='voice_broadcast',
            args=(
                infos,))
        t1.setDaemon(True)
        t1.start()

        return 0, 0
    index = np.argmin(e)
    # print('学号::', k_label[index])
    return k_label[index], min_distance
解决中文问题
- opencv对中文路径,中文文件名,绘画/放置中文文字可能出现错误
可以使用以下方式:
cv2.imencode() # 写
cv2.imdecode() # 读
- 如果要在图像上添加中文需要进行文字处理
import numpy as np
def cv2ImgAddText(img, text, left, top, textColor, textSize=50):
	'''
    :param img: 图像
    :param text: 文本
    :param left: x
    :param top: y
    :param textColor: 颜色
    :param textSize: 字体大小
    :return:
    '''
    if (isinstance(img, np.ndarray)):  # 判断是否numpy数组
        # fromarray:转换成PIL格式
        img = Image.fromarray(cv2.cvtColor(img, cv2.COLOR_BGR2RGB))
    draw = ImageDraw.Draw(img)
    # 在Windows下Font导入字体文件,
    fontText = ImageFont.truetype("zise/STKAITI.TTF", textSize, encoding="utf-8")
    draw.text((left, top), text, textColor, font=fontText)
    return cv2.cvtColor(np.asarray(img), cv2.COLOR_RGB2BGR)
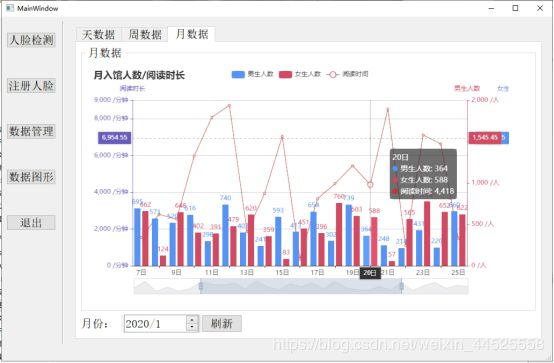
- pyecharts提供了将图形保存于html中,可以将数据生成HTML文件后QT界面再读取HTML文件进行显示图形。
要想在qt上直接显示而不进行保存,需要将图形对象进行反序列化。
并将该对象中的属性为None去除,才能正常显示。
# 对象反序列化
def xunhuan(daa):
    if isinstance(daa, dict):
        for k in daa.keys():
            try:
                daa[k] = daa[k].opts
                xunhuan(daa[k])
            except:
                if isinstance(daa[k], (list, dict)):
                    xunhuan(daa[k])
    elif isinstance(daa, list):
        for indexs, ls in enumerate(daa):
            try:
                daa[indexs] = ls.opts
            except:
                xunhuan(ls)

# 删除空
def Noness(daa):
    if isinstance(daa, dict):
        for k in daa.keys():
            if daa[k] == None:
                del daa[k]
                return Noness(daa)
            else:
                Noness(daa[k])
    elif isinstance(daa, list):
        for ls in daa:
            Noness(ls)
- 显示效果如:
- 如想让界面更好看一些,可以使用setStyleSheet()添加css样式
如:
# 设置字体大小
self.lable.setStyleSheet('font-size:16px;')