个人博客 Django 评论模块开发总结【一】Github第三方登陆
个人博客Django 评论模块开发总结
个人网站开通评论了 https://www.charmcode.cn/article/2020-07-09_Comment
欢迎评论
个人博客使用Python Django框架开发, 以下博客总结都是以Django为演示,前端使用原生Js 加简单封装的fetch请求库 替换JQuery的ajax,布局用的flex。

前言
我看网上现在很多都是使用的 畅言 或者 Disqus 等等的插件,当然集成插件确实也方便轻松。
但是,本着技术人员的热情,我还是想自己开发一下。
其他自己开发的评论就是像 阮一峰老师的网站一样。可以随便写个人信息然后评论,我不是很喜欢。
我最后选择了第三方登陆,然后再评论。想着技术人应该都有 GitHub 账号, 于是就选择了GitHub第三方登陆。
可参考阮一峰老师的 http://www.ruanyifeng.com/blog/2019/04/github-oauth.html
技术方向确定了,就想着如何开始着手开发。以下就是开发第三方登陆后评论的流程。实际一天半完成。(总结博客下班抽时间写,也算个教程了)
- 1 首先实现GitHub 第三方登陆
- 2 后台表设计, 数据管理, 评论接口设计。(用户输入的内容得特别小心,如恶意刷接口,SQL注入等)
- 3 页面样式html+css实现。
- 4 前端 js 逻辑控制,请求渲染数据。
GitHub 第三方登陆
首先要知道第三方登陆的原理 Oauth2.0协议,这里不再赘述, 不了解请看下面阮一峰老师的博客介绍。
- 理解OAuth 2.0 http://www.ruanyifeng.com/blog/2014/05/oauth_2_0.html
- OAuth 2.0 的四种方式 http://www.ruanyifeng.com/blog/2019/04/oauth-grant-types.html
- GitHub OAuth 第三方登录示例教程 http://www.ruanyifeng.com/blog/2019/04/github-oauth.html
三套组合拳下来,基本就差不多了吧。
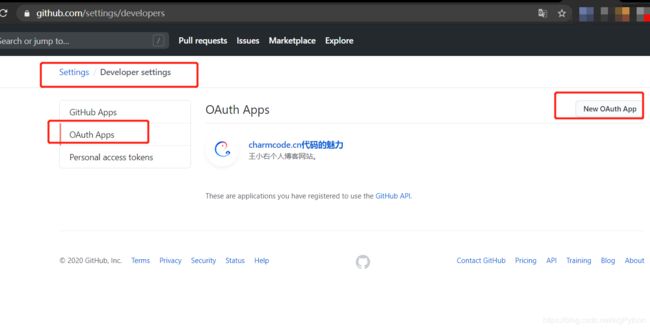
一 首先去注册信息

网址 https://github.com/settings/applications/new

本地测试可以像我这样填写localhost。
注册完后会得到两个id
Client ID xxxxxxxxx
Client Secret xxxxxxxxxxx
二 整个认证流程
- 1 请求github地址回调:
 https://github.com/login/oauth/authorize?
 client_id=你的client_id&
 redirect_uri=http://localhost:5000/github/oauth/redirect
弄个a标签或者其他的方式, 点击访问上面这个地址,github就会携带一个code 以get方式回调
http://localhost:5000/github/oauth/redirect 这个地址。
- 2 本地服务接收code
在本地启动一个服务, 接口地址为http://localhost:5000/github/oauth/redirect 的get服务,并获取code参数 - 3 获取access_token
接收到code参数后,再拼接以下地址 获取访问获取access_token
url = f"https://github.com/login/oauth/access_token?client_id={client_id}&client_secret={client_secret}&code={code}"

res = requests.post(url, headers={
            "accept": 'application/json'
        }, timeout=30)
# 返回json数据 获取access_token
access_token = res.json().get("access_token")
- 4 携带access_token获取用户信息
 res = requests.get("https://api.github.com/user", headers={
            "accept": 'application/json',
            "Authorization": f"token {access_token}"
        }, timeout=30)
return res.json()
以上整个第三方登陆就完成了。
迷惑的地方
为什么第一步的回调地址写 http://localhost:5000/github/oauth/redirect 本地的localhost都可以?
我看阮一峰老师博客有评论回答
那个地址是客户端浏览器用的,浏览器直接跳转的,所以你自己本机起了就能跳转过去访问。
那个回调地址并不是github发起,而是你本机的浏览器。
部署到线上的时候记得把这个回调地址 http://localhost:5000 换成你服务器的域名。GitHub设置也要记得改。
Django GitHub登陆接口
import logging
import traceback

import requests

from django.conf import settings
from django.http import JsonResponse
from django.shortcuts import redirect

logger = logging.getLogger(__file__)

class GithubOauth(View):
    """Github第三方登录"""

    def get(self, request):
        code = request.GET.get('code')
        if not code:
            # 没有获取到code直接跳转到首页
            return redirect("/")
        refer_url = self.get_refer_url(request)
        logger.info(f"github登录接口回调 code:{code}")
        try:
            access_token = self.get_access_token(code)
            user_info = self.get_user_info(access_token)
        except requests.exceptions.Timeout:
            return JsonResponse({"code": 400, "data": None, "message": "请求 Github 登录超时"})
        except Exception as e:
            logger.info(f"登录报错{traceback.format_exc()}")
            return JsonResponse({"code": 500, "data": None, "message": "请求 Github 未知错误"})
        else:
            logger.info(f"GitHub用户信息{user_info}")
            # 这里就获取到GitHub用户信息了
            # 可以自己存数据库一份
            # 携带用户部分信息回调
            response = redirect(refer_url)
            response.set_cookie("github_username",username)
            response.set_cookie("github_avatar", avatar)

            return response

    @staticmethod
    def get_refer_url(request):
        """
        获取跳转前的url
        :param request:
        :return:
        """
        refer_url = request.META.get('HTTP_REFERER', '/')
        host = request.META['HTTP_HOST']
        if refer_url.startswith('http') and host not in refer_url:
            refer_url = '/'
        return refer_url

    @staticmethod
    def get_access_token(code):
        """
        获取access_token
        :param code:
        :return:
        """
        client_id = settings.GITHUB_CLIENT_ID
        client_secret = settings.GITHUB_CLIENT_SECRET

        url = f"https://github.com/login/oauth/access_token?client_id={client_id}&client_secret={client_secret}&code={code}"

        res = requests.post(url, headers={
            "accept": 'application/json'
        }, timeout=30)

        access_token = res.json().get("access_token")

        return access_token

    @staticmethod
    def get_user_info(access_token):
        res = requests.get("https://api.github.com/user", headers={
            "accept": 'application/json',
            "Authorization": f"token {access_token}"
        }, timeout=30)
        return res.json()
以上就是第三方登陆的全部过程,其实非常简单。