TensorFlow模型转caffe模型,并使用pycaffe进行前向推理
最近在研究怎么将TensorFlow模型转化成caffe模型
奈何开源工具以caffe转TensorFlow居多,无奈只有硬着头皮去查资料
本篇博客参考了 jiongnima 大神的四篇博客,详细地址:
https://blog.csdn.net/jiongnima/article/details/72904526
在此对其表示敬意与感谢
TF模型转caffe的前提就是要对这两个框架的使用有一定的了解
下面记录了我用TensorFlow训练的类LeNet-5模型转化成caffe模型并预测的过程
网络结构是这样的:
input–>conv1–>relu1–>pool1–>conv1–>relu2–>pool2–>conv3–>relu3–>pool3–>fc1–>fc2
由于TensorFlow的图结构都是写在代码里的(没有像caffe这样将网络的前向过程写在prototxt文件内),所以转化的时候必须要先读懂训练代码,将整个计算图画出来(对,没错,用手画→_→)
接下来就是用TensorFlow的Python接口去读取权重文件了(我这里是ckpt文件)
import tensorflow as tf
import numpy as np
CKPT_MODEL_SAVE_PATH = 'CKPT模型文件路径'
with tf.Session() as sess:
    new_saver = tf.train.import_meta_graph(CKPT_MODEL_SAVE_PATH + "ckpt_model.model-1000.meta")
    for var in tf.trainable_variables():  # get the param names
        new_saver.restore(sess, tf.train.latest_checkpoint(CKPT_MODEL_SAVE_PATH))
        all_vars = tf.trainable_variables()
        for v in all_vars:
            name = v.name
            fname = name + '.prototxt'
            fname = fname.replace('/', '_')
            fname = fname.replace(':0', '')
            fname = 'E:/modelTest/' + fname
            print (fname)
            v_4d = np.array(sess.run(v))
            # 维度为4的是卷积层权重
            if v_4d.ndim == 4:
                # v_4d.shape [ H, W, I, O ]
                # 将TensorFlow的维度顺序变换 因为两个框架之间对卷积的处理顺序不一致
                # 使用numpy的swapaxes函数进行顺序变换
                v_4d = np.swapaxes(v_4d, 0, 2)  # swap H, I
                v_4d = np.swapaxes(v_4d, 1, 3)  # swap W, O
                v_4d = np.swapaxes(v_4d, 0, 1)  # swap I, O
                # v_4d.shape [ O, I, H, W ]
                f = open(fname, 'w')
                vshape = v_4d.shape[:]
                v_1d = v_4d.reshape(v_4d.shape[0] * v_4d.shape[1] * v_4d.shape[2] * v_4d.shape[3])
                f.write('  blobs {\n')
                for vv in v_1d:
                    f.write('    data: %8f' % vv)
                    f.write('\n')
                f.write('    shape {\n')
                for s in vshape:
                    f.write('      dim: ' + str(s))
                    f.write('\n')
                f.write('    }\n')
                f.write('  }\n')
            # 维度为1的是偏置项(包含卷积与全连接层)
            elif v_4d.ndim == 1:
                f = open(fname, 'w')
                # conv/fc 这个参数可以自行更改 根据TensorFlow训练代码的name更改
                # 这里加个if的目的是区分卷积层与全连接层
                # 如果是卷积层 就加上caffe的模板格式
                if 'conv' in fname:
                    f.write('  blobs {\n')
                    for vv in v_4d:
                        f.write('    data: %.8f' % vv)
                        f.write('\n')
                    f.write('    shape {\n')
                    f.write('      dim: ' + str(v_4d.shape[0]))  # print dims
                    f.write('\n')
                    f.write('    }\n')
                    f.write('  }\n')
                # 如果是全连接层就直接写入权重文件(反正就是个矩阵)
                elif 'fc' in fname:
                    for vv in v_4d:
                        f.write('%.8f\n' % vv)
            # 维度为2的是全连接层的权重
            elif v_4d.ndim == 2:
                f = open(fname, 'w')
                vshape = v_4d.shape[:]
                v_1d = v_4d.reshape(v_4d.shape[0] * v_4d.shape[1])
                for vv in v_1d:
                    f.write('%8f\n' % vv)
            f.close()
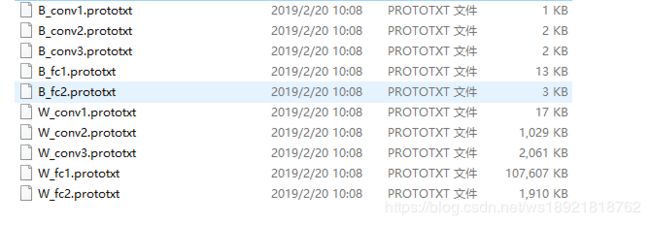
运行上述代码之后在本地E盘modelTest下会产生下列文件

接着创建一个新的prototxt文件,命名为:model.prototxt
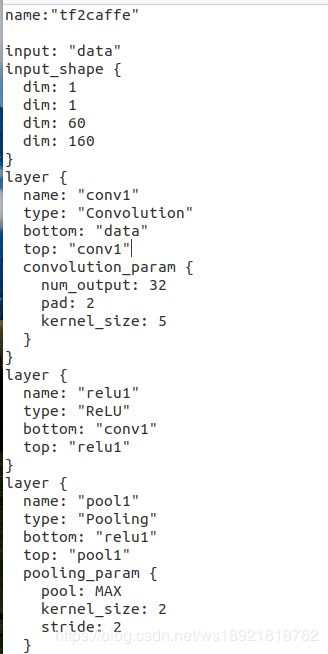
将TensorFlow的计算图转换成caffe格式(对,还是纯手写,不包含全连接层,示例如下图,很简单哒)
注意这里的input_shape四个dim参数分别是 batch、channel、height、width(我一开始就弄错了,心累)

然后再复制一份model.prototxt文件,更名为model_data.prototxt
在model_data.prototxt文件中加入刚刚用python生成的权重
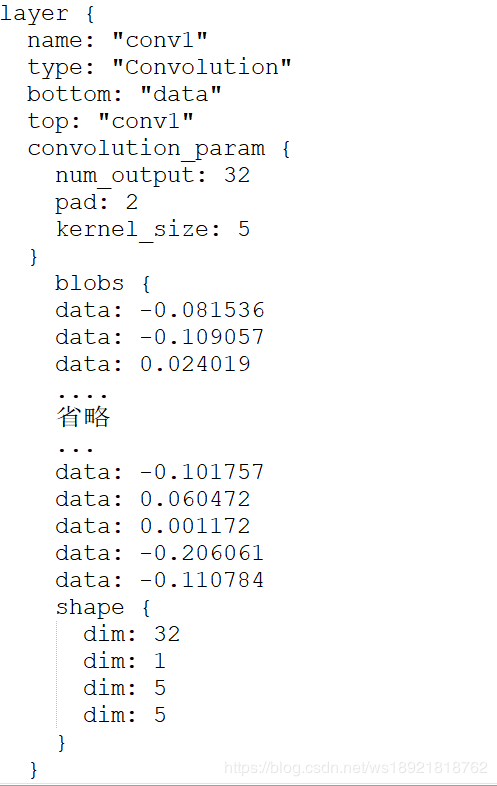
比如:W_conv1.prototxt中的数据全部复制到model_data.prototxt文件的conv1 layer下去
像这样:

偏置项(B_conv1)继续写在下面

conv1\conv2\conv3同理
这样我们就得到了一个含有数据的prototxt文件
然后我们用C++代码将上述文件转化成caffemodel文件
代码如下:
#include
#include
#include
#include
#include
#include
#include
#include
#include
#include
#include
#include "caffe/common.hpp"
#include "caffe/proto/caffe.pb.h"
#include "caffe/util/io.hpp"

using namespace caffe;
using namespace std;
using google::protobuf::io::FileInputStream;
using google::protobuf::io::FileOutputStream;
using google::protobuf::io::ZeroCopyInputStream;
using google::protobuf::io::CodedInputStream;
using google::protobuf::io::ZeroCopyOutputStream;
using google::protobuf::io::CodedOutputStream;
using google::protobuf::Message;

int main()
{
	NetParameter proto;
	ReadProtoFromTextFile("model_data.prototxt", &proto);
	WriteProtoToBinaryFile(proto, "model.caffemodel");
	return 0;
}
在linux环境下我们得到了

文件,这就是caffe的模型文件。
用caffe的python简单测试一下:
#coding=utf-8
import caffe
import numpy as np
import readFCLayerWeights
# relu 激活函数
def relu(array):
    return np.maximum(array,0)
deploy_proto = "/home/wangshuai/桌面/model/prototxt2caffemodel/model.prototxt"
caffe_model = "/home/wangshuai/桌面/model/prototxt2caffemodel/model.caffemodel"
img = '/home/wangshuai/桌面/model/1.png'
net = caffe.Net(deploy_proto, caffe_model, caffe.TEST)
# 图片预处理 变更为模型中的尺寸
transformer = caffe.io.Transformer({'data': net.blobs['data'].data.shape})
transformer.set_transpose('data', (2,0,1))                            	#改变维度的顺序
# transformer.set_raw_scale('data', 255)                                # 缩放到【0,255】之间
# 本身就是单通道
# 如果是三通道模式下需要加上  transformer.set_channel_swap('data', (2,1,0))
# pycaffe加载图片函数 false表示单通道
im = caffe.io.load_image(img,False)
#执行上面设置的图片预处理操作,并将图片载入到blob中
net.blobs['data'].data[...] = transformer.preprocess('data',im)
out = net.forward()
# 将传播值转为数组
cnn_result = out.get('pool3')
# 变更维度 由(1,64,20,8) 变为 (1,10240)
# caffe计算下来是(1,64,20,8)[ O, I, H, W ]
# 下面接tensorflow训练的全连接层,必须要转换成(20,8,64,1)[ H, W, I, O ]
cnn_result = np.swapaxes(cnn_result, 0, 1)
cnn_result = np.swapaxes(cnn_result, 1, 3)
cnn_result = np.swapaxes(cnn_result, 0, 2)
cnn_result = np.reshape(cnn_result,[1,20 * 8 * 64])
# 读取FC1权重
fc1_weights = readFCLayerWeights.read('W_fc1.prototxt')
# 变更维度 由1维数组变更为(10240,1024)
fc1_weights = np.reshape(fc1_weights,[10240,1024])
# 读取FC1偏置
fc1_bias = readFCLayerWeights.read('B_fc1.prototxt')
# 计算FC1层的输出
FC1_result = np.matmul(cnn_result,fc1_weights)
FC1_result = np.add(FC1_result,fc1_bias)
# relu激活
FC1_result = relu(FC1_result)
# 读取FC2权重
fc2_weights = readFCLayerWeights.read('W_fc2.prototxt')
# 变更维度 由1维数组变更为(1024,5*36)
fc2_weights = np.reshape(fc2_weights,[1024,5 * 36])
# 读取FC2偏置
fc2_bias = readFCLayerWeights.read('B_fc2.prototxt')
# 计算模型最终结果
output = np.matmul(FC1_result,fc2_weights)
output = np.add(output,fc2_bias)
#------------------------------------------------------
这里的output就是经过caffe模型计算到的结果啦~
注:readFCLayerWeights模块是自己实现的读取文本文件转化为float型矩阵的模块,很容易实现的啦