关于kereas、TensorFlow里的input_shape、shape的数据维度损失函数的定义方法
1、其中其使用input_shape=(12,),这个指的是输入一维的数据,其例子如下:
# as first layer in a Sequential model
model = Sequential()
model.add(Reshape((3, 4), input_shape=(12,)))
# now: model.output_shape == (None, 3, 4)
# note: `None` is the batch dimension

# as intermediate layer in a Sequential model
model.add(Reshape((6, 2)))
# now: model.output_shape == (None, 6, 2)

# also supports shape inference using `-1` as dimension
model.add(Reshape((-1, 2, 2)))
# now: model.output_shape == (None, 3, 2, 2)
这里一维的数据需要使用‘,’来表示一个Tuple量,而不能直接使用(12),此时的12是一个int型的变量,其是不符合网络输入的数据格式,其中Tuple是是一个元组,其列代表的是数据的每个属性,而行代表的是每个数据的全部数据,其如下:
例如,考虑一个含有32个样本的batch,每个样本都是10个向量组成的序列,每个向量长为16,则其输入维度为(32,10,16),其不包含batch大小的input_shape为(10,16)
我们可以使用包装器TimeDistributed包装Dense,以产生针对各个时间步信号的独立全连接:
# as the first layer in a model
model = Sequential()
model.add(TimeDistributed(Dense(8), input_shape=(10, 16)))
# now model.output_shape == (None, 10, 8)

# subsequent layers: no need for input_shape
model.add(TimeDistributed(Dense(32)))
# now model.output_shape == (None, 10, 32)
程序的输出数据shape为(32,10,8)
使用TimeDistributed包装Dense严格等价于layers.TimeDistribuedDense。不同的是包装器TimeDistribued还可以对别的层进行包装,如这里对Convolution2D包装:
model = Sequential()
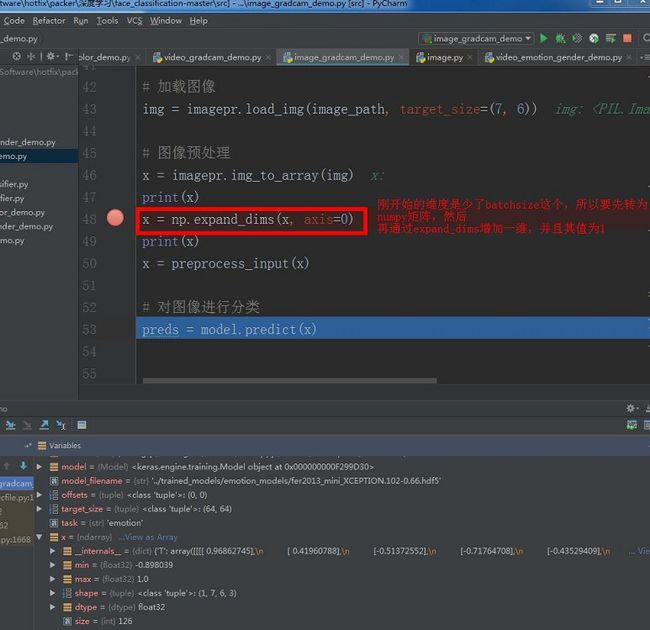
model.add(TimeDistributed(Convolution2D(64, 3, 3), input_shape=(10, 3, 299, 299)))这里的可以看出inpu_shape的数据格式很像图像的(batch,c,height,wieth),但是实际的不是按照这些参数来的,其中图像的的数据不能直接输入到识别网络里,其要进行转换为array矩阵,其实际格式是(batch,height,width,C),其输入格式一定要有四个参数值,如果不过要通过numpy里的expand_dims函数来生成对应维度的参数值。如下:
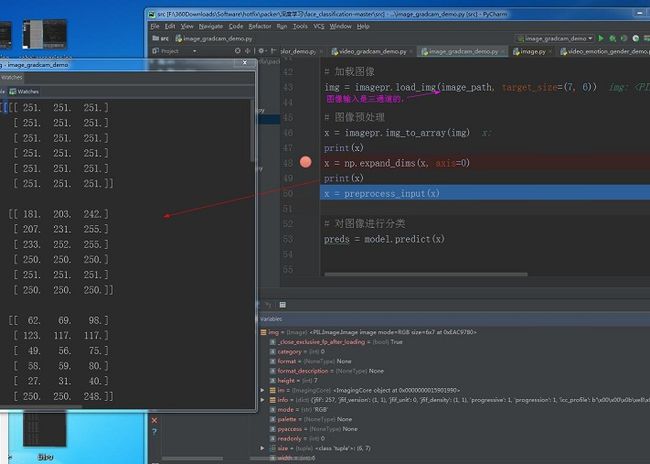
图像的数据要转化为对应的array矩阵,才可以输入到神经网络,否则会报错的。其转换后对应的input_shape为:
其通过img_to array()转换后的矩阵格式是(H,W,C),然后在通过expand_dims增加一维batchsize。其大小是上面的x显示的矩阵大小。这就解开了shape的真正输入格式了。其调试代码如下:
from keras.preprocessing import image as imagepr
import numpy as np

image_path = '../images/test_image.jpg'
# task = sys.argv[2]
# 加载图像
img = imagepr.load_img(image_path, target_size=(7, 6))

# 图像预处理
x = imagepr.img_to_array(img)
print(x)
x = np.expand_dims(x, axis=0)
print(x)
x = preprocess_input(x)
# 对图像进行分类
preds = model.predict(x)
其中shape使用格式跟input_shape的格式是一样的。其input_shape/shape:张量的形状,即每一阶的个数,其括号里参数从右到左是从矩阵从内到外读取的,用tuple表示。例如[[[1,2,3],[2,3,4]] , [[1,2,3],[2,3,4]]]的shape是(2,2,3)。只有一阶要带逗号,例如(4, )。
2、其中dense是kereas里的全连层函数,其效果如下:
# as first layer in a sequential model:
# as first layer in a sequential model:
model = Sequential()
model.add(Dense(32, input_shape=(16,)))
# now the model will take as input arrays of shape (*, 16)
# and output arrays of shape (*, 32)

# after the first layer, you don't need to specify
# the size of the input anymore:
model.add(Dense(32))
3、使用keras在定义网络的损失函数的方法:
keras的进行损失计算的方式大概有两种:
import keras.backend as K
from keras.models import *
from keras.layers import *
from keras.optimizers import *

label = []
logit = []
inputs = []
conv10 = []
#第一种:直接调用函数接口
loss = K.sparse_categorical_crossentropy(target=label, output=logit)
loss = K.binary_crossentropy(target=label, output=logit)

#第二种:调用compile接口
# compile的使用要跟Model搭配使用
model = Model(input=inputs, output=conv10)
# 其中的binary_crossentropy,是指其损失计算使用binary_crossentropy,这个使用的是交叉熵,keras的这个
#函数会先判断logit是否是有进行sigmoid激活计算,如果有的话,则会进行反向计算其进行激活前的值,然后再调用tensorflow里的
# tf.nn.sigmoid_cross_entropy_with_logits().
model.compile(optimizer=Adam(lr=1e-4), loss='binary_crossentropy', metrics=['accurcy'])
下面是一个U-net网络计算损失的例子:
    up9 = Conv2D(64, 2, activation = 'relu', padding = 'same', kernel_initializer = 'he_normal')(UpSampling2D(size = (2,2))(conv8))
    merge9 = merge([conv11,up9], mode = 'concat', concat_axis = 3)
    conv9 = Conv2D(64, 3, activation = 'relu', padding = 'same', kernel_initializer = 'he_normal')(merge9)
    conv9 = Conv2D(64, 3, activation = 'relu', padding = 'same', kernel_initializer = 'he_normal')(conv9)
    conv9 = Conv2D(2, 3, activation = 'relu', padding = 'same', kernel_initializer = 'he_normal')(conv9)
    conv10 = Conv2D(1, 1, activation = 'sigmoid')(conv9)

    model = Model(input = inputs, output = conv10)

    model.compile(optimizer = Adam(lr = 1e-4), loss = 'binary_crossentropy', metrics = ['accuracy'])
    # if(pretrained_weights):
    # 	model.load_weights(pretrained_weights)

    return model


