tkinter --最终版
功能,表格,游标,图像循环,单击,输出结果
# -*- coding: utf-8 -*-
"""
Created on Wed Nov  6 08:56:57 2019

@author: 01
"""

# -*- coding:utf-8 -*-

import MySQLdb
from hashlib import sha1
import tkinter
import tkinter.filedialog
import os
from PIL import ImageGrab
from time import sleep
from tkinter import *
import cv2
from PIL import Image,ImageTk
from tkinter.filedialog import askopenfilename
import json
import codecs
from tkinter.filedialog import askdirectory
import tkinter.messagebox
import sys,time
from tkinter import ttk
root1 = tkinter.Tk()
root1.title('登录')
root1.geometry('400x400+100+50')
      #name = input("请输入用户名:")
      # pwd = input("请输入密码:")
aa = StringVar()
aa.set('用户名')
aaa = tkinter.Label(root1, textvariable=aa)
aaa.place(x=200, y=150)


name = tkinter.Entry(root1,width=12,name="ss")
name.place(x =100 , y=100,width = 250, height=40,anchor = NW)
bb = StringVar()
bb.set('登录密码')
bbb = tkinter.Label(root1, textvariable=bb)
bbb.place(x=200, y=250)
pwd =tkinter.Entry(root1,width=12)
pwd.place(x =100 , y=200,width = 250, height=40,anchor = NW)
#登录界面===============================================
def jiunu():
        global root1

        words = pwd.get()
        print("a",words)
        root1.destroy()
        while(words!="sb"): #如果密码正确,摧毁登陆界面
          return 0

        def cv_imread(filePath):
            cv_img=cv2.imdecode(np.fromfile(filePath,dtype=np.uint8),-1)
            ## imdecode读取的是rgb,如果后续需要opencv处理的话,需要转换成bgr,转换后图片颜色会变化    ##cv_img=cv2.cvtColor(cv_img,cv2.COLOR_RGB2BGR)
            return cv_img
        # 创建tkinter主窗口
        root = tkinter.Tk()

        root.title('图片处理')

        # 指定主窗口位置与大小
        root.geometry('1000x800+100+50')   # width x height + widthoffset + heightoffset

        # 不允许改变窗口大小
        root.resizable(False, False)
        root.focusmodel()

        def buttonCaptureClick():
            #xy_text.set(str(file_entry.get()))
            xy_text.set(str(file_entry.get()).split('/')[-1][0:-4])

        def checkid():
            #xy_text.set(str(file_entry.get()))
            print("name.get()",a)
            xy_text1.set(str(a))

        #获取输入的标注内容
        def getstr():
            if input_valueText.get() != '':
                words = input_valueText.get()
                get_label["text"] = words
        def save_jsonfile():
            print("list_content",list_content)
        # 定义坐标显示位置
        xy_text = StringVar()
        xy_text1 = StringVar()

            # print('你的爱好是:', list_content)
        def click_1():
            flag_1 = False
            flag_1 = not flag_1


        def click_2():
            flag_2 = False
            flag_2 = not flag_2


        def click_3():
            flag_3 = False
            flag_3 = not flag_3

        def click_4():
            flag_3 = False

        def choosepic():
            path_ = askopenfilename()
            path.set(path_)
            img_open = Image.open(file_entry.get())
            img_open=img_open.resize((350,350))
            img = ImageTk.PhotoImage(img_open)
            image_label.config(image=img)
            image_label.image = img  # keep a reference
            treeview.insert('', 0, values=(path_))
        def choosepic1():
            pat = askdirectory()
            path.set(pat)
            j=0
            for i in os.listdir(pat):
                 print("paa",i)
                 treeview.insert('', j, values=(i))
                 j=j+1
        #打开图片文件并显示
       # def choosepic():
         #     path_ = askopenfilename()
         #     path.set(path_)
         #     img_open = Image.open(file_entry.get())
           #   img_open=img_open.resize((350,350))
            #  img = ImageTk.PhotoImage(img_open)
          #   image_label.config(image=img)
           #   image_label.image = img  # keep a reference
        path = StringVar()
        tkinter.Button(root, text = '...' ,command=choosepic1).place(x = 880, y = 5,w = 100, h = 40)
        file_entry = Entry(root, state='readonly', text=path)
        file_entry.place(x=20, y=5,width = 850, height = 40)

        image_label = Label(root, bg = 'gray')
        image_label.place(x=630, y=250,width = 350, height = 350)
        label1 = tkinter.Label(root, textvariable=xy_text1,fg = 'blue')
        label1.place(x=1130, y=570)
        columns = ("文件名", "总耗时")
        fram1= LabelFrame(root).place(x = 20, y = 50,w = 600, h = 730)

        treeview = ttk.Treeview(fram1, height=18, show="headings", columns=columns)  # 表格
        sb=ttk.Scrollbar(root,command=treeview.yview)
        treeview.config(yscroll=sb.set)
        sb.place(x = 568, y = 58,w = 40, h = 704)


        treeview.column("文件名", width=280, anchor='center') # 表示列,不显示
        treeview.column("总耗时", width=280, anchor='center')

        treeview.heading("文件名", text="文件名") # 显示表头
        treeview.heading("总耗时", text="总耗时")

        treeview.place(x = 20, y = 55,w = 590, h = 710)


        fram2= LabelFrame(root).place(x = 630, y = 50,w = 350, h = 200)
        ck1 = tkinter.Checkbutton(fram2, text='头发遮眉毛', command=click_1)
        ck2 = tkinter.Checkbutton(fram2, text='头发遮耳朵', command=click_2)
        ck3 = tkinter.Checkbutton(fram2, text='头发遮肩膀', command=click_3)
        ck4 = tkinter.Checkbutton(fram2, text='头发蓬散', command=click_4)
        ck1.place(x =650 , y=55)
        ck2.place(x =650 , y=80)
        ck3.place(x =650 , y=110)
        ck4.place(x =650 , y=140)


        tkinter.Button(root, text = '选择单张' ,command=choosepic).place(x = 630, y = 630,w = 350, h = 30)
        tkinter.Button(root, text = '全部检测' ,command=choosepic).place(x = 630, y = 680,w = 350, h = 30)
        tkinter.Button(root, text = '导出结果' ,command=choosepic).place(x = 630, y = 730,w = 350, h = 30)

# 启动消息主循环
buff=Button(root1,text="登录",command=jiunu,fg="red")
buff.place(x =170 , y=300,width = 100, height=40,anchor = NW)
root1.mainloop()
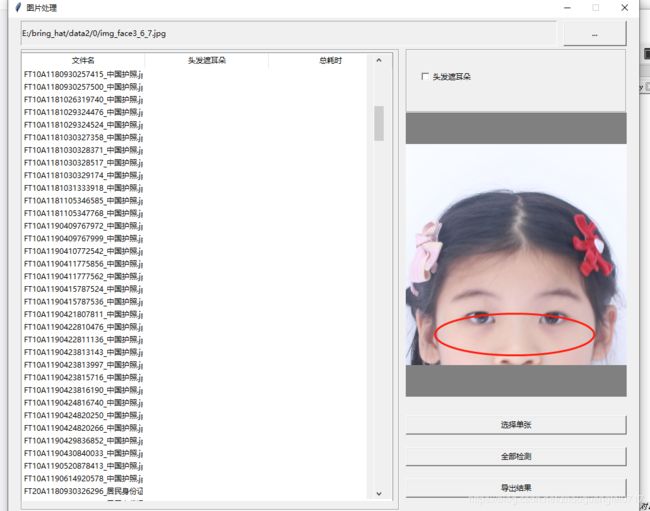
效果展示
