java验证码(算术型和字符型)和生成和解析——生成
spring boot 验证码(算术型和字符型)和生成
上次我们老师给我们一个任务:使用python生成验证码,但是我想用java来生成,于是就有了这一篇博客。
这个源码时我在github上找的(已经有一段时间了,我找不到作者的原原版了,只有我的经过修改后的注释版),我将带大家分享一下作者是如何来生成的验证码的。
下面是我的开发环境和使用技术
开发环境:IDEA
使用技术:spring boot,thymeleaf
1.先看看实际效果把
字符型的验证码
当输入正确时

当输入错误时
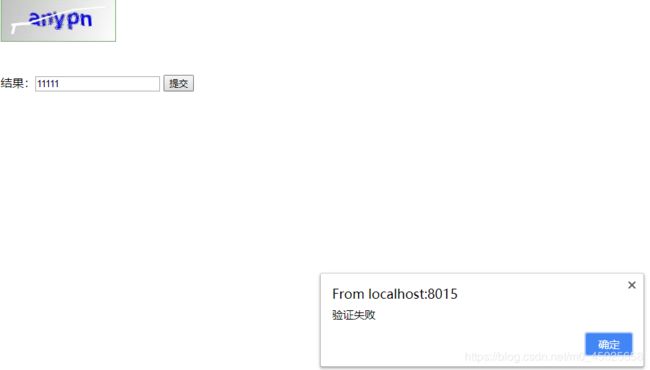
算术型验证码
当输入正确时

当输入错误时

如上图所示,支持算数型和字符型验证码。下面将一步一步解析作者的代码。
首先是使用到的jar包
<?xml version="1.0" encoding="UTF-8"?>
<project xmlns="http://maven.apache.org/POM/4.0.0" xmlns:xsi="http://www.w3.org/2001/XMLSchema-instance"
         xsi:schemaLocation="http://maven.apache.org/POM/4.0.0 http://maven.apache.org/xsd/maven-4.0.0.xsd">
    <modelVersion>4.0.0</modelVersion>
    <parent>
        <groupId>org.springframework.boot</groupId>
        <artifactId>spring-boot-starter-parent</artifactId>
        <version>2.1.4.RELEASE</version>
        <relativePath/> <!-- lookup parent from repository -->
    </parent>
    <groupId>com.zr</groupId>
    <artifactId>yanzhengma</artifactId>
    <version>0.0.1-SNAPSHOT</version>
    <name>yanzhengma</name>
    <description>Demo project for Spring Boot</description>
    <properties>
        <java.version>1.8</java.version>
    </properties>
    <dependencies>
        <dependency>
            <groupId>org.springframework.boot</groupId>
            <artifactId>spring-boot-starter-web</artifactId>
        </dependency>
        <dependency>
            <groupId>org.springframework.boot</groupId>
            <artifactId>spring-boot-starter-test</artifactId>
            <scope>test</scope>
        </dependency>
        <!--验证码 -->
        <dependency>
            <groupId>com.github.penggle</groupId>
            <artifactId>kaptcha</artifactId>
            <version>2.3.2</version>
        </dependency>
        <!--热编译插件-->
        <dependency>
            <groupId>org.springframework.boot</groupId>
            <artifactId>spring-boot-devtools</artifactId>
            <optional>true</optional>
        </dependency>
        <!--thymeleaf模板-->
        <dependency>
            <groupId>org.springframework.boot</groupId>
            <artifactId>spring-boot-starter-thymeleaf</artifactId>
        </dependency>
    </dependencies>
    <build>
        <plugins>
            <plugin>
                <groupId>org.springframework.boot</groupId>
                <artifactId>spring-boot-maven-plugin</artifactId>
                <configuration>
                    <fork>true</fork> <!-- 如果没有该配置,devtools不会生效 -->
                </configuration>
            </plugin>
        </plugins>
    </build>

</project>
要引入的jar中生成验证码的是kaptcha
下面就正式开始了
首先是部分前端代码(剩余的部分在解析部分时在说)
<img th:src="@{/captcha/captchaImage(type='math')}" class="imgcode">
你没看错,只有一条,这是thymeleaf的格式,用户点击该图片就会传到控制器。再通过控制器等等操作,来达到切换验证码的效果
部分控制器代码(剩余的部分在解析部分时在说)
@Controller
@RequestMapping("/captcha")
public class SysCaptchaController {
    //字符
    @Resource(name = "captchaProducer")
    private Producer captchaProducer;
    //数字
    @Resource(name = "captchaProducerMath")
    private Producer captchaProducerMath;

    /**
     * 验证码生成
     */
    @GetMapping(value = "/captchaImage")
    public ModelAndView getKaptchaImage(HttpServletRequest request, HttpServletResponse response) {

        ServletOutputStream out = null;
        try {
            HttpSession session = request.getSession();
            //设置响应类型为图片
            response.setContentType("image/jpeg");
            //获得前端发送来的type="math"或"char"
            String type = request.getParameter("type");
            //码
            String capStr = null;
            //值
            String code = null;
            BufferedImage bi = null;
            //如果传来的type=math,生成算术型验证码
            if ("math".equals(type)) {
                //创建验证码中的内容
                String capText = captchaProducerMath.createText();
                //substring:截取字符串
                //lastIndexOf:返回参数从字符串右边开始的索引
                //capStr中是capText从0位到@位之前的数据
                capStr = capText.substring(0, capText.lastIndexOf("@"));
                //输出码
                System.out.println(capStr);
                //获得上面剩余的字符
                //code中是@之后的数,一个随机数(就是验证码)
                code = capText.substring(capText.lastIndexOf("@") + 1);
                //输出值
                System.out.println(code);
                //创建验证码
                bi = captchaProducerMath.createImage(capStr);
            }
            //如果类型为字符型
            else if ("char".equals(type)) {
                capStr = code = captchaProducer.createText();
                bi = captchaProducer.createImage(capStr);
            }
            //向web端写出
            session.setAttribute(Constants.KAPTCHA_SESSION_KEY, code);
            out = response.getOutputStream();
            ImageIO.write(bi, "jpg", out);
            out.flush();
        } catch (Exception e) {
            e.printStackTrace();
        } finally {
            try {
                if (out != null) {
                    out.close();
                }
            } catch (IOException e) {
                e.printStackTrace();
            }
        }
        return null;
    }
我大概的说说吧,上面都有我写的注释。前端传来的“math"或"char"通过下面的代码来生成不同类型的验证码
	if ("math".equals(type)) {
      xxx
    }
    else if ("char".equals(type)) {
    xxx、
    }
下面的代码代表表示注入一个catchaProducer和captchaProducerMath的配置类,用来配置验证码的格式
//字符
@Resource(name = "captchaProducer")
private Producer captchaProducer;
//数字
@Resource(name = "captchaProducerMath")
private Producer captchaProducerMath;
就是注入下面的配置类
/**
 * 验证码配置
 */
@Configuration
public class CaptchaConfig
{
    //设置验证码的格式
    @Bean(name = "captchaProducer")
    public DefaultKaptcha getKaptchaBean()
    {
        DefaultKaptcha defaultKaptcha = new DefaultKaptcha();
        Properties properties = new Properties();
        // 是否有边框 默认为true 我们可以自己设置yes,no
        properties.setProperty("kaptcha.border", "yes");
        // 边框颜色 默认为Color.BLACK
        properties.setProperty("kaptcha.border.color", "105,179,90");
        // 验证码文本字符颜色 默认为Color.BLACK
        properties.setProperty("kaptcha.textproducer.font.color", "blue");
        // 验证码图片宽度 默认为200
        properties.setProperty("kaptcha.image.width", "160");
        // 验证码图片高度 默认为50
        properties.setProperty("kaptcha.image.height", "60");
        // 验证码文本字符大小 默认为40
        properties.setProperty("kaptcha.textproducer.font.size", "30");
        // KAPTCHA_SESSION_KEY
        properties.setProperty("kaptcha.session.key", "kaptchaCode");
        // 验证码文本字符间距 默认为2
        properties.setProperty("kaptcha.textproducer.char.space", "3");
        // 验证码文本字符长度 默认为5
        properties.setProperty("kaptcha.textproducer.char.length", "5");
        // 验证码文本字体样式 默认为new Font("Arial", 1, fontSize), new Font("Courier", 1, fontSize)
        properties.setProperty("kaptcha.textproducer.font.names", "Arial,Courier");
        // 验证码噪点颜色 默认为Color.BLACK
        properties.setProperty("kaptcha.noise.color", "white");
        Config config = new Config(properties);
        defaultKaptcha.setConfig(config);
        return defaultKaptcha;
    }

    //设置算术验证码格式
    @Bean(name = "captchaProducerMath")
    public DefaultKaptcha getKaptchaBeanMath()
    {
        DefaultKaptcha defaultKaptcha = new DefaultKaptcha();
        Properties properties = new Properties();
        // 是否有边框 默认为true 我们可以自己设置yes,no
        properties.setProperty("kaptcha.border", "yes");
        // 边框颜色 默认为Color.BLACK
        properties.setProperty("kaptcha.border.color", "105,179,90");
        // 验证码文本字符颜色 默认为Color.BLACK
        properties.setProperty("kaptcha.textproducer.font.color", "blue");
        // 验证码图片宽度 默认为200
        properties.setProperty("kaptcha.image.width", "160");
        // 验证码图片高度 默认为50
        properties.setProperty("kaptcha.image.height", "60");
        // 验证码文本字符大小 默认为40
        properties.setProperty("kaptcha.textproducer.font.size", "35");
        // KAPTCHA_SESSION_KEY
        properties.setProperty("kaptcha.session.key", "kaptchaCodeMath");
        // 验证码文本生成器
        properties.setProperty("kaptcha.textproducer.impl", "com.zr.yanzhengma.config.KaptchaTextCreator");
        // 验证码文本字符间距 默认为2
        properties.setProperty("kaptcha.textproducer.char.space", "3");
        // 验证码文本字符长度 默认为5
        properties.setProperty("kaptcha.textproducer.char.length", "6");
        // 验证码文本字体样式 默认为new Font("Arial", 1, fontSize), new Font("Courier", 1, fontSize)
        properties.setProperty("kaptcha.textproducer.font.names", "Arial,Courier");
        // 验证码噪点颜色 默认为Color.BLACK
        properties.setProperty("kaptcha.noise.color", "white");
        // 干扰实现类
        properties.setProperty("kaptcha.noise.impl", "com.google.code.kaptcha.impl.NoNoise");
        // 图片样式 水纹com.google.code.kaptcha.impl.WaterRipple 鱼眼com.google.code.kaptcha.impl.FishEyeGimpy 阴影com.google.code.kaptcha.impl.ShadowGimpy
        properties.setProperty("kaptcha.obscurificator.impl", "com.google.code.kaptcha.impl.ShadowGimpy");
        Config config = new Config(properties);
        defaultKaptcha.setConfig(config);
        return defaultKaptcha;
    }
}
            String capText = captchaProducerMath.createText();是创建算式验证码的内容,代码如下
            package com.zr.yanzhengma.config;
/**
 * 验证码文本生成器
 */
public class KaptchaTextCreator extends DefaultTextCreator
{
    private static final String[] CNUMBERS = "0,1,2,3,4,5,6,7,8,9,10".split(",");

    @Override
    public String getText()
    {
        Integer result = 0;
        Random random = new Random();
        int x = random.nextInt(10);
        int y = random.nextInt(10);
        StringBuilder suChinese = new StringBuilder();
        int randomoperands = (int) Math.round(Math.random() * 2);
        if (randomoperands == 0)
        {
            result = x * y;
            suChinese.append(CNUMBERS[x]);
            suChinese.append("*");
            suChinese.append(CNUMBERS[y]);
        }
        else if (randomoperands == 1)
        {
            if (!(x == 0) && y % x == 0)
            {
                result = y / x;
                suChinese.append(CNUMBERS[y]);
                suChinese.append("/");
                suChinese.append(CNUMBERS[x]);
            }
            else
            {
                result = x + y;
                suChinese.append(CNUMBERS[x]);
                suChinese.append("+");
                suChinese.append(CNUMBERS[y]);
            }
        }
        else if (randomoperands == 2)
        {
            if (x >= y)
            {
                result = x - y;
                suChinese.append(CNUMBERS[x]);
                suChinese.append("-");
                suChinese.append(CNUMBERS[y]);
            }
            else
            {
                result = y - x;
                suChinese.append(CNUMBERS[y]);
                suChinese.append("-");
                suChinese.append(CNUMBERS[x]);
            }
        }
        else
        {
            result = x + y;
            suChinese.append(CNUMBERS[x]);
            suChinese.append("+");
            suChinese.append(CNUMBERS[y]);
        }
        suChinese.append("=?@" + result);
        return suChinese.toString();
    }
}
 //向web端写出
            session.setAttribute(Constants.KAPTCHA_SESSION_KEY, code);
            out = response.getOutputStream();
            ImageIO.write(bi, "jpg", out);
            out.flush();
到在这里应该就没有什么问题了,验证码生成成功,返回前端用来显示。
下一篇讲解析生成的二维码,其实将这篇看懂了,解析就很简单了,比对一下就可以了,为了防止篇幅太大,就另写一篇吧。
如果有什么问题的话,留言就可以了。
源码在我的下载里面(还没有审核,要等一段时间)