转载自:
【Caffe实践】基于Caffe的人脸识别实现 - 1983的专栏 - 博客频道 - CSDN.NET
http://blog.csdn.net/chenriwei2/article/details/49500687
导言
深度学习深似海、尤其是在图像人脸识别领域,最近几年的顶会和顶刊常常会出现没有太多的理论创新的文章,但是效果摆在那边。
DeepID是深度学习方法进行人脸识别中的一个简单,却高效的一个网络模型,其结构的特点可以概括为两句话:1、训练一个多个人脸的分类器,当训练好之后,就可以把待测试图像放入网络中进行提取特征,2对于提取到的特征,然后就是利用其它的比较方法进行度量。具体的论文可以参照我的一篇论文笔记:【深度学习论文笔记】Deep Learning Face Representation from Predicting 10,000 Classes
首先我们完全参考论文的方法用Caffe设计一个网络结构:
其拓扑图如图1所示:

图1:DeepID的网络结构,图像比较大,需要放大才能看的清楚
网络定义文件:
############################# DATA Layer ############################# name: "face_train_val" layer { top: "data_1" top: "label_1" name: "data_1" type: "Data" data_param { source: "/media/crw/MyBook/TrainData/LMDB/CASIA-WebFace/10575_64X64/train" backend:LMDB batch_size: 128 } transform_param { mean_file: "/media/crw/MyBook/TrainData/LMDB/CASIA-WebFace/10575_64X64/mean.binaryproto" mirror: true } include: { phase: TRAIN } } layer { top: "data_1" top: "label_1" name: "data_1" type: "Data" data_param { source: "/media/crw/MyBook/TrainData/LMDB/CASIA-WebFace/10575_64X64/val" backend:LMDB batch_size: 128 } transform_param { mean_file: "/media/crw/MyBook/TrainData/LMDB/CASIA-WebFace/10575_64X64/mean.binaryproto" mirror: true } include: { phase: TEST } } ############################# CONV NET 1 ############################# layer { name: "conv1_1" type: "Convolution" bottom: "data_1" top: "conv1_1" param { name: "conv1_w" lr_mult: 1 decay_mult: 1 } param { name: "conv1_b" lr_mult: 2 decay_mult: 0 } convolution_param { num_output: 20 kernel_size: 4 stride: 1 weight_filler { type: "gaussian" std: 0.01 } bias_filler { type: "constant" value: 0 } } } layer { name: "relu1_1" type: "ReLU" bottom: "conv1_1" top: "conv1_1" } layer { name: "norm1_1" type: "LRN" bottom: "conv1_1" top: "norm1_1" lrn_param { local_size: 5 alpha: 0.0001 beta: 0.75 } } layer { name: "pool1_1" type: "Pooling" bottom: "norm1_1" top: "pool1_1" pooling_param { pool: MAX kernel_size: 2 stride: 2 } } layer { name: "conv2_1" type: "Convolution" bottom: "pool1_1" top: "conv2_1" param { name: "conv2_w" lr_mult: 1 decay_mult: 1 } param { name: "conv2_b" lr_mult: 2 decay_mult: 0 } convolution_param { num_output: 40 kernel_size: 3 group: 2 weight_filler { type: "gaussian" std: 0.01 } bias_filler { type: "constant" value: 0.1 } } } layer { name: "relu2_1" type: "ReLU" bottom: "conv2_1" top: "conv2_1" } layer { name: "norm2_1" type: "LRN" bottom: "conv2_1" top: "norm2_1" lrn_param { local_size: 5 alpha: 0.0001 beta: 0.75 } } layer { name: "pool2_1" type: "Pooling" bottom: "norm2_1" top: "pool2_1" pooling_param { pool: MAX kernel_size: 2 stride: 2 } } layer { name: "conv3_1" type: "Convolution" bottom: "pool2_1" top: "conv3_1" param { name: "conv3_w" lr_mult: 1 decay_mult: 1 } param { name: "conv3_b" lr_mult: 2 decay_mult: 0 } convolution_param { num_output: 60 kernel_size: 3 weight_filler { type: "gaussian" std: 0.01 } bias_filler { type: "constant" value: 0 } } } layer { name: "pool3_1" type: "Pooling" bottom: "conv3_1" top: "pool3_1" pooling_param { pool: MAX kernel_size: 2 stride: 2 } } layer { name: "conv4_1" type: "Convolution" bottom: "pool3_1" top: "conv4_1" param { name: "conv4_w" lr_mult: 1 decay_mult: 1 } param { name: "conv4_b" lr_mult: 2 decay_mult: 0 } convolution_param { num_output: 80 kernel_size: 2 stride: 2 weight_filler { type: "gaussian" std: 0.01 } bias_filler { type: "constant" value: 0.1 } } } layer{ name:"flatten_pool3_1" type:"Flatten" bottom:"pool3_1" top:"flatten_pool3_1" } layer{ name:"flatten_conv4_1" type:"Flatten" bottom:"conv4_1" top:"flatten_conv4_1" } layer{ name:"contact_conv" type:"Concat" bottom:"flatten_conv4_1" bottom:"flatten_pool3_1" top:"contact_conv" } layer { name: "deepid_1" type: "InnerProduct" bottom: "contact_conv" top: "deepid_1" param { name: "fc6_w" lr_mult: 1 decay_mult: 1 } param { name: "fc6_b" lr_mult: 2 decay_mult: 0 } inner_product_param { num_output: 160 weight_filler { type: "gaussian" std: 0.005 } bias_filler { type: "constant" value: 0.1 } } } layer { name: "relu6_1" type: "ReLU" bottom: "deepid_1" top: "deepid_1" } layer { name: "drop6_1" type: "Dropout" bottom: "deepid_1" top: "deepid_1" dropout_param { dropout_ratio: 0.5 } } layer { name: "fc8_1" type: "InnerProduct" bottom: "deepid_1" top: "fc8_1" param { name: "fc8_w" lr_mult: 1 decay_mult: 1 } param { name: "fc8_b" lr_mult: 2 decay_mult: 0 } inner_product_param { num_output: 10575 weight_filler { type: "gaussian" std: 0.01 } bias_filler { type: "constant" value: 0 } } } layer { name: "accuracy_1" type: "Accuracy" bottom: "fc8_1" bottom: "label_1" top: "accuracy_1" include: { phase: TEST } } layer { name: "loss_1" type: "SoftmaxWithLoss" bottom: "fc8_1" bottom: "label_1" top: "loss_1" #loss_weight: 0.5 }
- 1
- 2
- 3
- 4
- 5
- 6
- 7
- 8
- 9
- 10
- 11
- 12
- 13
- 14
- 15
- 16
- 17
- 18
- 19
- 20
- 21
- 22
- 23
- 24
- 25
- 26
- 27
- 28
- 29
- 30
- 31
- 32
- 33
- 34
- 35
- 36
- 37
- 38
- 39
- 40
- 41
- 42
- 43
- 44
- 45
- 46
- 47
- 48
- 49
- 50
- 51
- 52
- 53
- 54
- 55
- 56
- 57
- 58
- 59
- 60
- 61
- 62
- 63
- 64
- 65
- 66
- 67
- 68
- 69
- 70
- 71
- 72
- 73
- 74
- 75
- 76
- 77
- 78
- 79
- 80
- 81
- 82
- 83
- 84
- 85
- 86
- 87
- 88
- 89
- 90
- 91
- 92
- 93
- 94
- 95
- 96
- 97
- 98
- 99
- 100
- 101
- 102
- 103
- 104
- 105
- 106
- 107
- 108
- 109
- 110
- 111
- 112
- 113
- 114
- 115
- 116
- 117
- 118
- 119
- 120
- 121
- 122
- 123
- 124
- 125
- 126
- 127
- 128
- 129
- 130
- 131
- 132
- 133
- 134
- 135
- 136
- 137
- 138
- 139
- 140
- 141
- 142
- 143
- 144
- 145
- 146
- 147
- 148
- 149
- 150
- 151
- 152
- 153
- 154
- 155
- 156
- 157
- 158
- 159
- 160
- 161
- 162
- 163
- 164
- 165
- 166
- 167
- 168
- 169
- 170
- 171
- 172
- 173
- 174
- 175
- 176
- 177
- 178
- 179
- 180
- 181
- 182
- 183
- 184
- 185
- 186
- 187
- 188
- 189
- 190
- 191
- 192
- 193
- 194
- 195
- 196
- 197
- 198
- 199
- 200
- 201
- 202
- 203
- 204
- 205
- 206
- 207
- 208
- 209
- 210
- 211
- 212
- 213
- 214
- 215
- 216
- 217
- 218
- 219
- 220
- 221
- 222
- 223
- 224
- 225
- 226
- 227
- 228
- 229
- 230
- 231
- 232
- 233
- 234
- 235
- 236
- 237
- 238
- 239
- 240
- 241
- 242
- 243
- 244
- 245
- 246
- 247
- 248
- 249
- 250
- 251
- 252
- 253
- 254
- 255
- 256
- 257
- 258
- 259
- 260
- 261
- 262
- 263
- 264
- 265
- 266
- 267
- 268
- 269
- 270
- 271
- 272
- 273
- 274
- 275
- 276
- 277
- 278
- 279
- 280
- 281
- 282
- 283
- 284
- 285
- 286
- 287
- 288
- 289
- 290
- 291
- 292
- 293
- 294
- 295
- 296
- 297
- 298
- 299
- 300
- 301
- 302
- 303
- 304
- 305
- 306
- 307
- 308
- 309
- 310
- 311
- 312
- 313
- 314
- 315
- 316
- 317
- 318
- 319
- 320
- 321
- 322
- 323
- 324
- 325
- 326
- 327
- 328
- 329
- 330
- 331
- 332
- 333
2. 数据选择
训练一个好的深度模型,一个好的训练数据是必不可少的。针对人脸识别的数据,目前公开的数据也有很多:比如最近的MegaFace、港大的Celbra A、中科研的WebFace 等等。在这里,我选择WebFace人脸数据库作为训练(人脸库不是很干净,噪声较多),图像公共50万张左右,共10575个人,但是数据不平衡。
要评测一个算法的性能,需要找一个公平的比对数据库来评测,在人脸验证中,LFW数据库无疑是最好的选择。在lfw评测中,给出6000千对人脸图像对进行人匹配。
3. 数据处理
训练数据和测试数据都选择好之后,就需要进行数据处理了,为了提供较好的识别准确度,我采用了训练数据和测试数据统一的预处理方法(虽然LFW上有提供已经预处理过的人脸图像,但是预处理的具体参数还是未知的),测试数据和训练数据都采样相同的人脸检测和对齐方法。
主要分为3个步骤:
1,人脸检测
2,人脸特征点检测
3、人脸的对齐
这三个步骤可以用我做的一个小工具:FaceTools 来一键完成。
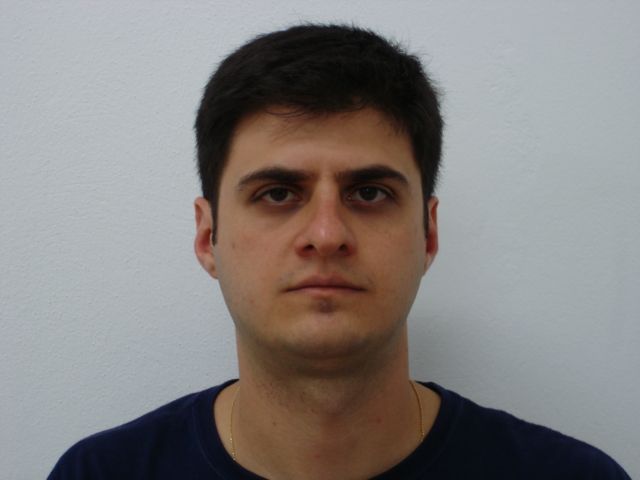
具体来说,需要选择一个标准的人脸图像作为对齐的基准,我挑选一位帅哥当标准图像:
如图:

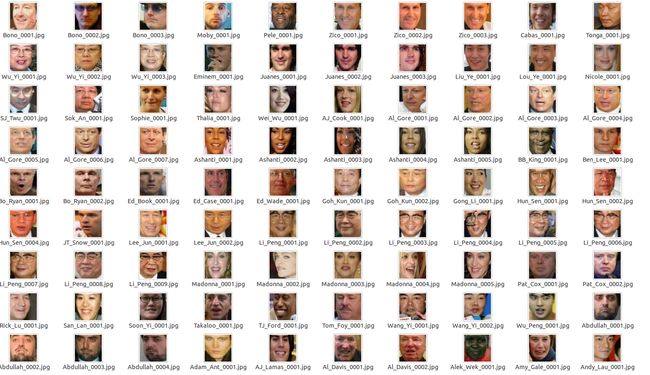
训练数据通过对齐后是这样的:

LFW测试数据通过对齐后是这样的:

4.数据转换
图像处理好之后,需要将其转化为Caffe 可以接受的格式。虽然Caffe支持直接读图像文件的格式进行训练,但是这种方式磁盘IO会比较的大,所以我这里不采用图像列表的方式,而是将训练和验证图片都转化为LMDB的格式处理。
4.1 划分训练集验证集
划分训练集和验证集(我采样的是9:1的比例)
脚本如下:
""" Created on Mon Jun 8 14:15:21 2015 @author: crw """ import os def div_database(filepath,savepath,top_num=1000,equal_num=False): ''' @brief: 提取webface人脸数据 @param : filepath 文件路径 @param : top_num=1000,表示提取的类别数目 @param : equal_num 是否强制每个人都相同 ''' dirlists=os.listdir(filepath) dict_id_num={} for subdir in dirlists: dict_id_num[subdir]=len(os.listdir(os.path.join(filepath,subdir))) sorted_num_id=sorted([(v, k) for k, v in dict_id_num.items()], reverse=True) select_ids=sorted_num_id[0:top_num] if equal_num == True: trainfile=save_path+'train_'+str(top_num)+'_equal_.list' testfile=save_path+'val_'+str(top_num)+'_qeual.list' else: trainfile=save_path+'train_'+str(top_num)+'.list' testfile=save_path+'val_'+str(top_num)+'.list' fid_train=open(trainfile,'w') fid_test=open(testfile,'w') pid=0 for select_id in select_ids: subdir=select_id[1] filenamelist=os.listdir(os.path.join(filepath,subdir)) num=1 for filename in filenamelist : if equal_num==True and num>select_ids[top_num-1][0]: break if num%10!=0: fid_train.write(os.path.join(subdir,filename)+'\t'+str(pid)+'\n') else: fid_test.write(os.path.join(subdir,filename)+'\t'+str(pid)+'\n') num=num+1 pid=pid+1 fid_train.close() fid_test.close() if __name__=='__main__': data_path = '/media/crw/MyBook/MyDataset/CASIA-WebFace/croped' save_path = '/media/crw/MyBook/MyDataset/CASIA-WebFace/' div_database(data_path,save_path, top_num=10575, equal_num=False)
- 1
- 2
- 3
- 4
- 5
- 6
- 7
- 8
- 9
- 10
- 11
- 12
- 13
- 14
- 15
- 16
- 17
- 18
- 19
- 20
- 21
- 22
- 23
- 24
- 25
- 26
- 27
- 28
- 29
- 30
- 31
- 32
- 33
- 34
- 35
- 36
- 37
- 38
- 39
- 40
- 41
- 42
- 43
- 44
- 45
- 46
- 47
- 48
- 49
- 50
- 51
4.2 数据转换
再调用Caffe 提供的转化函数:
脚本如下:
#!/usr/bin/env sh TOOLS=/home/crw/caffe-master/.build_release/tools TRAIN_DATA_ROOT=/media/crw/MyBook/MyDataset/CASIA-WebFace/croped/ VAL_DATA_ROOT=/media/crw/MyBook/MyDataset/CASIA-WebFace/croped/ IMAGE_LIST_ROOT=/media/crw/MyBook/MyDataset/CASIA-WebFace/ ROOT_LMDB=/media/crw/MyBook/TrainData/LMDB/CASIA-WebFace/10575_64X64 RESIZE=true if $RESIZE; then RESIZE_HEIGHT=64 RESIZE_WIDTH=64 else RESIZE_HEIGHT=0 RESIZE_WIDTH=0 fi if [ ! -d "$TRAIN_DATA_ROOT" ]; then echo "Error: TRAIN_DATA_ROOT is not a path to a directory: $TRAIN_DATA_ROOT" echo "Set the TRAIN_DATA_ROOT variable in create_imagenet.sh to the path" \ "where the ImageNet training data is stored." exit 1 fi if [ ! -d "$VAL_DATA_ROOT" ]; then echo "Error: VAL_DATA_ROOT is not a path to a directory: $VAL_DATA_ROOT" echo "Set the VAL_DATA_ROOT variable in create_imagenet.sh to the path" \ "where the ImageNet validation data is stored." exit 1 fi echo "Creating train lmdb..." GLOG_logtostderr=1 $TOOLS/convert_imageset \ --resize_height=$RESIZE_HEIGHT \ --resize_width=$RESIZE_WIDTH \ --shuffle \ $TRAIN_DATA_ROOT \ $IMAGE_LIST_ROOT/train_10575.list \ $ROOT_LMDB/train echo "Creating val lmdb..." GLOG_logtostderr=1 $TOOLS/convert_imageset \ --resize_height=$RESIZE_HEIGHT \ --resize_width=$RESIZE_WIDTH \ --shuffle \ $VAL_DATA_ROOT \ $IMAGE_LIST_ROOT/val_10575.list \ $ROOT_LMDB/val $TOOLS/compute_image_mean $ROOT_LMDB/train \ $ROOT_LMDB/mean.binaryproto echo "Done."
- 1
- 2
- 3
- 4
- 5
- 6
- 7
- 8
- 9
- 10
- 11
- 12
- 13
- 14
- 15
- 16
- 17
- 18
- 19
- 20
- 21
- 22
- 23
- 24
- 25
- 26
- 27
- 28
- 29
- 30
- 31
- 32
- 33
- 34
- 35
- 36
- 37
- 38
- 39
- 40
- 41
- 42
- 43
- 44
- 45
- 46
- 47
- 48
- 49
- 50
- 51
- 52
- 53
- 54
- 55
- 56
- 57
- 58
- 59
- 60
- 61
- 62
- 63
- 64
这样之后,训练的数据就准备好了。
训练网络
上面的这些步骤之后,数据就已经处理好了,现在需要指定网络的超参数:
具体超参数设置如下:
net: "FaceRecognition/try5_2/train_val.prototxt" test_iter: 100 test_interval: 1000 base_lr: 0.001 lr_policy: "step" gamma: 0.95 stepsize: 100000 momentum: 0.9 weight_decay: 0.0005 display: 100 max_iter: 5000000 snapshot: 50000 snapshot_prefix: "/media/crw/MyBook/Model/FaceRecognition/try5_2/snapshot" solver_mode: GPU device_id:0 #debug_info: true
- 1
- 2
- 3
- 4
- 5
- 6
- 7
- 8
- 9
- 10
- 11
- 12
- 13
- 14
- 15
- 16
- 17
- 18
一切就绪之后,开始训练网络
#!/usr/bin/env sh TOOLS=./build/tools GLOG_logtostderr=0 GLOG_log_dir=FaceRecognition/try5_2/Log/ \ $TOOLS/caffe train \ --solver=FaceRecognition/try5_2/solver.prototxt
训练的时候,可以查看学习曲线:

6.LFW上测试
LFW上,提供了6000对的人脸图像对来作为评测数据,由于我采用的是自己选的人脸检测和对齐方法,所以有些人脸在我的预处理里面丢失了(检测不到),为了简单的处理这种情况,在提特征的时候,没有检测到的图像就用原来的图像去替代。
import os import os.path def replace_miss(filelist, src_path, substitude_path): fid = open(filelist,'r') lines = fid.readlines() fid.close() fid = open(filelist,'w') count = 0; for line in lines: if not os.path.isfile(line.strip()): print 'file :'+line +'missed' count=count+1 line=line.replace(src_path,substitude_path) fid.write(line) fid.close() print 'Totally '+str(count)+' file missed' if __name__== '__main__': filelist='/media/crw/MyBook/Evaluate/LFW_Test_List/right.list' src_path = '/media/crw/MyBook/MyDataset/LFW/croped/lfw-funneled' substitude_path = '/media/crw/DataCenter/Dataset/LFW/lfw-funneled_croped' replace_miss(filelist, src_path, substitude_path)
- 1
- 2
- 3
- 4
- 5
- 6
- 7
- 8
- 9
- 10
- 11
- 12
- 13
- 14
- 15
- 16
- 17
- 18
- 19
- 20
- 21
- 22
- 23
- 24
- 25
然后进行人脸的比对
""" Created on Mon Apr 20 16:55:55 2015 @author: 陈日伟 @brief:在lfw数据库上验证训练好了的网络 """ import sklearn import numpy as np import matplotlib.pyplot as plt import skimage caffe_root = '/home/crw/caffe-master/' import sys sys.path.insert(0, caffe_root + 'python') import caffe import sklearn.metrics.pairwise as pw def read_imagelist(filelist): ''' @brief:从列表文件中,读取图像数据到矩阵文件中 @param: filelist 图像列表文件 @return :4D 的矩阵 ''' fid=open(filelist) lines=fid.readlines() test_num=len(lines) fid.close() X=np.empty((test_num,3,64,64)) i =0 for line in lines: word=line.split('\n') filename=word[0] im1=skimage.io.imread(filename,as_grey=False) image =skimage.transform.resize(im1,(64, 64))*255 if image.ndim<3: print 'gray:'+filename X[i,0,:,:]=image[:,:] X[i,1,:,:]=image[:,:] X[i,2,:,:]=image[:,:] else: X[i,0,:,:]=image[:,:,0] X[i,1,:,:]=image[:,:,1] X[i,2,:,:]=image[:,:,2] i=i+1 return X def read_labels(labelfile): ''' 读取标签列表文件 ''' fin=open(labelfile) lines=fin.readlines() labels=np.empty((len(lines),)) k=0; for line in lines: labels[k]=int(line) k=k+1; fin.close() return labels def draw_roc_curve(fpr,tpr,title='cosine',save_name='roc_lfw'): ''' 画ROC曲线图 ''' plt.figure() plt.plot(fpr, tpr) plt.plot([0, 1], [0, 1], 'k--') plt.xlim([0.0, 1.0]) plt.ylim([0.0, 1.0]) plt.xlabel('False Positive Rate') plt.ylabel('True Positive Rate') plt.title('Receiver operating characteristic using: '+title) plt.legend(loc="lower right") plt.show() plt.savefig(save_name+'.png') def evaluate(itera=500000,metric='cosine'): ''' @brief: 评测模型的性能 @param:itera: 模型的迭代次数 @param:metric: 度量的方法 ''' fin='/media/crw/MyBook/TrainData/LMDB/CASIA-WebFace/10575_64X64/mean.binaryproto' fout='/media/crw/MyBook/TrainData/LMDB/CASIA-WebFace/10575_64X64/mean.npy' blob = caffe.proto.caffe_pb2.BlobProto() data = open( fin , 'rb' ).read() blob.ParseFromString(data) arr = np.array( caffe.io.blobproto_to_array(blob) ) out = arr[0] np.save( fout , out ) caffe.set_mode_gpu() net = caffe.Classifier('/home/crw/caffe-master/FaceRecognition/try5_2/deploy.prototxt', '/media/crw/MyBook/Model/FaceRecognition/try5_2/snapshot_iter_'+str(itera)+'.caffemodel', mean=np.load(fout)) filelist_left='./LFW_Test_List/left.list' filelist_right='./LFW_Test_List/right.list' filelist_label='./LFW_Test_List/label.list' print 'network input :' ,net.inputs print 'network output: ', net.outputs X=read_imagelist(filelist_left) test_num=np.shape(X)[0] out = net.forward_all(data_1 = X) feature1 = np.float64(out['deepid_1']) feature1=np.reshape(feature1,(test_num,160)) X=read_imagelist(filelist_right) out = net.forward_all(data_1=X) feature2 = np.float64(out['deepid_1']) feature2=np.reshape(feature2,(test_num,160)) labels=read_labels(filelist_label) assert(len(labels)==test_num) mt=pw.pairwise_distances(feature1, feature2, metric=metric) predicts=np.empty((test_num,)) for i in range(test_num): predicts[i]=mt[i][i] for i in range(test_num): predicts[i]=(predicts[i]-np.min(predicts))/(np.max(predicts)-np.min(predicts)) print 'accuracy is :',calculate_accuracy(predicts,labels,test_num) np.savetxt('predict.txt',predicts) fpr, tpr, thresholds=sklearn.metrics.roc_curve(labels,predicts) draw_roc_curve(fpr,tpr,title=metric,save_name='lfw_'+str(itera)) def calculate_accuracy(distance,labels,num): ''' #计算识别率, 选取阈值,计算识别率 ''' accuracy = [] predict = np.empty((num,)) threshold = 0.2 while threshold <= 0.8 : for i in range(num): if distance[i] >= threshold: predict[i] =1 else: predict[i] =0 predict_right =0.0 for i in range(num): if predict[i]==labels[i]: predict_right = 1.0+predict_right current_accuracy = (predict_right/num) accuracy.append(current_accuracy) threshold=threshold+0.001 return np.max(accuracy) if __name__=='__main__': itera=500000 metric='cosine' evaluate(itera,metric)
- 1
- 2
- 3
- 4
- 5
- 6
- 7
- 8
- 9
- 10
- 11
- 12
- 13
- 14
- 15
- 16
- 17
- 18
- 19
- 20
- 21
- 22
- 23
- 24
- 25
- 26
- 27
- 28
- 29
- 30
- 31
- 32
- 33
- 34
- 35
- 36
- 37
- 38
- 39
- 40
- 41
- 42
- 43
- 44
- 45
- 46
- 47
- 48
- 49
- 50
- 51
- 52
- 53
- 54
- 55
- 56
- 57
- 58
- 59
- 60
- 61
- 62
- 63
- 64
- 65
- 66
- 67
- 68
- 69
- 70
- 71
- 72
- 73
- 74
- 75
- 76
- 77
- 78
- 79
- 80
- 81
- 82
- 83
- 84
- 85
- 86
- 87
- 88
- 89
- 90
- 91
- 92
- 93
- 94
- 95
- 96
- 97
- 98
- 99
- 100
- 101
- 102
- 103
- 104
- 105
- 106
- 107
- 108
- 109
- 110
- 111
- 112
- 113
- 114
- 115
- 116
- 117
- 118
- 119
- 120
- 121
- 122
- 123
- 124
- 125
- 126
- 127
- 128
- 129
- 130
- 131
- 132
- 133
- 134
- 135
- 136
- 137
- 138
- 139
- 140
- 141
- 142
- 143
- 144
- 145
- 146
- 147
- 148
- 149
- 150
- 151
- 152
- 153
- 154
- 155
- 156
- 157
- 158
- 159
- 160
- 161
- 162
- 163
- 164
- 165
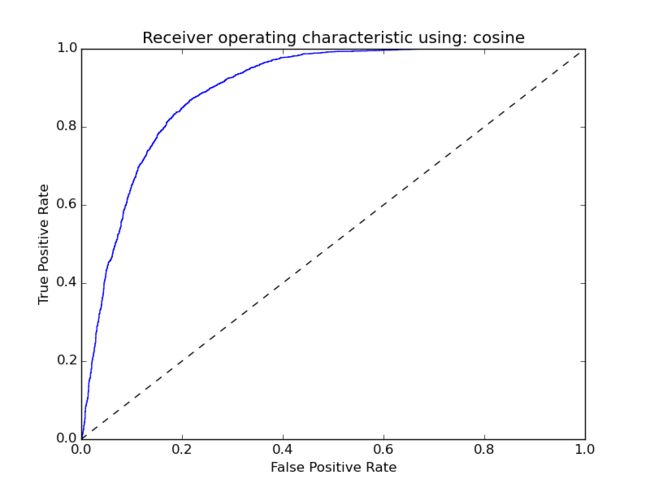
结果ROC曲线:

通过选择合适的脚本,得到的准确度为:0.826333333333, 有点低。
7.结果分析
实验的结果没有理想中的那么好,主要的原因分为几个:
1、数据集不够好:有较多的噪声数据
2、数据集合不平衡:每个人的图片个数从几十张到几百张不等。
3,、网络结构没优化:原始的DeepID的大小为:48*48,而我选择的人脸图像大小为64*64,网络结构却没有相对应的调整。(主要影响在于全连接层的个数太多了)
![]()
![]()
![]()
![]()
![]()
![]()