廖雪峰 /编程 / 2013-8-27 19:33 / 阅读: 21
Celery是Python开发的分布式任务调度模块,今天抽空看了一下,果然接口简单,开发容易,5分钟就写出了一个异步发送邮件的服务。
Celery本身不含消息服务,它使用第三方消息服务来传递任务,目前,Celery支持的消息服务有RabbitMQ、Redis甚至是数据库,当然Redis应该是最佳选择。
安装Celery
用pip或easy_install安装:
$ sudo pip install Celery
或着:
$ sudo easy_install Celery
使用Redis作为Broker时,再安装一个celery-with-redis。
开始编写tasks.py:
import time
from celery import Celery
celery = Celery('tasks', broker='redis://localhost:6379/0')
@celery.task
def sendmail(mail):
print('sending mail to %s...' % mail['to'])
time.sleep(2.0)
print('mail sent.')
然后启动Celery处理任务:
$ celery -A tasks worker --loglevel=info
上面的命令行实际上启动的是Worker,如果要放到后台运行,可以扔给supervisor。
如何发送任务?非常简单:
>>> from tasks import sendmail
>>> sendmail.delay(dict(to='[email protected]'))
1a0a9262-7858-4192-9981-b7bf0ea7483b>
可以看到,Celery的API设计真的非常简单。
然后,在Worker里就可以看到任务处理的消息:
[2013-08-27 19:20:23,363: WARNING/MainProcess] celery@MichaeliMac.local ready.
[2013-08-27 19:20:23,367: INFO/MainProcess] consumer: Connected to redis://localhost:6379/0.
[2013-08-27 19:20:45,618: INFO/MainProcess] Got task from broker: tasks.sendmail[1a0a9262-7858-4192-9981-b7bf0ea7483b]
[2013-08-27 19:20:45,655: WARNING/PoolWorker-4] sending mail to celery@python.org...
[2013-08-27 19:20:47,657: WARNING/PoolWorker-4] mail sent.
[2013-08-27 19:20:47,658: INFO/MainProcess] Task tasks.sendmail[1a0a9262-7858-4192-9981-b7bf0ea7483b] succeeded in 2.00266814232s: None
Celery默认设置就能满足基本要求。Worker以Pool模式启动,默认大小为CPU核心数量,缺省序列化机制是pickle,但可以指定为json。由于Python调用UNIX/Linux程序实在太容易,所以,用Celery作为异步任务框架非常合适。
Celery还有一些高级用法,比如把多个任务组合成一个原子任务等,还有一个完善的监控接口,以后有空再继续研究。
------------------------------
前言:
这里介绍一个python下,比celery更加简单的异步工具,真的是很简单,当然他的功能没有celery多,复杂程度也没有celery大,文档貌似也没有celery多,但是为啥会介绍rq这个东西 因为他够简单。
当然他虽然简单,但是也是需要中间人的,也就是 Broker,这里只能是redis了。 他没有celery支持的那么多,比如 redis rabbitmq mongodb mysql之类的。 说回来,咱们用rq,就是看重他的简单。
如对celery有兴趣,可以看看我以前写过的博文 。 http://rfyiamcool.blog.51cto.com/1030776/1325062
安装redis以及python-rq包,redis的话,直接yum就行,python rq需要pip来搞定。
[root@67 ~]
Downloading/unpacking rq
Downloading rq-0.4.5.tar.gz
Running setup.py egg_info for package rq
warning: no previously-included files matching '*' found under directory 'tests'
Requirement already satisfied (use --upgrade to upgrade): redis>=2.7.0 in /usr/lib/python2.6/site-packages (from rq)
Downloading/unpacking importlib (from rq)
Downloading importlib-1.0.3.tar.bz2
Running setup.py egg_info for package importlib
Requirement already satisfied (use --upgrade to upgrade): argparse in /usr/lib/python2.6/site-packages (from rq)
Installing collected packages: rq, importlib
Running setup.py install for rq
warning: no previously-included files matching '*' found under directory 'tests'
Installing rqinfo script to /usr/bin
Installing rqworker script to /usr/bin
Running setup.py install for importlib
Successfully installed rq importlib
Cleaning up...
先开始官方的demo:
这个是咱们要后端异步的模块:
import requests
def count_words_at_url(url):
    resp = requests.get(url)
    return len(resp.text.split())
创建队列
from redis import Redis
from rq import Queue
q = Queue(connection=Redis())
然后,直接rqworker !
一直往队列里面扔任务。
In [238]: result = q.enqueue(
  count_words_at_url, 'http://nvie.com'
)
In [241]: result = q.enqueue(
  count_words_at_url, 'http://nvie.com'
)
In [244]: result = q.enqueue(
  count_words_at_url, 'http://nvie.com'
)
In [247]: result = q.enqueue(
  count_words_at_url, 'http://xiaorui.cc'
)
In [250]: result = q.enqueue(
  count_words_at_url, 'http://xiaorui.cc'
)
In [253]: result = q.enqueue(
  count_words_at_url, 'http://xiaorui.cc'
)
In [256]: result = q.enqueue(
  count_words_at_url, 'http://xiaorui.cc'
)
rqworker的接口任务并执行:
(下面的log已经说明了一切,任务确实执行了,而且我在ipython下,很是流畅,我不需要担心任务是否很好的执行,我只需要把任务一扔,就甩屁股走人了。)
00:42:13 *** Listening on default...
00:42:22 default: nima.count_words_at_url('http://xiaorui.cc') (84f9d30f-8afc-4ea6-b281-4cb75c77779f)
00:42:22 Starting new HTTP connection (1): xiaorui.cc
00:42:23 Starting new HTTP connection (1): rfyiamcool.blog.51cto.com
00:42:23 Job OK, result = 2632
00:42:23 Result is kept for 500 seconds.
00:42:23
00:42:23 *** Listening on default...
00:42:27 default: nima.count_words_at_url('http://xiaorui.cc') (9fdaa934-e996-4719-8fb5-d619a4f15237)
00:42:27 Starting new HTTP connection (1): xiaorui.cc
00:42:28 Starting new HTTP connection (1): rfyiamcool.blog.51cto.com
00:42:28 Job OK, result = 2632
00:42:28 Result is kept for 500 seconds.
00:42:28
00:42:28 *** Listening on default...
00:42:28 default: nima.count_words_at_url('http://xiaorui.cc') (952cc12b-445e-4682-a12a-96e8019bc4a8)
00:42:28 Starting new HTTP connection (1): xiaorui.cc
00:42:28 Starting new HTTP connection (1): rfyiamcool.blog.51cto.com
00:42:28 Job OK, result = 2632
00:42:28 Result is kept for 500 seconds.
00:42:28
00:42:28 *** Listening on default...
00:42:29 default: nima.count_words_at_url('http://xiaorui.cc') (c25803e4-a3ad-4889-bbec-06cf1e77a11e)
00:42:29 Starting new HTTP connection (1): xiaorui.cc
00:42:29 Starting new HTTP connection (1): rfyiamcool.blog.51cto.com
00:42:29 Job OK, result = 2632
00:42:29 Result is kept for 500 seconds.
00:42:29
00:42:29 *** Listening on default..
紧接着咱们再跑一个我自己测试的模块,逻辑很简单在sleep情况下,是否会很好的执行,来测试他的 异步 任务执行。 当然你也可以rqworker执行的运行,下面的代码更像是event事件的感觉。
[root@67 ~]# cat worker.py
import os
import redis
from rq import Worker, Queue, Connection
listen = ['high', 'default', 'low']
redis_url = os.getenv('REDISTOGO_URL', 'redis://localhost:6379')
conn = redis.from_url(redis_url)
if __name__ == '__main__':
with Connection(conn):
worker = Worker(map(Queue, listen))
worker.work()
下面是自己需要异步执行的模块代码~
[root@67 ~]# cat utils.py
import requests
import time
def tosleep(num):
time.sleep(num)
return num
咱们在ipython测试下吧:
In [53]: from redis import Redis
In [54]: from rq import Queue
In [55]:
In [56]: q = Queue(connection=Redis())
In [57]: from utils import tosleep
In [58]: for i in range(5):
  q.enqueue(tosleep,5)
   ....:
   ....:
Out[59]: Job(u'8d71a0ee-695a-4708-b6cf-15821aac7299', enqueued_at=datetime.datetime(2014, 5, 14, 15, 42, 4, 47779))
Out[59]: Job(u'27419b10-8b12-418c-8af1-43c290fc2bf3', enqueued_at=datetime.datetime(2014, 5, 14, 15, 42, 4, 51855))
Out[59]: Job(u'7c98f0d1-7317-4c61-8bfa-10e223033948', enqueued_at=datetime.datetime(2014, 5, 14, 15, 42, 4, 53606))
Out[59]: Job(u'0a84a48f-3372-4ef0-8aa8-d868de2e0c11', enqueued_at=datetime.datetime(2014, 5, 14, 15, 42, 4, 57173))
Out[59]: Job(u'ad1986b9-a2fa-4205-93ab-a1b685d7cf88', enqueued_at=datetime.datetime(2014, 5, 14, 15, 42, 4, 58355))
看到没有,本来咱们调用了一个函数是sleep5s,但他不影响其他的代码的堵塞,会扔到队列里面后,迅速的执行后面的代码。
如果我想像celery那样,查看结果的话,也是用result方法的。
In [67]: job=q.enqueue(tosleep,5)
In [68]: job.result
In [69]: job.result
In [70]: job.result
In [71]: job.result
In [72]: job.result
Out[72]: 5
但是有个缺点,任务是异步方式的放到了redis的队列里面了,但是后端的work貌似是单进程的。。。当然也很好改,用threading针对每个任务进行fork线程就可以了。
In [47]: for i in range(5):
....: q.enqueue(tosleep,5)
....:
....:
Out[47]: Job(u'5edb3690-9260-4aba-9eaf-fa75fbf74a13', enqueued_at=datetime.datetime(2014, 5, 14, 15, 24, 54, 229289))
Out[47]: Job(u'e91cfcb8-850b-4da4-8695-13f84a6a0222', enqueued_at=datetime.datetime(2014, 5, 14, 15, 24, 54, 233016))
Out[47]: Job(u'cc6c78d4-e3b5-4c22-b027-8c070b6c43db', enqueued_at=datetime.datetime(2014, 5, 14, 15, 24, 54, 234333))
Out[47]: Job(u'569decc8-7ad2-41eb-83cc-353d7386d2b9', enqueued_at=datetime.datetime(2014, 5, 14, 15, 24, 54, 235954))
Out[47]: Job(u'155c493e-5a2c-4dcf-8d9b-3ae2934bf9e5', enqueued_at=datetime.datetime(2014, 5, 14, 15, 24, 54, 238030))
这个是worker.py打出来的日志:
23:24:59 Job OK, result = 5
23:24:59 Result is kept for 500 seconds.
23:24:59
23:24:59 *** Listening on high, default, low...
23:24:59 default: utils.tosleep(5) (e91cfcb8-850b-4da4-8695-13f84a6a0222)
23:25:04 Job OK, result = 5
23:25:04 Result is kept for 500 seconds.
23:25:04
23:25:04 *** Listening on high, default, low...
23:25:04 default: utils.tosleep(5) (cc6c78d4-e3b5-4c22-b027-8c070b6c43db)
23:25:09 Job OK, result = 5
23:25:09 Result is kept for 500 seconds.
23:25:09
23:25:09 *** Listening on high, default, low...
23:25:09 default: utils.tosleep(5) (569decc8-7ad2-41eb-83cc-353d7386d2b9)
23:25:14 Job OK, result = 5
23:25:14 Result is kept for 500 seconds.
23:25:14
23:25:14 *** Listening on high, default, low...
23:25:14 default: utils.tosleep(5) (155c493e-5a2c-4dcf-8d9b-3ae2934bf9e5)
23:25:19 Job OK, result = 5
23:25:19 Result is kept for 500 seconds.
23:25:19
23:25:19 *** Listening on high, default, low...
这里在看下官方给的例子:
from rq import Connection, Queue
from redis import Redis
from somewhere import count_words_at_url
redis_conn = Redis()
q = Queue(connection=redis_conn)
job = q.enqueue(count_words_at_url, 'http://xiaorui.cc')
print job.result
time.sleep(2)
print job.result
rq可以设置任务的优先级别的,比如一个low级别的。
q = Queue('low', connection=redis_conn)
q.enqueue(count_words_at_url, 'http://nvie.com')
好了先这么着吧,官方 http://python-rq.org/docs/ 还提供了很多实用的东西,比如装饰器啥的。
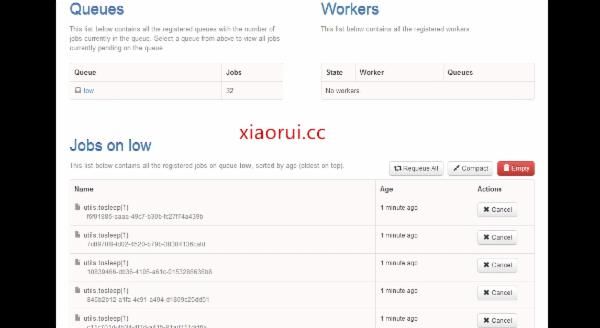
对了,官方提供了一个rq的管理平台页面。
地址是 https://github.com/nvie/rq-dashboard

本文出自 “峰云,就她了。” 博客,谢绝转载!