原文地址: https://medium.com/flutterpub/architecting-your-flutter-project-bd04e144a8f1
这篇文章中将使用The Movies DB网站上的popular movies来构建要给简单的app。在开始之前我假设你是已经了解widgets以及如何在flutter中进行网络请求。
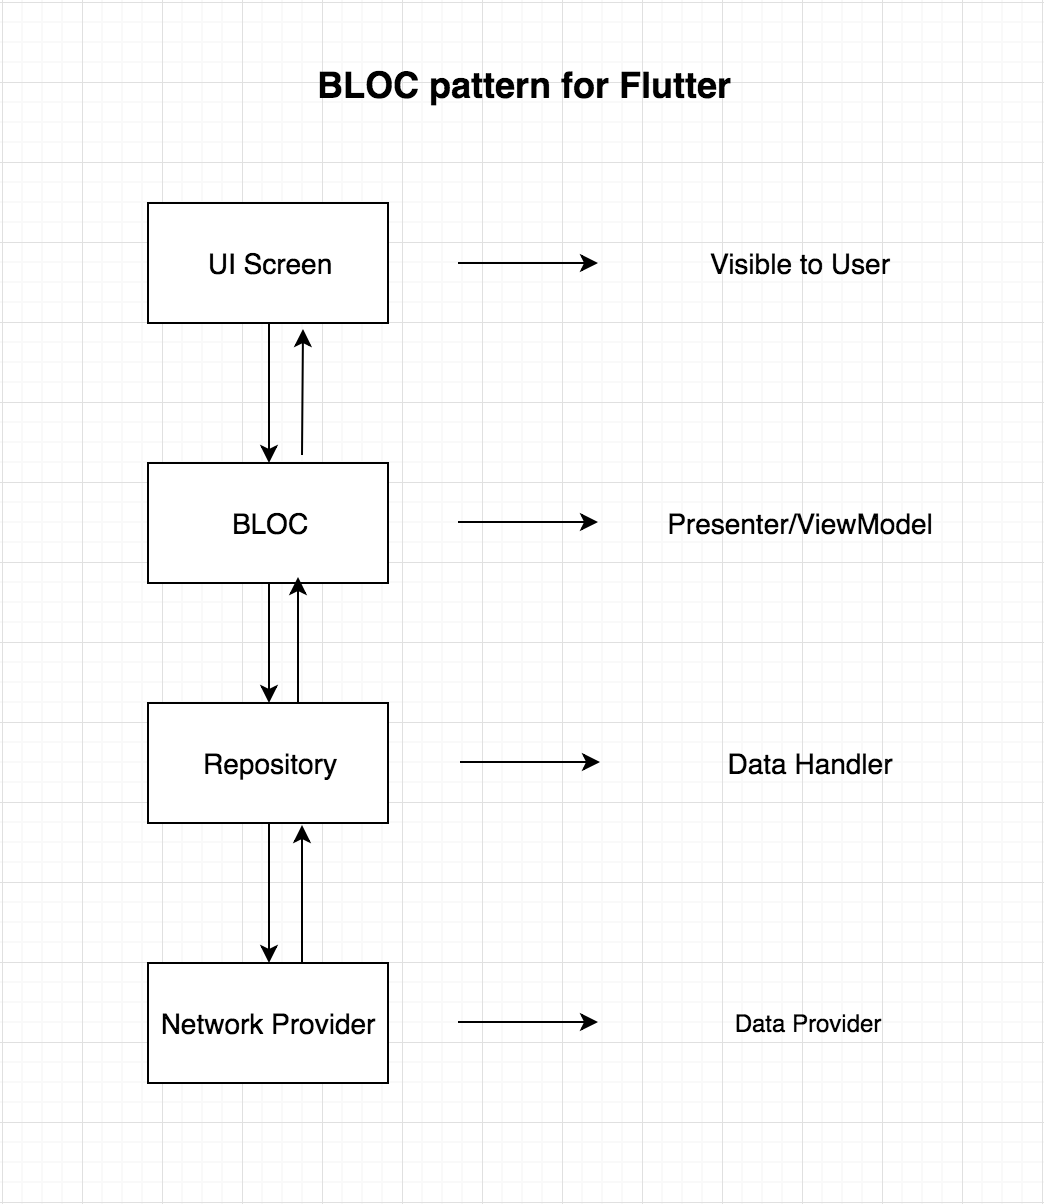
在深入代码之前,我们先从一张图来了解一下该架构。
上图展示了data如何从UI层流向数据层,反之也是如此。BLoC永远不会引用UI层中的任何组件。UI层仅观察来自BLoC类是否改变。
什么是BLoC模式
它是谷歌开发人员推荐的Flutter状态管理系统,用于对state进行管理以便在项目中集中访问数据。
可以将此架构与其它架构联系起来吗?
MVP和MVVM都是不错的选择,只是BLoC会被MVVM中的ViewModel取代。
BLoC的核心是什么?
STREAMS 和 REACTIVE方法,一般而言,数据将以流的方式从BLoC流向UI或者从UI流向BLoC,如果你没有听过流,阅读以下Stack Overflow上的这个回答。
接下来开始使用BLoC来构建项目
- 创建项目
flutter create [myProjectName]
- 修改main.dart
import 'package:flutter/material.dart';
import 'src/app.dart';

void main(){
  runApp(App());
}
- 在lib目录下创建src文件夹,接着在该文件夹下创建app.dart文件,在该文件中添加下面的代码:
import 'package:flutter/material.dart';
import 'ui/movie_list.dart';

class App extends StatelessWidget {
  @override
  Widget build(BuildContext context) {
    // TODO: implement build
    return MaterialApp(
        theme: ThemeData.dark(),
        home: Scaffold(
          body: MovieList(),
        ),
      );
  }
}
-
在src包中创建一个resources包,按照如下图示创建其余的包
BLoC包用来保存BLoC相关的代码
models包用来存放POJO类
resources用来保存repository类和网络调用相关的类
ui用来存放跟界面显示相关的类
- 添加RxDart library,在pubspec.yaml 文件中添加rxdart: ^0.18.0
dependencies:
  flutter:
    sdk: flutter

  # The following adds the Cupertino Icons font to your application.
  # Use with the CupertinoIcons class for iOS style icons.
  cupertino_icons: ^0.1.2
  rxdart: ^0.18.0
  http: ^0.12.0+1
接着运行flutter packages get
- 现在我们已经完成了项目的骨架,现在从网络层开始处理,在该链接中的设置页面获取Api Key,然后替换到该链接上**http://api.themoviedb.org/3/movie/popular?api_key=“your_api_key”
**,然后你就可以如下的json:
{
  "page": 1,
  "total_results": 19772,
  "total_pages": 989,
  "results": [
    {
      "vote_count": 6503,
      "id": 299536,
      "video": false,
      "vote_average": 8.3,
      "title": "Avengers: Infinity War",
      "popularity": 350.154,
      "poster_path": "\/7WsyChQLEftFiDOVTGkv3hFpyyt.jpg",
      "original_language": "en",
      "original_title": "Avengers: Infinity War",
      "genre_ids": [
        12,
        878,
        14,
        28
      ],
      "backdrop_path": "\/bOGkgRGdhrBYJSLpXaxhXVstddV.jpg",
      "adult": false,
      "overview": "As the Avengers and their allies have continued to protect the world from threats too large for any one hero to handle, a new danger has emerged from the cosmic shadows: Thanos. A despot of intergalactic infamy, his goal is to collect all six Infinity Stones, artifacts of unimaginable power, and use them to inflict his twisted will on all of reality. Everything the Avengers have fought for has led up to this moment - the fate of Earth and existence itself has never been more uncertain.",
      "release_date": "2018-04-25"
    },
- 我们创建一个实体类item_model.dart,将下面的代码复制到该类中
class ItemModel {
  int _page;
  int _total_results;
  int _total_pages;
  List<_Result> _results = [];

  ItemModel.fromJson(Map parsedJson) {
    print(parsedJson['results'].length);
    _page = parsedJson['page'];
    _total_results = parsedJson['total_results'];
    _total_pages = parsedJson['total_pages'];
    List<_Result> temp = [];
    for (int i = 0; i < parsedJson['results'].length; i++) {
      _Result result = _Result(parsedJson['results'][i]);
      temp.add(result);
    }
    _results = temp;
  }

  List<_Result> get results => _results;

  int get total_pages => _total_pages;

  int get total_results => _total_results;

  int get page => _page;
}

class _Result {
  int _vote_count;
  int _id;
  bool _video;
  var _vote_average;
  String _title;
  double _popularity;
  String _poster_path;
  String _original_language;
  String _original_title;
  List _genre_ids = [];
  String _backdrop_path;
  bool _adult;
  String _overview;
  String _release_date;

  _Result(result) {
    _vote_count = result['vote_count'];
    _id = result['id'];
    _video = result['video'];
    _vote_average = result['vote_average'];
    _title = result['title'];
    _popularity = result['popularity'];
    _poster_path = result['poster_path'];
    _original_language = result['original_language'];
    _original_title = result['original_title'];
    for (int i = 0; i < result['genre_ids'].length; i++) {
      _genre_ids.add(result['genre_ids'][i]);
    }
    _backdrop_path = result['backdrop_path'];
    _adult = result['adult'];
    _overview = result['overview'];
    _release_date = result['release_date'];
  }

  String get release_date => _release_date;

  String get overview => _overview;

  bool get adult => _adult;

  String get backdrop_path => _backdrop_path;

  List get genre_ids => _genre_ids;

  String get original_title => _original_title;

  String get original_language => _original_language;

  String get poster_path => _poster_path;

  double get popularity => _popularity;

  String get title => _title;

  double get vote_average => _vote_average;

  bool get video => _video;

  int get id => _id;

  int get vote_count => _vote_count;
}
将返回的json映射到该文件,fromJson方法时获取解码的json然后将属性映射到相应的字段中。
- 接下来开始网络实现,在resources包中创建一个movie_api_provider.dart文件,然后编写下面的代码:
import 'dart:async';
import 'package:http/http.dart' show Client;
import 'dart:convert';
import '../models/item_model.dart';

class MovieApiProvider {
  Client client = Client();
  final _apiKey = 'your_api_key';

  Future fetchMovieList() async {
    print("entered");
    final response = await client
        .get("http://api.themoviedb.org/3/movie/popular?api_key=$_apiKey");
    print(response.body.toString());
    if (response.statusCode == 200) {
      // If the call to the server was successful, parse the JSON
      return ItemModel.fromJson(json.decode(response.body));
    } else {
      // If that call was not successful, throw an error.
      throw Exception('Failed to load post');
    }
  }
}
fetchModelList方法发起一个网络请求,如果请求成功返回一个Future
- 接着在resources包中创建repository.dart文件,编写下面的代码
import 'dart:async';
import 'movie_api_provider.dart';
import '../models/item_model.dart';

class Repository {
  final moviesApiProvider = MovieApiProvider();

  Future fetchAllMovies() => moviesApiProvider.fetchMovieList();
}
此Repository类就是数据流向BLoC的中心点。
- 接下来让我们实现BLoC逻辑,在bloc目录下创建一个movies_bloc.dart文件,接着编写下面的代码:
import '../resources/repository.dart';
import 'package:rxdart/rxdart.dart';
import '../models/item_model.dart';

class MoviesBloc {
  final _repository = Repository();
  final _moviesFetcher = PublishSubject();

  Observable get allMovies => _moviesFetcher.stream;

  fetchAllMovies() async {
    ItemModel itemModel = await _repository.fetchAllMovies();
    _moviesFetcher.sink.add(itemModel);
  }

  dispose() {
    _moviesFetcher.close();
  }
}

final bloc = MoviesBloc();
在这个类中,我们创建了Repository对象用于访问fetchAllMovies。我们创建了一个PublishSubject对象,该对象的任务是将从服务器上获取到的Item作为数据流传递给UI,要将ItemModel对象作为流传递,我们创建了一个allMovies方法,其返回类型为Observable。这样我们就可以通过最后一行创建的bloc对象访问到数据流了。
如果你不理解什么是响应式编程,请看这个,简单的说就是如果有从服务器上来的新数据,我们就需要更新UI屏幕,为了使更新任务变得更简单,我们在UI中通过对BLoC进行观察从而更新UI的内容。
- 最后一部分,在ui包中创建一个movie_list.dart文件。
import 'package:flutter/material.dart';
import '../models/item_model.dart';
import '../blocs/movies_bloc.dart';

class MovieList extends StatelessWidget {
  @override
  Widget build(BuildContext context) {
    bloc.fetchAllMovies();
    return Scaffold(
      appBar: AppBar(
        title: Text('Popular Movies'),
      ),
      body: StreamBuilder(
        stream: bloc.allMovies,
        builder: (context, AsyncSnapshot snapshot) {
          if (snapshot.hasData) {
            return buildList(snapshot);
          } else if (snapshot.hasError) {
            return Text(snapshot.error.toString());
          }
          return Center(child: CircularProgressIndicator());
        },
      ),
    );
  }

  Widget buildList(AsyncSnapshot snapshot) {
    return GridView.builder(
        itemCount: snapshot.data.results.length,
        gridDelegate:
            new SliverGridDelegateWithFixedCrossAxisCount(crossAxisCount: 2),
        itemBuilder: (BuildContext context, int index) {
          return Image.network(
            'https://image.tmdb.org/t/p/w185${snapshot.data
                .results[index].poster_path}',
            fit: BoxFit.cover,
          );
        });
  }
}
在这个类中,没有使用StatefulWidget,而是使用了StreamBuilder,它将做和StatefulWidget相同的工作,用来更新UI。
我们在build方法中进行了网络调用,但是build方法时会执行多次的,在这里进行网络调用明显是不合适的。在下一篇文章中将会优化这一点。
总结
MovieBloc将数据转换成流,然后内置的StreamBuilder将会对流进行监听,如果数据流改变,就会去更新UI。StreamBuilder需要一个流参数,所以在MovieBloc中提供了一个allMovies的流。

