Ubuntu18 用postfix搭建邮件服务器步骤和坑
1、首先设置hostname
事先设置好hostname的话,Postfix可以自动配置好很多参数,节省时间。我们要假设的网站域名为ABC.com,要搭建独立的邮件服务器,就把主机名设置为mail.ABC.com。
输入下面的命令查看当前的主机名。
hostname -f
设置主机名为mail.ABC.com(永久)
hostnamectl --static set-hostname mail.ABC.com2、设置好系统时间
使用date命令查看时区设置以及当前的系统时间。

root@mail:~$ date
在Ubuntu系统上可以使用

sudo dpkg-reconfigure tzdata
3、安装Postfix和dovecot-pop3
sudo apt-get install mailutils
#安装mailutils客户端会自动检查postfix,并自动安装postfix

sudo apt-get install dovecot-pop3d
#当时只能正常发送,pop3老是连接失败,就查看发现110端口没有启用,所以是漏安装了pop3。。。
4、安装配置postfix
No configuration 表示不要做任何配置;
Internet Site 表示直接使用本地SMTP服务器发送和接收邮件;
Internet with smarthost 表示使用本地SMTP服务器接收邮件,但发送邮件时不直接使用本地SMTP服务器,而是使用第三方smart host来转发邮件;
Local only 表示邮件只能在本机用户之间发送和接收。
所以我们选择第二个Internet Site,按
我们可以用下面的命令查看Postfix的版本。
sudo postconf mail_version
mail_version = 2.11.0
5、使用netstat来查看Postfix的监听情况:
sudo netstat -lnpt需要保证master 25端口和dovecot 110 端口启用,这两个处理邮件收发。
6、创建邮件用户
邮件的用户是和系统用户一致的,也就是说系统用户可以当做邮件用户。
adduser Test
#添加了Test用户,输入密码,一路回车,最后输Y完成
删除邮件用户
sudo userdel -r username

加上-r可以删除/home/路径下的用户文件夹,否则不能

还需要删除用户在服务器上的邮件

var/mail/用户名
7、使用测试
链接SMTP 本地服务
telnet localhost 25
测试发送邮件到Test
mail from: root@localhost
rcpt to: test@localhost
hello,work
Subject: Re:hello,work
登陆Test用户,查看邮件
su Test

mail
8、非常重要的SSL、TLS认证
当时用foxmail登录个人账户时报错:-ERR Plaintext authentication disallowed on non-secure (SSL/TLS)
查了半天,最终知道了默认是开启SSL验证机制的,这里我是把它关闭,有需要的可以去查询相关启用方法。
#添加自启动
systemctl enable dovecot
systemctl enable postfix
#查看postfix状态
systemctl status postfix
vi /etc/dovecot/conf.d/10-auth.conf
去掉disable_plaintext_auth前面#,修改为: disable_plaintext_auth = no

vi /etc/dovecot/conf.d/10-ssl.conf
修改为: ssl = no

重启dovecot服务:
service dovecot restart
重启postfix服务:
service postfix restart
这样就关闭了SSL安全连接,默认使用25和110登录
9.设置postfix邮件发送限制10mb
发送超过10mb的附件提示:message file too big
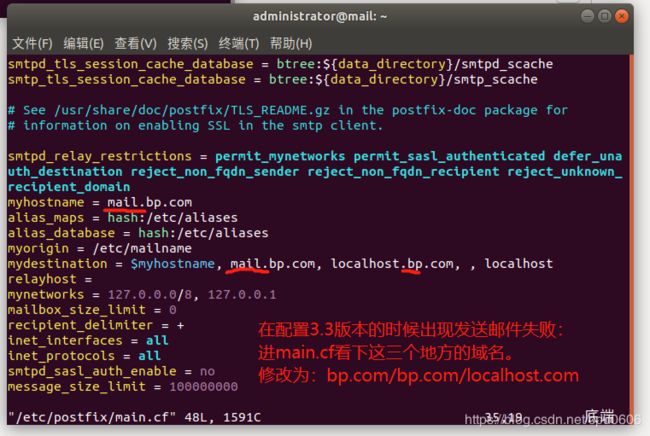
vi /etc/postfix/main.cf中
添加配置:message_size_limit = 0 不限制大小,或者51200000=50mb。ok了。
10.配置postfix 3.3版本出现以下报错
internal error ocurred refer to server log for more information
relay access denied
发送邮件失败


