android 里边添加hidl服务
笔者在Android 9 通过以下方式添加hidl服务,理论上对Android 8/9/10 都适用,
对于为何要有hidl这个东西以及如何添加hidl服务,google在https://source.android.google.cn/devices/architecture/hidl 里边有说明,
只是添加步骤不够详细,本人之前踩过一些坑折腾了好一会儿才添加成功,所以才想写这篇文章和同学们一起交流学习,本文目前只描述如何做不描述底层原理(底层也是用来binder),文章内容全部是基于android开源技术。
假设咱们要创建的hidl服务名字test,项目或公司的名字为vendorname,一般作为vendor咱们添加的服务放在/vendor/yourvendorname/目录下。
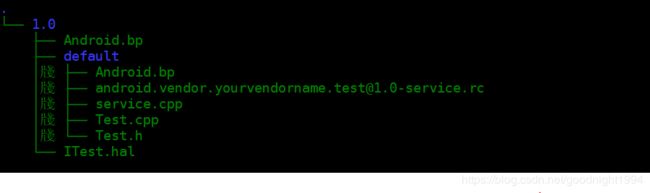
1,创建目录和接口文件
在 android/vendor/yourvendorname 底下创建test目录,(若读者下载的是原生代码,没有vendor和yourvendorname,麻烦分别创建);
由于是首次添加服务,在test 目录下创建名字为1.0的文件夹,表示第一个版本,
在1.0 目录下需要添加2个文件, Itest.hal 和 types.hal(不自定义结构体的话可以不需要创建),
ITest.hal里边定义test服务对外开放的接口,types.hal定义自定义的结构体类型,这2个的语法可以参考官网说明。
比如咱们的test服务要对外提供一个doSomething()的hidl接口,不自定义结构体,

//ITest.hal
package [email protected];

//import package (如果需要用到别的地方定义的类,可以import)

interface ITest {
    doSomething();//没有参数没有返回值
};
2,用hidl-gen 生成Android.bp, Test.cpp, Test.h
接着用hidl-gen 创建 Android.bp以及.cpp和.h文件,(若读者创建的test文件夹和相关文件是放在hardware/interface下,可以直接用
该目录下的update-makefiles.sh 脚本生成)
hidl-gen 工具位于 ./out/soong/host/linux-x86/bin/hidl-gen,
source, lunch 后可以直接在 android根目录下执行,(笔者以下几条命令也是基于android根目录执行),
hidl-gen -O "" -Landroidbp -r android.vendor:vendor [email protected]
[email protected]
LOC=android根目录路径/vendor/yourvendorname/test/1.0/default/ (即 "test绝对路径 + /1.0/default/")
hidl-gen -o $LOC -Lc++-impl -randroid.vendor:vendor -randroid.hidl:system/libhidl/transport $PACKAGE
hidl-gen -o $LOC -Landroidbp-impl -randroid.vendor:vendor -randroid.hidl:system/libhidl/transport $PACKAGE
执行完就会生成2个Android.bp(笔者有需要的话可以自行将default底下的那个改成Android.mk),
default文件夹以及Test.cpp,Test.h,里边包含test类和对其对外接口的定义,比如咱们目前的2个文件长这个样子,

//Test.h
#ifndef ANDROID_VENDOR_YOURVENDORNAME_TEST_V1_0_TEST_H
#define ANDROID_VENDOR_YOURVENDORNAME_TEST_V1_0_TEST_H

#include
#include
#include

namespace android {
namespace vendor {
namespace yourvendorname {
namespace test {
namespace V1_0 {
namespace implementation {

using ::android::hardware::hidl_array;
using ::android::hardware::hidl_memory;
using ::android::hardware::hidl_string;
using ::android::hardware::hidl_vec;
using ::android::hardware::Return;
using ::android::hardware::Void;
using ::android::sp;

struct Test : public ITest {
    // Methods from ::android::vendor::yourvendorname::test::V1_0::ITest follow.
    Return doSomething() override;

    // Methods from ::android::hidl::base::V1_0::IBase follow.

};

// FIXME: most likely delete, this is only for passthrough implementations
// extern "C" ITest* HIDL_FETCH_ITest(const char* name);

}  // namespace implementation
}  // namespace V1_0
}  // namespace test
}  // namespace yourvendorname
}  // namespace vendor
}  // namespace android

#endif  // ANDROID_VENDOR_YOURVENDORNAME_TEST_V1_0_TEST_H
//Test.cpp
#include "Test.h"

namespace android {
namespace vendor {
namespace yourvendorname {
namespace test {
namespace V1_0 {
namespace implementation {

// Methods from ::android::vendor::yourvendorname::test::V1_0::ITest follow.
Return Test::doSomething() {
    // TODO implement
    return Void();
}


// Methods from ::android::hidl::base::V1_0::IBase follow.

//ITest* HIDL_FETCH_ITest(const char* /* name */) {
    //return new Test();
//}
//
}  // namespace implementation
}  // namespace V1_0
}  // namespace test
}  // namespace yourvendorname
}  // namespace vendor
}  // namespace android
3,添加接口实现,rc文件,服务注册文件
3,添加接口实现,rc文件,服务注册文件
接下来就可以往test类添加相关的实现了,添加完后,由于咱们这是一个hidl服务,
(1)所以需要写一个main函数,将该test服务注册到hwservicemanager里边。(一般文件命名为service.cpp)
然后在main里边起一个线程程在 IPCThreadState 里边去监听hwbinder节点(即监听客户端请求)然后处理请求,
(2)然后还需要改一下default底下的Android.bp,编出一个bin文件,
(3)然后还需要编写[email protected] 在android系统启动的时候执行该bin文件。
//1.0/default/Android.bp
cc_binary {
    name: "[email protected]",
    relative_install_path: "hw",
    vendor: true,
    init_rc: ["[email protected]"],
    cflags: [
        "-Wall",
        "-Wextra",
        "-Werror",
        "-Wno-unused-parameter",
    ],
    srcs: ["service.cpp",
	    "Test.cpp",
	],

    shared_libs: [
        "liblog",
        "libcutils",
        "libdl",
        "libbase",
        "libutils",
        "libhidlbase",
        "libhidltransport",
        "[email protected]",
    ],
}
//1.0/Android.bp
// This file is autogenerated by hidl-gen -Landroidbp.

hidl_interface {
    name: "[email protected]",
    root: "android.vendor",
    srcs: [
        "ITest.hal",
    ],
    interfaces: [
        "[email protected]",
    ],
    gen_java: true,
}

//hidl_package_root {
//    name: "android.vendor",
//    path: "vendor",
//}

subdirs = ["default"]
//service.cpp
#define LOG_TAG "[email protected]"

#include
#include
#include
#include "Test.h"


using android::vendor::yourvendorname::test::V1_0::ITest;
using android::vendor::yourvendorname::test::V1_0::implementation::Test;
using android::hardware::configureRpcThreadpool;
using android::hardware::joinRpcThreadpool;
using android::sp;

int main() {

    configureRpcThreadpool(1 /*threads*/, true /*willJoin*/);

    sp test = new Test();

    //注册成为一个服务
    if(android::OK !=  test->registerAsService()) {
        LOG(ERROR) << "=====>lkh test register failed!!!";
        return -1; // or handle error
     } else {
	LOG(ERROR) << "=====>lkh test register success !!!";
     }

    // Adds this thread to the threadpool, resulting in one total
    // thread in the threadpool. We could also do other things, but
    // would have to specify 'false' to willJoin in configureRpcThreadpool.
    //开始监听请求
    joinRpcThreadpool();

    return -1;
}
#rc file
service vendor.test  /vendor/bin/hw/[email protected]
    class hal
    user system
    group system
4,编译
然后可以mm编译了,编出来的在out目录下的东西为:
system/lib/[email protected]
system/lib/[email protected]
system/lib64/[email protected]
system/lib64/[email protected]
vendor/etc/init/[email protected]
vendor/bin/hw/[email protected]
note: 若编译过程出现如下类似错误,
FAILED: out/soong/build.ninja
out/soong/.bootstrap/bin/soong_build -t -l out/.module_paths/Android.bp.list -b out/soong -n out -d out/soong/build.ninja.d -o out/soong/build.ninja Android.bp
error: vendor/yourvendorname/test/1.0/Android.bp:5:9: module "[email protected]_interface": root: Root, android, for [email protected] must be a prefix.
error: vendor/yourvendorname/test/1.0/Android.bp:9:15: module "[email protected]_interface": interfaces:
Cannot find package root specification for package root 'android' needed for module '[email protected]'.
Either this is a mispelling of the package root, or a new hidl_package_root module needs to be added.
 For example, you can fix this error by adding the following to /Android.bp:

hidl_package_root {
    name: "android",
    path: "",
}

可在1.0目录下的Android.bp添加如下内容尝试解决:
hidl_package_root {
    name: "android.vendor",
    path: "vendor",
}
5,启动运行
将4里边生成的那些东西push到咱们的android对应的路径下,然后reboot,
就可以看见咱们的服务已经起来了

lshal 也可以看见 [email protected]::ITest/default 已经注册到hwservicemanager了
6,客户端调用
Android.bp/Android.mk
共享库项里边添加
[email protected],libbase,libhardware,libhidlbase,libhidltransport,libhwbinder
  //再包含相关头文件
  #include
  //懒的写全称的话再加个using namespace
  using namespace android::vendor::yourvendorname::test::V1_0;

  //获取服务
  sp test = ITest::getService();
  //调用接口
  test->doSomething();