SpringBoot2集成Spock-Groovy测试框架从零开始
其他SpringBoot2集成Spock真的是千篇一律,而且一些细节问题还是比较多.花费了2个小时才集成完毕.此篇文章将会从maven导包开始,介绍如何集成Spock以及使用,如果有任何不足或问题之处请斧正.
前言
关于Groovy,Spock以及SpringBoot2测试本身的概念这里就不详细说了,资料也很多
maven集成Spock,Groovy
		<dependency>
            <groupId>org.spockframeworkgroupId>
            <artifactId>spock-coreartifactId>
            <version>1.3-RC1-groovy-2.4version>
            <scope>testscope>
        dependency>
        <dependency>
            <groupId>org.spockframeworkgroupId>
            <artifactId>spock-springartifactId>
            <version>1.3-RC1-groovy-2.4version>
            <scope>testscope>
        dependency>
        <dependency>
            <groupId>org.codehaus.groovygroupId>
            <artifactId>groovy-allartifactId>
            <version>2.4.6version>
            <scope>testscope>
            <type>pomtype>
        dependency>
这里注意一下,
- Groovy的导入使用
pom - 关于版本现在是2020年4月,目前的Groovy的最新版已经到3了.Spock的最新版到了2,我是什么都想用最新的性格,但是稍微尝试了一下,发现这玩意版本似乎有点混乱跑着有点问题.所以就先集成计较稳定的老版本吧.
- 任何库的版本,以及对应关系都是非常重要的,请重视
创建Groovy的测试类包位置


由于我们的语言使用Groovy,所以创建一个groovy文件夹,并且右键Mark Directory as->Test Sources Root这样文件夹就被我们绿了.绿了后的作用可以很友好的被IDEA发现,并且运行测试类
创建Groovy的测试类,并且使用Spock
我不太喜欢手动创建测试了,这样显得太累了.我们可以得到IDEA帮助,先到一个要生成测试的类中,按住Ctrl+Shift+T选择Spock创建测试类,类似下面这样

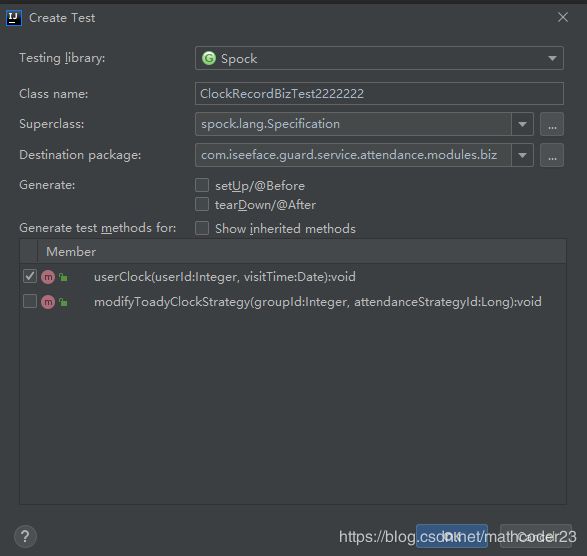
点击创建后会非常友好的在我们刚才创建的groovy文件夹中生成测试文件类
简单修改测试文件类,让Spock运行起来
import spock.lang.Specification

class ClockRecordBizTest2222222 extends Specification {
    def "test userClock"() {
        expect:
        1==2
    }
}
可以点击方法左侧的运行按钮,如果运行成功了.并且提示测试没通过那么久说明已经正确的集成可Spock以及Groovy
Spock支持SpringBoot
终于到了重头戏,我们需要集成SpringBoot的测试.代码如下
import com.iseeface.guard.service.attendance.ApplicationSpringBootTest
import org.springframework.boot.test.context.SpringBootTest
import org.springframework.test.context.ActiveProfiles
import spock.lang.Specification

@ActiveProfiles("test")
@SpringBootTest(classes= ApplicationSpringBootTest.class,webEnvironment =SpringBootTest.WebEnvironment.RANDOM_PORT)
class ClockRecordBizTest2222222 extends Specification {
    def "test userClock"() {
        expect:
        1==2
    }
}
点击运行就会出现SpringBoot启动的日志.这里说明一下我们使用SpringBoot2的@SpringBootTest注解来初始化测试入口.
ApplicationSpringBootTest此类是我自己创建SpringBoot初始化入口类,请酌情修改
让集成Spock的SpringBoot测试更加简洁
在上面我们通过@SpringBootTest注解实现注释,@ActiveProfiles注解配置环境文件,但是如果我们每个测试类都要写这两个代码就显得太麻烦了.所以我们建立一个接口类用来配置这些注解
/**
 * 这里此类路径必须在待测试类的路径中.
 */
@ActiveProfiles("test")
@SpringBootTest(classes= ApplicationSpringBootTest.class,webEnvironment =SpringBootTest.WebEnvironment.RANDOM_PORT)
interface BaseSpringBootTest {

}
基于BaseSpringBootTest的Spock测试
import com.iseeface.guard.service.attendance.BaseSpringBootTest
import spock.lang.Specification

/**
 * BaseSpringBootTest 接口为SpringBoot测试的注解入口
 */
class ClockRecordBizTest2222222 extends Specification implements BaseSpringBootTest {
    def "test userClock"() {
        expect:
        1==2
    }
}
这样看着是不是更加简洁了,而且很灵活,因为我们测试的一些入口配置是很可能修改的.
这里有个关键是BaseSpringBootTest 是接口类,而不是抽象类或类,因为如果基类继承Specification就不能很友好的使用Spock了.并且如果使用接口可以很容易扩展测试类的其他功能.比如IO相关的测试,云服务相关的测试.
额外赠送SpringBootTest.groovy配置
import javafx.application.Application
import org.mybatis.spring.annotation.MapperScan
import org.springframework.boot.SpringApplication
import org.springframework.boot.autoconfigure.SpringBootApplication
import org.springframework.context.annotation.ComponentScan
import org.springframework.scheduling.annotation.EnableScheduling

//注意这里的中括号是数组的意思,在groovy中,数组实例用[]表示,java中是{}
@ComponentScan(["com.xxx.xxx"])
@MapperScan(["com.xxx.xxx.mapper"])
@SpringBootApplication
@EnableScheduling
class ApplicationSpringBootTest {
    static void main(String[] args) {
        SpringApplication.run(Application.class, args);
    }
}
这里千万注意,我这个是groovy文件,在groovy中的数组是使用[],而不是{}
本文到这里就结束了,写的很简单.没有过多地介绍SpringBoot的测试过程,以及Spock如何使用.这些将在其他文章中总结.