转自我自己的 blog:Sources 开发日记四 (文件列表页面)
Code Reader 改名为 Sources
1.0 也已经上架,App Store: http://itunes.apple.com/app/id1125732186。
同时 Sources 也在 Github 上开源了,地址是:https://github.com/vulgur/Sources。
这篇讲讲 Repo 的文件列表的页面。
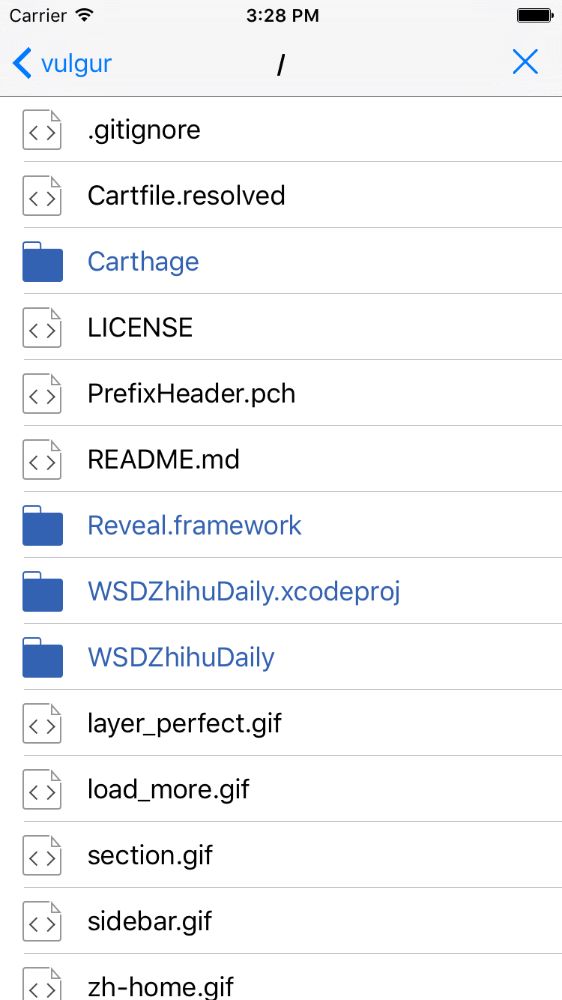
这部分的功能包括显示文件列表,根据文件类型显示不同的图标以及进行相应的选择处理。
View
这个页面就是一个简单的 UITableView,所以在 Storyboard 中就选择了 Table View Controller。每一个 Cell 就是一个文件(或目录),点击目录的话进入子目录的文件列表页面,点击文件的话就进入代码页面。
因为不能像电脑上通过树形视图来浏览文件目录结构,如果目录层次太深的话想返回到 Repo 页面就会令人十分抓狂(比如 Java 项目,无穷无尽的包目录啊),我在右上角添加了一个 Bar Button Item,用来一键返回到 Repo 页面。
File Cell 也是自定义的,布局十分简单,就是左面是图标,右面是文件名,这里就不贴图和代码了。
Model
每个 Cell 对应的 model 就是 RepoFile,这是根据 Github API 定义的类。
import ObjectMapper

class RepoFile: Mappable {
    var name: String?
    var type: String?
    var path: String?
    var downloadURLString: String?
    var htmlURLString: String?
    var apiURLString: String?

    required init?(_ map: Map) {

    }

    func mapping(map: Map) {
        name                <- map["name"]
        type                <- map["type"]
        path                <- map["path"]
        downloadURLString   <- map["download_url"]
        htmlURLString       <- map["html_url"]
        apiURLString        <- map["url"]
    }
}
这个类在以后的 blog 中还会用到,而且还需要改动,这里的代码是只满足本篇的版本。
Controller
负责 model 和 view 背后工作的就是 FileListViewController。
获取文件列表数据
这个 controller 有一个属性 apiURLString,是由 UINavigationController 中上一级的 controller 传入的,每个文件列表就是根据这个字符串通过 Github API 来获取文件数据的。
func fetchFileList(path: String) {
      EZLoadingActivity.show("loading files", disableUI: true)
      Alamofire.request(.GET, path)
          .responseJSON { (response) in
              switch response.result{
              case .Success:
                  if let items = Mapper().mapArray(response.result.value) {
                      self.fileList = items
                      self.tableView.reloadData()
                  }
              case .Failure(let error):
                  print(error)
              }
              EZLoadingActivity.hide()
      }
  }
显示文件和目录
RepoFile 有一个属性是 type,代表文件的类型,file 或 dir。在配置 cell 的时候,根据这个属性来设置 cell 的样式。
override func tableView(tableView: UITableView, cellForRowAtIndexPath indexPath: NSIndexPath) -> UITableViewCell {
     let cell = tableView.dequeueReusableCellWithIdentifier("FileCell", forIndexPath: indexPath) as! FileCell
     let file = fileList[indexPath.row]
     if file.type == "dir" {
         cell.filenameLabel.textColor = UIColor(red: 51/255, green: 98/255, blue: 178/255, alpha: 1)
         cell.fileIconImageView.image = UIImage(named: "dir")
     } else {
         cell.fileIconImageView.image = UIImage(named: "file")
     }
     cell.filenameLabel.text = file.name
     return cell
 }
根据文件类型选择不同的操作
前面说了,要区分对不同文件类型的点击操作。点击 file 文件就很简单,直接跳转到展示代码的页面,这个下一篇 blog 会讲。点击 dir 文件就要 push 一个 FileListViewController,这里需要用从 UIStoryboard 中新建,而不能直接初始化 FileListViewController,因为一来直接初始化得来的实例没有右上角那个 Bar Button Item,二来这个实例也没有 storyboard 中建立的那些 segue。
override func tableView(tableView: UITableView, didSelectRowAtIndexPath indexPath: NSIndexPath) {
      let file = fileList[indexPath.row]
      if file.type == "dir" {
          let nextFileListVC = UIStoryboard(name: "Main", bundle: nil).instantiateViewControllerWithIdentifier("FileListViewController") as! FileListViewController
          nextFileListVC.apiURLString = file.apiURLString
          if pathTitle == "/" {
              nextFileListVC.pathTitle = self.pathTitle + file.name!
          } else {
              nextFileListVC.pathTitle = self.pathTitle + "/" + file.name!
          }
          navigationController?.pushViewController(nextFileListVC, animated: true)
      } else if file.type == "file" {

          performSegueWithIdentifier("ShowCode", sender: file)
      }
}

override func prepareForSegue(segue: UIStoryboardSegue, sender: AnyObject?) {
    if segue.identifier == "ShowCode" {
        let codeVC = segue.destinationViewController as! CodeViewController
        let file = sender as! RepoFile
        RecentsManager.sharedManager.addRecentFile(file)
        codeVC.filename = file.name
        codeVC.downloadAPI = file.downloadURLString
    }
}
返回到 Repo 页面
终于讲到这个功能,这是我灵机一动想出来的,觉得还是十分实用的。
实现也十分简单,从 storyboard 中拉一个 IBAction 到 controller 中,pop 到 RepoViewController 就可以。
@IBAction func backToRoot(sender: UIBarButtonItem) {
    if let repoVC = navigationController?.viewControllers[1] {
        navigationController?.popToViewController(repoVC, animated: true)
    } else {
        navigationController?.popToRootViewControllerAnimated(true)
    }
}
优化路径显示
导航栏的标题显示的是当前目录的路径,但是如果路径太长的话(很常见)iOS 就会截断这个字符串,导致信息不完整。
所以我做了两个小事情:
- 优化返回按钮的 title。如果当前页面是根目录,这个 title 显示的是 repo 的名字;如果是第二级目录,则显示 “/”;其他子目录就显示父目录的名字。
- 导航栏的标题在长度允许的情况下,显示完整路径,否则只显示父目录和本目录,父目录以上的路径用“...”代替。
func configNavigationTitle() {
    let pathComponents = self.pathTitle.componentsSeparatedByString("/")
    let currentPath = pathComponents[pathComponents.count-1]
    let parentPath = pathComponents[pathComponents.count-2]

    navigationItem.backBarButtonItem = UIBarButtonItem(title: currentPath == "" ? "/" : currentPath, style: UIBarButtonItemStyle.Plain, target: nil, action: nil)

    if pathTitle.characters.count > 30 {
        navigationItem.title = ".../" + parentPath + "/" + currentPath
    } else {
        navigationItem.title = pathTitle
    }
}


