Spring学习笔记-6(注解)
文章目录
- 1.概述
- 2.使用注解配置AOP、IOC
- 2.1.配置applicationContext.xml文件
- 2.2.配置切点
- 2.3.配置通知
- 2.4.测试
- 3.使用注解获取属性文件中的值
- 3.1.新建.properties文件
- 3.2.配置applicationContext.xml文件
- 3.3.获取配置文件中的值
- 3.3.测试
- 4.其他注解
1.概述
在之前的Spring框架使用中,我们是通过applicationContext.xml文件来配置bean实例、切点、通知等的内容,其实这些内容可以通过注解的方式进行简单的配置。
2.使用注解配置AOP、IOC
2.1.配置applicationContext.xml文件
-
配置context:component-scan标签
由于Spring是默认使用applicationContext.xml文件来进行各项配置的,所以不会主动去扫描注解,如果想使用注解去配置一些内容,则需要告诉Spring需要进行注解扫描的包。这样Spring才会进行扫描从而完成配置。 -
配置aop:aspectj-autoproxy标签
如果不配置该标签,在使用注解的时候通知不会被织入到切点中。测试中貌似无论是配置为true还是配置为false都可以使通知织入到切点中,只要有这个标签存在就好了。 -
建议都设置为true,因为后续写web项目的时候,如果使用jdk动态代理,可能会报如下类型不匹配的错误,因为jdk动态代理和cglib动态代理的实现形式不同,前者是利用反射将通知织入到切点中形成一个代理,而后者则利用字节码技术将通知织入到切点中形成一个子类。
org.springframework.beans.factory.BeanNotOfRequiredTypeException: Bean named ‘userServiceImpl’ must be of type [com.bear.sxt.service.UserServiceImpl], but was actually of type [com.sun.proxy.$Proxy13]
而之前的AOP学习笔记中,没有配置aop:aspectj-autoproxy标签也可以成功织入,也没有报类型错误。可以推测与两方面有关:1.是否使用注解的方式配置AOP。2.是否开发的是web项目(之前的AOP笔记中的测试代码并没有放在tomcat中进行运行,而出现类型错误的测试代码有放到tomcat中运行)。
<beans xmlns="http://www.springframework.org/schema/beans"
       xmlns:xsi="http://www.w3.org/2001/XMLSchema-instance"
       xmlns:context="http://www.springframework.org/schema/context"
       xmlns:aop="http://www.springframework.org/schema/aop"
       xsi:schemaLocation="http://www.springframework.org/schema/beans
        http://www.springframework.org/schema/beans/spring-beans.xsd
        http://www.springframework.org/schema/context
        http://www.springframework.org/schema/context/spring-context.xsd
        http://www.springframework.org/schema/aop http://www.springframework.org/schema/aop/spring-aop.xsd">


    <context:component-scan base-package="com.bear.sxt.advice,com.bear.sxt.pointcut"/>


    <aop:aspectj-autoproxy proxy-target-class="true"/>
beans>
2.2.配置切点
- @Component注解:相当于bean标签
- @Pointcut注解:相当于aop:pointcut标签
//component注解作用为将当前对象实例交给spring管理
@Component
public class MyPointcut {

    //定义切点
    @Pointcut("execution(* com.bear.sxt.pointcut.MyPointcut.function())")
    public void function() {
        int x = 5 / 0;	//用于生成异常
        System.out.println("myPointcut.function");
    }
}
2.3.配置通知
- @Component注解:相当于bean标签
- @Aspect注解:相当于aop:aspect标签
各种通知注解
- @Before注解:相当于aop:before标签
- @After注解:相当于aop:after标签
- @AfterReturning注解:相当于aop:after-returning标签
- @AfterThrowing注解:相当于aop:after-throwing标签
- @Around注解:相当于aop:around标签
通知注解属性
- value属性:相当于pointcut-ref属性,但需要填写切点的全限定路径
- 其他属性看具体通知
//component注解标识将当前对象实例交给spring容器管理
@Component
//aspect注解标识将当前对象定义为切面
@Aspect
public class MyAdvice {

    @Before(value = "com.bear.sxt.pointcut.MyPointcut.function()")
    public void myBefore() {
        System.out.println("前置");
    }

    @After("com.bear.sxt.pointcut.MyPointcut.function()")
    public void myAfter() {
        System.out.println("后置-异常执行");
    }

    @AfterReturning("com.bear.sxt.pointcut.MyPointcut.function()")
    public void myAfterReturning() {
        System.out.println("后置-异常不执行");
    }

    @AfterThrowing(value = "com.bear.sxt.pointcut.MyPointcut.function()",throwing = "e")
    public void myThrows(Throwable e) {
        System.out.println("异常:" + e.getMessage());
    }

    @Around("com.bear.sxt.pointcut.MyPointcut.function()")
    public Object myAround(ProceedingJoinPoint p) throws Throwable {
        System.out.println("环绕-前置");
        Object result = p.proceed();
        System.out.println("环绕-后置");
        return result;
    }
}
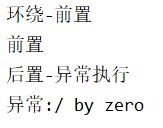
2.4.测试
- 测试代码
public class Test {

    public static void main(String[] args) {
        ApplicationContext ac = new ClassPathXmlApplicationContext("applicationContext.xml");
        MyPointcut mp = ac.getBean("myPointcut", MyPointcut.class);

        try {
            mp.function();
        } catch (Exception e) {

        }
    }
}
- 结果
3.使用注解获取属性文件中的值
项目中的一些配置我们喜欢写在.properties文件中,可以通过配置Spring来使用通过注解获取这些配置文件中属性的值。
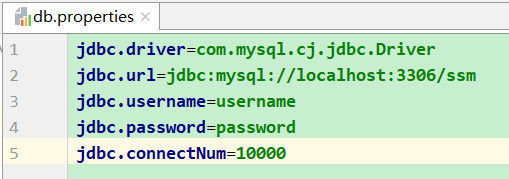
3.1.新建.properties文件
按需编写.properties文件,并放在/src文件夹下,如定义一个db.properties配置文件,里面包含了数据库的连接信息。
3.2.配置applicationContext.xml文件
主要是通过配置context:property-placeholder标签中的location属性来引入所需的配置文件。
<beans xmlns="http://www.springframework.org/schema/beans"
       xmlns:xsi="http://www.w3.org/2001/XMLSchema-instance"
       xmlns:context="http://www.springframework.org/schema/context"
       xmlns:aop="http://www.springframework.org/schema/aop"
       xsi:schemaLocation="http://www.springframework.org/schema/beans
        http://www.springframework.org/schema/beans/spring-beans.xsd
        http://www.springframework.org/schema/context
        http://www.springframework.org/schema/context/spring-context.xsd
        http://www.springframework.org/schema/aop http://www.springframework.org/schema/aop/spring-aop.xsd">


    <context:property-placeholder location="classpath:db.properties"/>
beans>
3.3.获取配置文件中的值
- 通过配置applicationContext.xml获取
配置bean标签中的property子标签中的value属性,使用${配置名}的形式获取相应配置的值。
    <bean id="propertiesTest" class="com.bear.sxt.test.PropertiesTest">
        <property name="jdbcDriver" value="${jdbc.driver}"/>
        <property name="jdbcUrl" value="${jdbc.url}"/>
        <property name="jdbcPassword" value="${jdbc.password}"/>
        <property name="jdbcUsername" value="${jdbc.username}"/>
        <property name="jdbcConnectNum" value="${jdbc.connectNum}"/>
    bean>
- 通过注解获取
要使用注解需要在applicationContext.xml文件中配置如下两个标签。
    <context:component-scan base-package="com.bear.sxt.advice,com.bear.sxt.pointcut,com.bear.sxt.test"/>


    <aop:aspectj-autoproxy proxy-target-class="true"/>
通过@Value("${配置名}")来将配置文件中的值赋给相应的成员变量,
@Component
public class PropertiesTest {

    @Value("${jdbc.driver}")
    String jdbcDriver;
    @Value("${jdbc.url}")
    String jdbcUrl;
    @Value("${jdbc.username}")
    String jdbcUsername;
    @Value("${jdbc.password}")
    String jdbcPassword;
    @Value("${jdbc.connectNum}")
    int jdbcConnectNum;
}
3.3.测试
- 测试代码
    public static void main(String[] args) {
        ApplicationContext ac = new ClassPathXmlApplicationContext("applicationContext.xml");
        PropertiesTest pt = ac.getBean("propertiesTest", PropertiesTest.class);
        System.out.println(pt.jdbcDriver);
        System.out.println(pt.jdbcUrl);
        System.out.println(pt.jdbcUsername);
        System.out.println(pt.jdbcPassword);
        System.out.println(pt.jdbcConnectNum);
    }
- 测试结果

4.其他注解
- @Component:相当于bean标签。
- @Service:作用与@Component一样,用于注解ServiceImpl类。
@Service
public class UserServiceImpl implements UserService {
	//code
}
- @Repository:作用与@Component一样,用于注解DAO层的实现类。
- @Controller:作用与@Compinent一样,用于注解控制器的实现类。
- @Resource:java提供的注解,相当于property标签,用于对象注入,写在相应的对象之上,使用该注解时相应的对象无需写get/set方法。(通过byName注入)
- @Autowired:Spring提供的注解,作用和@Resource一样,使用该注解时相应的对象无需写get/set方法。(通过byType注入)
@Service
public class UserServiceImpl implements UserService {
    @Autowired
    UserMapper userMapper;
}