node和bootstrap-table实现最简单的服务端分页
之前为了实现这个table分页效果找了很多例子,但因为服务端的解释并不是很清楚而且服务端也不是用js写的,所以自己动手用node实现了服务端,都是很简单的例子,方便理解
1.html页面
首先要引入必要的jquery,bootstap以及bootstrap-table依赖,注意引入顺序,其次在div添加一个table:
test.html:
<html lang="en">
<head>
    <meta charset="utf-8">
    <title>table分页title>
    <link rel="stylesheet" href="build/bootstrap.min.css">
    <link rel="stylesheet" href="build/bootstrap-table.min.css">
    <script defer src="build/jquery-3.1.1.min.js">script>
    <script defer src="build/bootstrap.js">script>
    <script defer src="build/bootstrap-table.js">script>
    <script defer src="build/bootstrap-table-zh-CN.min.js">script>
    <script defer src="test.js">script>
head>
<body>
<div >
    <table id="table">
    table>
div>
body>
html>
2.js文件:
我们在html引入test.js文件,里面的例子网上很多,各个参数以及更多参数的使用也请自行去查找,拿最简单的例子来说:
test.js:
$("#table").bootstrapTable({
  method: 'GET', //请求的方式,
  contentType: "application/x-www-form-urlencoded",
  url:"http://127.0.0.1:8081/",//要请求数据的文件路径,这是我们服务端给的接口,待会用服务端通过这个接口将要显示内容的数据返回到table进行显示
  pageNumber: 1, //初始化加载第一页,默认第一页
  pagination:true,//是否分页
  queryParams:queryParams,//请求服务器时所传的参数,服务端分页的时候一定要有这个函数,这个函数的返回值相当于查询要显示内容数据的参数,表格内容数据的获取取决于这个方法
  sidePagination:'server',//指定服务器端分页
  pageSize:5,//单页记录数
  pageList:[5,10,20],//分页步进值
  columns: [{
    field: 'id',
    title: '编号'
  }, {
    field: 'name',
    title: '姓名'
  }, {
    field: 'age',
    title: '年龄'
  }]
});
//请求服务数据时所传参数
function queryParams(params){
  return {
    pageSize : params.limit, //每一页的数据行数,默认是上面设置的5(pageSize)
    pageIndex : params.offset/params.limit+1, //当前页面,默认是上面设置的1(pageNumber)
  }
}
3.服务端:
在这里我们用node实现上面需要的http://127.0.0.1:8081接口,关于node的ubuntu安装可以参考我之前的文章:ubuntu安装webpack
server.js:
var http = require('http');
var url = require('url');
var util = require('util');
var data1 = {
  total: 10,
  rows: [
    {id: "1", name: "tom", age: "12"},
    {id: "2", name: "tom", age: "12"},
    {id: "3", name: "tom", age: "12"},
    {id: "4", name: "tom", age: "12"},
    {id: "5", name: "tom", age: "12"}
  ]
};
var data2 = {
  total: 10,
  rows: [
    {id: "6", name: "tom", age: "12"},
    {id: "7", name: "tom", age: "12"},
    {id: "8", name: "tom", age: "12"},
    {id: "9", name: "tom", age: "12"},
    {id: "10", name: "tom", age: "12"},
  ]
};
var data3 = {
  total: 10,
  rows: [
    {id: "1", name: "tom", age: "12"},
    {id: "2", name: "tom", age: "12"},
    {id: "3", name: "tom", age: "12"},
    {id: "4", name: "tom", age: "12"},
    {id: "5", name: "tom", age: "12"},
    {id: "6", name: "tom", age: "12"},
    {id: "7", name: "tom", age: "12"},
    {id: "8", name: "tom", age: "12"},
    {id: "9", name: "tom", age: "12"},
    {id: "10", name: "tom", age: "12"}
  ]
};
http.createServer(function (request, response) {
  // 发送 HTTP 头部
  // HTTP 状态值: 200 : OK
  response.writeHead(200, {"Content-Type": "text/plain", "Access-Control-Allow-Origin": "*"});
  var params = url.parse(request.url, true).query;
  if (params.pageIndex === "1" && params.pageSize === "5") {
    response.write(JSON.stringify(data1));
  } else if (params.pageIndex === "2" && params.pageSize === "5") {
    response.write(JSON.stringify(data2));
  } else {
    response.write(JSON.stringify(data3));
  }
  response.end();
}).listen(8081);
// 终端打印如下信息
console.log('Server running at http://127.0.0.1:8081/');注意服务端分页返回的数据格式,必须有total和rows两个字段,
total:返回所有数据总数的,这个数字是客户端为了计算一共多少页,当前在多少页显示多少内容的
rows:数据的内容,代表当前请求回去要显示在页面上的内容
比如data1,total为10,rows有5行数据,
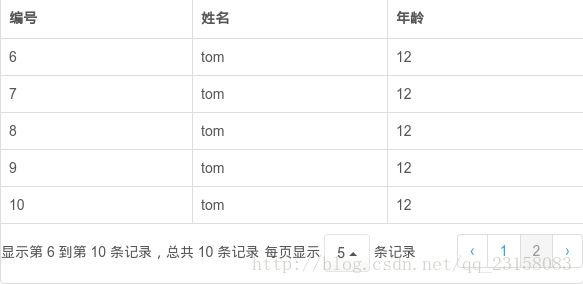
我们根据pageIndex为1和pageSize为5返回这组数据,代表一共有10个数据,而pageSize为5则要分2页,当前是第1页的内容,而data2则返回第2页的内容
再比如data3,total为10,rows有10行数据,
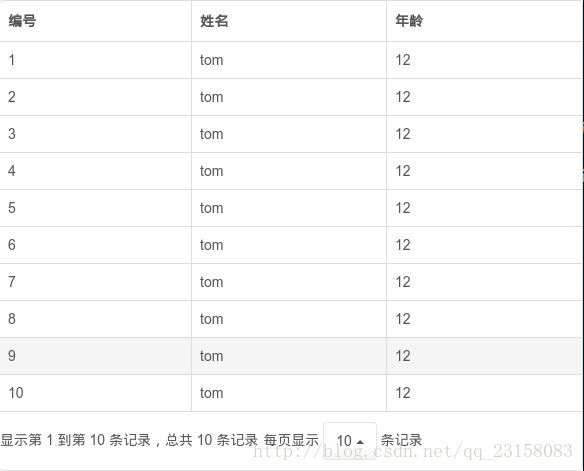
根据pageIndex为1和pageSize为10返回这组数据,代表一共有10个数据,而pageSize为10则只要分1页,当前是所有内容
服务端写好之后,我们用node启动服务:
node server启动成功之后会看到相应的log:
Server running at http://127.0.0.1:8081/我们在浏览器打开http://127.0.0.1:8081/能看到返回结果字符串,说明服务端没有问题了,
然后打开用浏览器打开test.html,就可以看到效果了:

点击数字2切换到第二页:

改变每页显示条数为10:

在我们点击页码数字切换和改变当前页面显示数时,其实是重新发送请求,
如
- 从第一页切换到第二页:127.0.0.1:8081?pageSize=5&pageIndex=2
- 从第二页切换到第一页:127.0.0.1:8081?pageSize=5&pageIndex=1
- 将页面显示数从5改成10:127.0.0.1:8081?pageSize=10&pageIndex=1
其实也就是我们在request中取出pageSize和pageIndex参数,然后根据这两个参数返回相应的数据
相信通过上面的例子已经明白客户端分页的原理和实现方法了,更多的关于参数也是在queryParams中添加,比如搜索框的参数等,这里不再详述
4.实现中遇到的问题
在写例子时,server的response头部要加跨域访问的权限,否则会报错:
response.writeHead(200, {"Content-Type": "text/plain", "Access-Control-Allow-Origin": "*"});此外在发送请求时请设置bootstrap-table请求的contentType,否则会报Request header field Content-Type is not allowed by Access-Control-Allow-Headers in preflight response.的错误
contentType: "application/x-www-form-urlencoded",