SSM+nginx+tomcat+maven+mysql+redis环境搭建及工程全套配置,实现前后端动静分离
目录
前言
服务器环境搭建
windows开发环境
SSM搭建
加入redis(注解形式)
nginx与tomcat关联配置,完成前后端连接
前言
本次采用前后端分离模式,前端以html、css、js为组成模式,后端以spring全家桶的"手动挡"模式SSM作为基础。nginx启动前端,并管理静态文件,tomcat启动后端,管理动态数据,mysql作为应用数据库。开发环境后端工程采用maven工程,并在后端加入redis缓存。
服务器环境搭建
本次是阿里云服务器,操作系统为ubuntu16.04,JDK和tomcat的安装可参照:
https://blog.csdn.net/qq_36632174/article/details/102461743
一、安装nginx
nginx可以在线安装,也可以离线安装。在线安装简单,直接。离线装主要针对有些内网环境准备的,且可自定义安装路径。
1.在线安装nginx
sudo apt-get update
sudo apt-get install nginx
sudo apt-get upgrade
配置文件:/etc/nginx/nginx.conf
程序文件:/usr/sbin/nginx
日志:/varlog/nginx
默认虚拟主机:/var/www/html
启动:sudo /etc/init.d/nginx start
停止:sudo /etc/init.d/nginx stop
重启:sudo /etc/init.d/nginx restart
状态:sudo /etc/init.d/nginx status
查看端口占用:lsof -i:80
2.离线安装nginx
①准备环境
gcc:nginx编译依赖gcc环境
apt-get install gcc -c++
pcre:(Perl Compatible Regular Expressions)是一个Perl库,包括 perl 兼容的正则表达式库。nginx的http模块使用pcre来解析正则表达式.
apt-get install -y pcre pcre-devel
# 查看zlib是否安装
dpkg -l | grep zlib
# 解决依赖包openssl安装
sudo apt-get install openssl libssl-dev
# 解决依赖包pcre安装
sudo apt-get install libpcre3 libpcre3-dev
# 解决依赖包zlib安装
sudo apt-get install zlib1g-dev
准备完前期环境后,去nginx官网下载nginx-1.14.0.tar.gz
安装之前需要手动创建上面指定的nginx文件夹,否则make会出错:mkdir /usr/local/nginx
②配置nginx
# 添加nginx组
groupadd unginx
# 创建nginx运行账户unginx并加入到unginx组,不允许unginx用户直接登录系统
useradd -g unginx unginx -s /bin/false
配置防火墙
如果是使用的腾讯服务器,只需要在服务器管理平台添加80端口的安全组就好
服务器则可以设置防火墙:
# 修改防火墙配置:
vi + /etc/sysconfig/iptables
# 添加配置项
-A INPUT -m state --state NEW -m tcp -p tcp --dport 80 -j ACCEPT
# 重启防火墙
service iptables restart
cd /usr/local/nginx-1.14.0
./configure --prefix=/usr/local/nginx
make && make install
cd /usr/local/nginx/sbin
检查nginx是否安装成功
./nginx -t
正确结果显示:
nginx: the configuration file /usr/local/nginx/conf/nginx.conf syntax is ok
nginx: configuration file /usr/local/nginx/conf/nginx.conf test is successful
③启动nginx
cd /usr/local/nginx
sbin/nginx
ps -ef | grep nginx
重启nginx:sbin/nginx -s reload
停止:sbin/nginx -s stop
访问:http://hadoop01
即可到nginx欢迎页
二、安装mysql
直接在线安装:apt-get install mysql-server
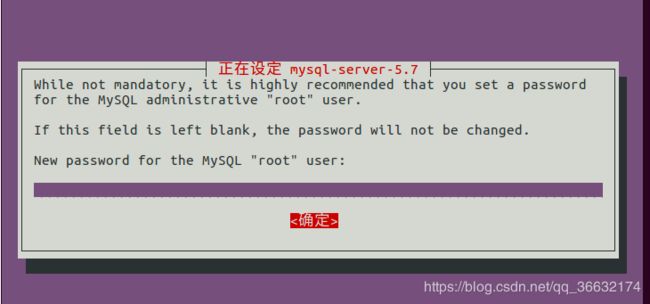
输入 y ,下载安装时会出现要求设置密码的界面:
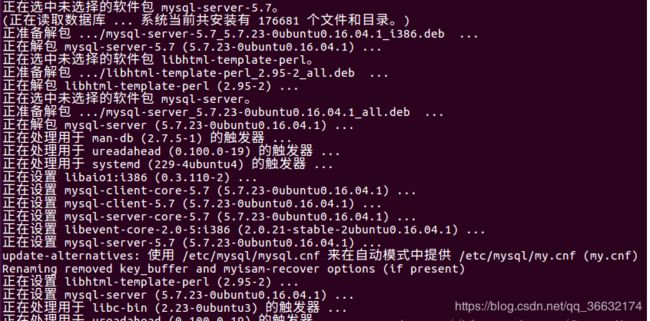
输入自己想设置的密码,之后再次输入确认密码。完成之后如下图:
启动mysql:service mysql start,启动后检验:ps -ef | grep mysql
打开数据库,mysql -uroot -p,mysql -uroot -p,输入设置的密码
设置mysql允许远程访问,首先编辑文件/etc/mysql/mysql.conf.d/mysqld.cnf:
sudo vi /etc/mysql/mysql.conf.d/mysqld.cnf,注释掉bind-address = 127.0.0.1:
保存退出,然后进入mysql服务,执行授权命令:
grant all on *.* to root@'%' identified by '你的密码' with grant option;
flush privileges;
然后执行quit命令退出mysql服务,执行如下命令重启mysql:
service mysql restart
数据库就可以被远程连接了。
三、安装redis
直接在线安装redis:sudo apt-get install redis-server
安装完成后,需要手动启动下:redis-server,验证启动redis-cli,输入命令:keys *
配置远程访问:vim /etc/redis/redis.conf,#bind 127.0.0.1注释掉
配置密码:requirepass abcd,设置密码为abcd
输入密码:auth 密码
修改后重启服务:/etc/init.d/redis-server restart
redis安装完毕。
到此,服务器环境准备完毕。
windows开发环境
windows开发环境参照之前博客:https://blog.csdn.net/qq_36632174/article/details/101699311
eclipse配置maven库参照:https://blog.csdn.net/qq_36632174/article/details/101704421
SSM搭建
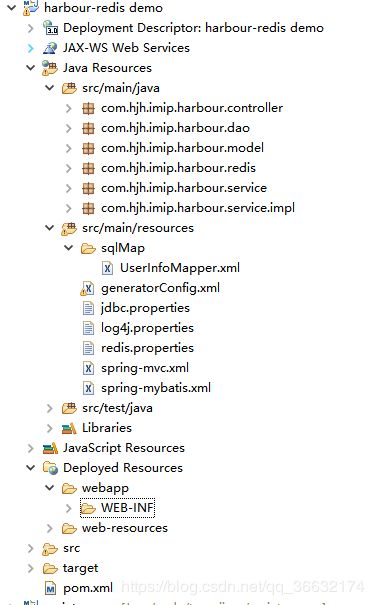
首先确定,Maven工程结构,如图:
创建一个maven web工程,在resources文件夹下创建框架文件(框架文件名可以自己定义)
spring-mybatis.xml:spring与mybatis结合;
spring-mvc.xml:spring与前端的结合;
redis.properties:redis基础参数;
jdbc.properties:mysql基础参数;
generatorConfig.xml:mybatis生成工具。
sqlmap文件夹下存放mybatis的SQL文件,其它几个包分别是controller层、dao层、model(实例)层、service接口层和service实现类。
创建好以上工程结构后,首先在pom.xml中引入需要的maven包,jar包加载到指定的maven库中:
在webapp/WEB-INF/下有个web.xml,它是整个spring web工程的的中枢,它连接着各种框架文件,其配置可参照如下(因为本次是前后分离,没有jsp文件,所以注释掉jsp相关):
xsi:schemaLocation="http://java.sun.com/xml/ns/javaee http://java.sun.com/xml/ns/javaee/web-app_3_0.xsd"
version="3.0">
配置mybatis,配置文件内容如下:
xmlns:aop="http://www.springframework.org/schema/aop" xmlns:tx="http://www.springframework.org/schema/tx"
xmlns:task="http://www.springframework.org/schema/task"
xsi:schemaLocation="http://www.springframework.org/schema/beans http://www.springframework.org/schema/beans/spring-beans-4.0.xsd
http://www.springframework.org/schema/context http://www.springframework.org/schema/context/spring-context-4.0.xsd
http://www.springframework.org/schema/aop http://www.springframework.org/schema/aop/spring-aop-4.0.xsd
http://www.springframework.org/schema/tx http://www.springframework.org/schema/tx/spring-tx-4.0.xsd
http://www.springframework.org/schema/task
http://www.springframework.org/schema/task/spring-task-4.0.xsd">
这是简单版的mybatis配置,集成了mysql和redis数据库,整合了mybatis的.xml文件格式的SQL,整合了Dao文件。企业版的配置请参照:SSM企业版:多数据源+activity+事务+定时任务()
配置spring-mvc.xml,配置文件内容如下:
xmlns:context="http://www.springframework.org/schema/context"
xmlns:mvc="http://www.springframework.org/schema/mvc"
xsi:schemaLocation="http://www.springframework.org/schema/beans
http://www.springframework.org/schema/beans/spring-beans-4.2.xsd
http://www.springframework.org/schema/context
http://www.springframework.org/schema/context/spring-context-4.2.xsd
http://www.springframework.org/schema/mvc
http://www.springframework.org/schema/mvc/spring-mvc-4.2.xsd">
如果是前后端分离,由nginx管理前端文件,html视图解析器、jsp视图解析器及最下面的
想操作generatorConfig.xml文件,先在eclipse的Marketplace(help->eclipse Marketplace)中下载小黑鸟工具
下载好之后,右键点击generatorConfig.xml会出现小黑鸟标志,在配置好文件以下内容后就可以通过此工具直接生成出实例、sql文件、Dao层的初始文件。
generatorConfig.xml配置如下:
PUBLIC "-//mybatis.org//DTD MyBatis Generator Configuration 1.0//EN"
"http://mybatis.org/dtd/mybatis-generator-config_1_0.dtd">
password="hjhmysql" />
enableCountByExample="false" enableUpdateByExample="false"
enableDeleteByExample="false" enableSelectByExample="false"
selectByExampleQueryId="false">
jdbc.properties:
driver=com.mysql.jdbc.Driver
url=jdbc:mysql://localhost:3306/harbour_db
username=user1
password=user1
#定义初始连接数
initialSize=0
#定义最大连接数
maxActive=50
#定义最大空间
maxIdle=300
#定义最小空间
minIdle=5
#定义最长等待时间
maxWait=60000
redis.properties:
#redis配置中心
redis.host=127.0.0.1
# server port
redis.port=6379
# server pass
redis.password=
# use dbIndex
redis.database=0
# 控制一个pool最多有多少个状态为idle(空闲的)的jedis实例
redis.maxIdle=300
# 表示当borrow(引入)一个jedis实例时,最大的等待时间,如果超过等待时间(毫秒),则直接抛出JedisConnectionException;
redis.maxWait=60000
redis.maxActive=6000
# 在borrow一个jedis实例时,是否提前进行validate操作;如果为true,则得到的jedis实例均是可用的
redis.testOnBorrow=true
redis.testOnReturn=false
redis.testWhileIdle=true
redis.blockWhenExhausted=true
# 当 客户端闲置闲置多少秒后,断开连接,如果指定为0,表示关闭该功能
redis.timeout=1800
#缓存清除的时间单位是秒,7776000s=90天,90天清理一次缓存
redis.expiration=7776000
log4j.properties:
#定义LOG输出级别
log4j.rootLogger=INFO,Console,File
#定义日志输出目的地为控制台
log4j.appender.Console=org.apache.log4j.ConsoleAppender
log4j.appender.Console.Target=System.out
#可以灵活地指定日志输出格式,下面一行是指定具体的格式
log4j.appender.Console.layout = org.apache.log4j.PatternLayout
log4j.appender.Console.layout.ConversionPattern=[%c] - %m%n
#文件大小到达指定尺寸的时候产生一个新的文件
log4j.appender.File = org.apache.log4j.RollingFileAppender
#指定输出目录
log4j.appender.File.File = logs/harbour.log
#定义文件最大大小
log4j.appender.File.MaxFileSize = 10MB
# 输出所以日志,如果换成DEBUG表示输出DEBUG以上级别日志
log4j.appender.File.Threshold = ALL
log4j.appender.File.layout = org.apache.log4j.PatternLayout
log4j.appender.File.layout.ConversionPattern =[%p] [%d{yyyy-MM-dd HH\:mm\:ss}][%c]%m%n
以上各种配置文件可以根据不同需求进行修改,以上后台工程配置完成,在eclipse中配置好tomcat(参照之前博客:Java基础-开发环境(windows+jdk+tomcat+maven+mysql)),启动配置好的工程,控制台不报错表示配置正确。数据库创建测试表,根据generatorConfig工具生成实例、Dao文件和sql文件后,写好controller文件、service接口和service实现类,一般前后端分离的controller最终返回给前端的是json字符串数据,具体写法网上很多,此篇不做介绍。
其次样例的调用关系:controller->service接口>service实现类->Dao文件,传参实例->映射sql文件,写好后,可以用Postman工具,测试后台配置的url是否能请求成功,例如后台url为:http://localhost:8080/user/login,login查询用户是否存在,如果用户存在,则返回查询到的数据。
controller.java样例,查询用户:
@Controller
@RequestMapping("/user")
public class UserController {
private final Log logger = LogFactory.getLog(this.getClass());
@Resource
private LoginService systemUserLoginService;
@RequestMapping(value = "/login", method = RequestMethod.POST)
public void login(HttpServletRequest httpServletRequest, HttpServletResponse httpServletResponse) {
JSONObject response = new JSONObject();
HttpSession session = httpServletRequest.getSession();
String username = httpServletRequest.getParameter("username");
String password = httpServletRequest.getParameter("password");
String suDeviceSn = httpServletRequest.getParameter("suDeviceSn");
String suClientId = httpServletRequest.getParameter("suClientId");
JSONObject jsonObject = new JSONObject();
String message = ParameterConstant.LOGIN_SUCCESS;
try {
jsonObject = systemUserLoginService.login(username, password, suDeviceSn, suClientId);
} catch (Exception e) {
logger.error(MessageConstant.LOGIN_FAILURE, e);
e.printStackTrace();
message = e.getMessage();
}
// 登录成功保存session
// 用户名
session.setAttribute(ParameterConstant.USERNAME, username);
// 登录用户信息
session.setAttribute(ParameterConstant.LOGIN_USER, jsonObject.getJSONObject(ParameterConstant.USER));
// 前端权限
session.setAttribute(ParameterConstant.FPERMISSION, jsonObject.getJSONArray(ParameterConstant.FPERMISSION));
// 后台权限
session.setAttribute(ParameterConstant.BPERMISSION, jsonObject.getJSONArray(ParameterConstant.BPERMISSION));
response.put(ParameterConstant.LOGIN_MESSAGE, message);
response.put(ParameterConstant.CONTENT, jsonObject);
// httpServletResponse.addHeader("Access-Control-Allow-Origin", "*");
/*httpServletResponse.addHeader("Access-Control-Allow-Credentials", "true");*/
logger.info(session.getAttribute(ParameterConstant.LOGIN_USER));
CommonFunction.reponseResult(httpServletResponse, response.toString());
}
}
当后端controller定义为http://localhost:8080/user/login时,前端ajax部分必须对应URL与controller相同以完成映射:
var localStorage = window.localStorage;
$("#j-ipt-login").click(function() {
var username = $("#j-ipt-une").val();
var password = $("#j-ipt-pwd").val();
if(!username) {
alert("用户名不能为空");
} else if(!password) {
alert("密码不能为空");
} else {
$.ajax({
type: "POST",
url: "http://localhost:8080/user/login",
data: {
username: username,
password: password
},
success: function(data) {
localStorage.clear();
if(data.message == 'success') {
以下省略··············
加入redis(注解形式)
在前面的spring-mybatis.xml配置文件中已经加入redis相关配置,还需要在Java中加入配置文件,如下:
/**
* 以Spring与配置文件来管理的redis缓存配置类
* @author wang
*
*/
@Configuration
@EnableCaching
public class RedisCacheConfig extends CachingConfigurerSupport {
private volatile JedisConnectionFactory mJedisConnectionFactory;
private volatile RedisTemplate
private volatile RedisCacheManager mRedisCacheManager;
public RedisCacheConfig() {
super();
}
public RedisCacheConfig(JedisConnectionFactory mJedisConnectionFactory, RedisTemplate
RedisCacheManager mRedisCacheManager) {
super();
this.mJedisConnectionFactory = mJedisConnectionFactory;
this.mRedisTemplate = mRedisTemplate;
this.mRedisCacheManager = mRedisCacheManager;
}
public JedisConnectionFactory redisConnectionFactory() {
return mJedisConnectionFactory;
}
public RedisTemplate
return mRedisTemplate;
}
public CacheManager cacheManager(RedisTemplate redisTemplate) {
return mRedisCacheManager;
}
@Bean
public KeyGenerator customKeyGenerator() {
return new KeyGenerator() {
@Override
public Object generate(Object o, Method method, Object... objects) {
StringBuilder sb = new StringBuilder();
sb.append(o.getClass().getName());
sb.append(method.getName());
for (Object obj : objects) {
sb.append(obj.toString());
}
return sb.toString();
}
};
}
}
完成以上配置,在service实现类中,可通过@Cacheable注解完成缓存,示例如下:
@Service
@Transactional(propagation = Propagation.REQUIRED, rollbackFor = Exception.class)
public class UserServiceImpl implements UserService {
@Resource
private UserInfoDao userInfoDao;
// 增加用户数据
@Override
@CacheEvict(value = { "insert" }, allEntries = true)
public Integer insert(UserInfo userInfo) {
return userInfoDao.insertSelective(userInfo);
}
// 根据主键删除用户数据
@Override
@CacheEvict(value = {"selectByPrimaryKey"}, allEntries = true)//allEntries=true表示清理所有缓存
public Integer delete(Integer uid) {
return userInfoDao.deleteByPrimaryKey(uid);
}
// 根据主键选择更新数据
@Override
/*@CachePut("updateByPrimaryKeySelective")*/
@CacheEvict(value = {"selectByPrimaryKey" }, key="#userInfo.getId()")
public Integer updateByPrimaryKeySelective(UserInfo userInfo) {
return userInfoDao.updateByPrimaryKeySelective(userInfo);
}
// 根据主键查询数据
@Override
@Cacheable(value="selectByPrimaryKey", key="#uid")
public UserInfo select(Integer uid) {
return userInfoDao.selectByPrimaryKey(uid);
}
}
@Cacheable主要针对方法配置,能够根据方法的请求参数对其结果进行缓存
@CacheEvict:即应用到移除数据的方法上,如删除方法。@Cacheable和@CacheEvict,这两个注解可以允许方法触发缓存或者缓存抽取。
@CacheEvict:主要针对方法配置,能够根据一定的条件对缓存进行清空
@CachePut():应用到写数据的方法上,如新增/修改方法。@CachePut 注释,这个注释可以确保方法被执行,同时方法的返回值也被记录到缓存中
@CachePut():主要针对方法配置,能够根据方法的请求参数对其结果进行缓存,和 @Cacheable 不同的是,它每次都会触发真实方法的调用
产生缓存数据后,可通过命令查看缓存,以下为windows环境下查看:
启动redis客户端:redis-cli.exe -h 127.0.0.1 -p 6379
查看redis缓存:keys *
nginx与tomcat关联配置,完成前后端连接
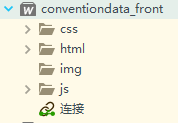
由于要做动静分离,前端工程其实就是文件目录,只包含html、js、css、图片等静态文件:
可根据实际情况,自定义文件名称。
如果是本地环境可参照以下配置:
找到nginx目录下nginx_home/conf路径下nginx.conf文件,配置如下:
user root;
worker_processes 1;
#error_log logs/error.log;
#error_log logs/error.log notice;
#error_log logs/error.log info;
#pid logs/nginx.pid;
events {
worker_connections 1024;
}
http {
include mime.types;
default_type application/octet-stream;
client_max_body_size 100M;
#log_format main '$remote_addr - $remote_user [$time_local] "$request" '
# '$status $body_bytes_sent "$http_referer" '
# '"$http_user_agent" "$http_x_forwarded_for"';
#access_log logs/access.log main;
sendfile on;
#tcp_nopush on;
#keepalive_timeout 0;
keepalive_timeout 65;
#gzip on;
server {
listen 80;
server_name localhost;
#把前端工程,放到路径D盘的HBuilderProject下,nginx就可以找到前端工程文件,并加载静态文件,在浏览器能正常显示
location ~ .*\.(html|js|css|ico|png|bmp|jpg|eot|jpeg|svg|ttf|woff|gif|swf|xlsx|docx|pdf|apk) {
root D:/HBuilderProject/;
expires 10d;
}
# 映射后端tomcat下工程web_project_resources
location /web_project_resources/ {
proxy_redirect off;
proxy_set_header Host $host;
proxy_set_header X-Real-IP $remote_addr;
proxy_set_header X-Forwarded-For $proxy_add_x_forwarded_for;
proxy_connect_timeout 5;
proxy_send_timeout 30;
proxy_read_timeout 10;
proxy_pass http://127.0.0.1:8080/web_project_resources/;
}
}
}
配置完成后,在本地启动nginx。
对maven打包,打成web_project_resources.war包后,放在tomcat路径的webapps下,启动tomcat,在浏览器访问url,就可以完成前后端连接。当启动nginx后,前端静态文件就可以在浏览器显示(比如:html、js实现的逻辑、css样式和图片、字体等),但是不启动tomcat则无法连接到spring后台,也无法连接到数据库获取数据。所以当启动tomcat,前后端url映射完成后,数据库数据才能传到前端浏览器画面正常显示。如果是测试服务器,无需配置域名的,也可参照本地nginx配置,只需要更换ip即可。
以上就是个人版全套SSM+nginx+tomcat+mysql+redis配置与实现,实现前后端分离,动静分离,并加入redis缓存。


